|
|

Table Of Contents
Customizing the VPN Client Software
Areas Affected by Customizing the VPN Client
oem.ini File Keywords and Values
Customizing the VPN Client Using an MSI Transform
Installing the VPN Client using the Edited Transform
Installing the VPN Client Without User Interaction
Silent Installation Using InstallShield
Customizing the VPN Client Software
This chapter explains how to replace the Cisco Systems brand with your own organization's brand. When you install and launch the VPN Client software, you see your own organization name, program name, and application names on menus, windows, dialogs, and icons. It also explains how to set up the software so that your users can install it automatically without being prompted. This feature is called silent install.
To customize the VPN Client software, you create your own distribution image combining the following elements, which this chapter describes:
•
Cisco Systems image that you receive on the Cisco Systems software distribution CD.
•
•
•
•
•
•
•
Note
These elements should all be in the same directory and folder. Because some of the files may be too large to distribute the oem software on diskettes, we recommend that you make a CD ROM distribution image.
Customizing the VPN Client occurs when the VPN Client and installation program see a text file called oem.ini on your distribution image. The oem.ini file is patterned after Microsoft standard initialization files. You create the oem.ini file and supply your own text, bitmap files, and icon files. When present, the oem.ini
,bitmap, and icon files are read when you first start the VPN Client. Since the VPN Client software reads these files when it first starts, the changes to them take effect only after you restart the VPN Client applications.This chapter contains the following sections:
•
•
•
Areas Affected by Customizing the VPN Client
Customizing replaces the following screen text, bitmaps, and icons.
•
•
•
•
Installation Bitmap
The InstallShield uses a bitmap when installing the VPN Client software: the setup bitmap (setup.bmp).
Figure 5-1 shows the setup bitmap that displays as the first screen during installation via InstallShield.
Figure 5-1 Setup Bitmap
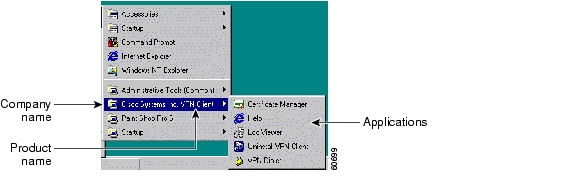
Program Menu Titles and Text
After installation, your organization or company, product, and application names appear in the Cisco Systems VPN Client applications menu. (See Figure 5-2.)
Figure 5-2 Applications menu
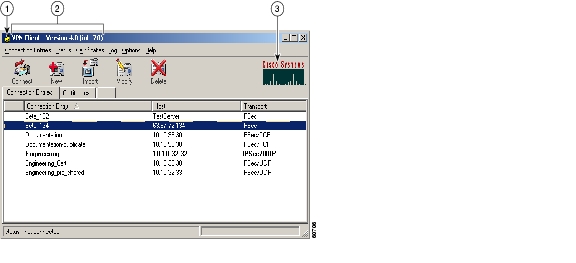
VPN Dialer
Figure 5-3 shows a dialer icon, window title, and dialer logo bitmap that the oem.ini file replaces in the VPN dialer software.
Figure 5-3 Three Types of Branding Changes
When you click the icon in the title line and select About Cisco Systems VPN Client, you see information about the copyright and version number of the VPN Client. The oem.ini file replaces the window title and the icon. Also the window displays
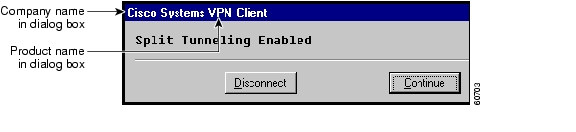
(OEM)when you are using the OEM version of the client software.Window Titles and Text
Figure 5-4 is typical of dialog boxes showing status messages. You can replace "Cisco Systems" with your organization's name and "VPN Client" with a different name for the client application.
Figure 5-4 Window Titles in a Dialog Box
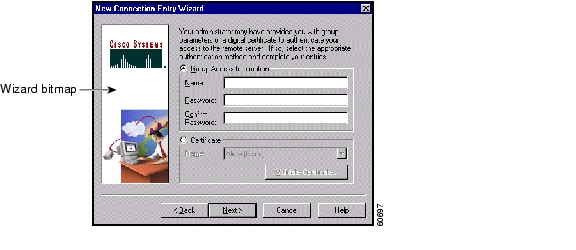
Bitmaps
The VPN Dialer application displays the wizard bitmap on windows while connecting to a VPN device. Figure 5-5 shows the wizard bitmap as used in the connection wizard.
Figure 5-5 Connection Wizard Dialog Box
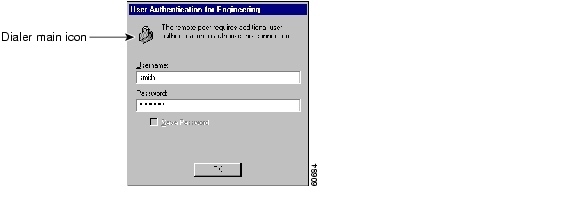
Icons
The next set of figures show the icons used in the VPN Dialer application. You can use the oem.ini file to replace all icons with icons you design for your organization. The interface uses several icon (.ico) files. The basic size is 32x32 pixels (the User Authentication window in Figure 5-6). The operating system automatically condenses the 32x32 icon to fit the 16x16 size displayed on window titles and the system tray. (See Figure 5-3 and Figure 5-7.)
Figure 5-6 Dialer Icon on User Authentication Window
The smaller icon on the system tray appears at the bottom right section of your screen.
Figure 5-7 Icon on System Tray
Four icons display while the VPN Dialer is connecting to VPN device. (See Figure 5-8 to Figure 5-11.)
Figure 5-8 Start of Negotiation
Figure 5-9 First Change
Figure 5-10 Second Change
Figure 5-11 Third Change
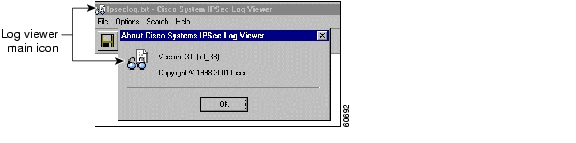
Log Viewer
The Log Viewer section of the oem.ini file replaces the icon used in the Log Viewer application
( Figure 5-12). You can also replace the name of the application.Figure 5-12 Log Viewer Icon
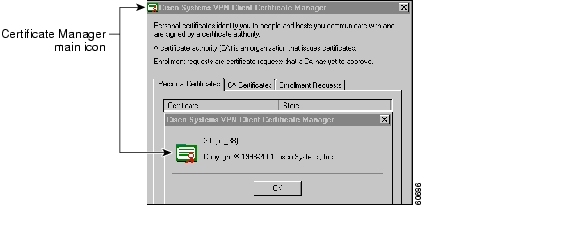
Certificate Manager
The Certificate Manager section of the oem.ini file replaces the icon used in the Certificate Manager application. (See Figure 5-13.) You can also replace the name of the application.
Figure 5-13 Certificate Manager Icon
Additional Bitmap—setup.bmp
The oem version of VPN Client includes a bitmap on the distribution CD that is not in the oem.ini file:
setup.bmp. You can substitute your own image for this .bmp file, as long as you keep the current filename (setup.bmp) and make sure that the file is in the same directory and folder as the oem.ini file.setup.bmp displays a logo on the window when you start the installation program. The size of the Cisco Systems setup bitmap is 330x330 pixels and it uses 256 colors.
Creating the oem.ini File
Your distribution CD must contain the oem.ini file for customizing. The oem.ini file contains the locations and names of bitmaps, icons, window titles, and screen text needed for customizing, all of which need to be in the same directory. When you install or start the VPN Client, the software checks to see if there is an oem.ini file. If so, the software scans it for bitmaps, icons, and text. If the oem.ini file lacks an element (for example, text for the product name), then the software uses whatever you have specified in the default section of the file. If no oem.ini file exists, the software defaults to Cisco Systems bitmaps, icons, and text.
Use Notepad or another ASCII text editor to create the oem.ini file and enter brand text and the names of your bitmap and icon files. See Table 5-1.
Note
The format of the oem.ini file is the same as a standard Windows
inifile:•
•
keyword=value.•
•
Sample oem.ini File
; This is a sample oem.ini file that you can use tooverwrite Cisco Systems; brand name on windows, bitmaps, and icons with your organization's brand; name.;; This file has six sections: [Main],[Brand], [Default], [Dialer],; [Log viewer], and [Configuration Manager]. Each section has keywords; designating parts of the interface that the file replaces.;; The [Main] section determines whether kerberos uses TCP or UDP (the default).[Main]DisableKerberosOverTCP = 1; The [Brand] section controls window titles during installation and in the; destination folder for the product and applications.;[Brand]CompanyText = Wonderland UniversityProductText = Wonderland Client;; The default section establishes the default bitmap and icon to use if; assignments are left blank. WizardBitMap appears in installation and; connection wizards. This section also sets up silent installation.; Silent mode installation proceeds without user intervention.;[Default]WizardBitMap = wuwiz.bmpMainIcon = wudial.icoSilentMode = 1InstallPath = C:\Program Files\Wonderland University\Wonderland ClientDefGroup = Wonderland ClientReboot = 1;; The [Dialer] section controls the text and icons for the dialer software.; AppNameText appears on the application selection menu. DialerBitMap; appears on connection windows. AllowSBLLaunches controls whether a remote user can; launch an application before connecting and logging on to a Windows NT platform;[Dialer]AppNameText = Wonderland DialerDialerBitMap = wudial.bmpMainIcon = wumainicon.icoMainIconX = RedXLocked.icoMainIconU = YellowUnlocked.icoMainIconUB = BlueUnlocked.icoMainIconUG = GreenUnlocked.icoMainIconUR = RedUnlocked.icoFrame0Icon = wudial.icoFrame1Icon = wudial1.icoFrame2Icon = wudial2.icoFrame3Icon = wudial3.icoAllowSBLLaunches = 0;; The [Log viewer] section controls the text and icons for the Log Viewer; application. AppNameText appears on the application selection menu and; the title screen. MainIcon appears on the window title bar and About; dialog.;[Log viewer]AppNameText = Wonderland LogViewerMainIcon = log.ico;; The [Certificate Manager] section controls the text and icon for the; Certificate Manager application. AppNameText appears on the application; selection menu and the title screen. MainIcon appears on the window title; bar.;[Certificate Manager]AppNameText = Wonderland Certificate ManagerMainIcon = cm.ico;; The [Set MTU] section controls the text and icon for the; Set MTU applications. AppNameText appears on the application; selection menu and the title screen. MainIcon appears on the window title; bar.;[Set MTU]AppNameText = MTU Setter ApplicationMainIcon = MtuIcon.icoAutoSetMtu = 1SetMtuValue = 1300MTUAdjustmentOverride = 144oem.ini File Keywords and Values
Table 5-1 describes each part of the oem.ini file.
Table 5-1 oem.ini File Parameters
[Main]Optional field that identifies a section of the OEM.ini file to address special circumstances.
Keep exactly as shown.
DisableKerberosOverTCP=InstallShield only
When installing the VPN Client on Windows, the installation program sets a registry value that forces windows to use Kerberos over TCP instead of UDP, the default. Some NAT devices, such as Linksys, do not support out-of-order IP fragments, which breaks Kerberos. With TCP, fragmentation is not required.
After the keyword and equal sign, enter either 1 or 0.
0 = keep the default, which is to force Kerberos to use TCP.
1 = prevent Kerberos from using TCP.
[Brand]Required field that identifies the branding text that appears on window titles and descriptions throughout the client application.
Keep exactly as shown, as the first branding section of the file.
CompanyText=Identifies the name of your organization. If not present, the default is "Cisco Systems."
After the keyword and equal sign, enter the organization's name. The name can contain spaces and is not case sensitive.
ProductText=Identifies the name of the application. If not present, the default is "VPN Client."
After the keyword and equal sign, enter the product name. The name can contain spaces and is not case sensitive.
[Default]Required field that identifies the section that contains names of default bitmap and icon to use if values are blank.
Enter exactly as shown, as the second section of the file.
WizardBitMap=Identifies the vertical graphic that appears on the side of some VPN Client windows, the Connection Wizard dialog box. (See Figure 5-5.) The Cisco Systems vertical graphic is 104x249 pixels; 256 colors.
After the keyword and equal sign, enter the name of the wizard bitmap file.
MainIcon=Identifies the main icon to use as a default. There are two sizes used: dimensions are 32x32 and 16x16 pixels; 256 colors.
After the keyword and equal sign, enter the name of the default icon file.
SilentMode=InstallShield only
Specifies whether to activate silent installation.
After the keyword and equal sign, enter either 0 or 1. 1 activates silent installation:
0 = prompt the user during installation.
1= do not prompt the user during installation.
InstallPath=InstallShield only
Identifies the directory into which to install the client software.
After the keyword and equal sign, enter the name of the directory in the suggested format:
root:\programs\company\product
DefGroup=
InstallShield only
Identifies the name of the folder to contain the client software.
After the keyword and equal sign, enter the name of the destination folder in the suggested format:
foldername
Reboot=
InstallShield only
Specifies whether to restart the system after the silent installation. If SilentMode is on (1) and Reboot is 1, the system automatically reboots after installation finishes.
After the keyword and equal sign, enter 0, 1, or 2:
0 = display the reboot dialog.
1 (and SilentMode = 1) = automatically reboot the system when installation finishes.
2 (and SilentMode = 1) = do not reboot after installation finishes.
[Dialer]
Required field that identifies the section that contains the name of the Dialer application, the bitmap to use on the connections window, and the connection icons.
Enter exactly as shown, as the third section of the file.
AppNameText=
Identifies the name of the dialer application.
After the keyword and equal sign, enter the name of the dialer application. The name can contain spaces and is not case sensitive.
DialerBitMap=
Identifies the dialer bitmap (shown in Figure 5-3.) The dimensions of this bitmap are 298x116 pixels; 256 colors.
After the keyword and equal sign, enter the name of the dialer bitmap file.
MainIcon=
Identifies the primary icon file for the connection and authentication windows. This icon appears in the User Authentication window and the system tray, for example. (See Figure 5-6 and Figure 5-7.) You can rotate or flip the lock image to fit with the brand graphic. There are two sizes used: dimensions are 32x32 and 16x16 pixels; 256 colors.
After the keyword and equal sign, enter the name of the primary icon file. The system tray uses the 16x16 size. You need to create only the 32x32 size.
For examples of following five icons, see Cisco VPN Client User Guide for Windows, Chapter 4, "Using Automatic VPN Initiation."
MainIconX=
Identifies the yellow, locked padlock with a red X over it, representing the disconnecting of an existing connection.
After the keyword and equal sign, enter the name of the icon file. The system tray uses the 16x16 size.
MainIconU=
Identifies the unlocked yellow padlock, representing suspended auto initiation.
After the keyword and equal sign, enter the name of the icon file. The system tray uses the 16x16 size.
MainIconUB=
Identifies the unlocked blue padlock, representing suspended auto initiation but with the dialer window showing.
After the keyword and equal sign, enter the name of the icon file. The system tray uses the 16x16 size.
MainIconUG=
Identifies the unlocked green padlock, representing that auto initiation is in process.
After the keyword and equal sign, enter the name of the icon file. The system tray uses the 16x16 size.
MainIconUR=
Identifies the unlocked red padlock, representing that the dialer is disabling auto initiation from the suspended mode.
After the keyword and equal sign, enter the name of the icon file. The system tray uses the 16x16 size.
Frame0Icon=
Identifies the Frame 0 icon file, which is based on the main icon. (See Figure 5-8.) This icon shows at the start of the connection negotiation. The dimensions are 32x32 pixels; 256 colors.
After the keyword and equal sign, enter the name of the Frame0 icon file.
Frame1Icon=
Identifies the Frame 1 icon file, which is based on the main icon. (See Figure 5-9.) This icon shows further progress of the connection. The dimensions are 32x32 pixels; 256 colors.
After the keyword and equal sign, enter the name of the Frame1 icon file.
Frame2Icon=
Identifies the Frame 2 icon file, which is based on the main icon. (See Figure 5-10.) This icon shows further progress of connection establishment. The dimensions are 32x32 pixels; 256 colors.
After the keyword and equal sign, enter the name of the Frame2 icon file.
Frame3Icon=
Identifies the Frame 3 icon file, which is based on the main icon. (See Figure 5-11.) This icon shows the end of connection establishment. The dimensions are 32x32 pixels; 256 colors.
After the keyword and equal sign, enter the name of the Frame3 icon file.
AllowSBLLaunches
InstallShield only
Specifies whether a VPN Client user is allowed to launch a third party application before logging on to a Windows NT platform.
After the keyword and equal sign, enter 1 to enable or 0 to disable this feature. The default is 0 (to disable). (See Note after table.)
[Log viewer]
Required field that identifies the application name and icon for the Log Viewer application.
Keep exactly as shown, as the fourth section of the file.
AppNameText=
Identifies the name of the Log Viewer application.
After the keyword and equal sign, enter the name you want to give to the Log Viewer application. The name can contain spaces and is not case sensitive.
MainIcon=
Identifies the icon for the Log Viewer title bar, About window and applications menu. There are two sizes used: dimensions are 32x32 and 16x16 pixels; 256 colors.
After the keyword and equal sign, enter the name of the icon (.ico) file for this icon.
[Certificate Manager]
Required field that identifies the application name and icon for the Certificate Manager application.
Keep exactly as shown, as the sixth section of the file.
AppNameText=
Identifies the name of the Certificate Manager application.
After the keyword and equal sign, enter the name you want to give to the Certificate Manager application. The name can contain spaces and is not case sensitive.
MainIcon=
Identifies the icon for the Configuration Manager title bar and the applications menu. The dimensions are 16x16 pixels; 256 colors.
After the keyword and equal sign, enter the name of the icon (.ico) file for this icon.
[Set Mtu]
Required field that identifies the section that contains the name of the Set MTU application, the name of the Set MTU icon, and other settings.
Enter exactly as shown.
AppNameText=
Identifies the name of the Set MTU application.
After the keyword and equal sign, enter the name you want to give to this application. The name can contain spaces and is not case sensitive.
MainIcon=
Identifies the icon for the Set MTU title bar, About window, and applications menu. There are two sizes used: dimensions are 32x32 and 16x16 pixels; 256 colors.
After the keyword and equal sign, enter the name of the icon (.ico) file for this icon.
AutoSetMtu=
InstallShield only
Identifies whether to automatically set the MTU for all adaptors during installation using the SetMTU- Value.
After the keyword and equal sign, enter a value 0 or 1:
0 = do not set MTU; do not launch.
1 = set MTU and silently launch during installation. This is the default
SetMTUValue=
InstallShield only
Identifies the value to be used for all adapters bound to TCP/IP
After the keyword and equal sign, enter a value between 64 and 1500, inclusive. The default = 1300.
MTUAdjustOverride=
InstallShield only; Windows NT-based only.
Identifies the DNE MtuAdjustment parameter. This value identifies the amount the NIC's MTU will be reduced.
After the keyword and equal sign, set to a value between 0 and 1300, inclusive. To use the SetMTU application to set the MTU for the TCP/IP protocol, set this parameter to 0.
Note
In the VPN Dialer program, choose Options > Windows Logon Properties.
Uncheck Disconnect VPN connection when logging off.
Log out.
Log in with cached credentials.
Make your VPN Dialer connection.
Log out.
Log in again while already connected.
Customizing the VPN Client Using an MSI Transform
This section describes how to customize VPN Client installation using a transform for the MSI. To customize the applications, you need both a transform and an oem.ini file.
Caution
Creating the Transform
To create the transform, you edit the vpnclient_en.msi file. You can create the transform with any commercially available MSI installation package, such as Wise or InstallShield. The procedure in this section uses the Microsoft ORCA editor available from the Microsoft Windows Installer SDK. The version used here is from Microsoft Platform SDK November 2001. So before you begin, make sure that ORCA is installed on your system. If you need information on transforms and ORCA, refer to the ORCA documentation.
Here is the procedure:
Step 1
Step 2
Step 3
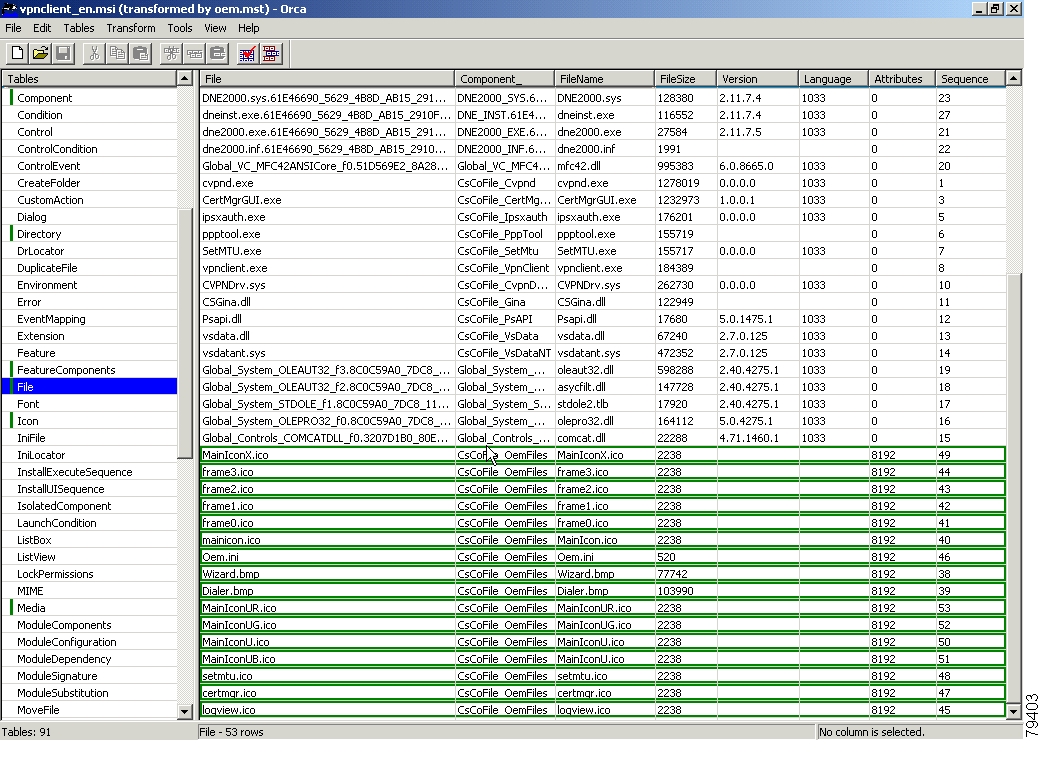
To customize oem.mst, you modify some of the information you see in the tables. The parts to modify have green change bars on the left side of the row. Figure 5-14 shows a partial oem.mst file.
Figure 5-14 Editing the Tables in a Transform File
Table 5-2 outlines the changes to make in the tables in the oem.mst file. The columns in the table are defined as follows:
•
•
•
•
OEM.INI File and MSI
At run-time, you need an oem.ini file to tell the VPN Client to use custom bitmaps and icons.
Copy your oem.ini file, the custom bitmaps, and the custom icons to your distribution media, for example a CD, placing them in the same directory as the vpnclient_en.msi file. If you use the transform to install the VPN Client, the oem.ini file, bitmaps, and icons, are copied along with the VPN Client files during installation. For a sample oem.ini file, see " Sample oem.ini File." For more information on the oem.ini file, see Table 5-1.
Table 5-3 lists InstallShield-specific control parameters and how to achieve similar results in MSI. The oem.ini file modifies both InstallShield installation parameters and VPN Client runtime parameters. For MSI all oem.ini parameters are required except the installation-time parameters.
Table 5-3 Oem.ini File Keywords and MSI Equivalents
Installing the VPN Client using the Edited Transform
To install the VPN Client with the transform oem.mst that you have prepared, execute the following command at the command-line prompt.
msiexec /i vpnclient_en_msi TRANSFORMS=oem.mst
If you want to record errors that might occur during the installation, you can create a log file as follows:
msiexec /i vpnclient_en_msi /l*v! c:oeminstall.log TRANSFORMS=oem.mst
Installing the VPN Client Without User Interaction
This section describes how to produce installation without user interaction for both InstallShield installations and MSI installations. Installing the VPN Client without user interaction is called silent mode. In silent mode, no messages or prompts appear on the screen.
Silent Installation Using InstallShield
To implement silent mode with or without customizing the VPN Client applications, you can create an oem.ini file containing only the part that configures silent mode. In this file, you turn silent mode on, identify the pathname and folder to contain the VPN Client software, and reboot the system, all without user interaction.
During silent mode installation, the installation program does not display error messages. The program stores error messages in a log file named VPNLog.txt located in the windows system directory (WINSYSDIR).
Note
A sample oem.ini file for implementing silent mode follows:
[Default]SilentMode = 1InstallPath = C:\Program Files\Engineering\IPSec ConnectionsDefGroup = IPSec remote usersReboot = 1
Silent Installation Using MSI
To install the VPN Client without dialogs and messages (user interface) displaying on the screen, you can use either of the two following commands on the command line.
msiexec.exe /q [n|b|r|f] /i vpnclient_en.msi
or
vpnclient_en.exe /q [n|b|r|f]
Launching SetMTU with Silent Installation
The SetMTU utility is automatically launched in silent mode with the value of 1300 for all installed adapters. To disable the SetMTU utility during installation, set the LAUNCHSETMTU property on the command-line to 0. To modify the MTU value, set SETMTUVALUE to value. To override the DNE MtuAdjuistment parameter, which is set to 0, set DNEMTUADJUSTMENT to value.
For example, to disable SetMTU and set the DNE Mtuadjustment to 144, execute the following command:
vpnclient_en.msi LAUNCHSETMTU=0 DNEMTUADJUSTMENT=144
For information on the SetMTU utility, see " Changing the MTU Size."
![]()
![]()
![]()
![]()
![]()
![]()
![]()
![]()
Posted: Mon Apr 18 08:26:13 PDT 2005
All contents are Copyright © 1992--2005 Cisco Systems, Inc. All rights reserved.
Important Notices and Privacy Statement.