cc/td/doc/product/voice/srst/srst34
hometocprevnextglossaryfeedbacksearchhelp
PDF

Table Of Contents

Setting Up Call Handling

Contents

Information About Setting Up Call Handling

How to Set Up Call Handling

Configuring Incoming Calls

Configuring Outgoing Calls

Where to Go Next


Setting Up Call Handling


This chapter describes how to configure Cisco Survivable Remote Site Telephony (SRST) for incoming calls and outgoing calls.


Note The Cisco IOS Voice Configuration Library includes a standard library preface, glossary, and feature and troubleshooting documents and is located at http://www.cisco.com/univercd/cc/td/doc/product/software/ios123/123cgcr/vcl.htm.


Contents

Information About Setting Up Call Handling

How to Set Up Call Handling

Where to Go Next

Information About Setting Up Call Handling

Cisco SRST offers a smaller set of call handling capabilities than Cisco CallManager, and much of the configuration for these feature involves enabling existing Cisco CallManager or IP phone settings.

How to Set Up Call Handling

Setting up call handling involves the following set of tasks:

Configuring Incoming Calls

Configuring Outgoing Calls

Configuring Incoming Calls

Incoming call configuration can include the following tasks:

Call Forwarding and Rerouting

Configuring Call Forwarding During a Busy Signal or No Answer (Optional)

Configuring Call Rerouting (Optional)

Configuring Call Pickup (Optional)

Phone Number Conversion and Translation

Configuring Global Prefixes (Optional)

Enabling Digit Translation Rules (Optional)

Enabling Translation Profiles (Optional)

Verifying Translation Profiles (Optional)

Hunting and Ringing Timeout Behavior

Configuring Dial-Peer and Channel Hunting (Optional)

Configuring Busy Timeout (Optional)

Configuring the Ringing Timeout Default (Optional)

Configuring Call Forwarding During a Busy Signal or No Answer

Incoming calls that reach a busy signal or go unanswered during Cisco CallManager fallback can be configured to be forwarded to one or more E.164 numbers.

SUMMARY STEPS

1. call-manager-fallback

2. call-forward busy directory-number

3. call-forward noan directory-number timeout seconds

4. exit

DETAILED STEPS

 
Command or Action
Purpose

Step 1 

call-manager-fallback

Example:

Router(config)# call-manager-fallback

Enters call-manager-fallback configuration mode.

Step 2 

call-forward busy directory-number
Example:
Router(config-cm-fallback)# call-forward busy 50..

Configures call forwarding to another number when the Cisco IP phone is busy.

directory-number—Selected directory number representing a fully qualified E.164 number. This number can contain "." wildcard characters that correspond to the right-justified digits in the directory number extension.

Step 3 

call-forward noan directory-number timeout seconds
Example:
Router(config-cm-fallback)# call-forward noan 5005 timeout 10

Configures call forwarding to another number when no answer is received from the Cisco IP phone.

directory-number—Selected directory number representing a fully qualified E.164 number or a local extension number. This number can contain "." wildcard characters that correspond to the right-justified digits in the directory number extension.

timeout seconds—Sets the waiting time, in seconds, before the call is forwarded to another phone. The seconds range is from 3 to 60000.

Step 4 

exit

Example:

Router(config-cm-fallback)# exit

Exits call-manager-fallback configuration mode.

Examples

The following example forwards calls to extension number 5005 when an incoming call reaches a busy or unattended IP phone extension number. Incoming calls will ring for 15 seconds before being forwarded to extension 5005.

call-manager-fallback
 call-forward busy 5005
 call-forward noan 5005 timeout seconds 15

The following example transforms an extension number for call forwarding when the extension number is busy or unattended. The call-forward busy command has an argument of 50.., which prepends the digits 50 to the last two digits of the called extension. The resulting extension is the number to which incoming calls are forwarded when the original extension number is busy or unattended. For instance, an incoming call to the busy extension 6002 will be forwarded to extension 5002, and an incoming call to the busy extension 3442 will be forwarded to extension 5042. Incoming calls will ring for 15 seconds before being forwarded.

call-manager-fallback
 call-forward busy 50..
 call-forward noan 50.. timeout seconds 15

Configuring Call Rerouting


Note The alias command obsoletes the default-destination command and is recommended over the default-destination command.


The alias command provides a mechanism for rerouting calls to telephone numbers that are unavailable during fallback. Up to 50 sets of rerouting alias rules can be created for calls to telephone numbers that are unavailable during Cisco CallManager fallback. Sets of alias rules are created using the alias command. An alias is activated when a telephone registers that has a phone number matching a configured alternate-number alias. Under that condition, an incoming call is rerouted to the alternate number. The alternate-number argument can be used in multiple alias commands, allowing you to reroute multiple different numbers to the same target number.

The configured alternate-number must be a specific E.164 phone number or extension that belongs to an IP phone registered on the Cisco SRST router. When an IP phone registers with a number that matches an alternate-number, an additional POTS dial peer is created. The destination pattern is set to the initial configured number-pattern, and the POTS dial peer voice port is set to match the voice port associated with the alternate-number.

If other IP phones register with specific phone numbers within the range of the initial number-pattern, the call is routed back to the IP phone rather than to the alternate-number (according to normal dial-peer longest-match, preference, and huntstop rules).

Call Forward Destination

The cfw keyword allows you to configure a call forward destination for calls that are busy or not answered. Call forward no answer is defined as when the phone rings for a user configurable amount of time, the call is not answered, and is forwarded to the configured destination. Call forward busy and call forward no answer can be configured to a set string and override globally configured call forward settings.


Note Globally configured settings are selected under call-manager-fallback and apply to all phones that register for SRST service.


You can also create a specific call forwarding path for a particular number. The benefit of using the cfw keyword is that during SRST, you can reroute calls from otherwise unreachable numbers onto phones that are available. Basic hunt groups can be established with call-forwarding rules so that if the first SRST phone is busy, you can forward the call to a second SRST phone.

The cfw keyword also allows you to alias a phone number to itself, permitting setting of per-phone number forwarding. An example of aliasing a number to itself follows. If a phone registers with extension 1001, a dial peer that routes calls to the phone is automatically created for 1001. If the call-manager-fallback dial-peer preference (set with the max-dn command) for this initial dial peer is set to 2, the dial peer uses 2 as its preference setting.

Then, use the alias command to alias the phone number to itself:

alias 1 1001 to 1001 preference 1 cfw 2001 timeout 20


In this example, you have created a second dial peer for 1001 to route calls to 1001, but that has preference 1 and call forwarding to 2001. Because the preference on the dial peer created by the alias command is now a lower numeric value than the preference that the dial peer first created, all calls come initially to the dial peer created by the alias command. In that way they are subject to the forward as set by the alias command, instead of any call forwarding that may have been set globally.

Huntstop on an Individual Alias

The alias huntstop keyword is relevant only if you have also set the global no huntstop command under call-manager-fallback. Also, you may need to set the global no huntstop if you have multiple alias commands with the same number-pattern, and you want to enable hunting on busy between the aliases. That is, one alias for number-pattern is tried, and then if that phone is busy, the second alias for number-pattern is tried.

The alias huntstop keyword allows you to turn huntstop behavior back on for an individual alias, if huntstop is turned off globally by the no huntstop command. Setting the huntstop keyword on an individual alias stops hunting at the alias, making the alias the final member of the hunt sequence.

SUMMARY STEPS

1. call-manager-fallback

2. alias tag number-pattern to alternate-number [preference preference-value] [cfw number timeout timeout-value] [huntstop]

3. max-dn max-directory-numbers [dual-line] [preference preference-order]

4. end

5. show dial-peer voice summary

DETAILED STEPS

 
Command or Action
Purpose

Step 1 

call-manager-fallback

Example:

Router(config)# call-manager-fallback

Enters call-manager-fallback configuration mode.

Step 2 

alias tag number-pattern to alternate-number [preference preference-value] [cfw number timeout timeout-value] [huntstop]

Example:
Router(config-cm-fallback)# alias 1 60.. to 5001 preference 1 cfw 2000 timeout 10

Creates a set rules for rerouting calls to sets of phones that are unavailable during Cisco CallManager fallback.

tag—Identifier for alias rule range. The range is from 1 to 50.

number-pattern—Pattern to match the incoming telephone number. This pattern may include wildcards.

to—Connects the tag number pattern to the alternate number.

alternate-number—Alternate telephone number to route incoming calls to match the number pattern. The alternate number has to be a specific extension that belongs to an IP phone that is actively registered on the Cisco SRST router. The alternate telephone number can be used in multiple alias commands.

preference preference-value—(Optional) Assigns a dial-peer preference value to the alias. The preference value of the associated dial peer is from 0 to 10. Use with the max-dn command.

cfw number—(Optional) The cfw keyword allows users to set call forward busy and call forward no answer to a set string and override globally configured call forward settings.

timeout timeout-value—(Optional) Sets the ring no-answer timeout duration for call forwarding, in seconds. Range is from 3 to 60000.

huntstop—(Optional) Stops call hunting after trying the alternate number.

Step 3 

max-dn max-directory-numbers [dual-line] [preference preference-order]

Example:

Router(config-cm-fallback)# max-dn 10 preference 2

Sets the maximum possible number of directory numbers or virtual voice ports that can be supported by a router and sets the global preference for creating the VoIP dial peers for all directory numbers that are associated with the primary number.

Using the max-dn command sets the preference for the default dial peers created with the alias command.

When configuring call rerouting, set the max-dn preference to a higher numeric preference than the preference that was set with the alias command.

Step 4 

end
Example:
Router(config-cm-fallback)# end

Returns to privileged EXEC mode.

Step 5 

show dial-peer voice summary
Example:
Router# show dial-peer voice summary

Displays information for voice dial peers.

If you suspect a problem with the dial peers, use this command to display the dial peers created by the alias command.

Example

The following example sets the preference keyword in the alias command to a lower preference value that the preference value created by the max-dn command. Setting the value lower allows the cfw keyword to take effect. The incoming call to extension 1000 hunts to alias because it has a lower preference, and no-answer/busy calls to 1000 are forwarded to 2000. All incoming calls to other extensions in SRST mode are forwarded to 3000 after 10 seconds.

call-manager-fallback
 alias 1 1000 to 1000 preference 1 cfw 2000 timeout 10
 max-dn 10 preference 2
 call-forward busy 3000
 call-forward noan 3000 timeout 10

Configuring Call Pickup

Configuring the pickup command enables the PickUp soft key on all SRST phones. You can then press the PickUp key and answer any currently ringing IP phone that has a DID called number that matches the configured telephone-number. This command does not enable the Group PickUp (GPickUp) soft key.

When a user presses the PickUp soft key, SRST searches through all the SRST phones to find a ringing call that has a called number that matches the configured telephone-number. When a match is found, the call is automatically forwarded to the extension number of the phone that requested the call pickup.

The SRST pickup command is designed to operate in a manner compatible with Cisco CallManager.


Note The default phone load on Cisco CallManager, Release 4.0(1), for the Cisco 7905 and Cisco 7912 IP phones does not enable the PickUp soft key during fallback. To enable the PickUp soft key on Cisco 7905 and Cisco 7912 IP phones, upgrade your default phone load to Cisco CallManager, Release 4.0(1) Sr2. Alternatively, you can upgrade the phone load to cmterm-7905g-sccp.3-3-8.exe or cmterm-7912g-sccp.3-3-8.exe, respectively.


SUMMARY STEPS

1. call-manager-fallback

2. no huntstop

3. alias tag number-pattern to alternate-number

4. pickup telephone-number

5. end

DETAILED STEPS

 
Command or Action
Purpose

Step 1 

call-manager-fallback

Example:

Router(config)# call-manager-fallback

Enters call-manager-fallback configuration mode.

Step 2 

no huntstop

Example:

Router(config-cm-fallback)# no huntstop

Disables huntstop.

Step 3 

alias tag number-pattern to alternate-number

Example:
Router(config-cm-fallback)# alias 1 8005550100 to 5001

Creates a set rules for rerouting calls to sets of phones that are unavailable during Cisco CallManager fallback.

tag—Identifier for alias rule range. The range is from 1 to 50.

number-pattern—Pattern to match the incoming telephone number. This pattern may include wildcards.

to—Connects the tag number pattern to the alternate number.

alternate-number—Alternate telephone number to route incoming calls to match the number pattern. The alternate number has to be a specific extension that belongs to an IP phone that is actively registered on the Cisco SRST router. The alternate telephone number can be used in multiple alias commands.

Step 4 

pickup telephone-number

Example:

Router(config-cm-fallback)# pickup 8005550100

Enables the PickUp soft key on all Cisco IP phones, allowing an external Direct Inward Dialing (DID) call coming into one extension to be picked up from another extension during SRST. The telephone-number argument is the telephone number to match an incoming called number.

Step 5 

end
Example:
Router(config-cm-fallback)# end

Returns to privileged EXEC mode.

Example

The pickup command is best used with the alias command. The following partial output from the show running-config command shows the pickup command and the alias command configured to provide call routing for a pilot number of a hunt group.

call-manager-fallback
 no huntstop
 alias 1 8005550100 to 5001
 alias 2 8005550100 to 5002
 alias 3 8005550100 to 5003
 alias 4 8005550100 to 5004
 pickup 8005550100

When a DID incoming call to 800 555-0100 is received, the alias command routes the call at random to one of the four extensions (5001 to 5004). Because the pickup command is configured, if the DID call rings on extension 5002, the call can be answered from any of the other extensions (5001, 5003, 5004) by pressing the PickUp soft key.

The pickup command works by finding a match based on the incoming DID called number. In this example, a call from extension 5004 to extension 5001 (an internal call) does not activate the pickup command because the called number (5001) does not match the configured pickup number (800 555-0100). Thus, the pickup command distinguishes between internal and external calls if multiple calls are ringing simultaneously.

Configuring Global Prefixes

The dialplan-pattern command creates a dial-plan pattern that specifies a global prefix for the expansion of abbreviated extension numbers into fully qualified E.164 numbers.

The extension-pattern keyword allows additional manipulation of abbreviated extension-number prefix digits. When this keyword and its argument are used, the leading digits of an extension pattern are stripped and replaced by the corresponding leading digits of the dial-plan pattern. This command can be used to avoid Direct Inward Dialing (DID) numbers like 408 555-0101 resulting in 4-digit extensions such as 0101.

Global prefixes are set with the dialplan-pattern command. Up to five dial-plan patterns can be created. The no-reg keyword provides dialing flexibility and prevents the E.164 numbers in the dial peer from registering to the gatekeeper. You have the option not to register numbers to the gatekeeper so that those numbers can be used for other telephony services.

SUMMARY STEPS

1. call-manager-fallback

2. dialplan-pattern tag pattern extension-length length [extension-pattern extension-pattern] [no-reg]

3. exit

DETAILED STEPS

 
Command or Action
Purpose

Step 1 

call-manager-fallback

Example:

Router(config)# call-manager-fallback

Enters call-manager-fallback configuration mode.

Step 2 

dialplan-pattern tag pattern extension-length length [extension-pattern extension-pattern] [no-reg]

Example:
Router(config-cm-fallback)# dialplan-pattern 1 4085550100 extension-length 3 extension-pattern 4..

Note This example maps all extension numbers 4xx to the PSTN number 40855501xx, so that extension 412 corresponds to 4085550112.

Creates a global prefix that can be used to expand the abbreviated extension numbers into fully qualified E.164 numbers

tag—Dial-plan string tag used before a 10-digit telephone number. The tag number is from 1 to 5.

pattern—Dial-plan pattern, such as the area code, the prefix, and the first one or two digits of the extension number, plus wildcard markers or dots (.) for the remainder of the extension number digits.

extension-length—Sets the number of extension digits.

length—The number of extension digits. The range is from 1 to 32.

extension-pattern—(Optional) Sets an extension number's leading digit pattern when it is different from the E.164 telephone number's leading digits defined in the pattern argument.

extension-pattern—(Optional) The extension number's leading digit pattern. Consists of one or more digits and wildcard markers or dots (.). For example, 5.. would include extension 500 to 599; 5... would include 5000 to 5999.

no-reg—(Optional) Prevents the E.164 numbers in the dial peer from registering with the gatekeeper.

Step 3 

exit

Example:
Router(config-cm-fallback)# exit

Exits call-manager-fallback configuration mode.

Examples

The following example shows how to create dial-plan pattern 1 for extension numbers 101 to 199 with the telephone prefix starting with 4085550. If the following example is set, the router will recognize that 4085550144 matches dial-plan pattern 1. It will use the extension-length keyword to extract the last three digits of the number 144 and present this as the caller ID for the incoming call.

call-manager-fallback
 dialplan-pattern 1 40855501.. extension-length 3 no-reg

In the following example, the leading prefix digit for the 3-digit extension numbers is transformed from 0 to 4, so that the extension-number range becomes 400 to 499.

call-manager-fallback
 dialplan-pattern 1 40855500.. extension-length 3 extension-pattern 4..

In the following example, the dialplan-pattern command creates dial-plan pattern 2 for extensions 801 to 899 with the telephone prefix starting with 4085559. As each number in the extension pattern is declared with the number command, two POTS dial peers are created. In the example, they are 801 (an internal office number) and 4085559001 (an external number).

call-manager-fallback
 dialplan-pattern 2 40855590.. extension-length 3 extension-pattern 8..

Enabling Digit Translation Rules

Digit translation rules can be enabled during Cisco CallManger fallback. Translation rules are a number-manipulation mechanism that performs operations such as automatically adding telephone area codes and prefix codes to dialed numbers. Translation rules can be used as follows:

To manipulate the answer number indication (ANI) (calling number) or dialed number identification service (DNIS) (called number) digits for a voice call.

To convert a telephone number into a different number before the call is matched to an inbound dial peer or before the call is forwarded by the outbound dial peer.

To view the translation rules configured for your system, use the show translation-rule command.


Note Digit translation rules have many applications and variations. For further information about them, see the " Configuration Dial Plans, Dial Peers, and Digit Manipulation" chapter of the Cisco IOS Voice, Video, and Fax Configuration Guide, Release 12.2.

If you are running Cisco SRST 3.2 or a later version, use the configuration described in the "Enabling Translation Profiles" section instead of using the translate command as described below. Translation Profiles are new to Cisco SRST 3.2 and provide added capabilities.


SUMMARY STEPS

1. call-manager-fallback

2. translate {called | calling} translation-rule-tag

3. exit

DETAILED STEPS

 
Command or Action
Purpose

Step 1 

call-manager-fallback

Example:

Router(config)# call-manager-fallback

Enters call-manager-fallback configuration mode.

Step 2 

translate {called | calling} translation-rule-tag

Example:
Router(config-cm-fallback)# translate called 20

Applies a translation rule to modify the phone number dialed or received by any Cisco IP phone user while CallManager fallback is active.

called—Applies the translation rule to an outbound call number.

calling—Applies the translation rule to an inbound call number.

translation-rule-tag—The reference number of the translation rule from 1 to 2147483647.

Step 3 

exit
Example:
Router(config-cm-fallback)# exit

Exits call-manager-fallback configuration mode.

Examples

The following example applies translation rule 10 to the calls coming into extension 1111. All inbound calls to 1111 will go to 2222 during Cisco CallManager fallback.

translation-rule 10
 rule 1 1111 2222 abbreviated
 exit
call-manager-fallback
 translate calling 10

The following is a sample configuration of digit translation rule 20, where the priority of the translation rule is 1 (the range is from 1 to 15) and the abbreviated representation of a complete number (1234) is replaced with the number 2345:

translation-rule 20
 rule 1 1234 2345 abbreviated
 exit

Enabling Translation Profiles

Cisco SRST version 3.2 and later versions support translation profiles. Translation profiles are the suggested way to allow you to group translation rules and provide instructions on how to apply the translation rules to the following:

Called numbers

Calling numbers

Redirected called numbers

In the configuration below, the voice translation-rule and the rule command allow you to set and define how a number is to be manipulated. The translate command in voice translation-profile mode defines the type of number you are going to manipulate; such as a called, calling, or a redirecting number. Once you have defined your translation profiles, you can then apply the translation profiles in various places, such as dial peers and voice ports. For SRST, you apply your profiles in call-manager fallback mode.

Cisco IP phones support one incoming and one outgoing translation profile when in SRST mode.


Note For Cisco SRST Version 3.2 and later versions use the voice translation-rule and translation-profile commands shown below instead of the translation rule configuration described in "Enabling Digit Translation Rules" section. Voice translation rules are a separate feature from translation rules. See the voice translation-rule command in the Cisco IOS Voice Command Reference, Release 12.3 T for more information, and the VoIP Gateway Trunk and Carrier Based Routing Enhancements documentation for more general information on translation rules and profiles.


SUMMARY STEPS

1. voice translation-rule number

2. rule precedence/match-pattern/ /replace-pattern/

3. exit

4. voice translation-profile name

5. translate {called | calling | redirect-called} voice-translation-rule-tag

6. exit

7. call-manager-fallback

8. translation-profile {incoming | outgoing} name

9. exit

DETAILED STEPS

 
Command or Action
Purpose

Step 1 

voice translation-rule number

Example:

Router(config)# voice translation-rule 1

Defines a translation rule for voice calls and enters voice translation-rule configuration mode.

number—Number that identifies the translation rule. Range is from 1 to 2147483647.

Step 2 

rule precedence/match-pattern/ /replace-pattern/

Example:

Router(cfg-translation-rule)# rule 1/^9/ //

Defines a translation rule.

precedence—Priority of the translation rule. Range is from 1 to 15.

match-pattern—Stream editor (SED) expression used to match incoming call information. The slash (/) is a delimiter in the pattern.

replace-pattern—SED expression used to replace the match pattern in the call information. The slash (/) is a delimiter in the pattern.

Step 3 

exit

Example:

Router(cfg-translation-rule)# exit

Exits voice translation-rule configuration mode.

Step 4 

voice translation-profile name

Example:

Router(config)# voice translation-profile name1

Defines a translation profile for voice calls.

name—Name of the translation profile. Maximum length of the voice translation profile name is 31 alphanumeric characters.

Step 5 

translate {called | calling | redirect-called} translation-rule-number

Example:
Router(cfg-translation-profile)# translate called 1

Associates a voice translation rule with a voice translation profile.

called—Associates the translation rule with called numbers.

calling—Associates the translation rule with calling numbers.

redirect-called—Associates the translation rule with redirected called numbers.

translation-rule-number—The reference number of the translation rule from 1 to 2147483647.

Step 6 

exit
Example:
Router(cfg-translation-profile)# exit

Exits translation-profile configuration mode.

Step 7 

call-manager-fallback

Example:

Router(config)# call-manager-fallback

Enters call-manager-fallback configuration mode.

Step 8 

translation-profile {incoming | outgoing} name

Example:
Router(config-cm-fallback)# translation-profile outgoing name1

Assigns a translation profile for incoming or outgoing call legs on a Cisco IP phone.

incoming—Applies the translation profile to incoming calls.

outgoing—Applies the translation profile to outgoing calls.

name—The name of the translation profile.

Step 9 

exit
Example:
Router(config-cm-fallback)# exit

Exits call-manager-fallback configuration mode.

Example

The following example shows the configuration where a translation profile called name1 is created with two voice translation rules. Rule1 consists of associated calling numbers, and rule2 consists of redirected called numbers. The Cisco IP phones in SRST mode are configured with name1.

voice translation-profile name1
 translate calling 1
 translate called redirect-called 2

call-manager-fallback
 translation-profile incoming name1

Verifying Translation Profiles

To verify translation profiles, perform the following steps.

SUMMARY STEPS

1. show voice translation-rule number

2. test voice translation-rule number input-test-string [type match-type [plan match-type]]

DETAILED STEPS


Step 1 show voice translation-rule number

Use this command to verify the translation rules that you have defined for your translation profiles.

Router# show voice translation-rule 6

Translation-rule tag: 6
Rule 1:
Match pattern: 65088801..
Replace pattern: 6508880101
Match type: none Replace type: none
Match plan: none Replace plan: none

Step 2 test voice translation-rule number input-test-string [type match-type [plan match-type]]

Use this command to test your translation profiles. See the test voice translation-rule command in the Cisco IOS Voice Command Reference, Release 12.3 T for more information.

Router(config)# voice translation-rule 5
Router(cfg-translation-rule)# rule 1 /201/ /102/
Router(cfg-translation-rule)# end
Router# test voice translation-rule 5 2015550101
Matched with rule 5
Original number:2015550101 Translated number:1025550101
Original number type: none Translated number type: none
Original number plan: none Translated number plan: none

Configuring Dial-Peer and Channel Hunting

Dial-peer hunting, the search through a group of dial peers for an available phone line, is disabled during Cisco CallManager fallback by default. To enable dial-peer hunting, use the no huntstop command. For more information about dial-peer hunting, see the "Configuring Dial Peer Hunting" section in the Cisco IOS Voice, Video, and Fax Configuration Guide, Release 12.2.

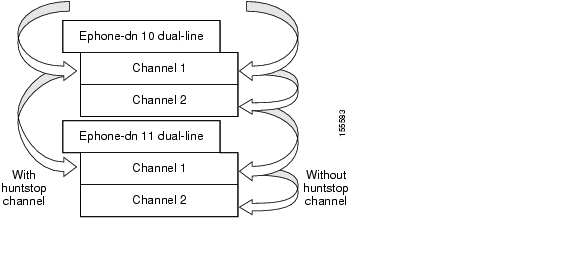
If you have a dual-line phone configuration (see the "Configuring Dual-Line Phones" section on page 51), you may want to keep incoming calls from hunting to the second channel if the first channel is busy or does not answer by using the channel keyword in the huntstop command. As show in Figure 3, this keeps the second channel free for call transfer, call waiting, or three-way conferencing.

Figure 3 Hunt Pattern for Dual-Line Configurations With and Without Huntstop

Channel huntstop also prevents situations in which a call can ring for 30 seconds on the first channel of a line with no person available to answer and then ring for another 30 seconds on the second channel before rolling over to another line.

SUMMARY STEPS

1. call-manager-fallback

2. huntstop [channel]

3. exit

DETAILED STEPS

 
Command or Action
Purpose

Step 1 

call-manager-fallback

Example:

Router(config)# call-manager-fallback

Enters call-manager-fallback configuration mode.

Step 2 

huntstop [channel]
Example:
Router(config-cm-fallback)# huntstop channel

Sets the huntstop attribute for the dial peers associated with the Cisco IP phone dial peers created during CallManager fallback.

For dual-line configurations, the channel keyword keeps incoming calls from hunting to the second channel if the first channel is busy or does not answer.

Step 3 

exit
Example:
Router(config-cm-fallback)# exit

Exits call-manager-fallback configuration mode.

Example

The following example disables dial-peer hunting during Cisco CallManager fallback and hunting to the secondary channels in dual-line phone configurations:

call-manager-fallback
 no huntstop channel

Configuring Busy Timeout

This task sets the timeout value for call transfers to busy destinations. The busy timeout value is the amount of time that can elapse after a transferred call reaches a busy signal before the call is disconnected.

SUMMARY STEPS

1. call-manager-fallback

2. timeouts busy seconds

3. exit

DETAILED STEPS

 
Command or Action
Purpose

Step 1 

call-manager-fallback

Example:

Router(config)# call-manager-fallback

Enters call-manager-fallback configuration mode.

Step 2 

timeouts busy seconds

Example:

Router(config-cm-fallback)# timeouts busy 20

Sets the amount of time after which calls are disconnected when they are transferred to busy destinations.

seconds—Number of seconds. Range is from 0 to 30. Default is 10.

Note This command sets the busy timeout only for calls that are transferred to busy destinations and does not affect the timeout for calls that directly dial busy destinations.

Step 3 

exit

Example:

Router(config-cm-fallback)# exit

Exits call-manager-fallback configuration mode.

Example

The following example sets a timeout of 20 seconds for calls that are transferred to busy destinations:

call-manager-fallback
 timeouts busy 20

Configuring the Ringing Timeout Default

The ringing timeout default is the length of time for which a phone can ring with no answer before returning a disconnect code to the caller. This timeout prevents hung calls received over interfaces such as Foreign Exchange Office (FXO) that do not have forward-disconnect supervision. It is used only for extensions that do not have no-answer call forwarding enabled.

SUMMARY STEPS

1. call-manager-fallback

2. timeouts ringing seconds

3. exit

DETAILED STEPS

 
Command or Action
Purpose

Step 1 

call-manager-fallback

Example:

Router(config)# call-manager-fallback

Enters call-manager-fallback configuration mode.

Step 2 

timeouts ringing seconds

Example:

Router(config-cm-fallback)# timeouts ringing 30

Sets the ringing timeout default, in seconds. The range is from 5 to 60000. There is no default value.

Step 3 

exit

Example:

Router(config-cm-fallback)# exit

Exits call-manager-fallback configuration mode.

Example

The following example sets the ringing timeout default to 30 seconds:

call-manager-fallback
 timeouts ringing 30

Configuring Outgoing Calls

Outgoing call configuration can include the following tasks:

Configuring Call Transfer

Configuring Local and Remote Call Transfer (Optional)

Enabling Consultative Call Transfer and Forward Using H.450.2 and H.450.3 with Cisco SRST V3.0 (Optional)

Enabling Analog Transfer Using Hookflash and the H.450.2 Standard with Cisco SRST V3.0 or Lower (Optional)

Configuring Trunk Access Codes (Required Under Certain Conditions)

Configuring Interdigit Timeout Values (Optional)

Configuring Class of Restriction (Optional)

Call Blocking (Toll Bar) Based on Time of Day and Day of Week or Date (Optional)

Configuring Local and Remote Call Transfer

You must configure Cisco SRST to allow Cisco IP phones to transfer telephone calls from outside the local IP network to another Cisco IP phone. By default, all Cisco IP phone directory numbers or virtual voice ports are allowed as transfer targets. A maximum of 32 transfer patterns can be entered.

Call transfer configuration is performed using the transfer-pattern command.

SUMMARY STEPS

1. call-manager-fallback

2. transfer-pattern transfer-pattern

3. exit

DETAILED STEPS

 
Command or Action
Purpose

Step 1 

call-manager-fallback

Example:

Router(config)# call-manager-fallback

Enters call-manager-fallback configuration mode.

Step 2 

transfer-pattern transfer-pattern

Example:

Router(config-cm-fallback)# transfer-pattern 52540..

Enables the transfer of a call from a non-IP phone number to another Cisco IP phone on the same IP network using the specified transfer pattern.

transfer-pattern—String of digits for permitted call transfers. Wildcards are permitted.

Step 3 

exit
Example:

Router(config-cm-fallback)# exit

Exits call-manager-fallback configuration mode.

Example

In the following example, the transfer-pattern command permits transfers from a non-IP phone number to any Cisco IP phone on the same IP network with a number in the range from 5550100 to 5550199:

call-manager-fallback
 transfer-pattern 55501..

Enabling Consultative Call Transfer and Forward Using H.450.2 and H.450.3 with Cisco SRST V3.0

Consultative call transfer using H.450.2 adds support for initiating call transfers and call forwarding on a call leg using the ITU-T H.450.2 and ITU-T H.450.3 standards. Call transfers and call forwarding using H.450.2 and H.450.3 can be blind or consultative. A blind call transfer or blind call forward is one in which the transferring or forwarding phone connects the caller to a destination line before a ringing tone begins. A consultative transfer is one in which the transferring or forwarding party either connects the caller to a ringing phone (ringback heard) or speaks with the third party before connecting the caller to the third party.


Note For Cisco SRST Versions 3.1 and higher, call transfer and call forward using H.450.2 is supported automatically with the default session application.


Prerequisites

Call transfer with consultation is available only when a second line or call instance is supported by the IP phone. Please see the dual-line keyword in the max-dn command.

All voice gateway routers in the VoIP network must support the H.450 standard.

All voice gateway routers in the VoIP network must be running the following software:

Cisco IOS Release 12.3(2)T or a later release

Cisco SRST V3.0

Restrictions

H.450.12 Supplementary Services Capabilities exchange among routers is not implemented.

SUMMARY STEPS

1. call-manager-fallback

2. call-forward pattern pattern (call forward only)

3. transfer-system {blind | full-blind | full-consult | local-consult} (call transfer only)

4. transfer-pattern transfer-pattern (call transfer only)

5. exit

6. voice service voip

7. h323

8. h450 h450-2 timeout {T1 | T2 | T3 | T4} milliseconds

9. end

DETAILED STEPS

 
Command or Action
Purpose

Step 1 

call-manager-fallback

Example:

Router(config)# call-manager-fallback

Enters call-manager-fallback configuration mode.

Step 2 

call-forward pattern pattern

Example:

Router(config-cm-fallback)# call-forward pattern 4...

Specifies the H.450.3 standard for call forwarding.

pattern—Digits to match for call forwarding using the H.450.3 standard. If an incoming calling-party number matches the pattern, it can be forwarded using the H.450.3 standard. A pattern of .T forwards all calling parties using the H.450.3 standard.

Step 3 

transfer-system {blind | full-blind | full-consult | local-consult}

Example:

Router(config-cm-fallback)# transfer-system full-consult

Defines the call-transfer method for all lines served by the Cisco SRST router.

blind—Calls are transferred without consultation with a single phone line using the Cisco proprietary method.

Note: The keyword blind is not recommended. Use either the full-blind or full-consult keyword instead.

full-blind—Calls are transferred without consultation using H.450.2 standard methods.

full-consult—Calls are transferred with consultation using a second phone line if available. The calls fall back to full-blind if the second line is unavailable.

local-consult—Calls are transferred with local consultation using a second phone line if available. The calls fall back to blind for nonlocal consultation or nonlocal transfer target.

Step 4 

transfer-pattern transfer-pattern
Example:

Router(config-cm-fallback)# transfer-pattern 52540..

Allows transfer of telephone calls by Cisco IP phones to specified phone number patterns.

transfer-pattern—String of digits for permitted call transfers. Wildcards are allowed.

Step 5 

exit

Example:

Router(config-cm-fallback)# exit

Exits call-manager-fallback configuration mode.

Timesaver Before exiting call-manager-fallback configuration mode, configure any other parameters that you need to set for the entire Cisco SRST phone network.

Step 6 

voice service voip

Example:

Router(config)# voice service voip

(Optional) Enters voice service configuration mode.

Step 7 

h323
Example:
Router(conf-voi-serv)# h323

(Optional) Enters H.323 voice service configuration mode.

Step 8 

h450 h450-2 timeout {T1 | T2 | T3 | T4} milliseconds
Example:

Router(conf-serv-h323)# h450 h450-2 timeout T1 750

(Optional) Sets timeouts for supplementary service timers, in milliseconds. This command is used primarily when the default settings for these timers do not match your network delay parameters. See the ITU-T H.450.2 specification for more information on these timers.

T1—Timeout value to wait to identify a response. Default is 2000.

T2—Timeout value to wait for call setup. Default is 5000.

T3—Timeout value to wait to initiate a response. Default is 5000.

T4—Timeout value to wait for setup of a response. Default is 5000.

milliseconds—Number of milliseconds. Range is from 500 to 60000.

Step 9 

end
Example:

Router(conf-serv-h323)# end

(Optional) Returns to privileged EXEC mode.

Examples

The following example specifies transfer with consultation using the H.450.2 standard for all IP phones serviced by the Cisco SRST router:

dial-peer voice 100 pots
 destination-pattern 9.T
 port 1/0/0

dial-peer voice 4000 voip
 destination-pattern 4...
 session-target ipv4:10.1.1.1

call-manager-fallback
 transfer-pattern 4...
 transfer-system full-consult

The following example enables call forwarding using the H.450.3 standard:

dial-peer voice 100 pots
destination-pattern 9.T
port 1/0/0
!
dial-peer voice 4000 voip
destination-pattern 4
session-target ipv4:10.1.1.1
!
call-manager-fallback
call-forward pattern 4

Enabling Analog Transfer Using Hookflash and the H.450.2 Standard with Cisco SRST V3.0 or Lower

Analog call transfer using hookflash and the H.450.2 standard allows analog phones to transfer calls with consultation by using the hookflash to initiate the transfer. Hookflash refers to the short on-hook period usually generated by a telephone-like device during a call to indicate that the telephone is attempting to perform a dial-tone recall from a PBX. Hookflash is often used to perform call transfer. For example, a hookflash occurs when a caller quickly taps once on the button in the cradle of an analog phone's handset.

This feature requires installation of a Tool Command Language (Tcl) script. The script app-h450-transfer.tcl must be downloaded from the Cisco Software Center at http://www.cisco.com/cgi-bin/tablebuild.pl/ip-iostsp and copied to a TFTP server that is available to the Cisco SRST router or copied to the flash memory on the Cisco SRST router. To apply this script globally to all dial peers, use the call application global command in global configuration mode. The Tcl script has parameters to which you can pass values using attribute-value (AV) pairs in the call application voice command. The parameter that applies to this feature is as follows:

delay-time—Speeds up or delays the setting up of the consultation call during a call transfer from an analog phone using a delay timer. When all digits have been collected, the delay timer is started. The call setup to the receiving party does not begin until the delay timer expires. If the transferring party goes on-hook before the delay timer expires, the transfer is considered a blind transfer rather than a consultative transfer. If the transferring party goes on-hook after the delay timer expires, either while the destination phone is ringing or after the destination party answers, the transfer is considered a consultative transfer.

In addition to the Tcl script, a ReadMe file describes the script and the configurable AV pairs. Read this file whenever you download a new version of the script because it may contain additional script-specific information, such as configuration parameters and user interface descriptions.


Note For Cisco SRST Versions 3.1 and higher, call transfer using H.450.2 is supported automatically with the default session application.


Prerequisites

The H.450 Tcl script named app-h450-transfer.tcl must be downloaded from the Cisco Software Center. The following versions of the script are available:

app-h450-transfer.2.0.0.2.tcl for Cisco IOS Release 12.2(11)YT1 and later releases

app-h450-transfer.2.0.0.1.tcl for Cisco IOS Release 12.2(11)YT

All voice gateway routers in the VoIP network must support H.450 and be running the following software:

Cisco IOS 12.2(11)YT or a later release

Cisco SRST V3.0 or a lower version

Tcl IVR 2.0

H.450 Tcl script (app-h450-transfer.tcl)


Note You can continue to use the app-h450-transfer.2.0.0.1.tcl script if you install Cisco IOS Release 12.2(11)YT1 or later, but you cannot use the app-h450-transfer.2.0.0.2.tcl script with a release of Cisco IOS software that is earlier than Cisco IOS Release 12.2(11)YT1.


Restrictions

When a consultative transfer is made by an analog FXS phone using hookflash, the consultation call itself cannot be further transferred (that is, it cannot become a recursive or chained transfer) until after the initial transfer operation has been completed and the transferee and transfer-to parties are connected. Once the initial call transfer operation has been completed and the transferee and transfer-to parties are now the only parties in the call, the transfer-to party may further transfer the call.

Call transfer with consultation is not supported for Cisco ATA-186, Cisco ATA-188, and Cisco IP Conference Station 7935. Transfer attempts from these devices are executed as blind transfers.

SUMMARY STEPS

1. call application voice application-name location

2. call application voice application-name language number language

3. call application voice application-name set-location language category location

4. call application voice application-name delay-time seconds

5. dial-peer voice number pots

6. application application-name

7. exit

8. dial-peer voice number voip

9. application application-name

10. exit

DETAILED STEPS

 
Command or Action
Purpose

Step 1 

call application voice application-name location

Example:

Router(config)# call application voice transfer_app flash:app-h450-transfer.tcl

Loads the Tcl script and specifies its application name.

application-name—User-defined name for the IVR application. This name does not have to match the script filename.

location—Script directory and filename in URL format. For example, flash memory (flash:filename), a TFTP (tftp://../filename) or an HTTP server (http://../filename) are valid locations.

Step 2 

call application voice application-name language number language

Example:

Router(config)# call application voice transfer_app language 1 en

(Optional) Sets the language for dynamic prompts used by the application.

application-name—IVR application name that was assigned in Step 1.

number—Number that identifies the language used by the audio files for the IVR application.

language—Two-character code that specifies the language of the prompts. Valid entries are en (English—default), sp (Spanish), ch (Chinese), or aa (all).

Step 3 

call application voice application-name set-location language category location

Example:
Router(config)# call application voice transfer_app set-location en 0 flash:/prompts

Defines the location and category of the audio files that are used by the application for dynamic prompts.

application-name—Name of the Tcl IVR application.

language—Two-character code to specify the language of the prompts. Valid entries are en (English—default), sp (Spanish), ch (Chinese), or aa (all).

category—Category group (0 to 4) for the audio files from this location. The value 0 means all categories.

location—URL of the directory that contains the language audio files used by the application, without filenames. Flash memory (flash) or a directory on a server (TFTP, HTTP, or RTSP) are all valid.

Prompts are required for call transfer from analog FXS phones. No prompts are needed for call transfer from IP phones.

Step 4 

call application voice application-name delay-time seconds

Example:

Router(config)# call application voice transfer_app delay-time 1

(Optional) Sets the delay time for consultation call setup for an analog phone that is making a call transfer using the H.450 application. This command passes a value to the Tcl script by using an attribute-value (AV) pair.

seconds—Number of seconds to delay call setup. Range is from 1 to 10. Default is 2.

A delay of more than 2 seconds is generally noticeable to users.

For more information about AV pairs and the Tcl script for H.450 call transfer and forwarding, see the ReadMe file that accompanies the script.

Step 5 

dial-peer voice number pots

Example:

Router(config)# dial-peer voice 25 pots

Enters dial-peer configuration mode to configure a POTS dial peer.

Step 6 

application application-name

Example:

Router(config-dial-peer)# application transfer_app

Loads the application named in Step 1 onto the dial peer.

Step 7 

exit

Example:

Router(config-dial-peer)# exit

Exits dial-peer configuration mode.

Timesaver Before exiting dial-peer configuration mode, configure any other dial-peer parameters that you need to set for this dial peer.

Step 8 

dial-peer voice number voip

Example:

Router(config)# dial-peer voice 29 voip

Enters dial-peer configuration mode to configure a VoIP dial peer.

Step 9 

application application-name

Example:

Router(config-dial-peer)# application transfer_app

Loads the application named in Step 1 onto the dial peer.

Step 10 

exit

Example:

Router(config-dial-peer)# exit

Exits dial-peer configuration mode.

Timesaver Before exiting dial-peer configuration mode, configure any other dial-peer parameters that you need to set for this dial peer.

Example

The following example enables the H.450 Tcl script for analog transfer using hookflash and sets a delay time of 1 second:

call application voice transfer_app flash:app-h450-transfer.tcl
call application voice transfer_app language 1 en
call application voice transfer_app set-location en 0 flash:/prompts
call application voice transfer_app delay-time 1
!
dial-peer voice 25 pots
 destination-pattern 9.T
 port 1/0/0
 application transfer_app
!
dial-peer voice 29 voip
 destination-pattern 4...
 session-target ipv4:10.1.10.1
 application transfer_app

Configuring Trunk Access Codes


Note Configure trunk access codes only if your normal network dial-plan configuration prevents you from configuring permanent POTS voice dial peers to provide trunk access for use during fallback. If you already have local PSTN ports configured with the appropriate access codes provided by dial peers (for example, dial 9 to select an FXO PSTN line), this configuration is not needed.


Trunk access codes provide IP phones with access to the PSTN during Cisco CallManger fallback by creating POTS voice dial peers that are active during Cisco CallManager fallback only. These temporary dial peers, which can be matched to voice ports (BRI, E&M, FXO, and PRI), allow Cisco IP phones access to trunk lines during Cisco CallManager mode. When Cisco SRST is active, all PSTN interfaces of the same type are treated as equivalent, and any port may be selected to place the outgoing PSTN call.

Trunk access codes are created using the access-code command.

SUMMARY STEPS

1. call-manager-fallback

2. access-code {{fxo | e&m} dial-string | {bri | pri} dial-string [direct-inward-dial]}

3. exit

DETAILED STEPS

 
Command or Action
Purpose

Step 1 

call-manager-fallback

Example:

Router(config)# call-manager-fallback

Enters call-manager-fallback configuration mode.

Step 2 

access-code {{fxo | e&m} dial-string | {bri | pri} dial-string [direct-inward-dial]}
Example:
Router(config-cm-fallback)# access-code e&m 8

Configures trunk access codes for each type of line so that the Cisco IP phones can access the trunk lines only in Cisco CallManager fallback mode when the Cisco SRST is enabled.

fxo—Enables a Foreign Exchange Office (FXO) interface.

e&m—Enables an analog Ear and Mouth (E&M) interface.

dial-string—String of characters that sets up dial access codes for each specified line type by creating dial peers. The dial-string argument is used to set up temporary dial peers for each specified line type.

bri—Enables a BRI interface.

pri—Enables a PRI interface.

direct-inward-dial—(Optional) Enables Direct Inward Dialing (DID) on the POTS dial peer.

Step 3 

exit
Example:
Router(config-cm-fallback)# exit

Exits call-manager-fallback configuration mode.

Example

The following example creates access code number 8 for BRI and enables DID on the POTS dial peer:

call-manager-fallback
 access-code bri 8 direct-inward-dial

Configuring Interdigit Timeout Values

Configuring interdigit timeout values involves specifying how long, in seconds, all Cisco IP phones attached to a Cisco SRST router are to wait after an initial digit or a subsequent digit is dialed. The timeouts interdigit timer is enabled when a caller enters a digit and is restarted each time the caller enters subsequent digits until the destination address is identified. If the configured timeout value is exceeded before the destination address is identified, a tone sounds and the call is terminated.


Note This value setting is important when using variable-length dial-peer destination patterns (dial plans). For more information on setting dial plans, see the "Configuration Dial Plans, Dial Peers, and Digit Manipulation" chapter of the Cisco IOS Voice, Video, and Fax Configuration Guide, Release 12.2.


SUMMARY STEPS

1. call-manager-fallback

2. timeouts interdigit seconds

3. exit

DETAILED STEPS

 
Command or Action
Purpose

Step 1 

call-manager-fallback

Example:

Router(config)# call-manager-fallback

Enters call-manager-fallback configuration mode.

Step 2 

timeouts interdigit seconds

Example:
Router(config-cm-fallback)# timeouts interdigit 5

(Optional) Configures the interdigit timeout value for all Cisco IP phones that are attached to the router.

seconds—Interdigit timeout duration, in seconds, for all Cisco IP phones. Valid entries are integers from 2 to 120.

Step 3 

exit
Example:
Router(config-cm-fallback)# exit

Exits call-manager-fallback configuration mode.

Example

The following example sets the interdigit timeout value to 5 seconds for all Cisco IP phones. In this example, 5 seconds are the elapsed time after which an incompletely dialed number times out. For example, a caller who dials nine digits (408555010) instead of the required ten digits (4085550100) will hear a busy tone after the 5 timeout seconds have elapsed.

call-manager-fallback
 timeouts interdigit 5

Configuring Class of Restriction

The class of restriction (COR) functionality provides the ability to deny certain call attempts on the basis of the incoming and outgoing class of restrictions provisioned on the dial peers. This functionality provides flexibility in network design, allows users to block calls (for example, calls to 900 numbers), and applies different restrictions to call attempts from different originators. The cor command sets the dial-peer COR parameter for dial peers associated with the directory numbers created during CallManager fallback.

You can have up to 20 COR lists for each incoming and outgoing call. A default COR is assigned to directory numbers that do not match any COR list numbers or number ranges. An assigned COR is invoked for the dial peers and created for each directory number automatically during CallManager fallback registration.

If a COR is applied on an incoming dial peer (for incoming calls) and it is a superset of or is equal to the COR applied to the outgoing dial peer (for outgoing calls), the call will go through. Voice ports determine whether a call is considered incoming or outgoing. If you hook up a phone to an FXS port on a Cisco SRST router and try to make a call from that phone, the call will be considered an incoming call to the router and voice port. If you make a call to the FXS phone, the call will be considered outgoing.

By default, an incoming call leg has the highest COR priority; the outgoing call leg has the lowest priority. If there is no COR configuration for incoming calls on a dial peer, you can make a call from a phone attached to the dial peer, so that the call will go out of any dial peer regardless of the COR configuration on that dial peer. Table 6 describes call functionality based on how your COR lists are configured.

Table 6 Combinations of COR List and Results

COR List on Incoming Dial Peer
COR List on Outgoing Dial Peer
Result

No COR

No COR

Call will succeed.

No COR

COR list applied for outgoing calls

Call will succeed. By default, the incoming dial peer has the highest COR priority when no COR is applied. If you apply no COR for an incoming call leg to a dial peer, the dial peer can make a call out of any other dial peer regardless of the COR configuration on the outgoing dial peer.

COR list applied for incoming calls

No COR

Call will succeed. By default, the outgoing dial peer has the lowest priority. Because there are some COR configurations for incoming calls on the incoming or originating dial peer, it is a superset of the outgoing call's COR configuration for the outgoing or terminating dial peer.

COR list applied for incoming calls (superset of COR list applied for outgoing calls on the outgoing dial peer)

COR list applied for outgoing calls (subsets of COR list applied for incoming calls on the incoming dial peer)

Call will succeed. The COR list for incoming calls on the incoming dial peer is a superset of the COR list for outgoing calls on the outgoing dial peer.

COR list applied for incoming calls (subset of COR list applied for outgoing calls on the outgoing dial peer)

COR list applied for outgoing calls (supersets of COR list applied for incoming calls on the incoming dial peer)

Call will not succeed. The COR list for incoming calls on the incoming dial peer is not a superset of the COR list for outgoing calls on the outgoing dial peer.


SUMMARY STEPS

1. call-manager-fallback

2. cor {incoming | outgoing} cor-list-name {cor-list-number starting-number - ending-number | default}

3. exit

DETAILED STEPS

 
Command or Action
Purpose

Step 1 

call-manager-fallback

Example:

Router(config)# call-manager-fallback

Enters call-manager-fallback configuration mode.

Step 2 

cor {incoming | outgoing} cor-list-name [cor-list-number starting-number - ending-number | default]

Example:
Router(config-cm-fallback)# cor outgoing LockforPhoneC 1 5010 - 5020

Configures a COR on dial peers associated with directory numbers.

incoming—COR list to be used by incoming dial peers.

outgoing—COR list to be used by outgoing dial peers.

cor-list-name—COR list name.

cor-list-number—COR list identifier. The maximum number of COR lists that can be created is 20, comprised of incoming or outgoing dial peers. The first six COR lists are applied to a range of directory numbers. The directory numbers that do not have a COR configuration are assigned to the default COR list, providing a default COR list has been defined.

starting-number - ending-number—Directory number range; for example, 2000 - 2025.

default—Instructs the router to use an existing default COR list.

Step 3 

exit

Example:

Router(config-cm-fallback)# exit

Exits call-manager-fallback configuration mode.

Examples

The following example shows how to set a dial-peer COR parameter for outgoing calls to the Cisco IP phone dial peers and directory numbers created during fallback:

call-manager-fallback
 cor outgoing LockforPhoneC 1 5010 - 5020

The following example shows how to set the dial-peer COR parameter for incoming calls to the Cisco IP phone dial peers and directory numbers in the default COR list:

call-manager-fallback
 cor incoming LockforPhoneC default

The following example shows how sub- and super-COR sets are created. First, a custom dial-peer COR is created with names declared under it:

dial-peer cor custom
 name 911
 name 1800
 name 1900
 name local_call

In the following configuration example, COR lists are created and applied to the dial peer.

dial-peer cor list call911
 member 911

dial-peer cor list call1800
 member 1800

dial-peer cor list call1900
 member 1900

dial-peer cor list calllocal
 member local_call

dial-peer cor list engineering
 member 911
 member local_call

dial-peer cor list manager
 member 911
 member 1800
 member 1900
 member local_call

dial-peer cor list hr
 member 911
 member 1800
 member local_call

In the example below, five dial peers are configured for destination numbers 734...., 1800......., 1900......., 316...., and 911. A COR list is applied to each of the dial peers.

dial-peer voice 1 voip
 destination pattern 734....
 session target ipv4:10.1.1.1
 cor outgoing calllocal

dial-peer voice 2 voip
 destination pattern 1800.......
 session target ipv4:10.1.1.1
 cor outgoing call1800

dial-peer voice 3 pots
 destination pattern 1900.......
 port 1/0/0
 cor outgoing call1900

dial-peer voice 5 pots
 destination pattern 316....
 port 1/1/0
! No COR is applied.

dial-peer voice 4 pots
 destination pattern 911
 port 1/0/1
 cor outgoing call911

Finally, the COR list is applied to the individual phone numbers.

call-manager-fallback
 max-conferences 8
 cor incoming engineering 1 1001 - 1001
 cor incoming hr 2 1002 - 1002
 cor incoming manager 3 1003 - 1008

The sample configuration allows for the following:

Extension 1001 to call 734... numbers, 911, and 316....

Extension 1002 to call 734..., 1800 numbers, 911, and 316....

Extension 1003 through 1008 to call all of the possible Cisco SRST router numbers

All extensions to call 316....

Call Blocking (Toll Bar) Based on Time of Day and Day of Week or Date

Call blocking to prevent unauthorized use of phones is implemented by matching a pattern of specified digits during a specified time of day and day of week or date. Up to 32 patterns of digits can be specified. Call blocking is supported on IP phones only and not on analog foreign exchange station (FXS) phones.

When a user attempts to place a call to digits that match a pattern that has been specified for call blocking during a time period that has been defined for call blocking, a fast busy signal is played for approximately 10 seconds. The call is then terminated, and the line is placed back in on-hook status.

In SRST (call-manager-fallback configuration) mode, there is no phone- or pin-based exemption to after-hours call blocking.

SUMMARY STEPS

1. call-manager-fallback

2. after-hours block pattern tag pattern [7-24]

3. after-hours day day start-time stop-time

4. after-hours date month date start-time stop-time

5. exit

DETAILED STEPS

 
Command or Action
Purpose

Step 1 

call-manager-fallback

Example:

Router(config)# call-manager-fallback

Enters call-manager-fallback configuration mode.

Step 2 

after-hours block pattern tag pattern [7-24]

Example:

Router(config-cm-fallback)# after-hours block pattern 1 91900

Defines a pattern of outgoing digits to be blocked. Up to 32 patterns can be defined, using individual commands.

If the 7-24 keyword is specified, the pattern is always blocked, 7 days a week, 24 hours a day.

If the 7-24 keyword is not specified, the pattern is blocked during the days and dates that are defined using the after-hours day and after-hours date commands.

Step 3 

after-hours day day start-time stop-time

Example:

Router(config-cm-fallback)# after-hours day mon 19:00 7:00

Defines a recurring time period based on the day of the week during which calls are blocked to outgoing dial patterns that are defined using the after-hours block pattern command.

day—Day of the week abbreviation. The following are valid day abbreviations: sun, mon, tue, wed, thu, fri, sat.

start-time stop-time—Beginning and ending times for call blocking, in an HH:MM format using a 24-hour clock. If the stop time is a smaller value than the start time, the stop time occurs on the day following the start time. For example, "mon 19:00 07:00" means "from Monday at 7 p.m. until Tuesday at 7 a.m."

Step 4 

after-hours date month date start-time stop-time

Example:

Router(config-cm-fallback)# after-hours date jan 1 0:00 0:00

Defines a recurring time period based on month and date during which calls are blocked to outgoing dial patterns that are defined using the after-hours block pattern command.

month—Month abbreviation. The following are valid month abbreviations: jan, feb, mar, apr, may, jun, jul, aug, sep, oct, nov, dec.

date—Date of the month. Range is from 1 to 31.

start-time stop-time—Beginning and ending times for call blocking, in an HH:MM format using a 24-hour clock. The stop time must be larger than the start time. The value 24:00 is not valid. If 00:00 is entered as an stop time, it is changed to 23:59. If 00:00 is entered for both start time and stop time, calls are blocked for the entire 24-hour period on the specified date.

Step 5 

exit

Example:

Router(config-cm-fallback)# exit

Exits call-manager-fallback configuration mode.

Example

The following example defines several patterns of digits for which outgoing calls are blocked. Patterns 1 and 2, which block calls to external numbers that begin with "1" and "011," are blocked on Monday through Friday before 7 a.m. and after 7 p.m., on Saturday before 7 a.m. and after 1 p.m., and all day Sunday. Pattern 3 blocks calls to 900 numbers 7 days a week, 24 hours a day.

call-manager-fallback
 after-hours block pattern 1 91
 after-hours block pattern 2 9011
 after-hours block pattern 3 91900 7-24
 after-hours block day mon 19:00 07:00
 after-hours block day tue 19:00 07:00
 after-hours block day wed 19:00 07:00
 after-hours block day thu 19:00 07:00
 after-hours block day fri 19:00 07:00
 after-hours block day sat 13:00 12:00
 after-hours block day sun 12:00 07:00
!

Where to Go Next

The next step is verifying whether you need to configure additional features available on Cisco SRST. For a description and configuration instructions, see the " Configuring Additional Call Features" chapter. If you need to configure security, see the " Setting Up Secure SRST" chapter, or if you need to configure voicemail, see the " Integrating Voice Mail with Cisco SRST" chapter. If you do not need any of those features, go to the "Monitoring and Maintaining Cisco SRST" chapter.


hometocprevnextglossaryfeedbacksearchhelp

Posted: Mon Nov 27 10:57:58 PST 2006
All contents are Copyright © 1992--2006 Cisco Systems, Inc. All rights reserved.
Important Notices and Privacy Statement.