|
|

Table Of Contents
Prerequisites for Setting Up Secure SRST
Restrictions for Setting Up Secure SRST
Information About Setting Up Secure SRST
Cisco IP Phones Clear-Text Fallback During SRST
SRST Routers and the TLS Protocol
Secure SRST Authentication and Encryption
Cisco IOS Credentials Server on Secure SRST Routers
Establishment of Secure SRST to the Cisco IP Phone
Preparing the SRST Router for Secure Communication
Importing Phone Certificate Files in PEM Format to the Secure SRST Router
Configuring Cisco CallManager to the Secure SRST Router
Enabling SRST Mode on the Secure SRST Router
Verifying Phone Status and Registrations
Configuration Examples for Secure SRST
Control Plane Policing: Example
Setting Up Secure SRST
This chapter describes new SRST security features such as authentication, integrity, and media encryption.
Contents
•
Prerequisites for Setting Up Secure SRST
•
•
•
•
Prerequisites for Setting Up Secure SRST
General
•
•
•
•
•
–
–
Public Key Infrastructure
•
•
•
% Failed to find Certificate Server's trustpoint at startup% Failed to find Certificate Server's cert.These messages are informational messages and indicate a temporary inability to configure the certificate server, because the startup configuration has not been fully parsed yet. The messages are useful for debugging, in case the startup configuration has been corrupted.
You can verify the status of the certificate server after the boot procedure using the show crypto pki server command.
SRST
•
Supported Cisco IP Phones, Platforms, and Memory Requirements
•
•
http://www.cisco.com/univercd/cc/td/doc/product/voice/srst/srst34/srs34spc.htm
Restrictions for Setting Up Secure SRST
General
•
A summary of U.S. laws governing Cisco cryptographic products may be found at:
http://www.cisco.com/wwl/export/crypto/tool/
If you require further assistance, please contact us by sending e-mail to export@cisco.com.
•
•
Not Supported in Secure SRST Mode
•
•
•
•
•
Supported Calls in Secure SRST Mode
Only voice calls are supported in secure SRST mode. Specifically, the following voice calls are supported:
•
•
•
•
•
Information About Setting Up Secure SRST
To configure secure SRST, you should understand the following concepts:
•
•
•
•
•
Benefits of Secure SRST
Secure Cisco IP phones that are located at remote sites and that are attached to gateway routers can communicate securely with Cisco CallManager using the WAN. But if the WAN link or Cisco CallManager goes down, all communication through the remote phones becomes nonsecure. To overcome this situation, gateway routers can now function in secure SRST mode, which activates when the WAN link or Cisco CallManager goes down. When the WAN link or Cisco CallManager is restored, Cisco CallManager resumes secure call-handling capabilities.
Secure SRST provides new SRST security features such as authentication, integrity, and media encryption. Authentication provides assurance to one party that another party is whom it claims to be. Integrity provides assurance that the given data has not been altered between the entities. Encryption implies confidentiality; that is, that no one can read the data except the intended recipient. These security features allow privacy for SRST voice calls and protect against voice security violations and identity theft.
SRST security is achieved when:
•
•
•
•
Cisco IP Phones Clear-Text Fallback During SRST
Cisco SRST versions prior to 12.3(14)T are not capable of supporting secure connections or have security enabled. If an SRST router is not capable of secure SRST as a fallback mode—that is, it is not capable of completing a TLS handshake with Cisco CallManager—its certificate is not added to the configuration file of the Cisco IP phone. The absence of an SRST router certificate causes the Cisco IP phone to use nonsecure (clear-text) communication when in SRST fallback mode. The capability to detect and fallback in clear-text mode is built into Cisco IP phone firmware. See the Media and Signaling Authentication and Encryption Feature for Cisco IOS MGCP Gateways for more information on clear-text mode.
SRST Routers and the TLS Protocol
Transport Layer Security (TLS) Version 1.0 provides secure TCP channels between Cisco IP phones, secure SRST routers, and Cisco CallManager. The TLS process begins with the Cisco IP phone establishing a TLS connection when registering with Cisco CallManager. Assuming that Cisco CallManager is configured to fallback to SRST, the TLS connection between the Cisco IP phones and the secure SRST router is also established. If the WAN link or Cisco CallManager fails, call control reverts to the SRST router.
SRST Routers and PKI
The transfer of certificates between an SRST router and Cisco CallManager is mandatory for secure SRST functionality. Public key infrastructure (PKI) commands are used to generate, import, and export the certificates for secure SRST. Table 7 shows the secure SRST supported Cisco IP phones and the appropriate certificate for each phone. The "Importing Phone Certificate Files in PEM Format to the Secure SRST Router" section contains information and configurations about generating, importing, and exporting certificates that use PKI commands.
Table 7 Supported Cisco IP Phones and Certificates
Secure SRST Authentication and Encryption
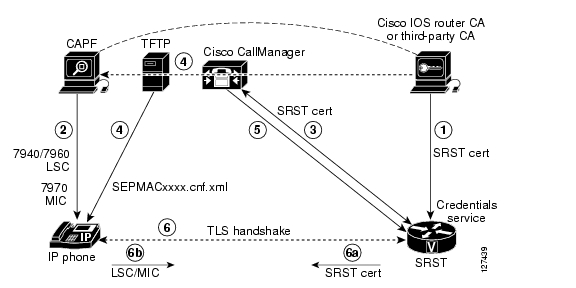
Figure 4 illustrates the process of secure SRST authentication and encryption, and Table 8 describes the process.
Figure 4 Secure SRST Authentication and Encryption
Table 8 Overview of the Process of Secure SRST Authentication and Encryption
1.
The CA server, whether it is a Cisco IOS router CA or a third-party CA, issues a device certificate to the SRST gateway, enabling credentials service. Optionally, the certificate can be self-generated by the SRST router using a Cisco IOS CA server.
The CA router is the ultimate trustpoint for the Certificate Authority Proxy Function (CAPF). For more information on CAPF, see the Cisco CallManager Security Guide.
2.
The CAPF is a process where supported devices can request a locally significant certificate (LSC). The CAPF utility generates a key pair and certificate that is specific for CAPF, copies this certificate to all Cisco CallManager servers in the cluster, and provides the LSC to the Cisco IP phone.
An LSC is required for Cisco IP phones that do not have a manufacturing installed certificate (MIC). The Cisco 7970 is equipped with a MIC and therefore does not need to go through the CAPF process.
3.
Cisco CallManager requests the SRST certificate from credentials server, and the credentials server responds with the certificate.
4.
For each device, Cisco CallManager uses the TFTP process and inserts the certificate into the SEPMACxxxx.cnf.xml configuration file of the Cisco IP phone.
5.
Cisco CallManager provides the PEM format files that contain phone certificate information to the SRST router. Providing the PEM files to the SRST router is done manually; see SRST Routers and PKI for more information.
When the SRST router has the PEM files, the SRST router can authenticate the IP phone and validate the issuer of the IP phones certificate during the TLS handshake.
6.
The TLS handshake occurs, certificates are exchanged, and mutual authentication and registration occurs between the Cisco IP phone and the SRST router.
a.
The SRST router sends its certificate, and the phone validates the certificate to the certificate that it received from Cisco CallManager in Step 4.
b.
The Cisco IP phone provides the SRST router the LSC or MIC, and the router validates the LSC or MIC using the PEM format files that it was provided in Step 5.
Note
Cisco IOS Credentials Server on Secure SRST Routers
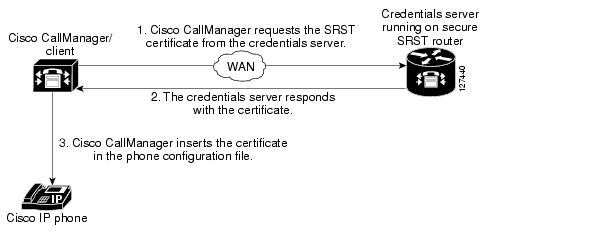
Secure SRST introduces a credentials server that runs on a secure SRST router. When the client, Cisco CallManager, requests a certificate through the TLS channel, the credentials server provides the SRST router certificate to Cisco CallManager. Cisco CallManager inserts the SRST router certificate in the Cisco IP phone configuration file and downloads the configuration files to the phones. The secure Cisco IP phone uses the certificate to authenticate the SRST router during fallback operations. The credentials service runs on default TCP port 2445.
Three Cisco IOS commands configure the credentials server in call-manager-fallback mode:
•
•
•
Two Cisco IOS commands provide credential server debugging and verification capabilities:
•
•
Establishment of Secure SRST to the Cisco IP Phone
Figure 5 and Table 9 show the interworking of the credentials server on the SRST router, Cisco CallManager, and the Cisco IP phone, and describe the establishment of secure SRST to the Cisco IP phone.
Figure 5 Interworking of Credentials Server on SRST Router, Cisco CallManager, and Cisco IP Phone
Table 9 Establishing Secure SRST
Regular Mode
The Cisco IP phone configures DHCP and gets the TFTP server address.
—
The Cisco IP phone retrieves a CTL file from the TFTP server.
The CTL file contains the certificates that the phone should trust.
The Cisco IP phone opens a Transport Layer Security (TLS) protocol channel and registers to Cisco CallManager.
Cisco CallManager exports secure SRST router information and the SRST router certificate to the Cisco IP phone. The phone places the certificate into its configuration. Once the phone has the SRST certificate, the SRST router is considered secure. See Figure 5.
If the Cisco IP phone is configured as "authenticated" or "encrypted" and Cisco CallManager is configured in mixed mode, the phone looks for an SRST certificate in its configuration file. If it finds an SRST certificate, it opens a standby TLS connection to the default port. The default port is the Cisco IP phone TCP port plus 443; that is, port 2443 on an SRST router.
The connection to the SRST router happens automatically, assuming there is not a secondary Cisco CallManager and SRST is configured as the backup device. See Figure 5.
Cisco CallManager should be configured in mixed mode, which is its secure mode.
In case of WAN failure, the Cisco IP phone starts SRST registration.
SRST Mode
The Cisco IP phone registers with the SRST router at the default port for secure communications.
—
How to Configure Secure SRST
The following configuration sections ensure that the secure SRST router and the Cisco IP phones can request mutual authentication during the TLS handshake. The TLS handshake occurs when the phone registers with the SRST router, either before or after the WAN link fails.
This section contains the following procedures:
•
•
•
•
•
Preparing the SRST Router for Secure Communication
The following tasks prepare the SRST router to process secure communications.
•
•
•
•
•
•
Configuring a Certificate Authority Server on a Cisco IOS Certificate Server
For SRST routers to provide secure communications, there must be a CA server that issues the device certificate in the network. The CA server can be a third-party CA or one generated from a Cisco IOS certificate server.
The Cisco IOS certificate server provides a certificate generation option to users who do not have a third-party CA in their network. The Cisco IOS certificate server can run on the SRST router or on a different Cisco IOS router.
If you do not have a third-party CA, full instructions on enabling and configuring a CA server can be found in the Cisco IOS Certificate Server documentation. A sample configuration is provided below.
SUMMARY STEPS
1.
2.
3.
4.
5.
6.
DETAILED STEPS
Step 1
crypto pki server cs-label
Example:Router (config)# crypto pki server srstcaserver
Enables the certificate server and enters certificate server configuration mode.
Note
For more information on the certificate server, see the Cisco IOS Certificate Server documentation.
Step 2
database level {minimal | names | complete}
Example:Router (cs-server)# database level complete
Controls what type of data is stored in the certificate enrollment database.
•
•
•
Note
Step 3
database url root-url
Example:Router (cs-server)# database url nvram
Specifies the location where all database entries for the certificate server will be written. After you create a certificate server via the crypto pki server command, use this command to specify a combined list of all the certificates that have been issued. The root-url argument specifies the location where database entries are written.
•
Step 4
issuer-name DN-string
Example:Router (cs-server)# issuer-name CN=srstcaserver
Sets the CA issuer name to the specified distinguished name (DN-string). The default value is as follows:
issuer-name CN=cs-label.
Step 5
grant auto
Example:Router (cs-server)# grant autoAllows an automatic certificate to be issued to any requestor.
•
Step 6
no shutdown
Example:Router (cs-server)# no shutdown
Enables the Cisco IOS certificate server.
•
Examples
The following example reflects one way of generating a CA.
Router(config)# crypto pki server srstcaserverRouter(cs-server)# database level completeRouter(cs-server)# database url nvramRouter(cs-server)# issuer-name CN=srstcaserverRouter(cs-server)# grant auto% This will cause all certificate requests to be automatically granted.Are you sure you want to do this? [yes/no]: yRouter(cs-server)# no shutdown% Once you start the server, you can no longer change some of% the configuration.Are you sure you want to do this? [yes/no]: y% Generating 1024 bit RSA keys ...[OK]% Certificate Server enabled.Autoenrolling and Authenticating the Secure SRST Router to the CA Server
The secure SRST router needs to define a trustpoint; that is, it must obtain a device certificate from the CA server. The procedure is called certificate enrollment. Once enrolled, the secure SRST router can be recognized by Cisco CallManager as a secure SRST router.
There are three options to enroll the secure SRST router to a CA server: autoenrollment, cut and paste, and TFTP. When the CA server is a Cisco IOS certificate server, autoenrollment can be used. Otherwise, manual enrollment is required. Manual enrollment refers to cut and paste or TFTP.
Use the enrollment url command for autoenrollment and the crypto pki authenticate command to authenticate the SRST router. Full instructions for the commands can be found in the Certification Authority Interoperability Commands documentation. An example of autoenrollment is available in the Certificate Enrollment Enhancements feature. A sample configuration is provided below.
SUMMARY STEPS
1.
2.
3.
4.
5.
6.
DETAILED STEPS
Step 1
crypto pki trustpoint name
Example:Router(config)# crypto pki trustpoint srstcaDeclares the CA that your router should use and enters ca-trustpoint configuration mode.
•
Step 2
enrollment url url
Example:Router(ca-trustpoint)# enrollment url http://10.1.1.22Specifies the enrollment parameters of your CA.
•
•
•
Step 3
revocation-check method1
Example:Router(ca-trustpoint)# revocation-check none
Checks the revocation status of a certificate. The argument method1 is the method used by the router to check the revocation status of the certificate. For this task, the only available method is none. The keyword none means that a revocation check will not be performed and the certificate will always be accepted.
•
Step 4
exit
Example:Router(ca-trustpoint)# exit
Exits ca-trustpoint configuration mode and returns to global configuration mode.
Step 5
crypto pki authenticate name
Example:Router(config)# crypto pki authenticate srstcaAuthenticates the CA (by getting the certificate from the CA).
•
Step 6
crypto pki enroll name
Example:Router(config)# crypto pki enroll srstca
Obtains the SRST router certificate from the CA.
•
Examples
The following example autoenrolls and authenticates the SRST router.
Router(config)# crypto pki trustpoint srstcaRouter(ca-trustpoint)# enrollment url http://10.1.1.22Router(ca-trustpoint)# revocation-check noneRouter(ca-trustpoint)# exitRouter(config)# crypto pki authenticate srstcaCertificate has the following attributes:Fingerprint MD5: 4C894B7D 71DBA53F 50C65FD7 75DDBFCAFingerprint SHA1: 5C3B6B9E EFA40927 9DF6A826 58DA618A BF39F291% Do you accept this certificate? [yes/no]: yTrustpoint CA certificate accepted.Router(config)# crypto pki enroll srstca%% Start certificate enrollment ..% Create a challenge password. You will need to verbally provide thispassword to the CA Administrator in order to revoke your certificate.For security reasons your password will not be saved in the configuration.Please make a note of it.Password:Re-enter password:% The fully-qualified domain name in the certificate will be: router.cisco.com% The subject name in the certificate will be: router.cisco.com% Include the router serial number in the subject name? [yes/no]: y% The serial number in the certificate will be: D0B9E79C% Include an IP address in the subject name? [no]: nRequest certificate from CA? [yes/no]: y% Certificate request sent to Certificate Authority% The certificate request fingerprint will be displayed.% The 'show crypto pki certificate' command will also show the fingerprint.Sep 29 00:41:55.427: CRYPTO_PKI: Certificate Request Fingerprint MD5: D154FB752524A24D 3D1F5C2B 46A7B9E4Sep 29 00:41:55.427: CRYPTO_PKI: Certificate Request Fingerprint SHA1: 0573FBB298CD1AD0 F37D591A C595252D A17523C1Sep 29 00:41:57.339: %PKI-6-CERTRET: Certificate received from Certificate AuthorityDisabling Automatic Certificate Enrollment
The command grant auto allows certificates to be issued and was activated in the optional task documented in the "Configuring a Certificate Authority Server on a Cisco IOS Certificate Server" section.
Note
SUMMARY STEPS
1.
2.
3.
4.
DETAILED STEPS
What to Do Next
For manual enrollment instructions, see the Manual Certificate Enrollment (TFTP and Cut-and-Paste) feature.
Verifying Certificate Enrollment
If you used the Cisco IOS certificate server as your CA, use the show running-config command to verify certificate enrollment or the show crypto pki server command to verify the status of the CA server.
SUMMARY STEPS
1.
2.
DETAILED STEPS
Step 1
Use the show running-config command to verify the creation of the CA server (01) and device (02) certificates. This example shows the enrolled certificates.
Router# show running-config...! SRST router device certificate.crypto pki certificate chain srstcacertificate 02308201AD 30820116 A0030201 02020102 300D0609 2A864886 F70D0101 0405003017311530 13060355 0403130C 73727374 63617365 72766572 301E170D 3034303431323139 35323233 5A170D30 35303431 32313935 3232335A 30343132 300F060355040513 08443042 39453739 43301F06 092A8648 86F70D01 09021612 6A61736F32363931 2E636973 636F2E63 6F6D305C 300D0609 2A864886 F70D0101 010500034B003048 024100D7 0CC354FB 5F7C1AE7 7A25C3F2 056E0485 22896D36 6CA70C19C98F9BAE AE9D1F9B D4BB7A67 F3251174 193BB1A3 12946123 E5C1CCD7 A23E6155FA2ED743 3FB8B902 03010001 A330302E 300B0603 551D0F04 04030205 A0301F0603551D23 04183016 8014F829 CE97AD60 18D05467 FC293963 C2470691 F9BD300D06092A86 4886F70D 01010405 00038181 007EB48E CAE9E1B3 D1E7A185 D7F0D565CB84B17B 1151BD78 B3E39763 59EC650E 49371F6D 99CBD267 EB8ADF9D 9E43A5F2FB2B18A0 34AF6564 11239473 41478AFC A86E6DA1 AC518E0B 8657CEBB ED2BDE8EB586FE67 00C358D4 EFDD8D44 3F423141 C2D331D3 1EE43B6E 6CB29EE7 0B8C2752C3AF4A66 BD007348 D013000A EA3C206D CFquitcertificate ca 0130820207 30820170 A0030201 02020101 300D0609 2A864886 F70D0101 0405003017311530 13060355 0403130C 73727374 63617365 72766572 301E170D 3034303431323139 34353136 5A170D30 37303431 32313934 3531365A 30173115 3013060355040313 0C737273 74636173 65727665 7230819F 300D0609 2A864886 F70D010101050003 818D0030 81890281 8100C3AF EE1E4BB1 9922A8DA 2BB9DC8E 5B1BD3321051C9FE 32A971B3 3C336635 74691954 98E765B1 059E24B6 32154E99 105CA9899619993F CC72C525 7357EBAC E6335A32 2AAF9391 99325BFD 9B8355EB C10F89639D8FC222 EE8AC831 71ACD3A7 4E918A8F D5775159 76FBF499 5AD0849D CAA41417DD866902 21E5DD03 C37D4B28 0FAB0203 010001A3 63306130 0F060355 1D130101FF040530 030101FF 300E0603 551D0F01 01FF0404 03020186 301D0603 551D0E04160414F8 29CE97AD 6018D054 67FC2939 63C24706 91F9BD30 1F060355 1D23041830168014 F829CE97 AD6018D0 5467FC29 3963C247 0691F9BD 300D0609 2A864886F70D0101 04050003 8181007A F71B25F9 73D74552 25DFD03A D8D1338F 6792C80547A81019 795B5AAE 035400BB F859DABF 21892B5B E71A8283 08950414 8633A8B2C98565A6 C09CA641 88661402 ACC424FD 36F23360 ABFF4C55 BB23C66A C80A3A575EE85FF8 C1B1A540 E818CE6D 58131726 BB060974 4E1A2F4B E6195522 122457F3DEDBAAD7 3780136E B112A6quitStep 2
Use the show crypto pki server command to verify the status of the CA server after a boot procedure.
Router# show crypto pki serverCertificate Server srstcaserver: Status: enabled Server's configuration is locked (enter "shut" to unlock it) Issuer name: CN=srstcaserver CA cert fingerprint: AC9919F5 CAFE0560 92B3478A CFF5EC00 Granting mode is: auto Last certificate issued serial number: 0x2 CA certificate expiration timer: 13:46:57 PST Dec 1 2007 CRL NextUpdate timer: 14:54:57 PST Jan 19 2005 Current storage dir: nvram Database Level: Complete - all issued certs written as <serialnum>.cerEnabling Credentials Service on the Secure SRST Router
Once the SRST router has its own certificate, you need to provide Cisco CallManager the certificate. Enabling credentials service allows Cisco CallManager to retrieve the secure SRST device certificate and place it in the configuration file of the Cisco IP phone.
Activate credentials service on all SRST routers.
Note
SUMMARY STEPS
1.
2.
3.
4.
DETAILED STEPS
Step 1
credentialsExample:Router(config)# credentialsProvides the SRST router certificate to Cisco CallManager and enters credentials configuration mode.
Step 2
ip source-address ip-address [port port]
Example:Router(config-credentials)# ip source-address 10.1.1.22 port 2445
Enables the SRST router to receive messages from Cisco CallManager through the specified IP address and port.
•
•
Step 3
trustpoint trustpoint-name
Example:Router(config-credentials)# trustpoint srstca
Specifies the name of the trustpoint that is to be associated with the SRST router certificate. The trustpoint-name argument is the name of the trustpoint and corresponds to the SRST device certificate.
•
Step 4
exit
Example:Router(config-credentials)# exit
Exits credentials configuration mode.
Examples
Router(config)# credentialsRouter(config-credentials)# ip source-address 10.1.1.22 port 2445Router(config-credentials)# trustpoint srstcaRouter(config-credentials)# exitTroubleshooting Credential Settings
The following steps display credential settings or set debugging on the credential settings of the SRST router.
SUMMARY STEPS
1.
2.
DETAILED STEPS
Step 1
Use the show credentials command to display the credential settings on the SRST router that are supplied to Cisco CallManager for use during secure SRST fallback.
Router# show credentialsCredentials IP: 10.1.1.22Credentials PORT: 2445Trustpoint: srstcaStep 2
Use the debug credentials command to set debugging on the credential settings of the SRST router.
Router# debug credentialsCredentials server debugging is enabledRouter#Sep 29 01:01:50.903: Credentials service: Start TLS Handshake 1 10.1.1.13 2187Sep 29 01:01:50.903: Credentials service: TLS Handshake returns OPSSLReadWouldBlockErrSep 29 01:01:51.903: Credentials service: TLS Handshake returns OPSSLReadWouldBlockErrSep 29 01:01:52.907: Credentials service: TLS Handshake returns OPSSLReadWouldBlockErrSep 29 01:01:53.927: Credentials service: TLS Handshake completes.Importing Phone Certificate Files in PEM Format to the Secure SRST Router
This task completes the provisioning tasks required of Cisco IP phones to authenticate secure SRST. The secure SRST router must retrieve phone certificates so that it can authenticate Cisco IP phones during the TLS handshake. Different certificates are used for different IP phones. Table 7 lists the certificates needed for each type of phone.
You must manually import certificates from Cisco CallManager to the SRST router. The number of certificates depends on the Cisco CallManager configuration. Manual enrollment refers to cut and paste or TFTP. For manual enrollment instructions, see the Manual Certificate Enrollment (TFTP and Cut-and-Paste) feature. Repeat the enrollment procedure for each phone or PEM file.
Note
Certificates are located in Cisco CallManager in the following location: In the menu bar in Cisco CallManager, choose Program Files > Cisco > Certificates.
Note
SUMMARY STEPS
1.
2.
3.
4.
5.
DETAILED STEPS
Examples
The following example shows three certificates imported to the SRST router (7970, 7960, PEM).
Router(config)# crypto pki trustpoint 7970Router(ca-trustpoint)# revocation-check noneRouter(ca-trustpoint)# enrollment terminalRouter(ca-trustpoint)# exitRouter(config)# crypto pki authenticate 7970Enter the base 64 encoded CA certificate.End with a blank line or the word "quit" on a line by itselfMIIDqDCCApCgAwIBAgIQNT+yS9cPFKNGwfOprHJWdTANBgkqhkiG9w0BAQUFADAuMRYwFAYDVQQKEw1DaXNjbyBTeXN0ZW1zMRQwEgYDVQQDEwtDQVAtUlRQLTAwMjAeFw0wMzEwMTAyMDE4NDlaFw0yMzEwMTAyMDI3MzdaMC4xFjAUBgNVBAoTDUNpc2NvIFN5c3RlbXMxFDASBgNVBAMTC0NBUC1SVFAtMDAyMIIBIDANBgkqhkiG9w0BAQEFAAOCAQ0AMIIBCAKCAQEAxCZlBK19w/2NZVVvpjCPrpW1cCY7V1q9lhzI85RZZdnQ2M4CufgIzNa3zYxGJIAYeFfcRECnMB3f5A+x7xNiEuzE87UPvK+7S80uWCY0UhtlAVVf5NQgZ3YDNoNXg5MmONb8lT86F55EZyVac0XGne77TSIbIdejrTgYQXGP2MJxQhg+ZQlGFDRzbHfM84Duv2Msez+l+SqmqO80kIckqE9Nr3/XCSj1hXZNNVg8D+mvHth2P6KZqAKXAAStGRLSZX3jNbS8tveJ3Gi5+sj9+F6KKK2PD0iDwHcRKkcUHb7glI++U/5nswjUDIAph715Ds2rn9ehkMGipGLF8kpuCwIBA6OBwzCBwDALBgNVHQ8EBAMCAYYwDwYDVR0TAQH/BAUwAwEB/zAdBgNVHQ4EFgQUUpIr4ojuLgmKTn5wLFalmrTUm5YwbwYDVR0fBGgwZjBkoGKgYIYtaHR0cDovL2NhcC1ydHAtMDAyL0NlcnRFbnJvbGwvQ0FQLVJUUC0wMDIuY3Jshi9maWxlOi8vXFxjYXAtcnRwLTAwMlxDZXJ0RW5yb2xsXENBUC1SVFAtMDAyLmNybDAQBgkrBgEEAYI3FQEEAwIBADANBgkqhkiG9w0BAQUFAAOCAQEAVoOM78TaOtHqj7sVL/5u5VChlyvU168f0piJLNWip2vDRihmE+DlXdwMS5JaqUtuaSd/m/xzxpcRJm4ZRRwPq6VeaiiQGkjFuZEe5jSKiSAK7eHgtup4HP/ZfKSwPA40DlsGSYsKNMm3OmVOCQUMH02lPkS/eEQ9sIw6QS7uuHN4y4CJNPnRbpFRLw06hnStCZHtGpKEHnY213QOy3h/EWhbnp0MZ+hdr20FujSI6G1+L39laRjeD708f2fYoz9wnEpZbtn2Kzse3uhU1Ygq1D1x9yuPq388C18HWdmCj4OVTXuxV6Y47H1yv/GJM8FvdgvKlExbGTFnlHpPiaG9tQ==quitCertificate has the following attributes:Fingerprint MD5: F7E150EA 5E6E3AC5 615FC696 66415C9FFingerprint SHA1: 1BE2B503 DC72EE28 0C0F6B18 798236D8 D3B18BE6% Do you accept this certificate? [yes/no]: yTrustpoint CA certificate accepted.% Certificate successfully importedRouter(config)# crypto pki trustpoint 7960Router(ca-trustpoint)# revocation-check noneRouter(ca-trustpoint)# enrollment terminalRouter(ca-trustpoint)# exitRouter(config)# crypto pki authenticate 7960Enter the base 64 encoded CA certificate.End with a blank line or the word "quit" on a line by itselfMIICKDCCAZGgAwIBAgIC8wEwDQYJKoZIhvcNAQEFBQAwQDELMAkGA1UEBhMCVVMxGjAYBgNVBAoTEUNpc2NvIFN5c3RlbXMgSW5jMRUwEwYDVQQDEwxDQVBGLTdEN0QwQzAwHhcNMDQwNzE1MjIzODMyWhcNMTkwNzEyMjIzODMxWjBAMQswCQYDVQQGEwJVUzEaMBgGA1UEChMRQ2lzY28gU3lzdGVtcyBJbmMxFTATBgNVBAMTDENBUEYtN0Q3RDBDMDCBnzANBgkqhkiG9w0BAQEFAAOBjQAwgYkCgYEA0hvMOZZ9ENYWme11YGY1it2rvE3Nk/eqhnv8P9eqB1iqt+fFBeAG0WZ5bO5FetdU+BCmPnddvAeSpsfr3Z+hx+r58fOEIBRHQLgnDZ+nwYH39uwXcRWWqWwlW147YHjV7M5c/R8T6daCx4B5NBo6kdQdQNOrV3IP7kQaCShdM/kCAwEAAaMxMC8wDgYDVR0PAQH/BAQDAgKEMB0GA1UdJQQWMBQGCCsGAQUFBwMBBggrBgEFBQcDBTANBgkqhkiG9w0BAQUFAAOBgQCaNi6xsL6M5NlDezpSBO3QmUVyXMfrONV2ysrSwcXzHu0gJ9MSJ8TwiQmVaJ47hSTlF5a8YVYJ0IdifXbXRo+/EEO7kkmFE8MZta5rM7UWj8bAeR42iqA3RzQaDwuJgNWT9FhhGgfuNAlo5h1AikxsvxivmDlLdZyCMoqJJd7B2Q==quitCertificate has the following attributes:Fingerprint MD5: 4B9636DF 0F3BA6B7 5F54BE72 24762DBCFingerprint SHA1: A9917775 F86BB37A 5C130ED2 3E528BB8 286E8C2D% Do you accept this certificate? [yes/no]: yTrustpoint CA certificate accepted.% Certificate successfully importedRouter(config)# crypto pki trustpoint PEMRouter(ca-trustpoint)# revocation-check noneRouter(ca-trustpoint)# enrollment terminalRouter(ca-trustpoint)# exit Router(config)# crypto pki authenticate PEMEnter the base 64 encoded CA certificate.End with a blank line or the word "quit" on a line by itselfMIIDqDCCApCgAwIBAgIQdhL5YBU9b59OQiAgMrcjVjANBgkqhkiG9w0BAQUFADAuMRYwFAYDVQQKEw1DaXNjbyBTeXN0ZW1zMRQwEgYDVQQDEwtDQVAtUlRQLTAwMTAeFw0wMzAyMDYyMzI3MTNaFw0yMzAyMDYyMzM2MzRaMC4xFjAUBgNVBAoTDUNpc2NvIFN5c3RlbXMxFDASBgNVBAMTC0NBUC1SVFAtMDAxMIIBIDANBgkqhkiG9w0BAQEFAAOCAQ0AMIIBCAKCAQEArFW77Rjem4cJ/7yPLVCauDohwZZ/3qf0sJaWlLeAzBlqRj2lFlSij0ddkDtfEEo9VKmBOJsvx6xJlWJiuBwUMDhTRbsuJz+npkaGBXPOXJmNVd54qlpc/hQDfWlbrIFkCcYhHws7vwnPsLuy1Kw2L2cP0UXxYghSsx8H4vGqdPFQNnYy7aKJ43SvDFt4zn37n8jrvlRuz0x3mdbcBEdHbA825Yo7a8sk12tshMJ/YdMmvny0pmDNZXmeHjqEgVO3UFUn6GVCO+K1y1dUU1qpYJNYtqLkqj7wgccGjsHdHr3aU+bw1uLgSGsQnxMWeMaWo8+6hMxwlANPweufgZMaywIBA6OBwzCBwDALBgNVHQ8EBAMCAYYwDwYDVR0TAQH/BAUwAwEB/zAdBgNVHQ4EFgQU6Rexgscfz6ypG270qSaccK4FoJowbwYDVR0fBGgwZjBkoGKgYIYtaHR0cDovL2NhcC1ydHAtMDAxL0NlcnRFbnJvbGwvQ0FQLVJUUC0wMDEuY3Jshi9maWxlOi8vXFxjYXAtcnRwLTAwMVxDZXJ0RW5yb2xsXENBUC1SVFAtMDAxLmNybDAQBgkrBgEEAYI3FQEEAwIBADANBgkqhkiG9w0BAQUFAAOCAQEAq2T96/YMMtw2Dw4QX+F1+g1XSrUCrNyjx7vtFaRDHyB+kobwdwkpohfkzfTyYpJELzV1r+kMRoyuZ7oIqqccEroMDnnmeApc+BRGbDJqS1Zzk4OAc6Ea7fm53nQRlcSPmUVLjDBzKYDNbnEjizptaIC5fgB/S9S6C1q0YpTZFn5tjUjyWXzeYSXPrcxb0UH7IQJ1ogpONAAUKLoPaZU7tVDSH3hD4+VjmLyysaLUhksGFrrNphzZrsVVilK17qpqCPllKLGAS4fSbkruq3r/6S/SpXS6/gAoljBKixP7ZW2PxgCU1aU9cURLPO95NDOFN3jBk3Sips7cVidcogowPQ==quitCertificate has the following attributes:Fingerprint MD5: 233C8E33 8632EA4E 76D79FEB FFB061C6Fingerprint SHA1: F7B40B94 5831D2AB 447AB8F2 25990732 227631BE% Do you accept this certificate? [yes/no]: yTrustpoint CA certificate accepted.% Certificate successfully importedUse the show crypto pki trustpoint status command to show that enrollment has succeeded and that five CA certificates were granted. The five certificates include the three certificates just entered and the CA server certificate and the SRST router certificate.
Router# show crypto pki trustpoint statusTrustpoint 7970:Issuing CA certificate configured:Subject Name:cn=CAP-RTP-002,o=Cisco SystemsFingerprint MD5: F7E150EA 5E6E3AC5 615FC696 66415C9FFingerprint SHA1: 1BE2B503 DC72EE28 0C0F6B18 798236D8 D3B18BE6State:Keys generated ............. Yes (General Purpose)Issuing CA authenticated ....... YesCertificate request(s) ..... NoneTrustpoint 7960:Issuing CA certificate configured:Subject Name:cn=CAPF-508A3754,o=Cisco Systems Inc,c=USFingerprint MD5: 6BAE18C2 0BCE391E DAE2FE4C 5810F576Fingerprint SHA1: B7735A2E 3A5C274F C311D7F1 3BE89942 355102DEState:Keys generated ............. Yes (General Purpose)Issuing CA authenticated ....... YesCertificate request(s) ..... NoneTrustpoint PEM:Issuing CA certificate configured:Subject Name:cn=CAP-RTP-001,o=Cisco SystemsFingerprint MD5: 233C8E33 8632EA4E 76D79FEB FFB061C6Fingerprint SHA1: F7B40B94 5831D2AB 447AB8F2 25990732 227631BEState:Keys generated ............. Yes (General Purpose)Issuing CA authenticated ....... YesCertificate request(s) ..... NoneTrustpoint srstcaserver:Issuing CA certificate configured:Subject Name:cn=srstcaserverFingerprint MD5: 6AF5B084 79C93F2B 76CC8FE6 8781AF5EFingerprint SHA1: 47D30503 38FF1524 711448B4 9763FAF6 3A8E7DCFState:Keys generated ............. Yes (General Purpose)Issuing CA authenticated ....... YesCertificate request(s) ..... NoneTrustpoint srstca:Issuing CA certificate configured:Subject Name:cn=srstcaserverFingerprint MD5: 6AF5B084 79C93F2B 76CC8FE6 8781AF5EFingerprint SHA1: 47D30503 38FF1524 711448B4 9763FAF6 3A8E7DCFRouter General Purpose certificate configured:Subject Name:serialNumber=F3246544+hostname=c2611XM-sSRST.cisco.comFingerprint: 35471295 1C907EC1 45B347BC 7A9C4B86State:Keys generated ............. Yes (General Purpose)Issuing CA authenticated ....... YesCertificate request(s) ..... YesConfiguring Cisco CallManager to the Secure SRST Router
The following tasks are performed in Cisco CallManager.
•
•
•
Adding an SRST Reference to Cisco CallManager
The following procedure describes how to add an SRST reference to Cisco CallManager.
Before following this procedure, verify that credentials service is running in the SRST router. Cisco CallManager connects to the SRST router for its device certificate. To enable credentials service, see the "Enabling Credentials Service on the Secure SRST Router" section.
For complete information on adding SRST to Cisco CallManager, see the "Survivable Remote Site Telephony Configuration" section of the Cisco CallManager Administration Guide, Release 4.1(2).
SUMMARY STEPS
1.
2.
3.
4.
5.
DETAILED STEPS
Step 1
Step 2
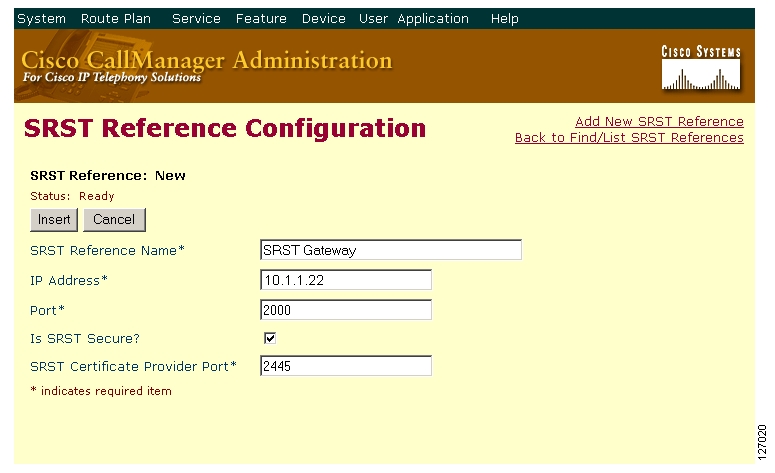
Step 3
a.
b.
c.
Figure 6 SRST Reference Configuration Window
Step 4
Step 5
Configuring SRST Fallback on Cisco CallManager
The following procedure describes how to configure SRST fallback on Cisco CallManager by assigning the device pool to SRST.
For complete information on adding a device pool to Cisco CallManager, see the "Device Pool Configuration" section of the Cisco CallManager Administration Guide, Release 4.1(2).
SUMMARY STEPS
1.
2.
3.
4.
5.
DETAILED STEPS
Step 1
Step 2
•
•
Step 3
Figure 7 Device Pool Configuration Window
Step 4
Step 5
Configuring CAPF on Cisco CallManager
The Certificate Authority Proxy Function (CAPF) process allows supported devices, such as Cisco CallManager, to request LSC certificates from Cisco IP phones. The CAPF utility generates a key pair and certificate that are specific for CAPF, and the utility copies this certificate to all Cisco CallManager servers in the cluster.
For complete instructions on configuring CAPF in Cisco CallManager, see the Cisco IP Phone Authentication and Encryption for Cisco CallManager documentation.
Enabling SRST Mode on the Secure SRST Router
To configure secure SRST on the router to support the Cisco IP phone functions, use the following commands beginning in global configuration mode.
SUMMARY STEPS
1.
2.
3.
4.
5.
6.
7.
8.
DETAILED STEPS
Step 1
call-manager-fallback
Example:Router(config)# call-manager-fallback
Enters call-manager-fallback configuration mode.
Step 2
secondary-dialtone digit-string
Example:Router(config-cm-fallback)# secondary-dialtone 9
Activates a secondary dial tone when a digit string is dialed.
Step 3
transfer-system {blind | full-blind | full-consult | local-consult}
Example:Router(config-cm-fallback)# transfer-system full-consult
Defines the call-transfer method for all lines served by the Cisco SRST router.
•
•
•
•
Step 4
ip source-address ip-address [port port]
Example:Router(config-cm-fallback)# ip source-address 10.1.1.22 port 2000
Enables the router to receive messages from the Cisco IP phones through the specified IP addresses and provides for strict IP address verification. The default port number is 2000.
Step 5
max-ephones max-phones
Example:Router(config-cm-fallback)# max-ephones 15Configures the maximum number of Cisco IP phones that can be supported by the router. The maximum number is platform dependent. The default is 0. See the "Platform and Memory Support" section on page 24 for further details.
Step 6
max-dn max-directory-numbers
Example:Router(config-cm-fallback)# max-dn 30
Sets the maximum number of directory numbers (DNs) or virtual voice ports that can be supported by the router.
•
Step 7
transfer-pattern transfer-patternExample:Router(config-cm-fallback)# transfer-pattern .....
Allows transfer of telephone calls by Cisco IP phones to specified phone number patterns.
•
Step 8
exit
Example:Router(config-cm-fallback)# exit
Exits call-manager-fallback configuration mode.
Examples
The following example enables SRST mode on your router.
Router(config)# call-manager-fallbackRouter(config-cm-fallback)# secondary-dialtone 9Router(config-cm-fallback)# transfer-system full-consultRouter(config-cm-fallback)# ip source-address 10.1.1.22 port 2000Router(config-cm-fallback)# max-ephones 15Router(config-cm-fallback)# max-dn 30Router(config-cm-fallback)# transfer-pattern .....Router(config-cm-fallback)# exitVerifying Phone Status and Registrations
To verify or troubleshoot IP phone status and registration, complete the following steps beginning in privileged EXEC mode.
SUMMARY STEPS
1.
2.
3.
4.
5.
DETAILED STEPS
Step 1
Use this command to display registered Cisco IP phones and their capabilities. The show ephone command also displays authentication and encryption status when used for secure SRST. In this example, authentication and encryption status is active with a TLS connection.
Router# show ephoneephone-1 Mac:1000.1111.0002 TCP socket:[5] activeLine:0 REGISTERED in SCCP ver 5+ Authentication + Encryption with TLS connectionmediaActive:0 offhook:0 ringing:0 reset:0 reset_sent:0 paging 0 debug:0IP:10.1.1.40 32626 7970 keepalive 390 max_line 8button 1: dn 14 number 2002 CM Fallback CH1 IDLEephone-2 Mac:1000.1111.000B TCP socket:[12] activeLine:0 REGISTERED in SCCP ver5 + Authentication + Encryption with TLS connectionmediaActive:0 offhook:0 ringing:0 reset:0 reset_sent:0 paging 0 debug:0IP:10.1.1.40 32718 7970 keepalive 390 max_line 8button 1: dn 21 number 2011 CM Fallback CH1 IDLEephone-3 Mac:1000.1111.000A TCP socket:[16] activeLine:0 REGISTERED in SCCP ver5 + Authentication + Encryption with TLS connectionmediaActive:0 offhook:0 ringing:0 reset:0 reset_sent:0 paging 0 debug:0IP:10.1.1.40 32862 7970 keepalive 390 max_line 8button 1: dn 2 number 2010 CM Fallback CH1 IDLEStep 2
Use this command to display Cisco IP phone status and quality for all phones that are off hook. In this example, authentication and encryption status is active with a TLS connection, and there is an active secure call.
Router# show ephone offhookephone-1 Mac:1000.1111.0002 TCP socket:[5] activeLine:1 REGISTERED in SCCP ver 5+ Authentication + Encryption with TLS connectionmediaActive:1 offhook:1 ringing:0 reset:0 reset_sent:0 paging 0:0IP:10.1.1.40 32626 7970 keepalive 391 max_line 8button 1: dn 14 number 2002 CM Fallback CH1 CONNECTEDActive Secure Call on DN 14 chan 1 :2002 10.1.1.40 29632 to 10.1.1.40 25616 via 10.1.1.40G711Ulaw64k 160 bytes no vadTx Pkts 295 bytes 49468 Rx Pkts 277 bytes 46531 Lost 0Jitter 0 Latency 0 callingDn 22 calledDn -1ephone-2 Mac:1000.1111.000B TCP socket:[12] activeLine:1 REGISTERED in SCCP ver5 + Authentication + Encryption with TLS connectionmediaActive:1 offhook:1 ringing:0 reset:0 reset_sent:0 paging 0 debug:0IP:10.1.1.40 32718 7970 keepalive 391 max_line 8button 1: dn 21 number 2011 CM Fallback CH1 CONNECTEDActive Secure Call on DN 21 chan 1 :2011 10.1.1.40 16382 to 10.1.1.40 16382 via 10.1.1.40G711Ulaw64k 160 bytes no vadTx Pkts 295 bytes 49468 Rx Pkts 277 bytes 46531 Lost 0Jitter 0 Latency 0 callingDn -1 calledDn 11Step 3
Use this command to show the call status for all voice ports on the Cisco SRST router. This command is not applicable for calls between two POTS dial peers.
Router# show voice call statusCallID CID ccVdb Port DSP/Ch Called # Codec Dial-peers0x1164 2BFE 0x8619A460 50/0/35.0 2014 g711ulaw 20035/200270x1165 2BFE 0x86144B78 50/0/27.0 *2014 g711ulaw 20027/200350x1166 2C01 0x861043D8 50/0/21.0 2012 g711ulaw 20021/200110x1168 2C01 0x860984C4 50/0/11.0 *2012 g711ulaw 20011/200210x1167 2C04 0x8610EC7C 50/0/22.0 2002 g711ulaw 20022/200140x1169 2C04 0x860B8894 50/0/14.0 *2002 g711ulaw 20014/200220x116A 2C07 0x860A374C 50/0/12.0 2010 g711ulaw 20012/200020x116B 2C07 0x86039700 50/0/2.0 *2010 g711ulaw 20002/200120x116C 2C0A 0x86119520 50/0/23.0 2034 g711ulaw 20023/200200x116D 2C0A 0x860F9150 50/0/20.0 *2034 g711ulaw 20020/200230x116E 2C0D 0x8608DC20 50/0/10.0 2022 g711ulaw 20010/200080x116F 2C0D 0x86078AD8 50/0/8.0 *2022 g711ulaw 20008/200100x1170 2C10 0x861398F0 50/0/26.0 2016 g711ulaw 20026/200280x1171 2C10 0x8614F41C 50/0/28.0 *2016 g711ulaw 20028/200260x1172 2C13 0x86159CC0 50/0/29.0 2018 g711ulaw 20029/200040x1173 2C13 0x8604E848 50/0/4.0 *2018 g711ulaw 20004/200290x1174 2C16 0x8612F04C 50/0/25.0 2026 g711ulaw 20025/200300x1175 2C16 0x86164F48 50/0/30.0 *2026 g711ulaw 20030/200250x1176 2C19 0x860D8C64 50/0/17.0 2032 g711ulaw 20017/200180x1177 2C19 0x860E4008 50/0/18.0 *2032 g711ulaw 20018/200170x1178 2C1C 0x860CE3C0 50/0/16.0 2004 g711ulaw 20016/200190x1179 2C1C 0x860EE8AC 50/0/19.0 *2004 g711ulaw 20019/200160x117A 2C1F 0x86043FA4 50/0/3.0 2008 g711ulaw 20003/200240x117B 2C1F 0x861247A8 50/0/24.0 *2008 g711ulaw 20024/200030x117C 2C22 0x8608337C 50/0/9.0 2020 g711ulaw 20009/200310x117D 2C22 0x8616F7EC 50/0/31.0 *2020 g711ulaw 20031/200090x117E 2C25 0x86063990 50/0/6.0 2006 g711ulaw 20006/200010x117F 2C25 0x85C6BE6C 50/0/1.0 *2006 g711ulaw 20001/200060x1180 2C28 0x860ADFF0 50/0/13.0 2029 g711ulaw 20013/200340x1181 2C28 0x8618FBBC 50/0/34.0 *2029 g711ulaw 20034/200130x1182 2C2B 0x860C3B1C 50/0/15.0 2036 g711ulaw 20015/200050x1183 2C2B 0x860590EC 50/0/5.0 *2036 g711ulaw 20005/200150x1184 2C2E 0x8617A090 50/0/32.0 2024 g711ulaw 20032/200070x1185 2C2E 0x8606E234 50/0/7.0 *2024 g711ulaw 20007/200320x1186 2C31 0x861A56E8 50/0/36.0 2030 g711ulaw 20036/200330x1187 2C31 0x86185318 50/0/33.0 *2030 g711ulaw 20033/2003618 active calls foundStep 4
Use this command to debug the process of Cisco IP phone registration.
Router# debug ephone register
EPHONE registration debugging is enabled*Jun 29 09:16:02.180: New Skinny socket accepted [2] (0 active)*Jun 29 09:16:02.180: sin_family 2, sin_port 51617, in_addr 10.5.43.177*Jun 29 09:16:02.180: skinny_socket_process: secure skinny sessions = 1*Jun 29 09:16:02.180: add_skinny_secure_socket: pid =155, new_sock=0, ip address = 10.5.43.177*Jun 29 09:16:02.180: skinny_secure_handshake: pid =155, sock=0, args->pid=155, ip address = 10.5.43.177*Jun 29 09:16:02.184: Start TLS Handshake 0 10.5.43.177 51617*Jun 29 09:16:02.184: TLS Handshake retcode OPSSLReadWouldBlockErr*Jun 29 09:16:03.188: TLS Handshake retcode OPSSLReadWouldBlockErr*Jun 29 09:16:04.188: TLS Handshake retcode OPSSLReadWouldBlockErr*Jun 29 09:16:05.188: TLS Handshake retcode OPSSLReadWouldBlockErr*Jun 29 09:16:06.188: TLS Handshake retcode OPSSLReadWouldBlockErr*Jun 29 09:16:07.188: TLS Handshake retcode OPSSLReadWouldBlockErr*Jun 29 09:16:08.188: CRYPTO_PKI_OPSSL - Verifying 1 Certs*Jun 29 09:16:08.212: TLS Handshake completesStep 5
Use this command to review call setup between two secure Cisco IP phones. The debug ephone state trace shows the generation and distribution of encryption and decryption keys between the two phones.
Router# debug ephone state*Jan 11 18:33:09.231:%SYS-5-CONFIG_I:Configured from console by console*Jan 11 18:33:11.747:ephone-2[2]:OFFHOOK*Jan 11 18:33:11.747:ephone-2[2]:---SkinnySyncPhoneDnOverlays is onhook*Jan 11 18:33:11.747:ephone-2[2]:SIEZE on activeLine 0 activeChan 1*Jan 11 18:33:11.747:ephone-2[2]:SetCallState line 1 DN 2(-1) chan 1 ref 6 TsOffHook*Jan 11 18:33:11.747:ephone-2[2]:Check Plar Number*Jan 11 18:33:11.751:DN 2 chan 1 Voice_Mode*Jan 11 18:33:11.751:dn_tone_control DN=2 chan 1 tonetype=33:DtInsideDialTone onoff=1 pid=232*Jan 11 18:33:15.031:dn_tone_control DN=2 chan 1 tonetype=0:DtSilence onoff=0 pid=232*Jan 11 18:33:16.039:ephone-2[2]:Skinny-to-Skinny call DN 2 chan 1 to DN 4 chan 1 instance 1*Jan 11 18:33:16.039:ephone-2[2]:SetCallState line 1 DN 2(-1) chan 1 ref 6 TsProceed*Jan 11 18:33:16.039:ephone-2[2]:SetCallState line 1 DN 2(-1) chan 1 ref 6 TsRingOut*Jan 11 18:33:16.039:ephone-2[2]::callingNumber 6000*Jan 11 18:33:16.039:ephone-2[2]::callingParty 6000*Jan 11 18:33:16.039:ephone-2[2]:Call Info DN 2 line 1 ref 6 call state 1 called 6001 calling 6000 origcalled*Jan 11 18:33:16.039:ephone-2[2]:Call Info DN 2 line 1 ref 6 called 6001 calling 6000 origcalled 6001 calltype 2*Jan 11 18:33:16.039:ephone-2[2]:Call Info for chan 1*Jan 11 18:33:16.039:ephone-2[2]:Original Called Name 6001*Jan 11 18:33:16.039:ephone-2[2]:6000 calling*Jan 11 18:33:16.039:ephone-2[2]:6001*Jan 11 18:33:16.047:ephone-3[3]:SetCallState line 1 DN 4(4) chan 1 ref 7 TsRingIn*Jan 11 18:33:16.047:ephone-3[3]::callingNumber 6000*Jan 11 18:33:16.047:ephone-3[3]::callingParty 6000*Jan 11 18:33:16.047:ephone-3[3]:Call Info DN 4 line 1 ref 7 call state 7 called 6001 calling 6000 origcalled*Jan 11 18:33:16.047:ephone-3[3]:Call Info DN 4 line 1 ref 7 called 6001 calling 6000 origcalled 6001 calltype 1*Jan 11 18:33:16.047:ephone-3[3]:Call Info for chan 1*Jan 11 18:33:16.047:ephone-3[3]:Original Called Name 6001*Jan 11 18:33:16.047:ephone-3[3]:6000 calling*Jan 11 18:33:16.047:ephone-3[3]:6001*Jan 11 18:33:16.047:ephone-3[3]:Ringer Inside Ring On*Jan 11 18:33:16.051:dn_tone_control DN=2 chan 1 tonetype=36:DtAlertingTone onoff=1 pid=232*Jan 11 18:33:20.831:ephone-3[3]:OFFHOOK*Jan 11 18:33:20.831:ephone-3[3]:---SkinnySyncPhoneDnOverlays is onhook*Jan 11 18:33:20.831:ephone-3[3]:Ringer Off*Jan 11 18:33:20.831:ephone-3[3]:ANSWER call*Jan 11 18:33:20.831:ephone-3[3]:SetCallState line 1 DN 4(-1) chan 1 ref 7 TsOffHook*Jan 11 18:33:20.831:ephone-3[3][SEP000DEDAB3EBF]:Answer Incoming call from ephone-(2) DN 2 chan 1*Jan 11 18:33:20.831:ephone-3[3]:SetCallState line 1 DN 4(-1) chan 1 ref 7 TsConnected*Jan 11 18:33:20.831:defer_start for DN 2 chan 1 at CONNECTED*Jan 11 18:33:20.831:ephone-2[2]:SetCallState line 1 DN 2(-1) chan 1 ref 6 TsConnected*Jan 11 18:33:20.835:ephone-3[3]::callingNumber 6000*Jan 11 18:33:20.835:ephone-3[3]::callingParty 6000*Jan 11 18:33:20.835:ephone-3[3]:Call Info DN 4 line 1 ref 7 call state 4 called 6001 calling 6000 origcalled*Jan 11 18:33:20.835:ephone-3[3]:Call Info DN 4 line 1 ref 7 called 6001 calling 6000 origcalled 6001 calltype 1*Jan 11 18:33:20.835:ephone-3[3]:Call Info for chan 1*Jan 11 18:33:20.835:ephone-3[3]:Original Called Name 6001*Jan 11 18:33:20.835:ephone-3[3]:6000 calling*Jan 11 18:33:20.835:ephone-3[3]:6001*Jan 11 18:33:20.835:ephone-2[2]:Security Key Generation! Ephone 2 generates a security key.*Jan 11 18:33:20.835:ephone-2[2]:OpenReceive DN 2 chan 1 codec 4:G711Ulaw64k duration 20 ms bytes 160*Jan 11 18:33:20.835:ephone-2[2]:Send Decryption Key! Ephone 2 sends the decryption key.*Jan 11 18:33:20.835:ephone-3[3]:Security Key Generation!Ephone 3 generates its security key.*Jan 11 18:33:20.835:ephone-3[3]:OpenReceive DN 4 chan 1 codec 4:G711Ulaw64k duration 20 ms bytes 160*Jan 11 18:33:20.835:ephone-3[3]:Send Decryption Key! Ephone 3 sends its decryption key.*Jan 11 18:33:21.087:dn_tone_control DN=2 chan 1 tonetype=0:DtSilence onoff=0 pid=232*Jan 11 18:33:21.087:DN 4 chan 1 Voice_Mode*Jan 11 18:33:21.091:DN 2 chan 1 End Voice_Mode*Jan 11 18:33:21.091:DN 2 chan 1 Voice_Mode*Jan 11 18:33:21.095:ephone-2[2]:OpenReceiveChannelAck:IP 1.1.1.8, port=25552,dn_index=2, dn=2, chan=1*Jan 11 18:33:21.095:ephone-3[3]:StartMedia 1.1.1.8 port=25552*Jan 11 18:33:21.095:DN 2 chan 1 codec 4:G711Ulaw64k duration 20 ms bytes 160*Jan 11 18:33:21.095:ephone-3[3]:Send Encryption Key! Ephone 3 sends its encryption key.*Jan 11 18:33:21.347:ephone-3[3]:OpenReceiveChannelAck:IP 1.1.1.9, port=17520,dn_index=4, dn=4, chan=1*Jan 11 18:33:21.347:ephone-2[2]:StartMedia 1.1.1.9 port=17520*Jan 11 18:33:21.347:DN 2 chan 1 codec 4:G711Ulaw64k duration 20 ms bytes 160*Jan 11 18:33:21.347:ephone-2[2]:Send Encryption Key!Ephone 2 sends its encryption key.*Jan 11 18:33:21.851:ephone-2[2]::callingNumber 6000*Jan 11 18:33:21.851:ephone-2[2]::callingParty 6000*Jan 11 18:33:21.851:ephone-2[2]:Call Info DN 2 line 1 ref 6 call state 4 called 6001 calling 6000 origcalled*Jan 11 18:33:21.851:ephone-2[2]:Call Info DN 2 line 1 ref 6 called 6001 calling 6000 origcalled 6001 calltype 2*Jan 11 18:33:21.851:ephone-2[2]:Call Info for chan 1*Jan 11 18:33:21.851:ephone-2[2]:Original Called Name 6001*Jan 11 18:33:21.851:ephone-2[2]:6000 calling*Jan 11 18:33:21.851:ephone-2[2]:6001
Configuration Examples for Secure SRST
This section provides the following configuration examples.
•
Note
Secure SRST: Example
This section provides a configuration example to match the identified configuration tasks in the previous sections. This example does not include using a third-party CA; it assumes the use of the Cisco IOS certificate server to generate your certificates.
Router# show running-config...! Define CallManager.ccm-manager fallback-mgcpccm-manager mgcpccm-manager music-on-holdccm-manager config server 10.1.1.13ccm-manager config!! Define root CA.crypto pki server srstcaserverdatabase level completedatabase url nvram
issuer-name CN=srstcaserver
!crypto pki trustpoint srstcaenrollment url http://10.1.1.22:80revocation-check none!crypto pki trustpoint srstcaserverrevocation-check nonersakeypair srstcaserver!! Define CTL/7970 trustpoint.crypto pki trustpoint 7970enrollment terminalrevocation-check none!crypto pki trustpoint PEMenrollment terminalrevocation-check none!! Define CAPF/7960 trustpoint.crypto pki trustpoint 7960enrollment terminalrevocation-check none!! SRST router device certificate.crypto pki certificate chain srstcacertificate 02308201AD 30820116 A0030201 02020102 300D0609 2A864886 F70D0101 0405003017311530 13060355 0403130C 73727374 63617365 72766572 301E170D 3034303431323139 35323233 5A170D30 35303431 32313935 3232335A 30343132 300F060355040513 08443042 39453739 43301F06 092A8648 86F70D01 09021612 6A61736F32363931 2E636973 636F2E63 6F6D305C 300D0609 2A864886 F70D0101 010500034B003048 024100D7 0CC354FB 5F7C1AE7 7A25C3F2 056E0485 22896D36 6CA70C19C98F9BAE AE9D1F9B D4BB7A67 F3251174 193BB1A3 12946123 E5C1CCD7 A23E6155FA2ED743 3FB8B902 03010001 A330302E 300B0603 551D0F04 04030205 A0301F0603551D23 04183016 8014F829 CE97AD60 18D05467 FC293963 C2470691 F9BD300D06092A86 4886F70D 01010405 00038181 007EB48E CAE9E1B3 D1E7A185 D7F0D565CB84B17B 1151BD78 B3E39763 59EC650E 49371F6D 99CBD267 EB8ADF9D 9E43A5F2FB2B18A0 34AF6564 11239473 41478AFC A86E6DA1 AC518E0B 8657CEBB ED2BDE8EB586FE67 00C358D4 EFDD8D44 3F423141 C2D331D3 1EE43B6E 6CB29EE7 0B8C2752C3AF4A66 BD007348 D013000A EA3C206D CFquitcertificate ca 0130820207 30820170 A0030201 02020101 300D0609 2A864886 F70D0101 0405003017311530 13060355 0403130C 73727374 63617365 72766572 301E170D 3034303431323139 34353136 5A170D30 37303431 32313934 3531365A 30173115 3013060355040313 0C737273 74636173 65727665 7230819F 300D0609 2A864886 F70D010101050003 818D0030 81890281 8100C3AF EE1E4BB1 9922A8DA 2BB9DC8E 5B1BD3321051C9FE 32A971B3 3C336635 74691954 98E765B1 059E24B6 32154E99 105CA9899619993F CC72C525 7357EBAC E6335A32 2AAF9391 99325BFD 9B8355EB C10F89639D8FC222 EE8AC831 71ACD3A7 4E918A8F D5775159 76FBF499 5AD0849D CAA41417DD866902 21E5DD03 C37D4B28 0FAB0203 010001A3 63306130 0F060355 1D130101FF040530 030101FF 300E0603 551D0F01 01FF0404 03020186 301D0603 551D0E04160414F8 29CE97AD 6018D054 67FC2939 63C24706 91F9BD30 1F060355 1D23041830168014 F829CE97 AD6018D0 5467FC29 3963C247 0691F9BD 300D0609 2A864886F70D0101 04050003 8181007A F71B25F9 73D74552 25DFD03A D8D1338F 6792C80547A81019 795B5AAE 035400BB F859DABF 21892B5B E71A8283 08950414 8633A8B2C98565A6 C09CA641 88661402 ACC424FD 36F23360 ABFF4C55 BB23C66A C80A3A575EE85FF8 C1B1A540 E818CE6D 58131726 BB060974 4E1A2F4B E6195522 122457F3DEDBAAD7 3780136E B112A6quitcrypto pki certificate chain srstcaservercertificate ca 0130820207 30820170 A0030201 02020101 300D0609 2A864886 F70D0101 0405003017311530 13060355 0403130C 73727374 63617365 72766572 301E170D 3034303431323139 34353136 5A170D30 37303431 32313934 3531365A 30173115 3013060355040313 0C737273 74636173 65727665 7230819F 300D0609 2A864886 F70D010101050003 818D0030 81890281 8100C3AF EE1E4BB1 9922A8DA 2BB9DC8E 5B1BD3321051C9FE 32A971B3 3C336635 74691954 98E765B1 059E24B6 32154E99 105CA9899619993F CC72C525 7357EBAC E6335A32 2AAF9391 99325BFD 9B8355EB C10F89639D8FC222 EE8AC831 71ACD3A7 4E918A8F D5775159 76FBF499 5AD0849D CAA41417DD866902 21E5DD03 C37D4B28 0FAB0203 010001A3 63306130 0F060355 1D130101FF040530 030101FF 300E0603 551D0F01 01FF0404 03020186 301D0603 551D0E04160414F8 29CE97AD 6018D054 67FC2939 63C24706 91F9BD30 1F060355 1D23041830168014 F829CE97 AD6018D0 5467FC29 3963C247 0691F9BD 300D0609 2A864886F70D0101 04050003 8181007A F71B25F9 73D74552 25DFD03A D8D1338F 6792C80547A81019 795B5AAE 035400BB F859DABF 21892B5B E71A8283 08950414 8633A8B2C98565A6 C09CA641 88661402 ACC424FD 36F23360 ABFF4C55 BB23C66A C80A3A575EE85FF8 C1B1A540 E818CE6D 58131726 BB060974 4E1A2F4B E6195522 122457F3DEDBAAD7 3780136E B112A6quitcrypto pki certificate chain 7970certificate ca 353FB24BD70F14A346C1F3A9AC725675308203A8 30820290 A0030201 02021035 3FB24BD7 0F14A346 C1F3A9AC 725675300D06092A 864886F7 0D010105 0500302E 31163014 06035504 0A130D43 6973636F20537973 74656D73 31143012 06035504 03130B43 41502D52 54502D30 3032301E170D3033 31303130 32303138 34395A17 0D323331 30313032 30323733 375A302E31163014 06035504 0A130D43 6973636F 20537973 74656D73 31143012 0603550403130B43 41502D52 54502D30 30323082 0120300D 06092A86 4886F70D 0101010500038201 0D003082 01080282 010100C4 266504AD 7DC3FD8D 65556FA6 308FAE95B570263B 575ABD96 1CC8F394 5965D9D0 D8CE02B9 F808CCD6 B7CD8C46 2480187857DC4440 A7301DDF E40FB1EF 136212EC C4F3B50F BCAFBB4B CD2E5826 34521B6501555FE4 D4206776 03368357 83932638 D6FC953F 3A179E44 67255A73 45C69DEEFB4D221B 21D7A3AD 38184171 8FD8C271 42183E65 09461434 736C77CC F380EEBF632C7B3F A5F92AA6 A8EF3490 8724A84F 4DAF7FD7 0928F585 764D3558 3C0FE9AF1ED8763F A299A802 970004AD 1912D265 7DE335B4 BCB6F789 DC68B9FA C8FDF85E8A28AD8F 0F4883C0 77112A47 141DBEE0 948FBE53 FE67B308 D40C8029 87BD790ECDAB9FD7 A190C1A2 A462C5F2 4A6E0B02 0103A381 C33081C0 300B0603 551D0F0404030201 86300F06 03551D13 0101FF04 05300301 01FF301D 0603551D 0E0416041452922B E288EE2E 098A4E7E 702C56A5 9AB4D49B 96306F06 03551D1F 046830663064A062 A060862D 68747470 3A2F2F63 61702D72 74702D30 30322F43 657274456E726F6C 6C2F4341 502D5254 502D3030 322E6372 6C862F66 696C653A 2F2F5C5C6361702D 7274702D 3030325C 43657274 456E726F 6C6C5C43 41502D52 54502D3030322E63 726C3010 06092B06 01040182 37150104 03020100 300D0609 2A864886F70D0101 05050003 82010100 56838CEF C4DA3AD1 EA8FBB15 2FFE6EE5 50A1972BD4D7AF1F D298892C D5A2A76B C3462866 13E0E55D DC0C4B92 5AA94B6E 69277F9BFC73C697 11266E19 451C0FAB A55E6A28 901A48C5 B9911EE6 348A8920 0AEDE1E0B6EA781C FFD97CA4 B03C0E34 0E5B0649 8B0A34C9 B73A654E 09050C1F 4DA53E44BF78443D B08C3A41 2EEEB873 78CB8089 34F9D16E 91512F0D 3A8674AD 0991ED1A92841E76 36D7740E CB787F11 685B9E9D 0C67E85D AF6D05BA 3488E86D 7E2F7F656918DE0F BD3C7F67 D8A33F70 9C4A596E D9F62B3B 1EDEE854 D5882AD4 3D71F72B8FAB7F3C 0B5F0759 D9828F83 954D7BB1 57A638EC 7D72BFF1 8933C16F 760BCA944C5B1931 67947A4F 89A1BDB5quitcrypto pki certificate chain PEMcertificate ca 7612F960153D6F9F4E42202032B72356308203A8 30820290 A0030201 02021076 12F96015 3D6F9F4E 42202032 B72356300D06092A 864886F7 0D010105 0500302E 31163014 06035504 0A130D43 6973636F20537973 74656D73 31143012 06035504 03130B43 41502D52 54502D30 3031301E170D3033 30323036 32333237 31335A17 0D323330 32303632 33333633 345A302E31163014 06035504 0A130D43 6973636F 20537973 74656D73 31143012 0603550403130B43 41502D52 54502D30 30313082 0120300D 06092A86 4886F70D 0101010500038201 0D003082 01080282 010100AC 55BBED18 DE9B8709 FFBC8F2D 509AB83A21C1967F DEA7F4B0 969694B7 80CC196A 463DA516 54A28F47 5D903B5F 104A3D54A981389B 2FC7AC49 956262B8 1C143038 5345BB2E 273FA7A6 46860573 CE5C998D55DE78AA 5A5CFE14 037D695B AC816409 C6211F0B 3BBF09CF B0BBB2D4 AC362F670FD145F1 620852B3 1F07E2F1 AA74F150 367632ED A289E374 AF0C5B78 CE7DFB9FC8EBBE54 6ECF4C77 99D6DC04 47476C0F 36E58A3B 6BCB24D7 6B6C84C2 7F61D326BE7CB4A6 60CD6579 9E1E3A84 8153B750 5527E865 423BE2B5 CB575453 5AA9609358B6A2E4 AA3EF081 C7068EC1 DD1EBDDA 53E6F0D6 E2E0486B 109F1316 78C696A3CFBA84CC 7094034F C1EB9F81 931ACB02 0103A381 C33081C0 300B0603 551D0F0404030201 86300F06 03551D13 0101FF04 05300301 01FF301D 0603551D 0E04160414E917B1 82C71FCF ACA91B6E F4A9269C 70AE05A0 9A306F06 03551D1F 046830663064A062 A060862D 68747470 3A2F2F63 61702D72 74702D30 30312F43 657274456E726F6C 6C2F4341 502D5254 502D3030 312E6372 6C862F66 696C653A 2F2F5C5C6361702D 7274702D 3030315C 43657274 456E726F 6C6C5C43 41502D52 54502D3030312E63 726C3010 06092B06 01040182 37150104 03020100 300D0609 2A864886F70D0101 05050003 82010100 AB64FDEB F60C32DC 360F0E10 5FE175FA 0D574AB502ACDCA3 C7BBED15 A4431F20 7E9286F0 770929A2 17E4CDF4 F2629244 2F3575AFE90C468C AE67BA08 AAA71C12 BA0C0E79 E6780A5C F814466C 326A4B56 7393838073A11AED F9B9DE74 1195C48F 99454B8C 30732980 CD6E7123 8B3A6D68 80B97E007F4BD4BA 0B5AB462 94D9167E 6D8D48F2 597CDE61 25CFADCC 5BD141FB 210275A20A4E3400 1428BA0F 69953BB5 50D21F78 43E3E563 98BCB2B1 A2D4864B 0616BACDA61CD9AE C5558A52 B5EEAA6A 08F96528 B1804B87 D26E4AEE AB7AFFE9 2FD2A574BAFE0028 96304A8B 13FB656D 8FC60094 D5A53D71 444B3CEF 79343385 3778C19374A2A6CE DC56275C A20A303Dquitcrypto pki certificate chain 7960certificate ca F301308201F7 30820160 A0030201 020202F3 01300D06 092A8648 86F70D01 010505003041310B 30090603 55040613 02555331 1A301806 0355040A 13114369 73636F2053797374 656D7320 496E6331 16301406 03550403 130D4341 50462D33 3545303833333230 1E170D30 34303430 39323035 3530325A 170D3139 30343036 3230353530315A30 41310B30 09060355 04061302 5553311A 30180603 55040A13 11436973636F2053 79737465 6D732049 6E633116 30140603 55040313 0D434150 462D333545303833 33323081 9F300D06 092A8648 86F70D01 01010500 03818D00 30818902818100C8 BD9B6035 366B44E8 0F693A47 250FF865 D76C35F7 89B1C4FD 1D122CE0F5E5CDFF A4A87EFF 41AD936F E5C93163 3E55D11A AF82A5F6 D563E21C EB89EBFAF5271423 C3E875DC E0E07967 6E1AAB4F D3823E12 53547480 23BA1A09 295179B685A0E83A 77DD0633 B9710A88 0890CD4D DB55ADD0 964369BA 489043BB B667E60F93954B02 03010001 300D0609 2A864886 F70D0101 05050003 81810056 60FD3AB36F98D2AD 40C309E2 C05B841C 5189271F 01D864E8 98BCE665 2AFBCC8C 54007A848F772C67 E3047A6C C62F6508 B36A6174 B68C1D78 C2228FEA A89ECEFB CC8BA9FC0F30E151 431670F9 918514D9 868D1235 18137F1E 50DFD32E 1DC29CB7 95EF4096421AF22F 5C1D5804 B83F8E8E 95B04F45 86563BFE DF976C5B FB490Aquit!!no crypto isakmp enable!! Enable IPSec.crypto isakmp policy 1authentication pre-sharelifetime 28800crypto isakmp key cisco123 address 10.1.1.13! The crypto key should match the key configured on Cisco CallManager.!! The crypto IPSec configuration should match your Cisco CallManager configuration.crypto ipsec transform-set rtpset esp-des esp-md5-hmac!!crypto map rtp 1 ipsec-isakmpset peer 10.1.1.13set transform-set rtpsetmatch address 116!!interface FastEthernet0/0ip address 10.1.1.22 255.255.255.0duplex autospeed autocrypto map rtp!interface FastEthernet0/1no ip addressshutdownduplex autospeed auto!ip classless!ip http serverno ip http secure-server!!! Define traffic to be encrypted by IPSec.access-list 116 permit ip host 10.1.1.22 host 10.1.1.13!!control-plane!!call application alternate DEFAULT!!voice-port 1/0/0!voice-port 1/0/1!voice-port 1/0/2!voice-port 1/0/3!voice-port 1/1/0timing hookflash-out 50!voice-port 1/1/1!voice-port 1/1/2!voice-port 1/1/3!! Enable MGCP voice protocol.mgcpmgcp call-agent 10.1.1.13 2427 service-type mgcp version 0.1mgcp dtmf-relay voip codec all mode out-of-bandmgcp rtp unreachable timeout 1000 action notifymgcp package-capability rtp-packagemgcp package-capability sst-packageno mgcp package-capability fxr-packageno mgcp timer receive-rtcpmgcp sdp simplemgcp fax t38 inhibitmgcp rtp payload-type g726r16 static!mgcp profile default!!dial-peer voice 81235 potsapplication mgcpappdestination-pattern 81235port 1/1/0forward-digits all!dial-peer voice 81234 potsapplication mgcpappdestination-pattern 81234port 1/0/0!dial-peer voice 999100 potsapplication mgcpappport 1/0/0!dial-peer voice 999110 potsapplication mgcpappport 1/1/0!!! Enable credentials service on the gateway.credentialsip source-address 10.1.1.22 port 2445trustpoint srstca!!! Enable SRST mode.call-manager-fallbacksecondary-dialtone 9transfer-system full-consultip source-address 10.1.1.22 port 2000max-ephones 15max-dn 30transfer-pattern ........Control Plane Policing: Example
This section provides a configuration example for the security best practice of protecting the credentials service port using control plane policing. Control plane policing protects the gateway and maintains packet forwarding and protocol states despite a heavy traffic load. For more information on control planes, see the Control Plane Policing documentation.
Router# show running-config...! Allow trusted host traffic. access-list 140 deny tcp host 10.1.1.11 any eq 2445 ! Rate-limit all other traffic. access-list 140 permit tcp any any eq 2445 access-list 140 deny ip any any ! Define class-map "sccp-class." class-map match-all sccp-class match access-group 140 policy-map control-plane-policy class sccp-class police 8000 1500 1500 conform-action drop exceed-action drop ! Define aggregate control plane service for the active Route Processor. control-plane service-policy input control-plane-policy ...Where to Go Next
If you require voice mail, see the voice-mail configuration instructions in the " Integrating Voice Mail with Cisco SRST" chapter. You may also want to read the "Monitoring and Maintaining Cisco SRST" chapter.
Additional References
The following sections provide additional references related to Cisco secure SRST:
•
•
Related Documents
Standards
MIBs
RFCs
RFC 2246
The Transport Layer Security (TLS) Protocol Version 1.0
RFC 3711
The Secure Real-Time Transport Protocol (SRTP)
Technical Assistance
![]()
![]()
![]()
![]()
![]()
![]()
![]()
![]()
Posted: Mon Nov 27 11:15:23 PST 2006
All contents are Copyright © 1992--2006 Cisco Systems, Inc. All rights reserved.
Important Notices and Privacy Statement.