|
|

You can customize your Cisco Personal Assistant through the Preferences menu. Use this menu to turn Personal Assistant on and off, change your time zone setting or password, narrow directory searches, and specify alternate names for yourself, among other options.
The following sections describe customizing options in the preferences menu:
The Dial Rules feature allows you to insert a prefix before a number, or strip a prefix from a number.
It is unlikely that you will need to configure your dial rules, as this feature is primarily handled by your system administrator. However, in unusual cases, you might want to configure dial rules to insert a special access code or long distance prefix in front of particular phone numbers.
 |
Note The digits you enter in your personal address book generally dictate how your Personal Assistant dials outbound calls to parties external to the corporate directory. Because you can enter area codes, external line codes, and other dialing prefixes directly into your personal address book, you do not need to rely on the Dial Rules page to set up these dialing patterns. |
Use the following procedure to configure dial rules.
Personal Assistant opens the Dial Rules page.
Step 2 Fill in the fields that complete the dial rule. You do not need to fill in all of the fields. Dashes and parentheses are invisible to Personal Assistant.
Step 3 Click Add Rule.
Step 4 Personal Assistant displays your rule in text form, as shown in Figure 7-1.
Use the following procedures to configure your settings:
You can turn off rule processing without changing your rule-set schedule. Turning off rule processing de-activates the call-forwarding and screening feature only; it does not deactivate name dialing, voice mail browsing and conferencing features.
When you disable Personal Assistant's rule processing feature, your calls will be forwarded as they were before you turned it on. Typically, this means your incoming calls will reach your desk phone.
Personal Assistant opens the Settings page.
Step 2 Check the "Turn off Cisco Personal Assistant" check box, as shown in Figure 7-2.
Check the box again at the time that you want to enable the call-forwarding feature.
The following sections describe the alternate name feature and how to use it:
The alternate name feature allows Personal Assistant to recognize you by one or more alternate names that you specify. Alternate names are different from the version of your name that shows up in the corporate directory; but how different is up to you.
See the "When to Use the Alternate Name Feature" section.
In general, use the alternate name feature when you want to help callers reach you successfully through speech-enabled directory dialing or spell-by-name.
For example, use the alternate name feature to specify a shortened version of your name if people know you by the short version. While Personal Assistant already recognizes hundreds of common shortened names (Bill in place of William, for example), you might need to specify the shortened version of an uncommon name.
Because Personal Assistant knows how to "read" names for pronunciation, you can specify an alternate spelling of your name to provide an easy-to-say version. Callers may not know how to pronounce the name "Wei," for example. By looking at the spelling, callers might try to pronounce it like "Why." To make sure all callers can reach you through directory dialing, you might choose to enter "Why" as an alternate name.
Additionally, some callers may know your name by sound only, and think to spell it "Way." To make sure all callers can reach you through spell-by-name dialing, you might enter "Way" as an alternate name, as shown in Figure 7-3.
See the "How to Specify an Alternate Name" section for instructions.
The following section explains how to specify an alternate name for yourself.
Personal Assistant opens the Settings page.
Step 2 In the Alternate Name section of the Settings page, enter information in Name fields and click Add. You are not required to fill in both fields.
Step 3 To remove an alternate name, select the name and click Remove.
Personal Assistant cannot identify you by your newly established alternate name until your system administrator refreshes user information. System refreshes vary by company; check with your system administrator if you want information about the refresh schedule for your system.
If you build rules that include Time of Day limitations, it is important to set the time zone. You may need to reset the time zone when you travel.
Personal Assistant opens the Settings page.
Step 2 Select a time zone from the Time Zone drop-down menu.
Your time-based rules now reflect the new time zone.
Personal Assistant uses speech-enabled directory dialing to dial phone numbers based on your spoken commands. If you say, "Call Harriet Smith," for example, Personal Assistant searches both the corporate directory and your personal address book for a name that matches your spoken command.
However, if you select the Name Dialing Preference, Personal Assistant restricts its search to the personal address book. In this case, Personal Assistant does not look in the corporate directory.
For information about why you might want to set the Name Dialing Preference, see the "Copying a Corporate Directory Entry Into Your Personal Address Book" section.
Use the following procedure to set the Name Dialing Preference:
Personal Assistant opens the Settings page.
Step 2 Check the Name Dialing Preference box, as shown in Figure 7-4.
Check the box again if you want to remove the selection.
You cannot assign nicknames to people who are in the corporate directory without first copying them into your personal address book. For instructions, see the "Copying a Corporate Directory Entry Into Your Personal Address Book" section.
The first time you call Personal Assistant, it prompts you to say your name. Personal Assistant uses this recording to identify you to other callers and to greet you in the future. If you don't like your recorded name, you can change it.
Use the following procedure to reset your spoken name.
Personal Assistant opens the setting page.
Step 2 Click the Reset Spoken Name button.
Step 3 Call the Personal Assistant and re-record your spoken name.
The call pick-up time-out feature controls how many seconds Personal Assistant rings each destination in a destination group before moving on to the next destination.
The default setting for the time-out feature is eight seconds. Because each ring takes about three seconds, the eight second default setting means that Personal Assistant allows approximately two to three rings at each destination before trying the next destination in the group.
To get to the time-out feature, choose Preferences > Settings from the main menu.
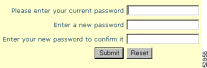
The first time you log in to the Personal Assistant User interface, Personal Assistant takes you directly to the Update Password page. After initially choosing a password, you can update your password any time by using this procedure.
Personal Assistant displays the Update Password page, as shown in Figure 7-7.
Step 2 Follow the instructions for updating your password.
If you forget your password, ask your system administrator to reset your default password. Personal Assistant will prompt you to customize the default password.
![]()
![]()
![]()
![]()
![]()
![]()
![]()
![]()
Posted: Thu Apr 24 14:13:46 PDT 2003
All contents are Copyright © 1992--2002 Cisco Systems, Inc. All rights reserved.
Important Notices and Privacy Statement.