|
|

The configuration of the Interface Controller Card (ICC) Primary Rate Interface (PRI) ISDN span is accomplished with most system administration utilities. Use the Card Maintenance screen to add ICC ISDN spans to the system database and place them in service (IS) and out of service (OOS). Place all PRI B-channels into resource groups the same way you would other system network interface ports.
 |
Note PRI D-channels cannot be added to a resource group. |
System administration utilities specific to ISDN PRI support include the ICC ISDN Span Configuration screen, ISDN Message Template Summary screen, ISDN Message Template screen, and the ISDN Supervision Templates screen.
This chapter highlights system administration support for the ISDN PRI package, concentrating on the following areas:
"Non-Facility Associated Signaling (NFAS)," describes the additional system administration functions provided to support ISDN Non-Facility Associated Signaling (NFAS). Use the information in Chapter 5 in conjunction with the Cisco VCO/4K System Administrator's Guide.
ICC ISDN spans are fully supported by the system administration Card Maintenance screen. Refer to the Cisco VCO/4K System Administrator's Guide for detailed information on this screen. Additional information specific to ICC ISDN span support is provided in this section.
When you add an ICC T1 ISDN span to the database via the Card Maintenance screen, the system controller assigns the first available contiguous block of 24 port addresses to the span. The first 23 port addresses are assigned to the B-channels, and the twenty-fourth address is reserved for the D-channel.
When you add an ICC E1 ISDN span to the database via the Card Maintenance screen, the system controller assigns the first available contiguous block of 32 port addresses to the span as follows:
The initial status of the span (either T1 or E1) is OOS. Use the C command (change status) to place the span in active mode. When the card comes into service, it transitions to the maintenance mode. The span remains in maintenance mode until the ICC ISDN application is downloaded, all signal alarms are cleared, and the D-channel link is established.
The span status mode reflects the state of the ICC ISDN span D-channel. All span status modes are supported for the ICC ISDN span except for the standby mode and the camped on mode. Diagnostic mode places the span into local loopback. An additional diagnostic mode, remote (R), has been added so you can place the span into remote loopback.
Use the card maintenance P command to deactivate/activate each B-channel on the span. Deactivating a B-channel places the port into a near-end OOS state. ISDN states can be viewed with the system administration Port Display screen.
When a span is manually placed into maintenance mode, the idle B-channels are placed into maintenance near-end state. Active calls are not affected. The associated B-channels of released calls are placed into the near-end maintenance mode.
The system supports autonomous channel maintenance processing through the use of the SERVICE and SERVICE ACKNOWLEDGE D-channel messages. In user mode (applicable to ICC-T1 PRI/4ESS, ICC-T1 PRI/5ESS, ICC-T1 PRI/NI-2, ICC-T1 PRI/NTI, ICC-T1 PRI/NTT, ICC-E1 PRI/NET5 (EURO), and ICC -E1 PRI/TS014 spans), when the D-channel is running and all signal alarms have cleared, B-channels assume the far-end OOS state until the network brings them into active service. In user-symmetrical mode (applicable to ICC-T1 PRI/4ESS, ICC-T1 PRI/5ESS, ICC-T1 PRI/NI-2, and ICC-T1 PRI/NTI), B-channels are automatically brought into active service.
Use the ICC ISDN Span Configuration screen to define the operating characteristics of an ICC ISDN span, and to assign port names to the B-channels associated with that span. Refer to the Cisco VCO/4K System Administrator's Guide for more information.
To access the ICC ISDN Span Configuration screen from the Card Summary screen, follow these steps:
Step 2 Type any character and press Enter.
|
Note The status field of the ICC ISDN Span Configuration screen must indicate that the ICC ISDN span is in the OOS state before you can configure its operating characteristics. |
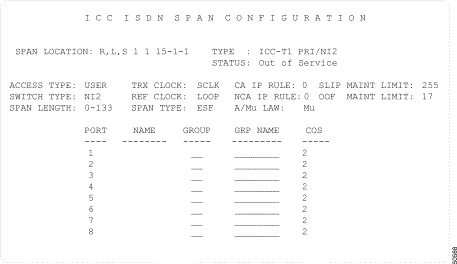
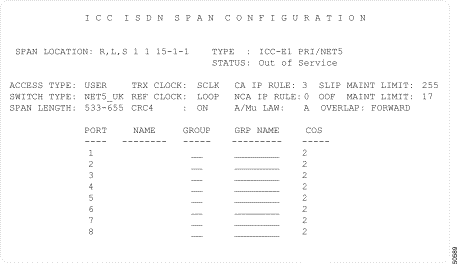
There are two different ICC ISDN Span Configuration screens—only one of which will be displayed on your monitor. One screen is associated with ICC T1 spans, the other is associated with ICC E1 spans.
The ICC ISDN Span Configuration screen associated with ICC T1 spans is shown in Figure 2-1. T1 ISDN types include 4ESS, ESS, NI-2, NTI, and NTT.
The ICC ISDN Span Configuration screen associated with ICC E1 spans is shown in Figure 2-2. The E1 ISDN types include NET5 (EURO), QSIG, and TS014.
|
Note Figure 2-2 represents the screen for E1 ISDN types EURO and QSIG; E1 ISDN type TS014 is represented by the same screen, but excludes the OVERLAP field. The per-span overlap feature is not available for TS014 span types. |
The ICC ISDN Span Configuration screen for T1 types can consist of up to three screens, each containing information on a maximum of eight ports. Ports corresponding to the 23 B-channels are displayed in ascending order.
The ICC ISDN Span Configuration screen for E1 types can consist of up to four screens, each containing a maximum of eight ports. Ports corresponding to the 30 B-channels are displayed in ascending order.
|
Note For T1 types, port 24 (the D-channel), and information for deactivated ports (taken out of service via the P command), are not displayed. For E1 types, port 17 (the D-channel), and information for deactivated ports taken OOS, are not displayed. |
Press Prev Field and Next Field to move between fields. Press Tab and < to move between the first field on each line. Press Prev Screen and Next Screen to page through the listings. Press Print Screen to obtain a hard copy of any of the screens.
The ICC ISDN Span Configuration screen contains the following fields:
SPAN LOCATION—Display only. The rack-level-slot address of the span. Refer to the "ISDN Primary Rate Interface Package" section for span location conventions.
TYPE—Display only. Indicates the type of span in that location. The valid values for ISDN PRI are either ICC-T1 PRI/x or ICC-E1 PRI/x, where x represents a particular ISDN protocol. (See "Non-Facility Associated Signaling (NFAS)," for ISDN NFAS values.)
STATUS—Display only. Indicates the current status of the span. To change span status, use the Card Maintenance screen. The field also reflects the status of the span due to signal alarms and establishment or release of the D-channel. Possible values for this field are listed in Table 2-1.
Table 2-1 STATUS Field Values and Meanings
ACCESS TYPE—The ACCESS TYPE selections vary according to span type. The ACCESS TYPE field selections for T1 spans are described in the "Field Selections for ICC T1 Span Types" section. The ACCESS TYPE field selections for E1 spans are described in the "Field Selections for ICC E1 Span Types" section.
TRX CLOCK—Data entry via Select or Rev Select key. Specifies the transmit clock (timing source) used for this span. Possible values for this field are listed in Table 2-2. You can only change this field when the span status is OOS.
Table 2-2 TRX CLOCK Field Values and Meanings
|
TRX CLOCK specifies which clock source is used for the transmission of data. If you set the TRX CLOCK to LOOP, the clock recovered from the received data is used to clock the data from the transmit buffer. In this case, transmit and receive slips are correlated.
If you set the TRX CLOCK to SCLK, the system clock is used to clock the data (effectively bypassing the transmit buffer). If there is any disparity between the remote system's clock and the system's clock, the slips are effectively exported to the remote system.
LOOP is recommended for plesiochronous networks.
1544, for T1 spans, and 2048, for E1 spans, are not recommended for normal operation; they are generally used for testing purposes.
|
Note If selecting the ICC board crystal clock (1544 or 2048), you must make this selection for
all spans in that group. For example, if you select the TRX CLOCK value of 1544 for one
span in a group, you must select 1544 for all other spans in that group. Again, 1544 and
2048 are not recommended for normal operation. Refer to Table 1-1 for a description of groups and their RLS addresses. |
CA IP RULE—Data entry via main keyboard. Specifies the default inpulse rule for call-associated connections. (Call-associated connections deliver services over the B-channel.) This rule applies when the channel ID information element within the SETUP message specifies a B-channel as the bearer channel. The inpulse rule you choose must have already been defined in the Inpulse Rule Table screens. Possible values for this field are 0 (no default inpulse rule) or a number between 1 and 255. Default value is 0.
SLIP MAINT LIMIT—Data entry via main keyboard. Specifies the number of transmit or receive slips that can be detected for this span in a 24-hour period before threshold processing occurs. Threshold processing either resets the span or puts it in maintenance mode for manual intervention.
This processing is controlled when you set the manual intervention for SLIP/OOF feature flag in the System Features Configuration screen. Refer to the Cisco VCO/4K System Administrator's Guide for more information.
Separate slip maintenance counts are maintained for receive and transmit slips. When either of these counters reaches the limit, threshold processing occurs. The current slip count is displayed on the Card Display screen. Slip counters are reset at midnight or when you change this value in the ICC ISDN Span Configuration screen. Possible values for this field are between 0 (slip maintenance processing is inhibited—recommended when the TRX Clock setting is LOOP) and 255. Default value is 255.
SWITCH TYPE—The SWITCH TYPE selections vary according to span type. The SWITCH TYPE field selections for T1 spans are described in the "Field Selections for ICC T1 Span Types" section. The SWITCH TYPE field selections for E1 spans are described in the "Field Selections for ICC E1 Span Types" section.
REF CLOCK—Data entry via Select or Rev Select key. Determines the reference clock (timing source) used for this span. This rule applies only if this span has been specified as the current timing source using either the Master Timing Link Selection menu or the T1 Synchronization Control ($C0 02) command. Possible values for this field are listed in Table 2-3. You can only change this field when the span status is OOS.
Table 2-3 REF CLOCK Field Values and Meanings
|
NCA IP RULE—Data entry via main keyboard. Specifies the default inpulse rule for non-call associated connections. This rule applies when the channel ID within the SETUP message specifies the D-channel as the bearer channel. The inpulse rule you choose must have already been defined in the Inpulse Rule Table screens. Possible values for this field are between 1 and 255. Default value is 0.
OOF MAINT LIMIT—Data entry via main keyboard. Specifies the number of out of frames (OOFs) that can be detected for this span in a 24-hour period before threshold processing occurs. Threshold processing either resets the span or puts it in maintenance mode for manual intervention. This processing is controlled by the setting of the manual intervention for SLIP/OOF feature flag on the System Features Configuration screen. Refer to the Cisco VCO/4K System Administrator's Guide for more information.
The OOF counter is reset at midnight and when this value is changed. Possible values for this field are between 0 (OOF maintenance processing inhibited—not recommended) and 255; default value is 17.
SPAN LENGTH—Data entry via Select or Rev Select key. Determines the line equalization used for the data stream. Choices are expressed either in terms of the cable length between the ICC ISDN span and the connected equipment or as defined by FCC Part 68 Option A. Possible values for this field are listed in Table 2-4. You can only change this field when the span status is OOS.
SPAN TYPE—Data entry via Select or Rev Select key. This field is valid for T1 spans only; refer to Figure 2-1. Specifies the format of the data stream. This value can only be changed when the span status is OOS. Possible values for this field are listed in Table 2-5.
Table 2-5 SPAN TYPE Field Values and Meanings
|
CRC4—Data entry via Select or Rev Select key. This field is valid for E1 spans only; refer to Figure 2-2. Cyclic Redundancy Check 4 (CRC4), is an enhanced error monitoring capability providing additional protection against simulation of the frame alignment signal. This value can only be changed when the span status is OOS. Possible values for this field and their meanings are listed in Table 2-6.
A/Mu LAW—Data entry via Select or Rev Select key. Specifies voice coding on the PRI stream. The system automatically turns off translation for calls which specify unrestricted digital information bearer capability. Possible values for this field are listed in Table 2-7.
Table 2-7 A/Mu LAW Field Values and Meanings
|
OVERLAP—Data entry via Select or Rev Select key. Specifies per-span overlap configuration. This field is used for NET5 (EURO) and QSIG E1 span types; all other span types, both E1 and T1, are not supported. Possible values for this field are listed in Table 2-8.
Table 2-8 OVERLAP Field Values and Meanings
|
|
Note The next five fields—PORT, NAME, GROUP, GRP NAME, and COS—contain information pertaining to the individual ports on the ICC ISDN span. However, for ICC-T1 ISDN types, port 24 (the D-channel), and deactivated ports (taken out of service via the P command) are not displayed. For ICC-E1 ISDN types, port 17 (the D-channel), and deactivated ports are not displayed. |
PORT—Display only. Indicates the port number on the span. There are 23 ports, or B-channels on T1 type ICC ISDN spans, and 30 B-channels on E1 type ICC ISDN spans.
NAME—Data entry via main keyboard. Optional database entry used to identify individual B-channels. When a port name is used, each one should be unique and descriptive of port usage. This field accepts up to eight alphanumeric characters, either upper- and/or lowercase.
GROUP—Display only. Indicates the number of the resource group to which this port belongs. If no resource group assignment has been made, this field is blank. This field can be changed using the Resource Group Configuration screens. Possible values for this field range between 1 and 255.
GRP NAME—Display only. Indicates the name of the resource group to which this port belongs. If no resource group assignment has been made, this field is blank. This field can be changed using the Resource Group Summary screen, and can contain up to eight alphanumeric characters, either upper- and/or lowercase.
COS—Data entry via main keyboard. Class of service; for ISDN B-channels, used for resource grouping and B-channel allocation processing. Spans can have different COS marks, as determined by the application design. Assignable values for this field are listed in Table 2-9.
|
Note Internal COS values such as U2 (2-way currently used as an outgoing) and T2 (2-way currently used as an incoming) may appear in this field during system operation. These values are internal processing representations and are not assignable by the user. |
Table 2-9 COS Field Values and Meanings
|
The ICC ISDN Span Configuration screen ACCESS TYPE and SWITCH TYPE field selections vary according to ICC T1 span type. Five ICC ISDN T1 span types are supported. They include 4ESS, 5ESS, NI-2, NTI, and NTT. The ACCESS TYPE and SWITCH TYPE field selections for each ICC ISDN T1 type are described below. Refer to Figure 2-1 for the location of these fields within the screen.
ACCESS TYPE—Data entry via Select or Rev Select key. Specifies the type of access connection used for this span. You can only change this field when the span status is OOS. Refer to Table 2-10 for the different selection options available for the ICC T1 span types.
Table 2-10 ACCESS TYPE Field Selections for ICC T1 Span Types
|
SWITCH TYPE—For NTT spans—Data entry via Select and Rev Select keys. All other T1 span types are not selectable. Determines the type of switch to which this PRI ISDN span is to be connected. This allows for the correct handling of manufacturer-specific ISDN implementations. The span status must be OOS in order to change this field.
Possible values for this field are listed in Table 2-11.
Table 2-11 SWITCH TYPE Field Selections for ICC T1 Span Types
|
|
1 The NI2_SERV switch type parameter allows the control of B-channel initialization, and supports SERVICE and SERVICE ACKNOWLEDGEMENT messages. The following restrictions apply: - Transmission of RESTART message is not supported. - Connection to a Cisco router ISDN interface is not supported. - Supports only the USER side—ACCESS TYPE field configured as USER. - The VCO/4K end expects the network to bring the B-channels into service. - Used only when the far end (network side) supports B-channel availability control procedures contained in the Bellcore standard, SR-4619. Refer to the 1999 Version of National ISDN Primary Rate Interface (PRI) Customer Premises Equipment Generic Guidelines (SR-4619) for further information on B-channel availability control procedures. |
The ICC ISDN Span Configuration screen ACCESS TYPE and SWITCH TYPE field selections vary according to ICC E1 span type. Three ICC ISDN E1 span types are supported. They include NET5 (EURO), QSIG, and TS014. The ACCESS TYPE and SWITCH TYPE field selections for each ICC ISDN E1 type are described below. Refer to Figure 2-2 for the location of this field within the screen.
ACCESS TYPE— Data entry via Select or Rev Select key. Specifies the type of access connection used for this span. You can only change this field when the span status is OOS. Refer to Table 2-12 for the different selection options available for the ICC E1 span types.
Table 2-12 ACCESS TYPE Field Selections for ICC E1 Span Types
|
| 1 PINX = Private Integrated Services Network Exchange. |
SWITCH TYPE—Data entry via Select and Rev Select keys. Determines the type of switch to which this PRI ISDN span is to be connected. This allows for the correct handling of manufacturer-specific ISDN implementations. The span status must be OOS in order to change this field.
Possible values for this field are listed in Table 2-13.
Table 2-13 SWITCH TYPE Field Selections for ICC E1 Span Types
|
Use the ICC ISDN Span Configuration screen to change the ACCESS TYPE, TRX CLOCK, CA IP RULE, SLIP MAINT LIMIT, SWITCH TYPE, REF CLOCK, NCA IP RULE, OOF MAINT LIMIT, SPAN LENGTH, SPAN TYPE, CRC4, A/Mu LAW, NAME, and COS fields.
|
Note Take the span out of service through the Card Maintenance screen before changing the ACCESS TYPE, TRX CLOCK, SWITCH TYPE, REF CLOCK, SPAN LENGTH, SPAN TYPE, CRC4, or A/Mu LAW fields. Refer to the Cisco VCO/4K System Administrator's Guide for instructions to take your span out of service. |
To change the ICC ISDN span parameters, complete the following steps:
Step 2 Press Next Field. The cursor moves to the ACCESS TYPE field.
Step 3 Use the Select and Rev Select keys to step through the values until the correct access type is shown, then press Next Field. The cursor moves to the TRX CLOCK field.
Step 4 Use the Select and Rev Select keys to step through the values until the correct TRX clock value is shown, then press Next Field. The cursor moves to the CA IP RULE field.
Step 5 Type the inpulse rule number for call associated connections, if any, then press Next Field. The cursor moves to the SLIP MAINT LIMIT field. If no inpulse rule number is entered, the field display changes to 0.
Step 6 The SLIP MAINT LIMIT field contains a default value of 255. To change it, type the new value, then press Next Field. The cursor moves to the SWITCH TYPE field.
Step 7 Use the Select and Rev Select keys to step through the values until the correct switch type is shown, then press Next Field. The cursor moves to the REF CLOCK field.
Step 8 Use the Select and Rev Select keys to step through the values until the correct reference clock value is shown, then press Next Field. The cursor moves to the NCA IP RULE field.
Step 9 Type the inpulse rule number for non-call associated connections, then press Next Field. The cursor moves to the A/Mu LAW field. If you do not enter an inpulse rule number, the field display changes to 0.
Step 10 Use the Select and Rev Select keys to step through the values until the correct A/Mu Law encoding value is shown, then press Next Field. The cursor moves to the OOF MAINT LIMIT field.
Step 11 The OOF MAINT LIMIT field contains a default value of 17. To change it, type the new value, then press Next Field. The cursor moves to the SPAN LENGTH field.
Step 12 Use the Select and Rev Select keys to step through the values until the correct span length value is shown, then press Next Field. The cursor moves to the SPAN TYPE field.
Step 13 Use the Select and Rev Select keys to step through the values until the correct span type value is shown, then press Next Field. The cursor moves to the NAME field for the first port on the span.
Step 14 Type the name information, if any, and then press Next Field. The cursor skips over the GROUP and GRP NAME fields and moves to the COS field for that port.
Step 15 Type the Class of Service character(s). Press Next Field. The cursor moves to the NAME field for the next port.
Step 16 Repeat Steps 13 and 14 until all changes for the eight ports displayed have been made, then press Next Screen to display ports 9 to 16.
Make any changes necessary, then press Next Screen to display ports 17 to 23 and make any changes necessary.
Use Prev Screen and Next Screen to move among the screens until all changes have been made.
Step 17 Press Enter; the system database is automatically updated.
Step 18 Press Exit to return to the Card Summary screen.
To leave the ICC ISDN Span Configuration screen without making any changes, press Exit, Prev Menu, or Main Menu. No changes are made to the database unless you press Enter.
You can access the following screens from the ICC ISDN Span Configuration screen:
The system software contains one System Host Configuration screen field that has an affect on ISDN processing—the Host Setup Timer field. The Host Setup Timer uses a timer which you configure (from 1 to 60 seconds) to trap the condition in which a host link fails to respond to a call attempt, a D-channel SETUP message.
The System Host Configuration screen is shown in Figure 2-3.
Configure the Host Setup Timer field to enable or disable host setup timing, as well as to configure the duration of the timer. In addition to this ISDN-specific field, there are the standard System Host Configuration screen fields, which are described in the Cisco VCO/4K System Administrator's Guide.
To enable/disable the Host Setup Timer, press the Select and Rev Select keys. When it is enabled, the default time of 6 seconds is displayed in the next field. When it is disabled, this field is blank.
To modify the default time, enable the Host Setup Timer and use the keypad to enter the new time.
The Host Setup Timer, if enabled, is performed for the assigned host link. If the assigned host process does not respond to the initial call report, D-channel SETUP message, within the defined Host Setup Timer interval, the call is torn down. A line/trunk port marked as an Always Off-hook class of service is set back to idle state. Line/trunk ports with other classes of service are processed through permanent signaling conditioning (PSC).
The Host Setup Timer processing provides the reorder sequence when no host link is available to control the call.
You can modify the behavior of the Host Setup Timer with one of the following methods:
If the host times out, the NOHOST inpulse rule token forces rule processing to execute the inpulse rule specified in the data field of the NOHOST inpulse rule token. This behavior can cause delays in tearing down a call which is not responded to by a host. Note that a self-referential NOHOST token can cause the inpulse rule to loop indefinitely.
Refer to the "Inpulse and Outpulse Rule Support" section for more information.
Refer to the Cisco VCO/4K System Administrator's Guide for more information on the System Host Configuration screen and inpulse rules.
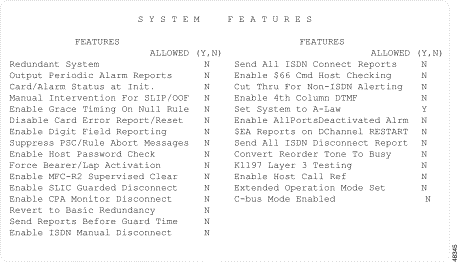
The VCO/4K system software contains the following System Features screen fields that have an affect on ISDN processing:
Refer to the Cisco VCO/4K System Administrator's Guide for a description of these features, and for feature setting instructions. The System Features screen is shown in Figure 2-4.
The ISDN PRI package is fully supported by inpulse and outpulse rule processing. This support is defined by the following rule processing abilities:
The tokens used to support ISDN call processing are unique instructions that, when combined with other tokens, compose inpulse and outpulse rules. Each token takes advantage of a function within the system, and the ISDN supporting tokens are limited to two types—supervision control and processing control functions.
Supervision control consists of in-band or out-of-band signaling to the distant end (i.e., answer, wink, tone, voice prompt) or waits a specified length of time before continuing rule processing.
Processing control consists of the construction of rules with more than 16 tokens, and outpulse rule execution.
Each ISDN supporting token is described in detail below. They are listed alphabetically.
Token type—Processing control. Use this token in inpulse rules to execute a specified inpulse rule when an ISDN glare condition occurs. Refer to "Call Examples," for an explanation of glare. The GLARE [xx] token must always be the first token in the rule, where [xx] specifies the number of the inpulse rule to execute. Possible values for this field are 1 to 255.
Token type—Supervision control. Use this token in either inpulse or outpulse rules to specify the ISDN message template for rule processing. Use a value from 1 to 96 in the additional data entry field to specify the number of the ISDN message template to be processed. The template you specify must be configured as an ISDN receive message template and cannot have a message type of CHAINED. At the time of data entry, if the template number corresponds to a template that has been configured as a transmit template, an error message is displayed on the screen.
In addition, you can use this token in an inpulse rule to specify which ISDN receive message template is to be used to handle incoming D-channel message processing. When the system encounters an ISDN RX [xx] token, processing continues with the template specified in the additional data field. Template processing is not completed until the message specified in the template is received. When template processing ends, rule processing continues with the token following ISDN RX [xx].
The receive template stores received D-channel message data in that call record and/or condition reporting of the received D-channel message to the host.
In outpulse rules, ISDN RX [xx] tokens function as setup tokens for ISDN SUP [xx] tokens. Rule processing does not wait for the messages specified in the ISDN message template to be received. Instead, the ISDN RX [xx] and the ISDN SUP [xx] token determine how the D-channel message is reported and stored.
Token type—Supervision control. Use this token in outpulse rules to specify the ISDN supervision template for outpulse rule processing, where [xx] is the number of the template. Template numbers range from 1 to 24.
Outpulse rule processing waits for an event to occur when this token is processed. When an event, or events, are detected that satisfy the specified ISDN supervision template, outpulse rule processing continues with the token following the ISDN SUP [xx].
Token type—Supervision control. Use this token in either inpulse or outpulse rules to specify the ISDN message template for constructing outgoing D-channel messages, where [xx] is the number of the template. Template numbers range from 1 to 96.
A transmitted D-channel message can be constructed by any combination of data from the following sources:
|
Note IEs are the elements in D-channel messages that contain the additional information needed for call processing, such as calling party number, called party number, and channel ID. IEs vary depending on the message, action being performed, and connected equipment. |
The template you specify must be an ISDN transmit message template and it cannot have a message type of CHAINED. If the template number corresponds to a template that has been configured as a receive template at the time of data entry, an error message is displayed on the screen.
When template processing ends, rule processing continues with the token following the ISDN TX [xx] token.
Token type—Processing control. Use this token in inpulse rules to execute a specified inpulse rule following the expiration of the Host Setup Timer. If the system does not receive a host command before the timer expires, it executes the inpulse rule indicated in the NOHOST token's [xx] data field. Inpulse rules are from 1 to 255.
If you disable the Host Setup Timer, the NOHOST token does not get executed; the system waits indefinitely for the host to respond before continuing. If you enable the Host Setup Timer, the NOHOST token is not used; the system automatically performs a RELEASE when the timer expires.
An overview of ISDN inpulse and outpulse rule processing is provided in "ISDN Processing Overview," including the FLD, I FLD, and D FLD digit field types used by ISDN call processing. The interaction among rule, template, and command/report processing is illustrated by the examples in "Call Examples."
NOHOST [xx] is not a valid token for outpulse rules.
Refer to the Cisco VCO/4K System Administrator's Guide for information on defining inpulse and outpulse rules.
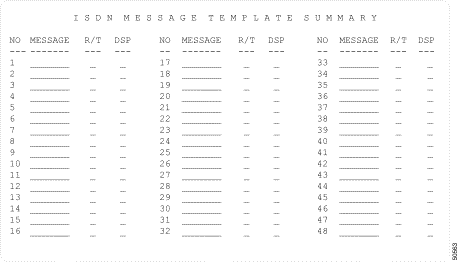
Use the ISDN Message Template Summary screen to do the following:
You can define up to 96 templates for use in rule processing of ISDN calls. Template processing is reported to the host via the ISDN Inpulse Rule Complete ($ED) and ISDN Port Change of State ($EA) reports. When reporting is done in conjunction with inpulse or outpulse rule processing, timing of the reports is controlled by the reporting control tokens contained in the rule, or by the supervision template.
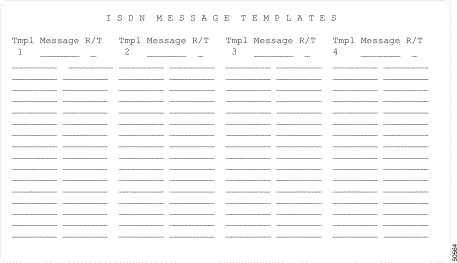
To access the ISDN Message Template Summary screen from the Database Administration menu, type K and press Enter. The ISDN Message Template Summary screen is displayed (see Figure 2-5). The cursor is located in the DSP (display) field corresponding to Message Template 1.
|
Note An ISDN feature must be installed in order to access any ISDN System Administration screens. |
The ISDN Message Template Summary screen consists of two screens; each screen lists 48 message templates in numerical order. Use the keyboard to move within the screen and between the two screens.
Press Prev Field and Next Field to move between DSP fields in the same column. Press Tab and < to move between the first DSP fields in each column. Press Prev Screen and Next Screen to page through the listings. Press Print Screen to obtain a hard copy of any of the screens.
The ISDN Message Template Summary screen contains the following fields:
NO—Display only. Template number. Templates are listed in ascending order, from 1 to 96.
MESSAGE—Display only. The ISDN message for which the template is configured. Change this value through the ISDN Message Templates screen. Possible values for this field are listed under the definition of the MESSAGE field for that screen.
R/T—Display only. Indicates whether the template is an ISDN Receive Message Template (R) or an ISDN Transmit Message Template (T).
DSP—Data entry via main keyboard, access to another screen(s). This is the Display Template field. It provides access to the ISDN Message Template screens. To display another screen, type any character on the main keyboard, then press Enter. Refer to the "Accessing Other Menus and Screens from the ISDN Message Template Summary Screen" section for instructions on using this field.
You can access the following screens from the ISDN Message Template Summary screen:
Use the ISDN Message Templates screen to configure up to 96 templates for use in rule processing for ISDN calls. There are two kinds of ISDN message templates: receive and transmit.
ISDN Receive Message Templates control the processing, storing, and reporting of specific D-channel messages received during inpulse or outpulse rule processing of an ISDN RX [xx] token. ISDN Transmit Message Templates control the construction and transmission of specific D-channel messages during inpulse or outpulse rule processing of an ISDN TX [xx] token.
You can set up multiple templates for a single ISDN message type. Specify the template to be used in rule processing in a data field—the receive/transmit template (R/T) designation determines whether it can be used with the ISDN RX [xx] or ISDN TX [xx] token, where [xx] is the data field containing the receive/transmit template designation. Refer to "ISDN Processing Overview," for additional information on these tokens and rule processing for ISDN.
You can access the ISDN Message Templates screen from the ISDN Message Template Summary screen. Use the Prev Field or Next Field key to position the cursor in the DSP field that corresponds to the ISDN message template that you want to display configuration information. Then type any character and press Enter. The ISDN Message Templates screen is displayed (see Figure 2-6).
There are 24 screens; each screen contains 4 template listings. The displayed screen is that of the selected template. The cursor is located in the Message field. Use the keyboard to move within the screen and between the 24 screens. Press the Prev Field and Next Field keys to page through the listings. Press the Tab and < keys to move between templates. Press Print Screen to obtain a hard copy of any of the screens.
Because of the number of templates available, it is often easier to return to the ISDN Message Template Summary screen and select the desired template, rather than page through template listings. To save the template information already displayed, press Enter before leaving the ISDN Message Templates screen.
The ISDN Message Templates screen contains the following fields:
Tmpl—Display only. Indicates the ISDN Message Template listing displayed. Valid ISDN message template numbers are 1 to 96.
Message—Data entry via Select or Rev Select key or main keyboard. Specifies the ISDN message for which the template is defined. For the standard messages listed in Table 2-14, use the Select and Rev Select keys to specify the message. You can also type the two digit hexadecimal values corresponding to these messages into the space. Table 2-14 represents the only messages that can be controlled by the host or ISDN message templates. Other ISDN messages trigger autonomous processing in the system; refer to "ISDN Processing Overview," for more information. Definitions for ISDN messages are contained in the International Telecommunications Union document ITU-T Q.931. Messages can be used for either transmit or receive unless otherwise specified.
Table 2-14 Standard ISDN Messages
|
| 1 System call processing handles disconnect and release processing autonomously. Control over these events is provided via the ISDN Port Control ($49) command. These messages are provided to allow additional call control. |
R/T—Data entry via Select or Rev Select key and main keyboard. Specifies whether the template is an ISDN Receive Message Template (R) or an ISDN Transmit Message Template (T). For transmit processing, the system automatically populates the connect length byte for each IE constructed. When the Channel ID IE is transmitted, the system automatically ensures that the B-channel is correctly specified. When the Channel ID IE is specified, the B-channel designator byte must be present.
Data Entry Fields—Data entry via Select or Rev Select key and main keyboard. Fifteen lines are displayed under each Tmpl, Message, R/T heading. Each of these lines contains two data entry fields. The first field is the action token field, the second is the optional IE/data field. The action token specifies the type of processing to be performed. The IE/data field specifies the D-channel message information element on which the action token operates. Action tokens, and their associated IE/data values are defined in the "Action Tokens" section.
Action tokens specify the type of processing that is to be performed on D-channel message IEs. The action tokens are divided into six functional groups—report control, IE storage control, processing control, transmission control, codeset shift control, and the template control group.
Report Control tokens specify the data that gets reported to the host computer. Timing of those reports is controlled by inpulse or outpulse rule reporting control tokens in the rule from which the ISDN Message Template is called.
Information Element (IE) Storage Control tokens specify where the IEs are stored, and the storage format.
Processing Control tokens determine whether the system processes specific information elements without interaction from the host computer.
Transmission Control tokens determine how the information is formatted for transmission—as information elements, or as hexadecimal bytes. These tokens are supported in ISDN Transmit templates only.
Codeset Shift Control tokens determine whether there is a shift to another codeset during template processing. All action tokens are assumed to be codeset 0 unless they are preceded by a CODESET token.
|
Note Codesets are used to map one hexadecimal value to several entities. For example, in Codeset 0, hexadecimal 70 is CD NUM (called number). However, in another codeset, hexadecimal 70 may represent an entirely different entity. Codesets are typically vendor specific, and it is beyond the scope of this manual to discuss them. Refer to the International Telecommunications Union document ITU-T Q.931 or Northern Telecom documentation for further information on codesets. |
Template Control tokens allow you to construct a message template with more than 15 tokens.
Display action tokens by pressing the Select and Rev Select keys while the cursor is located in a Data Entry field of the ISDN Message Templates screen. Specify values for the associated IE/data field by using either the Select and Rev Select keys, or by typing the data in the field. When entered via the keyboard, up to four bytes of data can be specified in this field.
In addition, you can specify values for the associated IE/data field either by using the Select and Rev Select keys or by typing the data using the main keyboard. When entered via the main keyboard, up to four bytes of data can be specified in this field. Definitions for ISDN IEs are contained in the International Telecommunications Union document ITU-T Q.931. A unique IE can be entered as a single hexadecimal byte, if necessary.
The following sections describe the action tokens in greater detail. Each action token is defined in three ways—by functional group, template group it is applicable to (R or T, for receive or transmit template respectively), and a detailed description. They are listed in the order in which they appear as selections.
Functional group—Transmission control; T.
The IE action token specifies that a complete IE is to be constructed for transmission in the D-channel message for which the template is defined. An IE action token can be followed by additional data; this is specified with D FLD and DATA action tokens. The system does not check to assure that the data specified is appropriate for the IE specified in the IE/data field.
Possible IE/data field values include the IEs listed in Table 2-15 or a one-digit or two-digit hexadecimal value.
Table 2-15 ISDN Selectable Information Elements (CODESET 0)
|
Functional group—Transmission control; T.
The DATA action token specifies that hexadecimal bytes are to be used to construct an IE for transmission in the D-channel message for which the template is defined. These hexadecimal bytes are transmitted exactly as they are specified on the screen.
Use each DATA action token to specify up to four hexadecimal bytes. You can construct longer data strings by using multiple DATA action tokens in a template; the DATA tokens must appear in the order in which the hexadecimal bytes are to be sent.
DATA action tokens must be preceded by an I FLD or IE action token. It can precede D FLD action tokens.
Valid IE/data field values are up to four hexadecimal bytes. When you use a DATA action token to construct an IE header, you don't specify the length bytes—system processing automatically inserts the correct IE length byte when the message is transmitted.
When you use a DATA action token to construct a channel ID IE, specify the B-channel ID as 00. The system ensures that the correct B-channel designation is used.
In NFAS applications, the interface ID is automatically inserted. If the interface ID is specified by the host, the system verifies it. If the interface ID is found to be incorrect, the specified message is not transmitted. Indication of this error condition is provided to the host in an ISDN Port Change of State ($EA) report with the following values: Change byte = $08, Event Code = $00, Status Code = $A4.
Functional group—IE storage control; R and T.
For receive templates, FLD action tokens specify that the complete IE (header and data) identified in the IE/data field is to be stored in a field. IEs are stored in the format in which they are received. There are five different FLD action tokens to indicate the field in which to store the IE. These tokens and the maximum number of bytes each field can store are listed in Table 2-16.
If the received field length is greater than the storage field length, the data is truncated. No indication of truncation for storage is provided to the host.
If the IE is reported to the host, the entire received IE is reported up to a maximum report length of 255 bytes (including the network header segment). Possible IE/data field values for receive templates include those listed in Table 2-15.
For transmit templates, FLD action tokens specify that the complete IE (header and data) stored in the field is to be transmitted in the D-channel message for which the template is defined. Because an IE can be placed into a field only as a result of processing a Receive template that contained an FLD action token or an ISDN Port Control ($49) command that specifies FLD data, it is assumed an FLD action token always contains a complete IE.
No IE/data field entry is allowed for this token when it is used in a transmit template.
Functional group—IE storage control; R and T.
For receive templates, I FLD action tokens specify that the header (intermediate) information for the IE identified in the IE/data field is to be stored in a field. This header, or intermediate, information consists of the hexadecimal bytes which precede the digit or information bytes in the IE. This includes the IE identifier and IE length bytes. IE headers are stored in the format in which they are received. There are five different I FLD action tokens to indicate the field in which to store the IE header. These tokens and the maximum number of bytes each field can store are listed in Table 2-17.
The possible IE/data field values for this action token are CP NUM, CP SADDR, CD NUM, CD SADDR, RD NUM and USR-USR. If it is used for any other IE, the IE identifier and length are stored. "Valid Information Elements for I FLD and D FLD Action Tokens," contains examples of the valid IEs, showing the information that would be stored in an I FLD.
For transmit templates, I FLD action tokens specify that the IE header is to be transmitted in the D-channel message for which the template is defined. Because IE data can be placed into a field only as a result of processing a receive template that contained an I FLD token or an ISDN Port Control ($49) command that specifies I FLD data, it is assumed an I FLD action token always contains an IE header.
I FLD action tokens must be followed by one or more D FLD or DATA tokens. This allows for construction of complete IEs from separate IE header and information fields. The system automatically populates the length byte with the correct value when IEs are constructed in this manner.
No IE/data field entry is allowed for this token when it is used in a transmit template.
Functional group—IE storage control; R and T
For receive templates, D FLD action tokens specify that only the data portion (following the header) of the IE identified in the IE/data field is to be stored in a field. Data is stored in the format in which it is received. There are five different D FLD action tokens to indicate the field in which to store the information. These tokens and the maximum number of bytes each field can store are listed in Table 2-18.
If the received field length is greater than the storage field length, the data is truncated. No indication of truncation for storage is provided to the host.
The possible IE/data field values for this token are CP NUM, CP SADDR, CD NUM, CD SADDR, RD NUM and USR-USR. Specifying any other value in the IE/data field results in no information being stored in the specified D FLD. "Valid Information Elements for I FLD and D FLD Action Tokens," contains examples of the valid IEs, showing the information that would be stored in a D FLD.
For transmit templates, D FLD tokens specify that the data contained in the field is to be used to construct an IE for transmission in the D-channel message for which the template is defined. Data can be placed into this field as the result of processing a receive template that contained a D FLD token, an inpulse rule that contained an IP ANI [xx] or IP FIELD [xx] token, or an ISDN Port Control ($49) command that specifies D FLD data.
Data in this field is formatted correctly for transmission over the D-channel, regardless of the format in which it was stored. Transmit D FLD tokens must be preceded by an IE or DATA token, or an I FLD token to specify the IE header information (which includes the IE identifier).
No IE/data field entry is allowed for this token when it is used in a transmit template.
Functional group—Codeset shift control; R and T.
The CODESET action token specifies that all action tokens and information that follows is specified according to the codeset number indicated in the IE/data field. The default codeset used by the system is 0.
The codeset number returns to 0 when the system processes a new template as the result of a GO TMP or DO TMP action token. Once you use a CODESET action token in a template, you must enter subsequent entries requiring specification of an IE in hexadecimal.
Possible IE/data field values are 1 to 7.
Functional group—Template control; R and T.
Use the GO TMP action token to instruct the system to perform processing for the ISDN message template you specify. This allows you to construct message templates with more than 15 steps. When template processing encounters this action token, processing continues with the first token of the message template you specified in the IE/data field. Processing does not return to the calling template. Consider the following important points when using the GO TMP action token:
Possible IE/data field values are 1 to 96.
Functional group—Template control; R and T.
Use the DO TMP action token to instruct the system to perform processing for the ISDN message template specified, and then return to this template. This allows you to construct message templates with more than 15 steps. When template processing encounters this token, processing continues with the first token of the message template specified in the IE/data field. At the end of the specified template, processing continues with the token following the DO TMP action token in the original message template. Consider the following important points when using the DO TMP action token:
Possible IE/data field values are 1 to 96.
Functional group—Reporting control; R.
Use the REP token to indicate that the IE specified in the IE/data field should be reported to the host. If the IE is not received, a status byte in the report indicates that not all expected IEs were received. The entire received IE is reported to the host.
If the ISDN Inpulse Rule Complete ($ED) or ISDN Port Change of State ($EA) report length exceeds 255 bytes, it is truncated. A status byte in the $ED report indicates that the report has been truncated. No indication of truncation is provided for the $EA report.
Possible IE/data field values include the IEs listed in Table 2-15.
Functional group: reporting control; R.
The REP ALL action token specifies that all IEs contained in the received message should be reported to the host. The entire received IE is reported to the host.
If the ISDN Inpulse Rule Complete ($ED) report or ISDN Port Change of State ($EA) report length exceeds 255 bytes, it is truncated. A status byte in the $ED report indicates truncation has been performed. No indication of truncation is provided for the $EA report.
Use of this token does not preclude the use of NO REP in the same template. When NO REP is used in the same template as REP ALL, the specified IE is not reported to the host if received.
No IE/data field entry is allowed for this token.
Functional group—Reporting control; R.
The NO REP token is used in conjunction with REP ALL to specify that the specific IE contained in the IE/data field should not be reported to the host.
Valid IE/data field values include the IEs listed in Table 2-15.
Functional group—Reporting control; R.
The PROCESS action token is used to specify that the IE contained in the IE/data field should be processed by the system. The only IE processed autonomously is CHAN ID (Channel ID). When this token is processed, the system selects the appropriate B-channel based on the coding of the received IE and the state of the B-channel. If the IE is not received, a status byte in the report indicates that not all expected IEs were received and no B-channel selection is performed.
The B-channel selection is based on Class of Service (COS) and port state. The system selects a port that is in service, idle, and has a COS of either 2 (2-way) or T (terminating/incoming). When a B-channel has been assigned due to a PROCESS token, the port address of the selected B-channel is reported to the host in an ISDN Inpulse Rule Complete ($ED) or ISDN Port Change of State ($EA) report.
If you use the Select and Rev Select keys, CHAN ID is the only value that can be displayed.
To add an ISDN message template, complete the following steps:
Step 2 Use the Prev Screen, Next Screen, Tab, and < keys to advance the cursor to the Message field of the template you want to add.
Step 3 Use the Select and Rev Select keys to step through the token listing until the correct token is displayed, or type the correct value. Press Next Field. The cursor moves to the R/T field.
Step 4 Type either R or T (or display the correct value by using the Select and Rev Select keys) and press Next Field. The cursor moves to the first Action field for that template field.
Step 5 Use the Select and Rev Select keys to step through the token listing until the correct token is displayed, or type the correct value. Press Next Field.
Step 6 Repeat Step 5 until all action tokens and values for the template are displayed on the screen, then press Enter. The database is automatically updated.
Step 7 Repeat Steps 2 through 6 for all ISDN message templates you want to add.
Step 8 When all ISDN message templates are entered, press Exit to return to the ISDN Message Template Summary screen.
To leave the ISDN Message Templates screen without making any changes, press Exit, Prev Menu, or Main Menu. No changes are made to the database unless you press Enter.
To delete an ISDN message template, complete the following steps:
Step 2 Use the Prev Screen, Next Screen, Tab, and < keys to advance the cursor to the Message field of the template you want to delete.
Step 3 Use the Prev Field and Next Field keys to advance the cursor to the first Action field.
Step 4 Use the Select and Rev Select keys to step through the token listing until a blank line is displayed, or use the space bar to type blank spaces over the token. Press the Next Field key. The cursor advances to the next action token field in the rule.
Step 5 Repeat Step 4 until all fields in the template are blank, then press Enter. The database is automatically updated.
Step 6 Repeat Steps 2 through 4 for each template you want to delete.
Step 7 Press Exit to return to the ISDN Message Template Summary screen.
To leave the ISDN Message Templates screen without making any changes, press Exit, Prev Menu, or Main Menu. No changes are made to the database unless you press Enter.
To add an action token to an existing ISDN message template, complete the following steps:
Step 2 Use the Prev Screen, Next Screen, Tab, and < keys to advance the cursor to the Message field of the template you want to add.
Step 3 Use the Prev Field and Next Field keys to advance the cursor to the Action field preceding the one into which you want to insert the token.
Step 4 Press the Insert key. All action tokens, including that field, and the cursor, move down one line. Press the Prev Field key to move the cursor into the blank field.
Step 5 Use the Select and Rev Select keys to step through the token listing until the correct action token is displayed. Press the Next Field key.
Step 6 Repeat Steps 3 through 5 for each token you want to add.
Step 7 When all action tokens have been added, press Enter to automatically update the database.
Step 8 Press Exit to return to the ISDN Message Template Summary screen.
To leave the ISDN Message Templates screen without making any changes, press Exit, Prev Menu, or Main Menu. No changes are made to the database unless you press Enter.
To delete an action token from an existing ISDN message template, complete the following steps:
Step 2 Use the Prev Screen, Next Screen, Tab, and < keys to advance the cursor to the Message field of the template from which you want to delete a token.
Step 3 Use the Prev Field and Next Field keys to advance the cursor to the Action field from which you want to delete the token.
Step 4 Use the Select and Rev Select keys to step through the token listing until a blank line is displayed, or use the space bar to type blank spaces over the token. To delete more than one token in a template, advance to that token and change it to a blank line. This action also clears the corresponding IE/data field. Press Enter. The database is automatically updated and the screen display is updated to show the deletion of the action token(s) and its associated IE/data field(s).
Step 5 Repeat Steps 3 and 4 for each template from which you want to delete one or more action tokens.
Step 6 Press Exit to return to the ISDN Message Template Summary screen.
To leave the ISDN Message Templates screen without making any changes, press Exit, Prev Menu, or Main Menu. No changes are made to the database unless you press Enter.
You can access the following screens from the ISDN Message Templates screen:
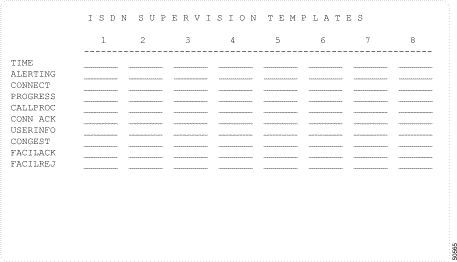
Use the ISDN Supervision Templates screens to configure up to 24 supervision templates for use with the ISDN SUP [xx] outpulse rule token. Each template defines a set of system responses to the detection of specific ISDN messages, such as ALERTING, CONNECT, PROGRESS, and CALL PROC (call proceeding).
Use condition tokens to specify individual system responses to these messages, or events. These responses include reporting, propagation of the message to the incoming port, call failure, or error condition reporting.
ISDN calls are not marked stable when a template is being executed unless the template specifies to do so. Generally, the receipt of a CONNECT message causes the state of the port to go stable.
After the end of an outpulse rule and before receipt of a CONNECT message, the system reports all received D-channel messages (IEs and messages) to the host as supervision outside an outpulse rule (change byte = $08) in an ISDN Port Change of State ($EA) report. When the system receives an ISDN CONNECT message, the call is considered answered and changes to stable. The ISDN CONNECT message is also propagated back to the incoming port if the incoming port is not considered answered.
To access the ISDN Supervision Templates screen (see Figure 2-7) from the Database Administration menu, type J and press Enter. There are three screens; each contains eight template listings. The displayed screen is that of the selected template. The cursor is located in the Time token field of Template 1.
Press Prev Screen and Next Screen to page through the listings. Press Tab and < to move between the templates. Press Print Screen to obtain a hard copy of any of the screens.
|
Note A version of ISDN must be installed in order to access any ISDN System Administration screen. |
The ISDN Supervision Templates screen contains nine columns of data. The leftmost column contains ten event fields, which we refer to as the Events Column. The remaining columns have eleven fields each—they begin with a template number at the top, followed by ten data entry fields below—which we refer to as Template Number Columns. As you can see in Figure 2-7, there are eight Template Number Columns. The Events Column and the Template Number Columns are described as follows:
Events Column—Display only. For the first event, TIME, identifies a timer event for which an action is specified. The remaining event fields identify the ISDN message for which an action is specified. The event values are listed in Table 2-19. Definitions for ISDN messages are contained in the International Telecommunications Union document ITU-T Q.931.
Table 2-19 ISDN Supervision Templates Event Values and Meanings
|
Template Number Columns—The template numbers fields (1 to 8) are display only; the data entry fields are for your use—Data entry via Select or Rev Select keys.
The template number field identifies the specific template configuration for use with the ISDN SUP [xx] outpulse rule token.
The data entry fields specify the events to be detected, and consequent actions taken when each event is detected, including host reporting, propagating events, and indicating error conditions. These condition tokens define the action for the system to take when the event is detected during template processing.
Ten condition tokens specify individual system responses, and combinations of responses, to a signaling event, such as report generation. Condition tokens also use the detection of the event as an indicator of error conditions and failed calls. Condition tokens are defined for each signaling event; events are disregarded when no token is defined for the event.
Use the Select and Rev Select keys to display the condition tokens, which will vary according to supervision events. The possible tokens are described below, and listed in the order in which they appear as selections.
Indicates that an event was detected during processing of the ISDN SUP [xx] outpulse rule token. The event is not reported to the host when it occurs. When the event is detected, the ISDN SUP [xx] token is satisfied and template processing ends. Outpulse rule processing continues with the token following the ISDN SUP [xx] until the rule completes or the call goes to stable state.
Indicates that an event was detected during processing of the ISDN SUP [xx] outpulse rule token. An ISDN Port Change of State ($EA) report to the host is generated. When the event is detected, the ISDN SUP [xx] outpulse rule token is satisfied and template processing ends. Outpulse rule processing continues with the token following the ISDN SUP [xx] token until the rule completes or the call goes to stable state.
Valid only for the CONNECT event. Indicates that a CONNECT event was detected during processing of the ISDN SUP [xx] outpulse rule token and that answerback was sent to the incoming port (assuming it has not already been answered). The event is not reported to the host when it occurs. When the event is detected and answerback sent, the ISDN SUP [xx] outpulse rule token is satisfied and template processing ends.
Outpulse rule processing continues with the token following the ISDN SUP [xx] token until the rule completes or the call goes to stable state. Because the outgoing port is considered answered when answerback is sent, the call automatically goes to stable state when outpulse rule processing completes. For ISDN-to-ISDN calls, answerback takes the form of a CONNECT event message generated for the incoming call. Use of this token provides the correct answer supervision of non-ISDN incoming calls.
Valid only for the CONNECT event. Indicates that the system detected a CONNECT event during processing of the ISDN SUP [xx] outpulse rule token and sent answerback to the incoming port (assuming it has not already been answered).
The system generates an ISDN Port Change of State ($EA) report to the host. When the event is detected and answerback sent, the ISDN SUP [xx] outpulse rule token is satisfied and template processing ends. Outpulse rule processing continues with the token following the ISDN SUP [xx] token until the rule completes, or the call goes to stable state. Because the outgoing port is considered answered when answerback is sent, the call automatically goes to stable state when outpulse rule processing completes. For ISDN-to-ISDN calls, answerback takes the form of a CONNECT event message generated for the incoming call.
Use of this token provides the correct answer supervision for non-ISDN incoming calls.
Indicates that an event will be reported to the host when detected. An ISDN Port Change of State ($EA) report is generated containing the event indicator. Events marked with REP condition tokens do not satisfy an ISDN SUP [xx] outpulse rule token; template processing continues until an event marked with another type of condition token is detected.
Indicates that a signaling event has detected a failed call. The event is not considered a supervision error. The outgoing port is removed from the call and the incoming port is left in setup. The system generates an ISDN Port Change of State ($EA) report, indicating a failed call attempt. Template processing ends when the event is detected and the outpulse rule is aborted.
Indicates that an event caused outpulse rule processing to abort. Template processing ends and the outgoing port returns to the state it was in prior to outpulse rule processing, but is not removed from the call. An ISDN Port Change of State ($EA) report is generated, indicating an outpulse rule failure. The QUIT condition token event can occur at any time during outpulse rule processing, even after the port is considered answered.
Valid only for ALERTING, PROGRESS, and CALL PROC events. Indicates that an event was detected during processing of the ISDN SUP [xx] outpulse rule token and that the event is to be propagated (sent back) to the incoming port.
If the incoming port is a non-ISDN resource, only the ALERTING message can be propagated, and the incoming port is presented with ringback tone. No report is generated. Events marked with PRP tokens do not satisfy an ISDN SUP [xx] outpulse rule token; template processing continues until an event marked with another type of condition token is detected. The CONNECT message can be propagated back to the incoming port through the ANSBK and ANSREP tokens.
Valid only for ALERTING, PROGRESS, and CALLPROC events. Indicates that the system detected an event while processing the ISDN SUP [xx] outpulse rule token, and that the event is to be propagated (sent back) to the incoming port.
If the incoming port is a non-ISDN resource, only the ALERTING message can be propagated and the incoming port is presented with audible ringback tone. The system generates an ISDN Port Change of State ($EA) report containing the event indicator. Events marked with PRPREP tokens do not satisfy an ISDN SUP [xx] outpulse rule token; template processing continues until an event marked with another type of condition token is detected.
To add an ISDN supervision template, complete the following steps:
Step 2 Use the Prev Screen, Next Screen, Tab, Prev Field, and Next Field keys to advance the cursor to the first token field of the template you want to add.
Step 3 Use the Select and Rev Select keys to step through the condition token listing until the correct token is displayed. Press Next Field.
Step 4 Repeat Step 3 until all condition tokens for the template are displayed on the screen. Use the Prev Screen, Next Screen, Tab, <, Prev Field, and Next Field keys to advance the cursor to the first token field of any other templates you want to add. Repeat Steps 2 through 4 for all other templates.
Step 5 When all templates are entered, press Enter. The database is automatically updated.
Step 6 When all templates are entered, press Exit to return to the Database Administration menu.
To leave the ISDN Supervision Templates screen without making any changes, press Exit, Prev Menu, or Main Menu. No changes are made to the database unless you press Enter.
To delete an ISDN supervision template, complete the following steps:
Step 2 Use the Prev Screen, Next Screen, Tab, Prev Field, and Next Field keys to advance the cursor to the first token field of the template you want to delete.
Step 3 Use the Select and Rev Select keys to step through the condition token listing until a blank line is displayed. Press Next Field. The cursor advances to the next token field in the template.
Step 4 Repeat Step 3 until all fields in the template are blank.
Step 5 Repeat Steps 2 through 4 for each template you want to delete. Press Enter after all deletions are made. The database is automatically updated.
Step 6 Press Exit to return to the Database Administration menu.
To leave the ISDN Supervision Templates screen without making any changes, press Exit, Prev Menu, or Main Menu. No changes are made to the database unless you press Enter.
To add a condition token to an existing ISDN supervision template, complete the following steps:
Step 2 Use the Prev Screen, Next Screen, Tab, Prev Field, and Next Field keys to advance the cursor to the token field into which you want to insert the token.
Step 3 Use the Select and Rev Select keys to step through the condition token listing until the correct token is displayed. Press Next Field.
Step 4 Repeat Steps 2 through 4 for each condition token you want to add.
Step 5 When you have completed adding all condition tokens, press Enter. The database is automatically updated.
Step 6 Press Exit to return to the Database Administration Menu.
To leave the ISDN Supervision Templates screen without making any changes, press Exit, Prev Menu, or Main Menu. No changes are made to the database unless you press Enter.
To delete a condition token from an ISDN Supervision Template, complete the following steps:
Step 2 Use the Prev Screen, Next Screen, Tab, Prev Field, and Next Field keys to advance the cursor to the token field you want to delete.
Step 3 Use the Select and Rev Select keys to step through the condition token listing until a blank line is displayed. If you want to delete more than one condition token in a template, advance to that token and change it to a blank line. The screen display is updated to show the deletion of the token(s).
Step 4 Repeat Steps 2 and 3 for each template from which you want to delete one or more condition tokens. Press Enter after all deletions are made. The database is automatically updated.
Step 5 Press Exit to return to the Data Base Administration menu.
To leave the ISDN Supervision Templates screen without making any changes, press Exit, Prev Menu, or Main Menu. No changes are made to the database unless you press Enter.
You can access the following screens from the ISDN Supervision Template screen:
The Display Card Data screen fully supports the ICC ISDN span. No changes have been made to the screen fields or layout for this ISDN functionality; additional values have been added to the Card Status and Alarm States fields.
|
Note Although additional values can be displayed for other span types, the span status values listed in Table 2-20 are specific to the ICC ISDN span. Alarm states for the ICC ISDN spans are listed in the "Card Alarm State Messages" section. |
When you use the Display Card Data screen to display a ICC ISDN span, the status field indicates the status of the span's D-channel. Possible values for this field are listed in Table 2-20.
Table 2-20 ICC ISDN Span Status Values and Meanings
|
The Display Card Data screen is fully documented in the Cisco VCO/4K System Administrator's Guide.
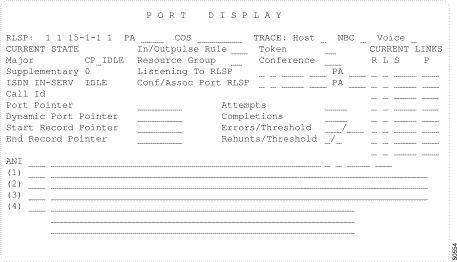
The Port Display screen is shown in Figure 2-8.
Three fields in the Port Display screen are specific to ISDN channels—IN-SERV, which indicates the ISDN port state; IDLE, which indicates the ISDN port state's associated call state; and Call Id. These fields are described in detail below.
In addition to the three ISDN specific fields, there are the standard Port Display screen fields, which are described in the Cisco VCO/4K System Administrator's Guide.
IN-SERV—Display only. Identifies the state of the ISDN port (channel) being displayed. Possible values are listed in Table 2-21.
Table 2-21 ISDN Port State Field Values and Meanings
|
IDLE—Display only. Identifies the state of the ISDN call carried on the displayed port (channel). Possible values and corresponding User-Side call states and state numbers are listed in Table 2-22.
Definitions for user-side call states and state numbers are contained in the International Telecommunications Union document ITU-T Q.931.
CALL ID—Display only. Indicates the call identification assigned to this call attempt by the system. The system ensures that call identification values are unique for the life of the call. CALL ID values range from 1 to 127 for each D-channel.
ICC ISDN spans are supported by the card alarm state display function. The Card Alarm Display screen displays these card alarm messages which are defined in Table 2-23. Two abbreviations, which precede each message, indicate alarm importance.
The alarm state messages accommodate both ICC ISDN T1 spans and ICC ISDN E1 spans.
Refer to the Cisco VCO/4K System Administrator's Guide for further information on the Card Alarm Display screen. Refer to the Cisco VCO/4K System Messages for more information on card alarm state messages.
Table 2-23 Card Alarm State Messages and Meanings
|
![]()
![]()
![]()
![]()
![]()
![]()
![]()
![]()
Posted: Fri Jan 23 12:14:25 PST 2004
All contents are Copyright © 1992--2004 Cisco Systems, Inc. All rights reserved.
Important Notices and Privacy Statement.