|
|

This chapter presents the following major topics:
 |
Note This chapter does not cover the details of using the Cisco UGCA browser-based application, except for launching it and performing basic housekeeping. Instructions for using that application to generate and view reports are available in the online help. |
To access Cisco UGCA from a Web browser, do the following:
|
Note Initial releases of this application require Microsoft Internet Explorer. Make sure you have read "Installing Cisco UGCA," in particular Prerequisites. |
where FQDN is the fully qualified domain name of the application server (for example, myserver.mydomain.com)
 |
Tip You may get a warning that the security certificate was not issued by a trusted company. You can add the certificate now. This stops future warning messages from appearing when you launch the application. |
Step 2 Enter your user ID and password.
The predefined user ID is admin.
The predefined password is admin.
You are now connected to Cisco UGCA and can create reports.
Maintaining the Cisco UGCA application on the server is discussed in the remainder of this chapter.
A brief introduction to using Cisco UGCA follows. For more details, see the online help. The major tasks, in order, are as follows:
To load CDR records in the form of syslog files, do the following:
Refer to Loading CDR Data. The syslog records are saved in /tmp/syslog.log.
Step 2 Open a UNIX terminal window and login as root.
Step 3 Enter the following to run CDRLoader and load the syslog file into the application:
where install is the user-selected installation directory. The following messsage should appear:
Step 4 After the job is started, you can observe its status in the browser.
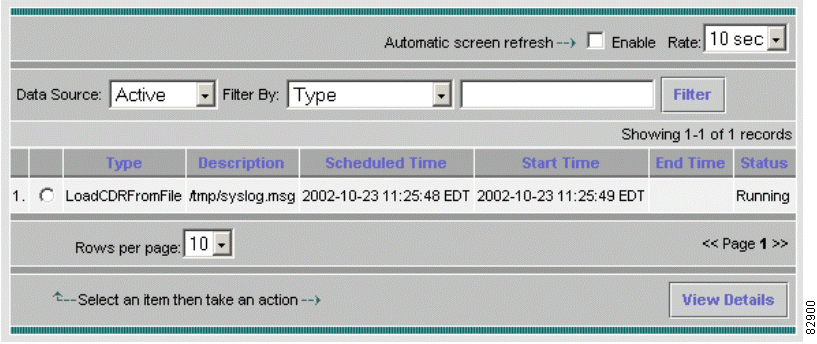
a. Job status is initially considered active. To confirm this, choose Reports > Job Status from the main window. Choose Data Source > Active. See Figure 3-1.
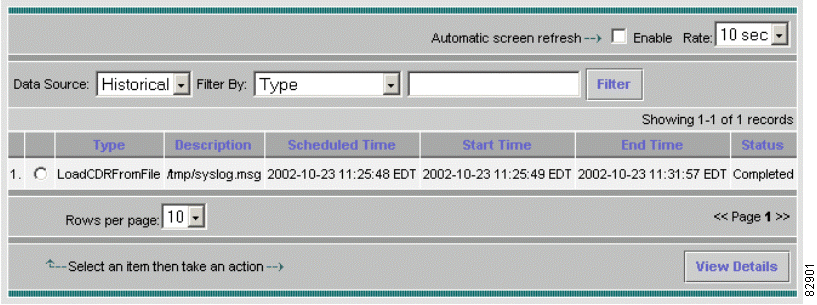
b. After the job is completed, it is moved to the historical job list. To confirm this, choose Reports > Job Status from the main window. Choose Data Source > Historical. See Figure 3-2.
An output file containing statistics, /tmp/syslog.log.result, is generated.
To generate a report for call volume distribution across nodes for calls lasting longer than 300 seconds, do the following:
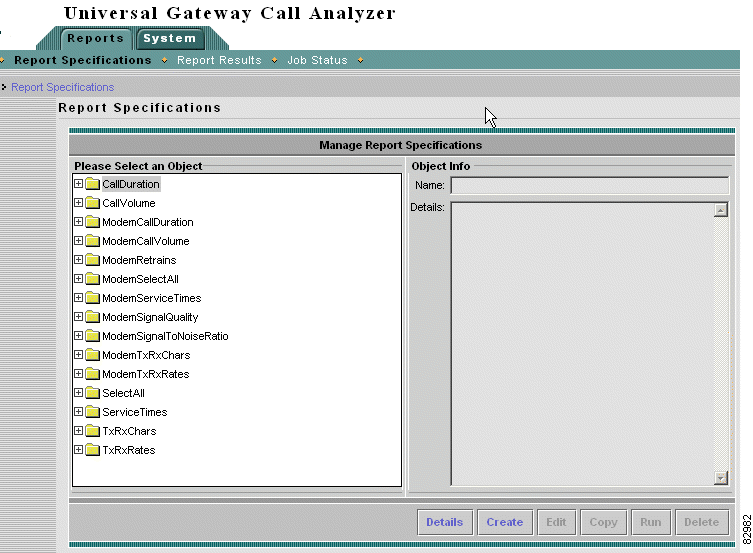
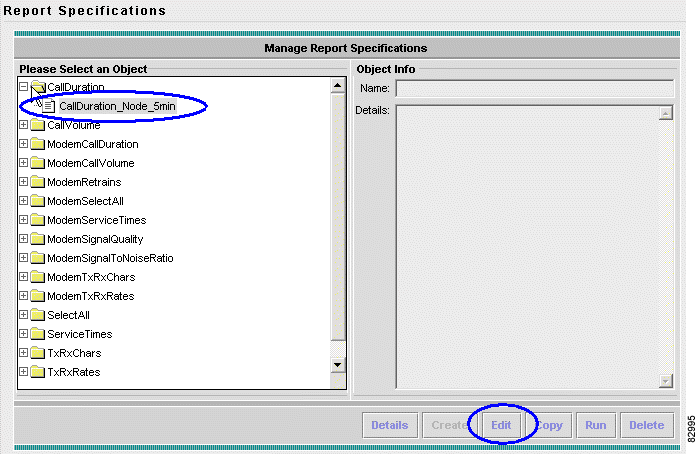
a. Choose Reports > Report Specifications. The Manage Report Specifications window appears. See Figure 3-3.
b. Click the folder Call Duration.
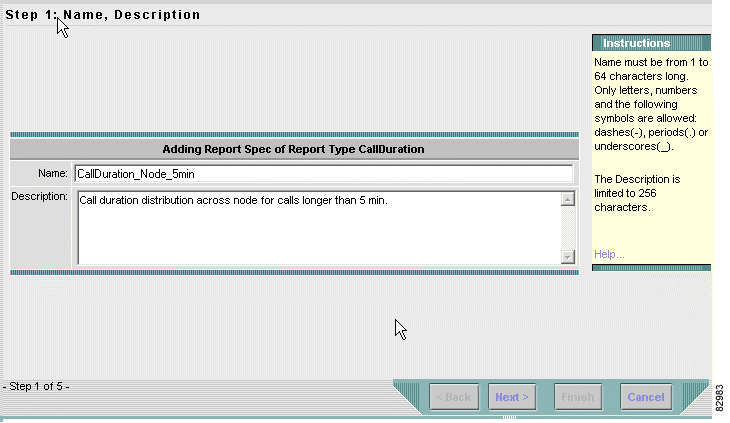
c. Click Create, at the bottom right. The Name, Description window appears. See Figure 3-4.
Step 2 Enter a report name and description.
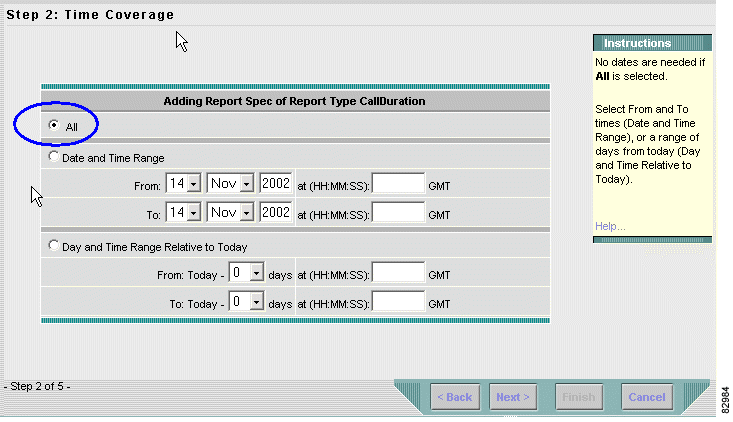
c. Click Next. The Time Coverage window appears. See Figure 3-5.
Step 3 Configure time coverage.
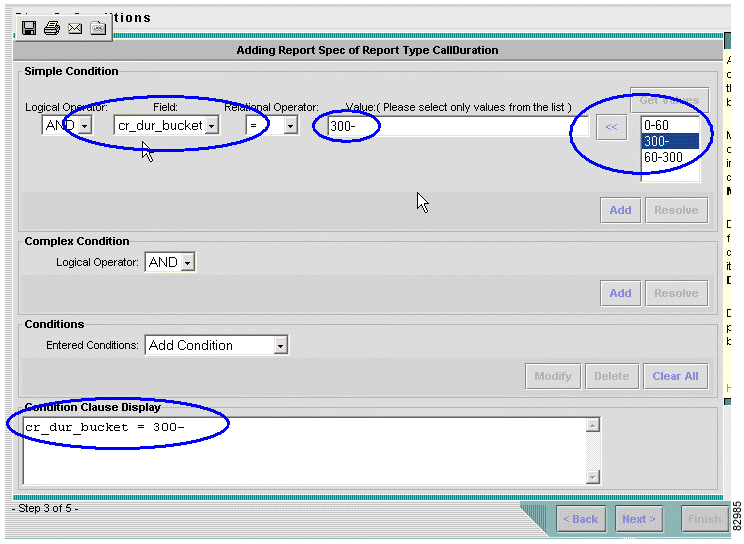
b. Click Next. The Configuring Conditions window appears. See Figure 3-6.
Step 4 Configure conditions.
a. Under Field, choose cr_dur_bucket.
b. Under Get Values, choose 300-.
c. Click << to populate the Value field.
d. Under Get Values, click Add.
e. Leave other conditions at their default values.
f. Note the Condition Clause Display field at the bottom, and verify that it reads as follows:
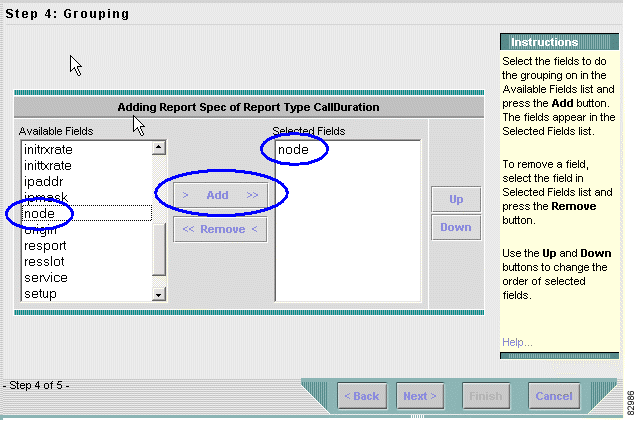
g. Click Next. The Grouping window appears. See Figure 3-7.
Step 5 Configure grouping.
a. Under Available Fields, choose node.
c. Under Selected Fields, verify that node is added.
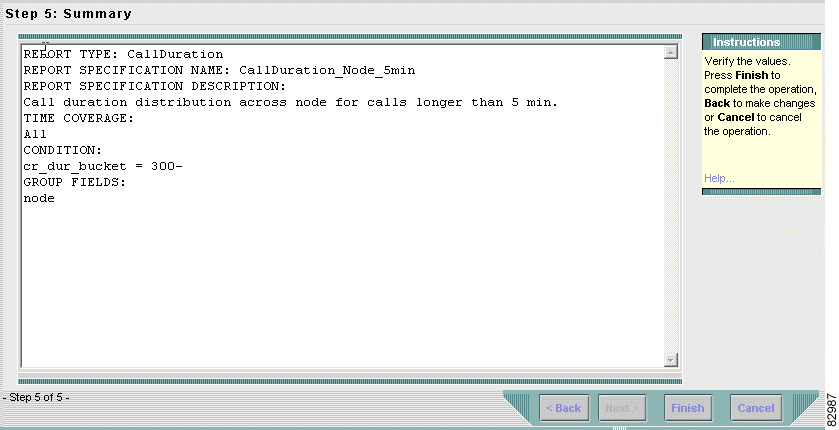
d. Click Next. The Summary window appears. See Figure 3-8.
Step 6 Verify the report specification.
a. In the Summary window, verify the report specification.
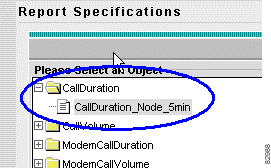
b. Click Finish. The Report Specifications window appears. See Figure 3-9.
Step 7 Finish creating the report specification.
a. Look at the Report Specifications window.
b. Verify that the report specification CallDuration_Node_5min is created under CallDuration.
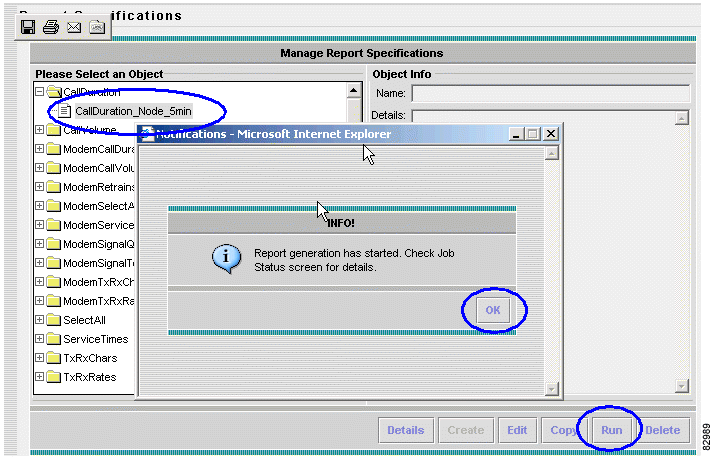
To generate a report, do the following:
a. From the main menu, choose Reports > Report Specifications. The Manage Report Specifications window appears. See Figure 3-10.
b. Choose Call Duration > CallDuration_Node_5min.
c. Click Run, at the bottom of the window. A dialog box confirms that report generation has started.
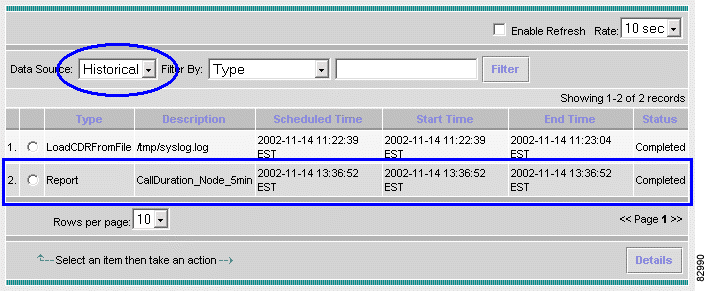
Step 2 Verify that report generation has completed.
a. From the main menu, choose Reports > Job Status. See Figure 3-11.
b. Choose Data Source > Active. Wait until the task CallDuration_Node_5min disappears from the list.
c. Choose Data Source > Historical. Look under the Status column to verify that the report generation is completed.
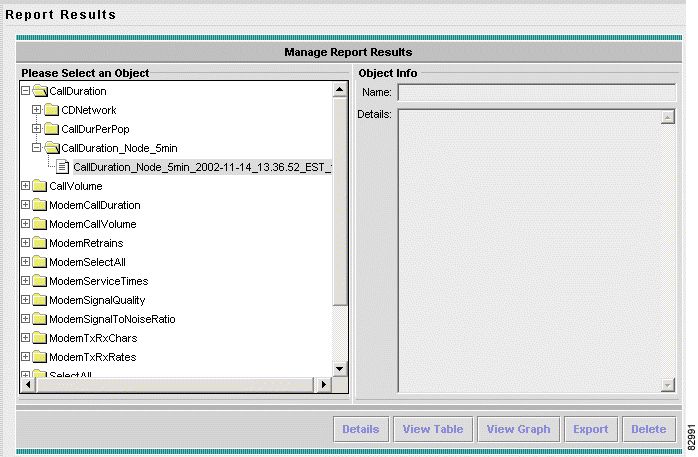
To view a report, do the following:
a. From the main menu choose Reports > Report Results. The Report Results window appears. See Figure 3-12.
b. Double-click the folder CallDuration to expand it, and find the folder CallDuration_Node_5min.
c. Open the folder CallDuration_Node_5min and choose the report result that has the appropriate time stamp.
|
Note The timestamp of a report result is taken from the End Time of the job (see Step 2 in Task 3: Generate a Report 3-11. Reports of the same type that are run at different times will have different time stamps appended to the original title. In our example, we are concerned with only a single report. |
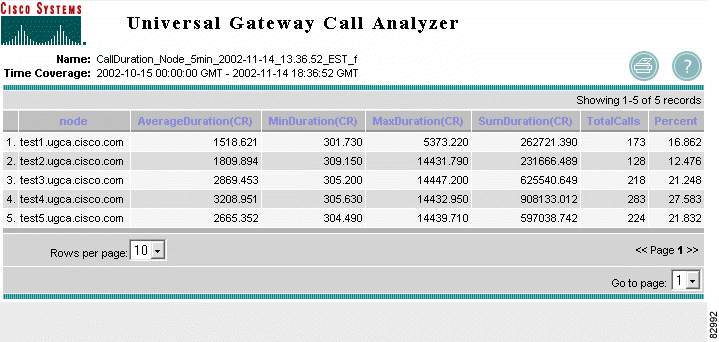
Step 2 View the report as a table. See Figure 3-12.
a. Click View Table. Report details appear. See Figure 3-13.
Step 3 View the report as a graph. See Figure 3-12.
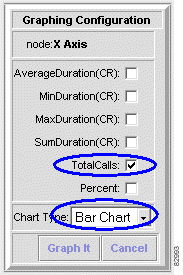
a. Click View Graph. The Graphing Configuration window appears. See Figure 3-14.
b. Choose TotalCalls as the value to be displayed.
c. Choose Bar Chart as the type of the graph.
d. Click Graph It. In our example, the following bar chart appears. See Figure 3-15.
Step 4 Print the report. You can print a report from either table or graph views.
a. To print a report as a table, first view the report as a table. (See Step 2 in this task.)
b. Within the selected view, select the printer icon. A new window with the report in printable format is displayed.
d. To print a report as a graph, first view the report as a graph. (See Step 3 in this task.). Then repeat Step b and Step c immediately above.
a. From the main menu, choose Reports > Report Specifications. The Manage Report Specifications window appears. See Figure 3-16.
b. Double-click the folder CallDuration to expand it, and find the folder CallDuration_Node_5min.
c. Open the folder CallDuration_Node_5min and choose the report result that has the appropriate time stamp.
Step 2 Modify the report specification.
The procedure for modifying a report is the same as in Task 2: Create a Report Specification, except that you can choose specific screens to modify directly.
Perform the following routine maintenance procedures as needed to maintain Cisco UGCA:
 |
Caution Root access is required for the following activities. |
|
Note The output messages resulting from purging, backing up, restoring, starting, and stopping Cisco UGCA are also logged in syslog messages. |
|
Note In the following discussion, install represents the directory in which you installed the Cisco UGCA application. See also Managing crontab Entries for Backups and Purges. |
A purge utility purges data older than the specified age and is located in the following directory:
install/CSCOugca/bin/purge.sh.
The utility purges three data sets:
|
Note Apache Tomcat is the servlet container that is used in the official Reference Implementation for the Java
Servlet and JavaServer Pages technologies. The Java Servlet and JavaServer Pages specifications are
developed by Sun under the Java Community Process. For more information, refer to the Apache Jakarta
Project at the following URL: http://jakarta.apache.org/tomcat/ |
The purging is controlled by age parameters specified in the configuration file install/CSCOugca/etc/config/ugca.xml, under the module "purge."
The parameters are as follows:
To purge the data, enter the following at the UNIX command line:
For loaded syslog data, data falling into the following range is purged:
(current date in GMT) - (call setup date in GMT) >= (callrecordsage + 1)
For historical job entries, data falling into the following range is purged:
(current date in local time) - (job end date) >= (tasksage + 1)
For Apache Tomcat log files, data falling into the following range is purged:
(current local time) - (last time log file was modified) >= tomcatlogsage * 24 hour
|
Note The use of the "+ 1" leaves the current day's data. For callrecordsage = 0 (the minimum allowed value), data for the previous day and earlier is purged. |
|
Caution Before attempting a backup, you must ensure that sufficient free memory is available to accommodate the files. See Determine Free Disk Space. |
|
Note The backup directory must exist before this utility can be run. See also Managing crontab Entries for Backups and Purges. |
The backup utility is located in the following directory:
install/CSCOugca/bin/backup.sh
The utility will back up the database plus the directory install/CSCOugca/etc into the specified backup directory. The backup directory is specified in the configuration file install/CSCOugca/etc/config/ugca.xml, under the module "backup" with the parameter "backupdir."
To back up the system, enter the following at the UNIX command line:
The backup file is compressed and is named automatically in the following ISO-standard format (HH represents time in 24-hour format):
|
Note If the Cisco UGCA server is up before a backup is run, the backup utility stops the server first, then restarts the server following the backup. If the server is down before the backup is run, it remains down following the backup. |
|
Note Before restoring the system, shut down the Cisco UGCA server. See Stopping Cisco UGCA. |
To restore the system, enter the following:
This command takes as its parameter the filename and path as discussed in Backing Up the System, above. This restores either the database, the directory install/CSCOugca/etc, or both the database and the directory.
|
Caution Cisco strongly recommends that you run the backup utility first, to back up the current database and the /etc directory. If a restore fails, the system attempts to revert to the previous database files, but this cannot be ensured. |
|
Caution Do not stop Cisco UGCA while maintenance activities (backup, restore, reset, purge, check_markup) are in progress. If a report is running or a file is being loaded, stopping the application aborts these activities. |
To stop Cisco UGCA on the server, enter the following:
Note the following caveats and example reports following a stop command. The following cases are considered:
|
Note User input is highlighted in bold. |
The stop command first checks whether any Cisco UGCA processes are running. If none are running, the application exits.
If any Cisco UGCA processes are running, then a stop command asks them to shut down and report on success:
If the system is busy, it may take more than a minute for the application to exit.
|
Caution Do not interrupt a stop command during this time or attempt to run another stop. |
If any problems are encountered as the process is shutting down (for example, the process does not reply to the request to shut down), then the stop command will report that it encountered problems. This should be taken only as a warning, as it is the eventual success of the stop process that really counts. In the example below, a stop command encounters some issues but eventually runs successfully:
The only circumstances under which the user needs to take further action is when a stop command reports that some processes remained running. For example:
|
Note The system may or may not report "Problems encountered whilst shutting down." What counts is the line "UGCA stop failed, the following processes were detected:" followed by a list of processes. |
To return the system to a stable state, first try issuing a stop command again. If the system still reports that it detected Cisco UGCA processes, do the following:
Step 2 Issue another stop command.
Step 3 If processes are still reported, use the kill command again, this time with the -9 flag:
Step 4 Issue another stop command.
The system is down when a stop reports either of the following:
At this point you can then either (1) perform a maintenance activity that requires a stopped system, or (2) start the system again. When the process of stopping the system is started, continue until the system is successfully stopped. Do not attempt to restart the system or perform a maintenance activity that requires a stopped system until the system is finally down.
|
Caution Any maintenance activity (such as restore, reset, check_markup) that requires a stopped system followed by a start refuses to run if the system is not totally stopped. |
Resetting the database returns it to the state it is in immediately following an installation.
|
Caution A reset removes all data from the database and reverts to the predefined user ID and password of admin. |
Step 2 To reset the Cisco UGCA database, enter the following:
To start Cisco UGCA on the server, enter the following:
Step 2 Follow the prompts. The system stops CSCOugca first, before removing it from the server.
Session timeout is a mechanism that will invalidate a user session after a predefined number of minutes of inactivity. The invalidation of a user session also causes all locked resources to be unlocked.
|
Note The ReportSpec is locked whenever a user goes to "Edit mode." In this case no other session can delete the ReportSpec or edit it. However, session timeout unlocks the ReportSpec. |
The default timeout is 10 minutes.
install/CSCOugca/jakarta-tomcat-4.0.3/webapps/ugca/WEB-INF/web.xml
Step 2 Find the following line and change the default timeout value, taking care to write and save the file:
By default, the crontab file is set to add entries to run a backup at 10:00 p.m. and purge data at 5:00 a.m. daily. If you chose not to enable backups and purges during installation, you can use the crontab command to enable them now, as well as to change the default times.
When the system is removed, these entries are removed from the crontab file for the root user. The following is a sample crontab file.
The last two lines belong to the application, and are always added when the package is installed and removed when the package is removed. The "#" signs mean that these lines are commented out. If you answer yes to the enabling of backup or purge during installation, then the "#" is removed automatically from the beginning of the appropriate line. The backup line says to run the backup script at 0 minutes past 22 hours on the * (every) day of the month, on * (every) month of the year and * (every) day of the week. The purge script is similar, this time running at 5 a.m. instead of at 10 p.m. The format of this file and how to manipulate it is described if you type the following, to launch the UNIX man page for crontab:
|
Note The rest of the file was established by the Sun Solaris operating system during installation. |
Cisco UGCA uses a program called CDRLoader to load CDR data into the database for report generation. The CDRLoader script prints out usage information such as the following. Below is the default without special parameters set.
|
Note User input is highlighted in bold. The value of install is the user-selected installation directory. |
For example, to load a syslog file with the filename /tmp/syslog.msg, the resulting file is generated in the same directory with the following name:
Internally, the CDR loading request was translated into a job. CDRLoader then executes this job. During execution, if you open the "Job Status" page and select "Active" jobs on the browser, the status of this job is displayed. After the job is executed, you can display it by choosing "Historical" as the data source.
Figure 3-17 illustrates the status of a running LoadCDRFromFile job.
Figure 3-18 illustrates the status of the completed job.
The result file is always generated. If the operation was successful, it contains the statistics of the execution. Otherwise, it contains error messages. An additional purpose of the result file is to automate CDR loading. An external script can create the syslog file, invoke the loadcdr_file.sh script, and wait for the creation of the result file. By analyzing the contents of the result file, the script can also determine whether the file loaded successfully.
The configuration of CDRLoader is stored in the following files:
During system startup, the backend server reads the file ugca.xml. This file is the master source of configuration for the Cisco UGCA system. Then, the backend server starts a process that reads only the file cdrloader.xml. When an attribute in the configuration is queried, CDRLoader looks locally first, to the file cdrloader.xml on the client machine. If the attribute is found, it is returned. Otherwise, it forwards the query to the backend server, which has the content of the file ugca.xml.
|
Note In other words, if a configuration aspect is configured in ugca.xml and not in cdrloader.xml, CDRLoader uses the configuration from ugca.xml. If the aspect is also configured in cdrloader.xml, CDRLoader uses the configuration from cdrloader.xml. See the following Tip. |
|
Tip For example, you may want to change only the logging level configuration in cdrloader.xml. If you change it in ugca.xml, it affects all processes. |
The format of ugca.xml and cdrloader.xml is identical. In most cases, it is sufficient to use only ugca.xml. However, some situations require cdrloader.xml. For example, the user may want to change only the logging level of CDRLoader. Table 3-1 lists and describes CDRLoader configuration attributes, with their defaults.
Table 3-1 CDRLoader Configuration Attributes
|
Note A result file is not created when the CDR loader process is not shut down properly. An example of an improper shutdown is the use of the UNIX command kill -9 or the unplugging of the power cord. |
Markup data is generated from raw CDR data. Markup data (table markup) is stored in the database . The primary purpose of markup data is to increase the efficiency of report generation, as well as to provide some level of normalization of raw data. For a better understanding of this topic, some knowledge of SQL and high-level programming languages is required.
Markup is generated automatically during the loading of CDR data, and no direct user involvement is required. However, user interaction is required for configuration and maintenance.
This section presents the following major topics:
General configurations are stored in the file markup.xml. Table 3-2 lists and describes markup configuration attributes, with their defaults.
Table 3-2 General Markup Configurations
The database schema and rules used for markup generation are totally controlled by the configuration file markup.xml (defined by markup.dtd). Changes in this file can be detected automatically during system startup, but the user must manually invoke a utility for the changes to take effect. Below is the file markup.dtd:
The content of the file markup.xml must be 100 percent compliant with its DTD, markup.dtd. Internally, all markup data is stored in a table called markup. As defined in the DTD, the root element MarkupSetup consists of one or more MarkupAttributes. Each has the following attributes:
A MarkupAttribute can have 0 or 1 MarkupAttrEnumTypes. If an enumeration type is presented in the definition of a markup attribute, this attribute is interpreted internally as an enumeration type. This type must be unique across the system. A MarkupAttrEnumType has the following attributes:
A MarkupAttrEnumType consists of one or more Pairs (name-value mappings).
The following is a simplified example of markup.xml:
The rules used to generate markup data are similar to those of a simple programming language. Note that the XML specification requires the use of character sequences for certain characters. For better readability, most examples in the text will not substitute the following:
|
Note The full BNF grammar for markup generation rule can be found in "BNF for Markup Interpreter: Terminals and Nonterminals." The file makup.xml is shown in "Cisco UGCA Markup: markup.xml and call_record.discid." |
The return value of the markup logic should always be saved in the variable value. After execution, if this variable cannot be found in the internal symbol table, the default value defined in previous section is used.
The rules are applied to call record and modem record pairs; all values in these records are accessible from the markup interpreter. Details about these tables can be found in "Cisco UGCA Database Schema." For example, the following are call record and modem record pairs:
| Variable | Explanation |
|---|---|
The following additional topics are illustrated below:
The following comment styles are supported:
Only two data types are supported: string and number. Strings are character sequence quoted by `"'.
|
Note In the XML file, `"' must be substituted by `"e;'). |
Any number is interpreted as a float internally (range: -2139095040 to 2139095039).
| Operation | Explanation |
|---|---|
Matching. Returns the first match of a regular expression (right-hand side) from the left-hand side. |
"if" "(" Expression ")" Statement ( "else" Statement )?
PrimaryExpression "=" Expression
Table 3-3 illustrates a fully commented section from markup.xml. See also "Cisco UGCA Markup: markup.xml and call_record.discid."
Table 3-3 Markup Attributes and Explanations
| Markup Attribute | Explanation |
|---|---|
|
If call duration defined in table call_record is greater than 300, set cr_dur_bucket value to enumeration value 3 (300-).
|
The first column represents bucketized call duration in the call_record according to the following criteria:
You can manually invoke the script check_markup.sh to perform markup data maintenance.
|
Caution You must stop the system first before performing maintenance. See Stopping Cisco UGCA. |
Under normal circumstances, no maintenance is required. During system startup, the system performs checks on markup data and determines if maintenance of markup data is required. If system decides, that maintenance of markup data must be performed, it prints out a warning message. However, it does not perform markup data maintenance automatically.
The script install/CSCOugca/bin/check_markup.sh tries to detect the following:
If maintenance of the markup data is required, the script performs one of the following actions:
The following example illustrates markup data being repaired:
|
Note Currently, Cisco UGCA provides mostly error checking of the file markup.xml at the syntax level. Logical errors such as invalid enumeration values may not be detected. |
The logging facility of Cisco UGCA captures information about the state of the system. This information is stored as text files in the directory install/CSCOugca/logs. As these files increasingly consume space on the hard disk, memory consumption must be managed.
Two parameters, or "pair keys," in the configuration file install/CSCOugca/etc/config/ugca.xml control the logging files volume:
These pair keys are found under the section "Module logger" in the file. See "Cisco UGCA Configuration File: ugca.xml."
For example, if limit is set to 500000 (500 KB) and count is set to 5, the total cumulative size of the log files will be no more than 2.5 MB.
To edit the limit and count log file parameters (pair keys), do the following:
Step 2 Stop and restart the system.
Cisco UGCA provides a limited read-only access to the historical data the application stores. For more information and a presentation of the database schema, see "Cisco UGCA Database Schema."
Cisco UGCA contains two database accounts, a system account that is used by Cisco UGCA and a user account for read-only access to the raw data. See the Accessing and Reading Raw Data section in this chpater.
|
Note Before changing the database account passwords, shut down the Cisco UGCA server. See the Stopping Cisco UGCA section in this chapter. |
To change the system password, enter the following:
To change the user password, enter the following:
In both cases, follow the prompts to complete the changes.
Cisco UGCA provides a variety of utility tools, or scripts, to assist you in general maintenance as well as in troubleshooting:
Some releases of Cisco IOS have Cisco Call Tracker syslog messages that need repair. The following are currently known issues:
|
Note A missing comma has been identified after authen=aValue. Another has been identified in CALLTRKR-6-CALL_RECORD before the init-rx field. Negative values for numbers greater than the maximum positive value of an integer have been identified for 32-bit counters of rx/tx chars in CALLTRKR-6-CALL_RECORD and rx/tx: chars in CALLTRKR-6-MODEM_CALL_REC. The utility script deals only with these defects. For any other defects you can edit the script to make the desired corrections to the syslog records. |
A scripting tool has been developed to address these issues, by correcting malformed Cisco Call Tracker syslog messages into correct ones that can be loaded into the Cisco UGCA application. The scripting tool is on the application CD-ROM, in the directory /utils/tools. The scripting file name is repairSyslog.awk.
You can launch the script from the directory /utils/tools, or you can copy it to a working directory and launch from there.
input_file_name is the input syslog file to be fixed, and output_file_name is the output (fixed) syslog file that can be loaded into the Cisco UGCA application.
The script provides a summary containing information about the following:
Two example scripts, push_syslog.sh and pull_syslog.sh, are provided to schedule the loading of syslog files by means of the UNIX cron utility. These scripts address the following scenario:
|
Caution The environment setup and configuration may vary considerably from customer to customer. Consequently, these scripts should be used only as a starting point, and should be modified according to the actual environment. |
This script takes two parameters: input_file_name and output_file_name. It reads the input file (in this example, /var/log/syslog7.log), repairs the syslog files, and saves the verified files to the output file. It then clears the input file after the result file is created, in preparation for the next invocation. The output file can be accessed by the Cisco UGCA system.
This script takes one parameter: input_file_name. It invokes CDRLoader to load the input file. CDRLoader automatically provides the output file name, which is the input file name plus the time stamp of the invocation. The output file is created in the same directory as the input file.
|
Note Reserve sufficient time between the input and output files, so that push_syslog.sh can create its output file completely. |
Both scripts can be invoked as cron tasks.
The following example creates a cron entry for each script to process syslog once a day at 01:00 UTC, with 15 minutes between the input and output files:
The scripts are located on the application CD-ROM, in the directory /utils/sample.
A sample script, run_sch_report.sh is provided to schedule report generation by means of the UNIX cron utility. By default, the content of this script is completely commented out. You can modify or add new entries to this script, as well as create a cron entry for it.
|
Caution Because the environment setup and configuration may vary considerably from customer to customer, this script should be used only as a starting point. |
|
Note If you want to generate a report after CDR data is loaded to the system, make sure to leave enough time between CDRLoader's loading of the cron entry and the report generation. Also, during report generation, make sure no other maintenance activities or CDR loading are running. |
The script is located on the application CD-ROM, in the directory /utils/sample.
In case the database becomes corrupt, it is possible to repair it.
If the database is corrupt, console and syslog messages so indicate during a backup. In addition, the following error message appears when the application starts. The message also appears in the log files.
Also, other database error messages may appear in the log files. Check these files for messages if all other possible causes of database corruption have been eliminated. However, the absence of messages is not an indication of database integrity.
Once you have determined that the database is corrupted, you must repair it. To do so, run the script myisamchk script, as indicated below.
|
Caution Stop the system before proceeding. See Stopping Cisco UGCA. If you do not stop the system first, bogus errors are reported. If you try to fix these bogus errors, further corruption results. |
This checks for errors in all .MYI files.
Step 2 If errors are reported, repeat Step 1, but add --recover to the list of options only for the .MYI file reported to have errors.
This section contains known techniques that can resolve problems and improve performance.
|
Tip See also Using Cisco UGCA Utility Tools. |
The report engine can execute multiple reports in parallel. In turn, the maximum number of reports that are executable in parallel is determined by the configuration parameter nThreads in the following file:
install/CSCOugca/etc/config/ugca.xml
The default value for nThreads has been set to 1. This number optimizes performance on the minimum recommended hardware, the Sun Ultra 10. However, in some cases, on powerful multi-CPU machines with large memory and fast disks, it is beneficial to increase this default value to run parallel report-engine threads.
Where the machine is sufficiently capable, the user is free to experiment with the configuration parameter nThreads. If performance appears not to be affected, you can adjust this parameter and evaluate its effects. The file, presented in "Cisco UGCA Configuration File: ugca.xml,", should provide sufficient comments to enable you to understand the various parameters.
|
Note Although the system has been tuned for the hardware specified, a Sun Ultra 10, it scales well to
higher-end hardware. Because CDR loading is multithreaded and limited by CPU speed, using multiple
or faster processors speeds up loading. However, report running is disk bound, so using a machine with
sufficient memory (2 GB or more) for the operating system to cache the database files can dramatically
improve the performance of running individual reports. Once a report is running in memory and not off
the hard disk, it is limited by CPU speed. In this case, faster processors help, and adding more processors
and increasing the parameter nThreads increases parallel processing. It is recommended that you do not run multiple reports in parallel (change nThreads > 1) while reports are still running off the disk. The system is disk bound, and this slows down report generation. |
![]()
![]()
![]()
![]()
![]()
![]()
![]()
![]()
Posted: Thu Mar 27 17:19:43 PST 2003
All contents are Copyright © 1992--2002 Cisco Systems, Inc. All rights reserved.
Important Notices and Privacy Statement.