|
|

CiscoWorks Blue SNA View can be installed on AIX, SunOS, HP-UX, and Solaris.
You use the System Management Interface Tool (SMIT), an IBM AIX system administration facility, to install and configure CiscoWorks Blue SNA View from a local or remote CD-ROM drive. The example installation and configuration process described in this chapter uses the graphical user interface (GUI) version of SMIT; you can use the ASCII version called SMITTY, if you prefer. Refer to your IBM documentation for more information about SMIT and SMITTY.
In the process of installing and configuring CiscoWorks Blue SNA View Workstation, you do the following:
This section also contains instructions for deinstalling CiscoWorks Blue SNA View software.
The user named root can perform functions restricted from normal users. To install and configure CiscoWorks Blue SNA View, you must know the root user's password and log in to your system as the root user or become the root user by use of the su command. For information on how to become the root user, refer to the "Becoming the Root User" section in the "Installing and Configuring CiscoWorks Blue SNA View" chapter.
You can install CiscoWorks Blue SNA View from a CD-ROM drive attached to your system or from a drive connected to a remote system. You must first use SMIT to mount the local or remote device on the local AIX system.
 | Caution Avoid exposing the CiscoWorks Blue SNA View CD-ROM to direct sunlight because it could harm the contents. |
To mount the CD-ROM on the file system from a local CD-ROM drive, use SMIT to perform the following steps:
Step 1 Place the CD-ROM into its caddy, if necessary, and insert it into the CD-ROM drive.
Step 2 Log in as the root user. For details, see "Becoming the Root User."
Step 3 Start SMIT by entering the following at the command prompt:
smit
The main SMIT menu appears, as shown in Figure 3-1.

Step 4 From the System Management menu, click Physical & Logical Storage.
Step 5 Click File Systems.
Step 6 Click Add/Change/Show/Delete File Systems.
Step 7 Click CDROM File Systems.
Step 8 Click Add a CDROM File System.
Step 9 Click the "DEVICE name" List button and select the device name (such as /dev/cd0) from the list that appears.
Step 10 Enter the name of a mount point directory (such as /cdrom) in the "Mount point" field.
Step 11 Click Do and read the output.
Step 12 Click Done.
Step 13 Terminate SMIT by pressing F12 or by selecting Exit SMIT on the Exit menu.
Step 14 Enter the following at the command prompt:
smit mountfs
Step 15 Click the "FILE SYSTEM name" List button and select a device name (such as /dev/cd0) from the list that appears.
Step 16 In the "DIRECTORY over which to mount" field, enter the name of a mount point directory (such as /cdrom).
Step 17 Click the "TYPE of file system" List button and select cdrfs as the file system type.
Step 18 Set the "Mount as Read-Only System" field to yes.
Step 19 Click Do and read the output, and then click Done.
Step 20 Terminate SMIT by pressing F12 or by selecting Exit SMIT on the Exit menu.
To install software from a device on a remote system, you must have remote access rights to that system. Specifically, the .rhosts file (in the root directory) on the remote system must contain the local host name and your username to access the remote system. For more information, refer to the manual (man) page for .rhosts
Installation of CiscoWorks Blue SNA View does not require any disk space on the remote system. The software is copied across the network to the local workstation.
To mount the CD-ROM on the local file system from a remote CD-ROM drive, perform the following steps on the remote system:
Step 1 Place the CD-ROM into its caddy and insert it into the CD-ROM drive.
Step 2 Log in as the root user. For details, see "Becoming the Root User."
Step 3 Start SMIT by entering the following at the command prompt:
smit
The main SMIT menu appears, as shown in Figure 3-1.
Step 4 From the System Management list, click Physical & Logical Storage.
Step 5 Click File Systems.
Step 6 Click Add/Change/Show Delete File Systems.
Step 7 Click CDROM File Systems.
Step 8 Click Add a CDROM File System.
Step 9 Click the "DEVICE name" List button and select the device name (such as /dev/cd0) from the list that appears.
Step 10 Enter the name of a mount point directory (such as/cdrom) in the "Mount point" field.
Step 11 Click Do and read the output.
If you have already performed this procedure, or if another device is already mounted on the mount point, the process will fail.
Step 12 Click Done.
Step 13 Terminate SMIT by pressing F12 or by selecting Exit SMIT on the Exit menu.
Step 14 Enter the following at the command prompt:
smit mountfs
Step 15 Click the "FILE SYSTEM name" List button and select a device name (such as /dev/cd0) from the list that appears.
Step 16 In the "DIRECTORY over which to mount" field, enter the name of a mount point directory (such as /cdrom).
Step 17 Click the "TYPE of file system" List button and select cdrfs as the file system type.
Step 18 Set the Mount as Read-Only System field to yes.
Step 19 Click Do and read the output, and then click Done.
Step 20 Terminate SMIT by pressing F12 or by selecting Exit SMIT on the Exit menu.
Step 21 Enter the following at the command prompt
smit mknfsexp
Step 22 Enter the "PATHNAME of directory to export" (such as /cdrom).
Step 23 Use the arrow keys to change the "Mode to Export Directory" field to read-only.
Step 24 Enter the appropriate information, if necessary, into any of the other fields.
Step 25 Click Do, read the output, then click Done.
Step 26 Terminate SMIT by pressing F12 or by selecting Exit SMIT on the Exit menu.
Perform the following steps on the local system:
Step 1 Log in as the root user. For details, see "Becoming the Root User."
Step 2 Enter the following at the command prompt:
hostname# mount remote_hostname:remote_exported_filesystem_name local_mount_point
For example, to mount a remote file system named zen, enter the following at the prompt:
hostname# mount zen:/cdrom /cdrom
The CD-ROM is ready for installation of software.
Installation is the transfer of software from the distribution medium to the AIX system.
| Caution CiscoWorks Blue SNA View can be installed only in the /usr/cw-blue directory. If you create a file system, its mount point must be /usr/cw-blue. |
To install CiscoWorks Blue SNA View from a mounted CD-ROM drive, perform the following steps:
Step 1 Place the CD-ROM into its caddy and insert it into the local or remote CD-ROM drive.
Step 2 Log in as the root user. For details, see "Becoming the Root User."
Step 3 Start SMIT by entering the following at the command prompt:
smit
Step 4 On the System Management menu, click Software Installation & Maintenance.
Step 5 On the next menu, click Install/Update Software.
Step 6 On the next menu, click Install /Update Selectable Software (Custom Install).
Step 7 On the next menu, click Install Software Products at Latest Available Level.
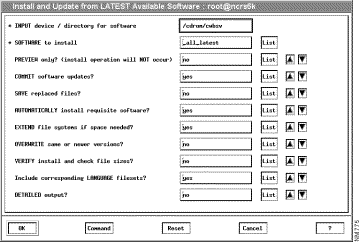
Step 8 In the Install Software Products at Latest Available Level dialog box, type the name of the CD-ROM device and install file on which you loaded the CD-ROM in Step 1, such as /cdrom/cwbsv.
Step 9 Click Do.
The Install Software Products at Latest Available Level dialog box displays additional fields as shown in Figure 3-2.
Step 10 Click the List button next to the "SOFTWARE to install" field. After a brief delay, the Multi-Select List dialog box appears, as shown in Figure 3-3.
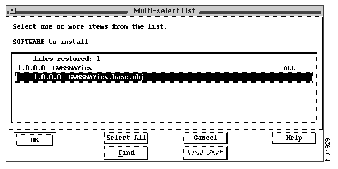
Step 11 Click the CWBSNAView.base.obj module.
Step 12 Click OK and then click Do.
Step 13 In response to the "ARE YOU SURE?" prompt, click OK when you are sure you want to install the modules you just highlighted. An animated man is displayed on the screen.
While the animated man is running, SMIT installs the selected modules in the /usr/cw-blue directory, and CiscoWorks Blue SNA View modifies SMIT to allow subsequent configuration and deinstallation of CiscoWorks Blue SNA View.
If the man raises his hands and SMIT displays OK, the process has succeeded.
If the man falls, installation has failed. If the reason is not apparent, read the installation log file $HOME/smit.log or /usr/cw-blue/install/cwb_install.log and supply it to a Cisco Technical Assistance Center (TAC) representative.
Step 14 Click Done.
Step 15 If Step 13 indicated success, click the Return to System Management button and go to the following section, "Configuring CiscoWorks Blue SNA View on AIX."
In the event of failure, terminate SMIT by pressing F12 or by selecting Exit SMIT on the Exit menu.
Configuring CiscoWorks Blue SNA View on AIX consists of specifying the mainframe domains with which SNA View is to operate, plus a set of parameters for each domain.
To configure the CiscoWorks Blue SNA View product, perform the following steps:
Step 1 Start SMIT if you have not already done so:
smit
Step 2 On the initial SMIT menu, click Communications Applications and Services.
Step 3 On the next menu, click Cisco Network Management Applications for AIX.
Step 4 On the next menu, click CiscoWorks Blue SNA View.
Step 5 On the CiscoWorks Blue SNA View menu, click Configure.
The SNA View dialog appears, as shown in Figure 3-4.
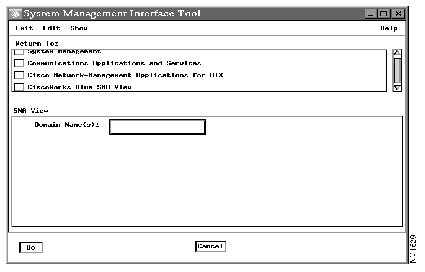
Step 6 Type one or more new domain names into the SNA Domains field, separated by spaces.
Step 7 This field can take any 1 to 8 character alphanumeric value. It should be a meaningful name in your environment since it will be an extension to your PU and LU names (PUNAME.DOMAIN). All uppercase for domain names is recommended.
Step 8 Click Do. SMIT presents a window with the name of each domain you specified, plus the name of each pre-existing domain. (When the Domain Selection menu is active, the SMIT man continues to run.)
Step 9 In the Domain Selection menu, click once on a domain name, then click the Select button at the bottom of the window.
SMIT presents a parameter configuration screen for the selected domain.
Step 10 See the section "Domain-Specific Parameters" and configure the selected domain. To put the cursor in a field where you want to make a change, point and click with the mouse. Press the TAB key to move down the list, or press Shift TAB to move the cursor up the list. Click the scroll bar to scroll the form up and down.
Step 11 When your are finished with the parameters of a given domain, click Save, then Quit.
Step 12 Repeat Step 9 through Step 11 for each SNA domain.
Step 13 When you have configured each domain, click Close on the Domain Selection menu. The SMIT man should raise his hands to indicate success.
Step 14 Click Done, and then Cancel.
Step 15 Terminate SMIT by pressing F12 or by selecting Exit SMIT on the Exit menu.
Perform these tasks after installation and configuration of CiscoWorks Blue SNA View.
Unmount the CD by logging in as the root user and entering the following at the local or remote workstation where it is mounted:
hostname# cd /
hostname# umount /cdrom
AIX unmounts the CD-ROM device from the /cdrom directory. Remove the CD-ROM caddy from the drive.
During installation and configuration, log files are created to track the installation process and provide diagnostic information if a problem arises. When you are satisfied that CiscoWorks Blue SNA View is properly installed and operating, you can remove these files. To remove these files from your system, log in as the root user and enter the following command:
hostname# rm /tmp/cwb_install.log cwb_config.log $CWBROOT/INSTALL
hostname# rm $CWBROOT/log/snaview.log
Unless an error message appears, the log files are removed.
After installing and configuring CiscoWorks Blue SNA View, proceed to the chapter "CiscoWorks Blue SNA View Features."
Application default files for each of the SNA View Motif windows are copied from $SVHOME/app-defaults to /usr/lib/X11/app_defaults by the installation program. The defaults consist of:
These defaults may be modified to suit each individual user's preferences.
If you must deinstall all files related to CiscoWorks Blue SNA View, perform these steps:
Step 1 Log in as the root user. For details, see "Becoming the Root User."
Step 2 Start SMIT by entering the following at the command prompt:
smit
Step 3 On the System Management menu, click Communications Applications and Services.
Step 4 On the next menu, click Cisco Network-Management Applications for AIX.
Step 5 On the next menu, click CiscoWorks Blue SNA View.
Step 6 On the next menu, click Deinstall CiscoWorks Blue SNA View.
Step 7 In the Deinstall dialog box, click the "De-install" List button.
Step 8 In the Multi-select List dialog box, select all object names so that all are highlighted simultaneously, then click OK.
Step 9 In response to the "ARE YOU SURE?" prompt, click OK. An animated man appears on the screen.
While the animated man is running, SMIT deinstalls all files related to CiscoWorks Blue SNA View.
If the man raises his hands and SMIT displays OK, the deinstallation process has succeeded.
If the man falls down, deinstallation has failed. Contact a TAC representative.
Step 10 Terminate SMIT by pressing F12 or by selecting Exit SMIT on the Exit menu.
For each SNA Domain listed on the Domain Selection menu, you must set a group of operational parameters. See the section "Domain-Specific Parameters" later in this chapter for descriptions of the parameters you can set.
To configure LU 6.2 connectivity between an AIX workstation and a mainframe domain, perform these steps.
Step 1 Log in as the root user.
Step 2 Use SMIT to set up two SNA Server/6000 Transaction Program profiles for the LU 6.2 sessions for the SNA View command server and message server:
Step 3 Use SMIT to configure an LU 6.2 Session Mode profile set to PARALLEL.
You can install and configure CiscoWorks Blue SNA View from a local or remote CD-ROM drive.
Step 1 If you are installing from a remote CD-ROM drive, insert the CD-ROM into the drive on a remote system and export the CD-ROM file system (make it available to an outside system). See "Exporting a CD-ROM File System from a Remote SunOS, HP-UX, or Solaris System" and "Mounting a Remotely Exported CD-ROM File System on a Local System."
If you are installing from a local CD-ROM drive, insert the CD-ROM into the drive on the local system, then mount the CD-ROM file system on the local system. See "Mounting a Local CD-ROM on SunOS, HP-UX, or Solaris."
Step 2 Perform installation. See "Installing on SunOS, HP-UX, or Solaris."
Step 3 Perform configuration. See "Configuring SNA View on SunOS, HP-UX, or Solaris."
Step 4 After successful configuration, remove log files. See "Removing Log Files on SunOS, HP-UX, or Solaris."
This section also contains instructions for deinstalling CiscoWorks Blue SNA View software.
| Caution The instructions for mounting a remotely exported CD-ROM drive on a local system are for like systems. For example, the instructions are for exporting a CD-ROM file system from an HP-UX system and mounting it on another HP-UX system for installation, and for exporting from a SunOS system and mounting on SunOS, but not for cross-platform operation. If necessary, your system administrator can help you with cross-platform exporting and mounting. |
If it is necessary to reinstall a CiscoWorks Blue product, deinstall the existing software using procedures in "Deinstalling on SunOS, HP-UX, or Solaris," then reinstall as if it were a new installation.
To stop the SunOS or HP-UX installation or configuration process at any time, press Break or Ctrl-C.
The user named root can perform functions restricted from normal users. To install and configure CiscoWorks Blue SNA View, you must know the root user's password and log in to your system as the root user or become the root user by use of the su command. For information on how to become the root user, refer to the "Becoming the Root User" section in the "Installing and Configuring CiscoWorks Blue SNA View" chapter.
The root .rhosts file on the remote system must contain the host name of your local system and an entry for the user root. Otherwise, you cannot access the remote system to download software from its CD-ROM drive. For more information, refer to the rhosts manual page.
To export a CD-ROM file system from a SunOS, HP-UX, or Solaris system, perform the following steps on the remote system:
Step 1 Place the CD-ROM in its caddy and insert it into the CD-ROM drive.
Step 2 Log in as the root user.
Step 3 Create a /cdrom directory, if one does not exist, by entering the following command:
mkdir /cdrom
If the /cdrom directory already exists, proceed to the next step.
Step 4 Create an /etc/exports file using a text editor, if the file does not exist. For Solaris, the directory and filename should be /etc/dfs/dfstab.
Step 5 Edit the /etc/exports file to include the following line. For Solaris, the directory and filename should be /etc/dfs/dfstab.
/cdrom -ro
Step 6 If you just created /etc/exports (in Step 4) (or /etc/dfs/dfstab for Solaris), you must enable your workstation as an Network File System server. Start the nfsd server option by entering the following at the UNIX command line:
On SunOS:
/etc/nfsd 8 &
# /usr/etc/rpc.mountd -n
On Solaris:
/etc/init.d/nfs.server start
On HP-UX:
/sbin/init.d/nfs.server start
# /usr/sbin/rpc.mountd -n
Step 7 On Solaris only, add the following line to the etc/dfs/dfstab file:
Step 8 Mount the CD-ROM.
On Solaris, the vold daemon process automatically manages the CD-ROM device and performs the mounting. The CD-ROM may automatically mount onto the /cdrom/cdrom0 directory. If you are running File Manager, a separate File Manager window displays the contents of the CD-ROM disk. If the /cdrom/cdrom0 directory is empty because the CD was not mounted, or if File Manager did not open a window displaying the contents of the CD-ROM disk, verify if the vold daemon is running by entering the following command:
If the system does not display anything, restart the daemon using:
If the vold daemon is running but did not mount the CD, stop the vold daemon process and then restart the daemon:
On SunOS and HP-UX, enter the mount command, as follows.
On SunOS:
mount -r -t hsfs /dev/device_filename /cdrom
On Solaris:
/usr/sbin/mount -r device_filename /cdrom/cdrom0
On HP-UX 9:
/etc/mount -o ro -F cdfs /dev/device_filename /cdrom
On HP-UX 10:
/etc/mount -o ro -t cdfs /dev/device_filename /cdrom
In the SunOS command, the -r option mounts the CD-ROM in read-only mode.
In the HP-UX command, the -o ro option mounts the CD-ROM in read-only mode.
In each command, -t or -F indicates the type of file system: hsfs for the ISO 9660 standard and cdfs for the High Sierra standard with Rock Ridge extensions.
In the SunOS command, replace the device_filename variable with /dev/sr0.
In the HP-UX command, replace the device_filename variable with /dev/dsk/c201d2s0 or a different device number reported by the /etc/ioscan program for the CD-ROM device.
Step 9 If the /etc/exports file existed previously (before Step 4), enter the following command to run exportfs:
exportfs -va
Step 10 If /etc/exports did not exist previously, reboot your system.
reboot
Step 11 Go to "Mounting a Remotely Exported CD-ROM File System on a Local System."
To mount a file system that is exported from a remote system, perform the following steps on the local SunOS, HP-UX, or Solaris system:
Step 1 Log in as the root user.
Step 2 Create a /cdrom directory, if one does not already exist, by entering the following command:
mkdir /cdrom
Step 3 To mount a file system that is exported from a remote system, enter the following at the command prompt:
mount remote_hostname:remote_filesystem local_mount_point
For example, to mount the /cdrom file system from a remote host called faraway on a local directory named /cdrom, enter the following command at the prompt:
mount faraway:/cdrom /cdrom
The remote CD-ROM is ready for installation of software on the local system.
Step 4 Go to "Installing on SunOS, HP-UX, or Solaris."
To prepare the system for installation of software from a local CD-ROM drive, complete the following steps:
Step 1 Place the CD-ROM in its caddy and insert it into the CD-ROM drive.
Step 2 Log in as the root user.
Step 3 Create a /cdrom directory, if one does not exist, by entering the following command:
mkdir /cdrom
If the /cdrom directory already exists, proceed to the next step.
Step 4 Mount the CD-ROM.
On Solaris, the vold daemon process automatically manages the CD-ROM device and performs the mounting. The CD-ROM may automatically mount onto the /cdrom/cdrom0 directory. If you are running File Manager, a separate File Manager window displays the contents of the CD-ROM disk. If the /cdrom/cdrom0 directory is empty because the CD was not mounted, or if File Manager did not open a window displaying the contents of the CD-ROM disk, verify if the vold daemon is running by entering the following command:
If the system does not display anything, restart the daemon using:
If the vold daemon is running but did not mount the CD, stop the vold daemon process and then restart the daemon:
On SunOS and HP-UX, enter the mount command, as follows:
On SunOS:
mount -r -t hsfs /dev/device_filename /cdrom
On HP-UX 9:
/etc/mount -o ro -F cdfs /dev/device_filename /cdrom
On HP-UX 10:
/etc/mount -o ro -t cdfs /dev/device_filename /cdrom
In the SunOS command, the -r option mounts the CD-ROM in read-only mode.
In the HP-UX command, the -o ro option mounts the CD-ROM in read-only mode.
In each command, -t or -F indicates the type of file system: hsfs for the ISO 9660 standard and cdfs for the High Sierra standard with Rock Ridge extensions.
In the SunOS command, replace the device_filename variable with /dev/sr0.
In the HP-UX command, replace the device_filename variable with /dev/dsk/c201d2s0 or a different device number reported by the /etc/ioscan program for the CD-ROM device.
Step 5 Go to "Installing on SunOS, HP-UX, or Solaris."
After the CD-ROM is mounted, use this procedure to move the software to the host system.
The default for each prompt is the value in brackets. To accept any default value, press Enter. Note that you can press Break or Ctrl-C to stop the installation script at any time.
Step 1 Start the interactive installation and configuration script by entering the following commands:
cd /cdrom
cwbinstall
Step 2 In response the following prompt, enter the source of the software to be installed.
On SunOS or Solaris, press Enter to accept the default directory.
On HP-UX 9, enter the image file in which the software is stored.
On HP-UX 10, enter the image file in which the software is stored.
Step 3 In response the following prompt, press Enter.
Step 4 In response to the following prompt, press Enter.
On SunOS, Solaris, or HP-UX 9:
On HP-UX 10:
Step 5 The installation program reviews your responses to the previous questions and asks:
Press Enter to continue, or type n and press Enter to terminate installation.
Step 6 The program installs the software from CD-ROM and reports on its progress.
Step 7 Examine /tmp/update.log for error messages by typing the following command:
On SunOS or Solaris, press Enter to accept the default directory.
more /usr/cw-blue/log/cwb_install.log
On HP-UX, type:
more /tmp/update.log
Press Enter to advance the display one screen at a time.
Step 8 Installation is complete. Go to "Configuring SNA View on SunOS, HP-UX, or Solaris."
If it is necessary to deinstall any or all CiscoWorks Blue SNA View applications, see "Deinstalling on SunOS, HP-UX, or Solaris."
If it is necessary to deinstall CiscoWorks Blue SNA View, such as after a failed installation, follow this procedure. Note that you can press Break or Ctrl-C to stop the deinstallation script at any time.
Step 1 Shut down the SNA View application.
Step 2 To start the interactive deinstallation script, log in as the root user and type the following commands:
cd /usr $CWBROOT/install/bin
cwbdeinstall
The deinstallation script lists the Maps and SNA View filesets that are installed.
Step 3 To deinstall the SNA View application only, type the following and press Enter:
On SunOS, Solaris, or HP-UX 9:
CWBLUE-SNAVIEW
On HP-UX 10:
CWBLUE-SNA
Step 4 In response to the following prompt, press Enter to begin the deinstallation, or type n and press Enter to terminate deinstallation.
Step 5 When the system prompt returns, examine the deinstallation log file. Unless you see an error message in that file, deinstallation is complete.
On HP-UX, type:
# more /tmp/cwb_deinstall.log
On Solaris, type:
# rm /tmp/cwb_sybase_deinstall.log
# rm /tmp/cwb_syb_deinstall
On SunOS, there is no deinstallation log file.
Step 6 Remove the deinstallation log file.
On HP-UX, type:
# rm /tmp/cwb_deinstall.log
On Solaris, type:
# rm /tmp/cwb_sybase_deinstall.log
# rm /tmp/cwb_syb_deinstall
You can now reinstall the software.
Perform these steps on a SunOS, HP-UX, Solaris system when installation of the software in complete.
The default for each prompt is the value in brackets. To accept any default value, press Enter. Note that you can press Break or Ctrl-C to stop the configuration script at any time.
Step 1 To run the interactive configuration script, type the following:
cd $CWBROOT/install/bin
cwbconfigure
Step 2 In response to the following prompt, type snaview to specify that you want to configure the SNA View product.
Step 3 The following prompt appears only if the CWBROOT variable is not already set. Press Enter to accept the default (the same directory in which you placed the software during installation), or type an alternate directory name.
for HP-UX 10 and Solaris:
Step 4 In response to the following prompt, type the names of the SNA domains from which SNA View will collect information. Separate multiple names with spaces.
If you specify an existing domain name, the configuration program displays a message asking you to confirm the re-configuration of the existing file.
Step 5 The configuration program reviews your responses to the previous questions and asks:
Press Enter to continue, or type n and press Enter to terminate configuration.
Step 6 An SNA View domain selection window pops up. The window lists the name of each domain you specified, plus the name of each pre-existing domain. In the Domain Selection Menu, click once on a domain name, then click the Select button at the bottom of the window.
Step 7 See the section "Configuring Domain-Specific Parameters" for information about domain-specific configuration parameters, and configure the selected domain. To put the cursor in a field where you want to make a change, point and click with the mouse. Press the TAB key to move down the list, or press Shift-TAB to move the cursor up the list. Click the scroll bar to move the form up and down.
Step 8 When you are finished with the parameters of a given domain, click Save, then click Quit.
Step 9 Repeat Step 6 through Step 8 for each SNA domain.
Step 10 When you have configured each domain, click Close on the Domain Selection Menu.
Step 11 Click Done, then click Cancel.
Control returns to the window in which you previously executed the configuration script.
Step 12 Unmount the CD-ROM by entering the following commands:
cd /
# umount /cdrom
Step 13 Eject the CD-ROM.
Step 14 Configuration is complete. Go to "Removing Log Files on SunOS, HP-UX, or Solaris."
During installation and configuration, messages are recorded in a log file to provide diagnostic information in case a problem arises. Perform these commands on a SunOS, HP-UX, or Solaris system when you are satisfied that configuration of the software is complete.
On SunOS:
# rm /usr/cw-blue/log/cwb_install.log
On HP-UX:
# rm /tmp/update.log
On Solaris, type:
# rm /tmp/cwb_sybase_deinstall.log
# rm /tmp/cwb_syb_deinstall
rm *.log to remove the log files because the directory might contain other applications' log files that you do not want to remove.
For each SNA Domain listed on the Domain Selection menu, you must set a group of operational parameters. See the section "Domain-Specific Parameters" later in this chapter for descriptions of the parameters you can set.
To configure LU 6.2 connectivity between an HP-UX workstation and a mainframe domain, perform these steps. (Neither SunOS nor Solaris are supported for LU 6.2 connection to the host; use a TCP connection on those systems.)
Use xsnapconfig or snapconfig to set up two SNA Plus Transaction Program profiles for the LU 6.2 sessions:
For each SNA Domain listed on the Domain Selection menu, you must set a group of operational parameters.
Table 3-1 lists the parameters that must be set. Table 3-2 lists additional parameters that you may choose to customize. Table 3-3 lists additional parameters whose defaults you may choose to accept. Detailed descriptions of all parameters follow the tables.
| Parameter | Default Value | Valid Values |
|---|---|---|
| SVCMD_DEFDIS | Yes | Yes or No. Change to No for VTAM 4.2 or later. |
| SVCMD_OPERATOR | NSPAUTO1 | Valid NetView/SOLVE:Netmaster for MVS operator task. |
| INCLUDE_LUS | Yes | Yes or No. |
| SVCMD_TIMEOUT | 30 | Any number of seconds. |
| Parameter | Default Value | Valid Values |
|---|---|---|
| SVPATH | /usr/cw-blue/snaview1 | SNA View home directory. |
| SVWORK_AREA | /usr/cw-blue/snaview/tmp | Any valid directory. |
| SVVTAM_AGENT_ADDR | machine.name.com2 | Machine name running the VTAM Server. |
| SVMVS_AGENT_ADDR | machine.name.com | Machine name running the MVS Server. |
| SVCMDS_AGENT_ADDR | machine.name.com | Machine name running the Command Server. |
| SVHCI_AGENT_ADDR | machine.name.com | Machine name running the Host Connection Interface. |
| SVSOCKET_MODE | TCP | TCP. |
| SVVTAM_AGENT_PORT | 6100 | Any unused PORT value. |
| SVALERT_AGENT_PORT | 6101 | Any unused PORT value. |
| SVCMDS_AGENT_PORT | 6102 | Any unused PORT value. |
| SVHCI_VTAM_PORT | 6103 | Any unused PORT value. |
| SVHCI_ALERT_PORT | 6104 | Any unused PORT value. |
| SVHCI_STATUS_PORT | 6105 | Any unused PORT value. |
| SVMF_HCI_AGENT_PORT | 6106 | Any unused PORT value. Must match PORTs defined in SNA View mainframe PARM member. |
| SVMF_CMDS_AGENT_PORT | 6107 | Any unused PORT value. Must match PORTs defined in SNA View mainframe PARM member. |
| SVMVS_AGENT_PORT | 6108 | Any unused PORT value. |
| SVHCI_MVS_PORT | 6109 | Any unused PORT value. |
| SVACK_AGENT_PORT | 6110 | Any unused PORT value. |
The following information describes each parameter in detail.
You must set the following parameters for each domain:
These parameters are preset. You should review them. You might want to change some of them.
d net,id=pu_name
d net,id=pu_name,max=*
These parameters are preset. You should review them. You should consider accepting their preset values.
|
SVVTAM_AGENT_PORT | SVMF_HCI_AGENT_PORT |
| SVALERT_AGENT_PORT | SVMF_CMDS_AGENT_PORT |
| SVCMDS_AGENT_PORT | SVMVS_AGENT_PORT |
| SVHCI_VTAM_PORT | SVHCI_MVS_PORT |
| SVHCI_STATUS_PORT | SVACK_AGENT_PORT |
If you configure TCP connectivity to the mainframe, you must match the SVMF_HCI_AGENT_PORT and SVMF_CMDS_AGENT_PORT parameters of the domain to the TCP Parameter Cards in the mainframe. (TCP Parameter Cards are documented in the CiscoWorks Blue SNA View Mainframe Installation Guide.) Example:
The workstation parameters for domain north should be:
SVMF_HCI_AGENT_PORT 6116
SVMF_CMDS_AGENT_PORT 6117
The host configuration file for SNA View should have a TCP card containing:
TCP 6116 6117
If you configure TCP connectivity to multiple mainframe domains, you must match the SVMF_HCI_AGENT_PORT and SVMF_CMDS_AGENT_PORT parameters of each domain to the TCP Parameter Cards in the mainframe. (TCP Parameter Cards are documented in the CiscoWorks Blue SNA View Mainframe Installation Guide.) Example:
The workstation parameters for domain north should be:
SVMF_HCI_AGENT_PORT 6116
SVMF_CMDS_AGENT_PORT 6117
The workstation parameters for domain south should be:
SVMF_HCI_AGENT_PORT 6126
SVMF_CMDS_AGENT_PORT 6127
The host configuration file for SNA View should have a TCP card containing:
TCP 6116 6117
TCP 6126 6127
The section "Issuing MVS, VTAM, and NetView Commands" in Chapter 4 describes how to issue commands from your workstation to the mainframe computer. If you are using a security program such as RACF or ACF/2 on the mainframe, you might want to enforce user ID and password security. CiscoWorks Blue SNA View Workstation can provide this security.
After you install and configure SNA View, the following two files are installed in the /usr/cw-blue/snaview/bin:
| File | Purpose |
|---|---|
| svXcmds_client | Implements the secure version for mainframe commands. When the user tries to issue a mainframe VTAM, MVS, or NetView/SOLVE:Netmaster command from SNA View, a Mainframe Logon window prompts the user for a user ID and password for the mainframe host. |
| svXcmds_client_ns | Implements the non-secure version for mainframe commands. When the user tries to issue a mainframe VTAM, MVS, or NetView/SOVLE:Netmaster command from SNA View, there is NO prompt for the user ID and password. |
There are several options for using these files:
|
|