|
|

This tutorial introduces you to QoS Policy Manager (QPM) version 3 and provides examples of many of the tasks that you can perform with it. To make these examples easier to follow, you can practice the procedures on virtual devices that are provided with the product.
This tutorial is not intended as an exhaustive description of QPM's features or of quality of service (QoS) technology. For more information about these topics, refer to the QPM online help and User Guide for QoS Policy Manager 3.0.
The tutorial is structured as follows:
Chapters 2 and 3 use separate example networks, but the virtual devices on which you perform the tutorial procedures are provided in one virtual device file, which is provided with the product. For more information about the virtual devices, see "Lesson 1-2: Importing the Tutorial Virtual Devices" section.
The QPM environment for the tutorial has the following characteristics:
To use the tutorial, you must log into QPM with user permissions to modify devices in the default device group. For more information, see the user permissions information in Installation Guide for QoS Policy Manager 3.0.
This chapter includes the following sections:
The following topics describe getting started with QPM:
QoS Policy Manager is accessed from the CiscoWorks2000 desktop.
Step 1 In your web browser, start CiscoWorks. The default URL is http://< QPMinstall>:1741, where <QPMinstall> is the name of the computer with the QPM installation.
The CiscoWorks2000 desktop is displayed.
 |
Note The first time you start CiscoWorks2000 on a CiscoWorks2000 server or a client machine, the Java Runtime Environment is automatically installed. |
 |
Note Verify on the front page that Java, JavaScript, and cookies are enabled. If they are not enabled, change your browser preferences to enable them, then continue to the next step. |
Step 2 Log into CiscoWorks with your username and password.
The CiscoWorks navigation tree appears in the left pane.
Step 3 Click QoS Policy Manager in the navigation tree.
Step 4 Click QPM under the QoS Policy Manager drawer.
A Security Alert window opens. Click Yes to proceed.
QPM opens in a separate browser window.
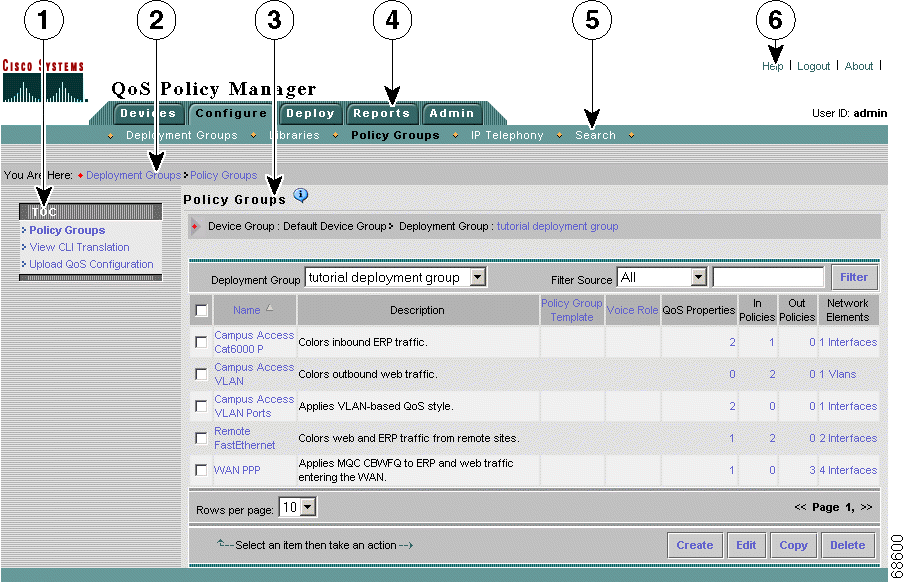
All the pages in the web-based QPM user interface have a consistent look and feel.
Figure 1-1 shows an example of a QPM page.

Table 1-1 describes the common elements in each page.
| Number | Area | Description |
|---|---|---|
1 | TOC | Provides up to two additional levels of navigation, if required:
|
2 | Path bar | Provides a context for the displayed page. Indicates from which tab and option the current page is derived. |
3 | Content area | Displays the pages in which you perform application tasks. |
4 | QPM tabs | Contains tabs that provide access to QPM functionality. Click a tab to access its options:
|
5 | Option bar | Displays the options available for the selected tab. |
6 | QPM banner | Contains the Help, Logout, and About buttons:
|
 |
Note It is not recommended to use the browser Back button to navigate in QPM. |
Now that you understand the QPM user interface, you are ready to learn how to exit QPM.
When you finish working with QPM, you must log out of CiscoWorks to close the application.
Step 1 Click Logout in any open QPM windows to close them.
Step 2 Click Logout in the CiscoWorks2000 Desktop window.
The CiscoWorks session ends.
Now you are ready to add devices to the QPM device inventory.
A file of the virtual devices that are used in the tutorial is included with QPM. To import the tutorial virtual devices, you must first copy the virtual devices file to your client system.
For information about the virtual devices used in the data network tutorial, see the Understanding the Data Network Tutorial. For information about the devices used in the voice-over-IP network tutorial, see Understanding the IP Telephony Network Example.
Virtual devices are not physical devices, but rather are defined in a file that contains the same device information required to import a physical device. You can import these virtual devices into the inventory and use them to perform the tasks described in the tutorial.
Step 1 Copy the tutorial virtual devices file from the QPM server to a location you will remember on your client system.
The file is named TutorialDevices.xml. It is located in the Tutorial folder that is located in the CiscoWorks Common Services installation directory on the QPM server at CSCOpx\MDC\qpm\tutorial.
Step 2 Select Devices > Manage. The Device Table page appears.
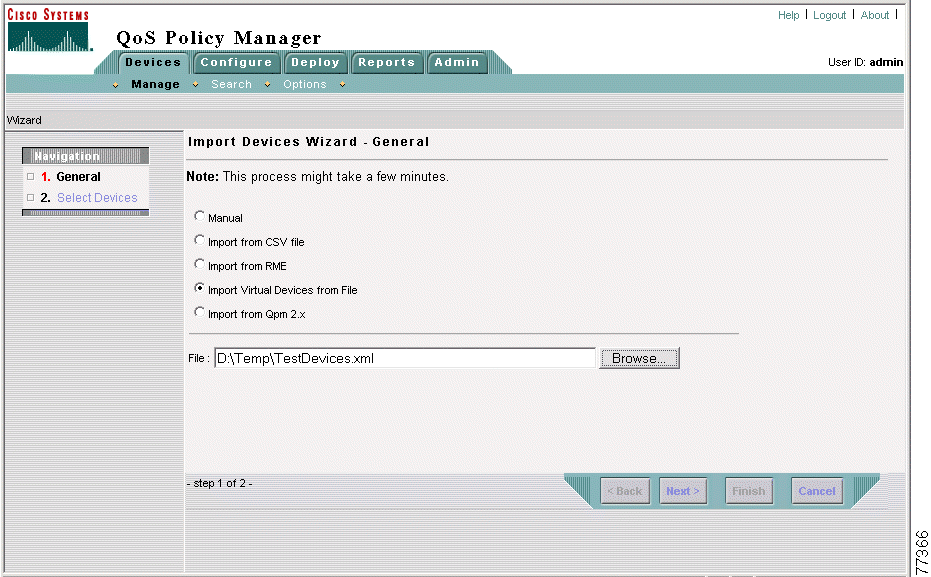
Step 3 Select Add Device. The Import Devices Wizard - General page appears.
Step 4 Do the following in the Import Devices Wizard - General page:
a. Select the Import Virtual Devices from File radio button.
b. Enter the path to the virtual devices file on your client system in the File field, or click Browse to navigate to the file. Figure 1-2 shows the completed Import Devices Wizard - General page.
c. Click Next. The Import Devices Wizard - Select Devices page appears.

Step 5 In the Import Devices Wizard - Select Devices page, select the check box next to all of the devices, then click Finish.
QPM imports the devices from the file, and displays the Discovery Status page so you can see the status of the import. The discovery job that you just started is the first entry in the table. Wait until the discovery job is complete, as indicated by an entry appearing in the End column.
Step 6 Verify that the tutorial virtual devices and their elements were added to the inventory:
a. Select Device Table from the TOC. The Device Table page appears.
Note that the imported devices now appear in the device table.
b. To view the network elements on a device, click the icon in the Interfaces column. The Interfaces page appears, and links to view any other network elements on the device appear in the TOC.
Now that you have imported the tutorial virtual devices, you are ready to create the tutorial deployment group.
To make it easier to keep track of the devices used in the tutorial, create a device folder named "Tutorial" for the tutorial and move the tutorial virtual devices into it.
Step 1 In the Devices > Manage TOC, select Device Folders. The Device Folders page appears.
Step 2 Click Create. The Device Folder Properties page appears.
Step 3 Do the following in the Device Folder Properties page:
a. Enter Tutorial in the Device Folder Name field.
b. Enter Tutorial device folder in the Description field.
c. Click Save. The Device Folders page appears.
Step 4 Select Device Table in the TOC. The Device Table page appears.
Step 5 Do the following in the Device Table page:
a. Select the tutorial virtual devices by selecting the check boxes next to them.
The following are the tutorial virtual devices:
b. Click Set Device Folder. The Device Folder setting dialog box opens.
Step 6 Do the following in the Device Folder Setting dialog box:
a. Select the Set Device Folder radio button.
b. Select the radio button next to the Tutorial folder name.
c. Click OK. The Device Table page refreshes.
To separate the tutorial policy groups from any existing policy groups, create a deployment group named "Tutorial" for the tutorial.
Step 1 Select Configure > Deployment Groups. The Deployment Groups page appears.
Step 2 Do the following in the Deployment Groups page:
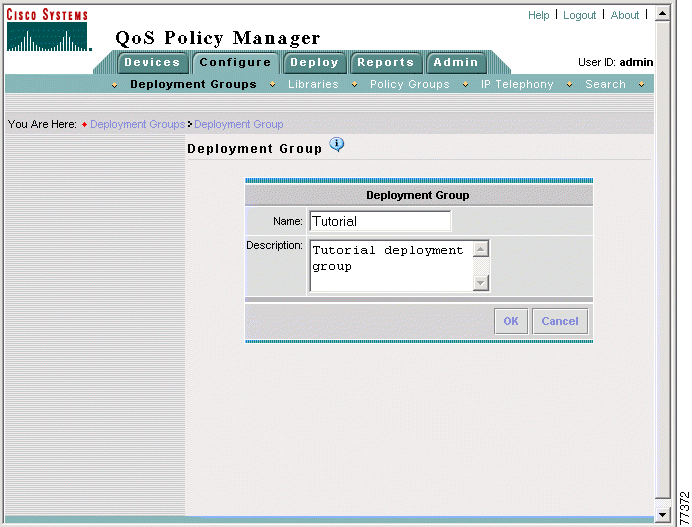
a. Click Create. The Deployment Group page appears.
b. Enter the name Tutorial in the Name field.
c. Enter the description Tutorial deployment group in the Description field. Figure 1-2 shows the completed Deployment Group page.
d. Click OK. The Deployment Groups page appears.

Step 3 Verify that the Tutorial deployment group appears in the list.
After completing all the lessons in this chapter, you are ready to proceed with the data network or IP telephony tutorial. You can use the tutorials in any order (they are not sequential).
![]()
![]()
![]()
![]()
![]()
![]()
![]()
![]()
Posted: Thu Nov 14 04:51:56 PST 2002
All contents are Copyright © 1992--2002 Cisco Systems, Inc. All rights reserved.
Important Notices and Privacy Statement.