|
|

August 27, 2001
 |
Note If you purchased your router with QDM pre-installed, you do not need to follow the "Installing QDM" instructions listed in the "Installation Instructions" section of this document. To launch a pre-installed version of QDM, see the "Launching QDM" section on page 15. |
|
Note For a list of changes that have been made to the document after the original QDM 2.0 release, see Table 1 in this document. |
These release and installation notes describe the system requirements, installation instructions, caveats, and other information for both versions of Cisco Quality of Service Device Manager 2.0 (QDM 2.0). Two versions of QDM 2.0 have been released, QDM 2.0 and QDM 2.0.1, and this document contains information for both products.
QDM is an easy-to-use application for configuring and monitoring advanced IP-based Quality of Service (QoS) functionality within Cisco routers and is available free of charge. QDM 2.0 and QDM 2.0.1 operate on Cisco 2600, 3600, 7100, 7200, and VIP-enabled Cisco 7500 series routers running Cisco IOS Release 12.1(5)T or later, Cisco IOS Release 12.1(1)E through 12.1(4)E, and Cisco IOS Release 12.1(6)E or later. (Note: Cisco IOS Release 12.1 E only supports Cisco 7100, 7200, and 7500 series routers). QDM 2.0 and QDM 2.0.1 also operate on Cisco 1700 series routers running Cisco IOS Release 12.2(2)T or later. For additional information on system requirements, see the "System Requirements" section of this document.
Most of the features and functionality in QDM 1.1 are also in QDM 2.0 and QDM 2.0.1. QDM 2.0 contains fixes for some caveats that were in QDM 1.1, as well as support for new software features introduced in Cisco IOS Release 12.1(5)T. Similarly, QDM 2.0.1 contains fixes for some caveats that were in QDM 2.0. See the "What's New in QDM 2.0?" section for a list of new features available in QDM 2.0 that were not available in prior versions of QDM.
|
Note No new features were introduced in the QDM 2.0.1 maintenance release. |
For a list of the major software caveats that apply to QDM 2.0 and QDM 2.0.1, see the "Caveats" section of this document.
This document contains the following sections:
Cisco Quality of Service Device Manager (QDM) provides an easy-to-use application for configuring and monitoring advanced IP-based Quality of Service (QoS) functionality within Cisco routers. The QDM application is stored in the Flash memory of the Cisco router and can be run from any workstation with proper support (as detailed in the "System Requirements" section of this document). QDM runs in a web browser as a Java applet. The QDM application uploads when the client web browser makes a connection to the embedded web server of the router.
Once the QDM application is uploaded, the online help embedded within the application is designed to make QDM a user-friendly application. For information on the various QoS functionalities that can be configured in QDM, consult the online help within the QDM application. The online help is context-specific and can be accessed by clicking the Help button.
QDM can be downloaded from cisco.com and is available free of charge. See the "Installation Instructions" section for information on downloading QDM.
The following features and capabilities are now available in QDM 2.0:
|
Note No new features were introduced in the QDM 2.0.1 maintenance release. |
Through the use of a classification wizard, the process of configuring a traffic class is simplified when QDM is used. QDM simplifies the following traffic classification scenarios:
QDM traffic classification supports class-based packet marking using standards-based marking schemes, including user-defined IP precedence values, IP DSCP values, QoS group values, CoS values, and MPLS experimental bits.
Once traffic classification has been established, QDM supports a broad range of QoS features that can be applied to each traffic class:
All versions of QDM allow users to monitor real-time performance of QoS functionality through the router with the use of graphs and tables. With QDM graphs, users can monitor QoS data by class, policy, or interface. QDM has the ability to display up to four graphs in one frame, and users can open multiple frames simultaneously. Each graph can monitor various statistics, including packet rates, bit rates, byte counts, packet counts, and protocol discovery. The monitoring table functionality of QDM allows users to monitor QoS functionality statistics on a real-time basis.
By default, QDM is able to graph and provide statistics (in a graph or table format) for all objects based on weighted averages. These graphs contain no history and start building when the graphs are launched, although graph settings can be bookmarked within a web browser and can be retrieved easily.
QDM 2.0 introduced the ability to bookmark and export graphs. The bookmarking function allows users to bookmark a graph created in QDM in a web browser window. This web browser bookmark is useful for saving graph settings. If you want to monitor the same QoS attributes over an extended period of time without having to configure the same graph each time QDM is opened, use the graph bookmarking feature.
The export graph feature is used to export data points into another window and have the outputs appear in the comma-separated variable (CSV) format. The Export button is particularly useful if you want to keep a record of data points in a separate application for research purposes. After choosing to export a graph or table, the data points can then be inserted into the desired application.
QDM 2.0 also introduced the ability to print a graph using the QDM application.
QDM 2.0 introduced the ability to configure simple access control lists (ACLs) using QDM. For information on configuring an ACL using QDM, use the Traffic Class Configuration Wizard and specify the ACL match criterion. Use the context-sensitive online help within the QDM application for additional information on ACL configuration using QDM.
Access control list configuration using QDM is not available on Cisco IOS Release 12.1 E.
QDM 2.0 introduced the ability to configure the Quality of Service for Virtual Private Networks (QoS for VPNs) feature using QDM. The QoS for VPNs feature, which is sometimes called QoS preclassification, allows users to apply QoS on connections that use a VPN tunnel.
QoS for VPNs is only available on Cisco 7100 and 7200 series routers.
The following sections describe the system requirements for QDM 2.0:
QDM 2.0 has the following minimum memory requirements:
|
Note QDM 2.0 cannot be installed on a partitioned Flash file system. If you have a partitioned Flash file system, the no partition flash command can be used to eliminate the partitions. |
Cisco Quality of Service Device Manager operates with the following platforms:
|
Note On a Cisco 7500 series router, QoS features can only run on a Versatile Interface
Processor (VIP). To run QoS features on a VIP, you must configure distributed Cisco
Express Forwarding (dCEF) on all interfaces running QoS features. For more information on dCEF, refer to the Cisco Express Forwarding section of the Cisco IOS Switching Services Configuration Guide for your Cisco IOS mainline release (which is likely Cisco IOS Release 12.1 or 12.2). |
The following Cisco IOS release software versions support QDM 2.0 and QDM 2.0.1.
|
Note All features and functionality that are supported in Cisco IOS Release 12.1(5)T
are also supported in Cisco IOS Release 12.2(1) or later versions of Release 12.2,
and all features and functionality in Release 12.2(1) are also in Cisco IOS
Release 12.2(2)T or later versions of Release 12.2 T. Unless otherwise noted in
the Cisco IOS Release documentation, IOS software will continue to be released
based on this pattern. For this reason, QDM, besides being supported on Cisco IOS Release 12.1(5)T, is subsequently supported on Release 12.2 and Release 12.2T and any other future software releases that contain the features and functionality supported in Release 12.2 and Release 12.2T. |
|
Note We recommend having 16 available virtual terminal (vty) lines for QDM. If 16 vty lines
are unavailable, we suggest having at least 5 vty lines for QDM. QDM might not properly install or run on systems with limited numbers of vty lines. The number of vty lines available on a router can be expanded by entering the line vty global configuration command. To configure 16 vty lines, enter the command on the router in global configuration mode: line vty 0 15 We also recommend having the same configuration for all of your vty lines. |
|
Note Many of the software releases listed in this section have been deferred. A deferred software release is a newer, improved version of an existing software release. A deferral of a software release is indicated by an additional number at the end of the Cisco IOS release number; for instance, if Cisco IOS Release 12.1(5)T was deferred, the deferred version of Cisco IOS Release 12.1(5)T would be named Cisco IOS Release 12.1(5)T1. In the software releases listed below, the deferred versions of the supported software also support QDM 2.0 and QDM 2.0.1. For example, Cisco IOS Release 12.1(5)T1 would support QDM 2.0 and QDM 2.0.1 because Cisco IOS Release 12.1(5)T is listed as a supported IOS Release. |
QDM 2.0 and QDM 2.0.1 require one of the following operating systems:
|
Note The Linux window managers mentioned in this section are part of the RedHat 6.2 and 7.0 installation packages and are available with most of the recent Linux installation packages. |
QDM 2.0 supports the following web browsers:
|
Note For the QDM 2.0 application, Microsoft Internet Explorer web browsers generally provide better overall performance than Netscape Navigator web browsers. |
|
Note QDM 2.0 does not operate properly in Netscape Navigator web browsers running on
Windows 2000 operating systems. If you are running Windows 2000, we suggest using
Internet Explorer. For additional information on this problem, see caveat CSCdt47849 in the "Caveats" section 21 of this document. |
 |
Caution QDM can theoretically run on all web browsers that support Java, JavaScript, or DHTML. However, QDM has only been successfully tested on the supported web browsers listed in this section of the document. Therefore, we highly recommend that you use a supported web browser to run QDM. Cisco Systems cannot guarantee support for web browsers that have not been successfully tested for QDM web browser support. |
1 - When using the Internet Explorer web browser, a Virtual Machine (VM) version of 3167 or higher is required to run QDM. The VM number can be viewed in a Windows Operating System by clicking Start: Run and entering "wjview" or by clicking View: Java Console in Internet Explorer (this second option is not always available because the Java Console is usually disabled by default). The VM version is the last four digit number in the version field (for instance, if the VM version is 5.00.3168, your VM version is 3168).
Consult the appropriate Microsoft documentation for additional information regarding VMs.
The minimum screen size requirement for QDM 2.0 and QDM 2.0.1for the desktop area is 1024 by 768 pixels. If your system is configured at a smaller desktop area size, the QDM screen might not properly fit in the web browser. Because the QDM screen does not properly fit in the web browser, certain graphs might be unreadable and certain functions might be unusable.
|
Note If you purchased your router with QDM pre-installed, you do not need to follow the "Installing QDM" instructions listed in this section of the document. To launch a pre-installed version of QDM, proceed to the "Launching QDM" section on page 15. |
|
Note When QDM 2.0.1 became available, QDM 2.0 was no longer downloadable from
cisco.com. Therefore, these installation instructions only explain installing QDM 2.0.1. QDM 2.0.1 contains all of the functionality in QDM 2.0 as well as some additional caveat fixes and can be downloaded free of charge. |
To install, delete, or use QDM, follow the instructions in the following sections:
If you are installing QDM 2.0.1 on your system for the first time, proceed to the "Installing QDM" section of this document.
If you are upgrading from a previous version of QDM to QDM 2.0.1, ensure that your device meets the specified System Requirements and then uninstall the previous version of QDM. QDM configuration information is stored on your router, so uninstalling the previous version of QDM will not affect any functionality on your router.
After uninstalling the previous version of QDM, follow the instructions in the "Installing QDM" section of this document.
|
Note If you purchased your router with QDM pre-installed, you do not need to follow the instructions listed in this section of the document. To launch a pre-installed version of QDM, proceed to the "Launching QDM" section on page 15. |
|
Note When QDM 2.0.1 became available, you could no longer download QDM 2.0 from
cisco.com. Therefore, these installation instructions only explain installing QDM 2.0.1. QDM 2.0.1 contains all of the functionality in QDM 2.0 as well as some additional caveat fixes. |
Step 2 Switch to enable mode on the router:Router> enableEnter password: xxxxxEnsure that the router has 1.2 MB of free Flash memory in order to support QDM. The available Flash memory can be in one of the following Flash file systems: flash, slot0, slot1, disk0, or disk1. Use the directory command to verify the amount of free space on a Flash memory card.
Router#
|
Note In these particular installation notes, QDM is stored in slot 0. In instances where slot0 appears in the command-line interface, simply replace the slot0 text in the command with the correct Flash file system location (flash, slot1, disk0, or disk1). |
|
Note QDM 2.0.1 cannot be installed on a partitioned Flash file system. If you have a partitioned Flash file system, the no partition flash command can be used to eliminate the partitions. |
Router# directory slot0:Directory of slot0:/
1 -rw- 448893 Dec 03 2000 18:06:17 file01.txt
2 -rw- 213273 Dec 03 2000 18:06:17 file02.txt
20578304 bytes total (19733404 bytes free)
If 1.2 MB of free space is not available on any Flash file system, try one of the following methods to create more Flash file system memory:
|
Note The squeeze command was introduced for Cisco 2600 and Cisco 3600 series routers in Cisco IOS Release 12.2(1). Therefore, the squeeze command is not available on Cisco 2600 and Cisco 3600 series routers running Cisco IOS Release 12.1(5)T. |
Router# squeeze slot0:All deleted files will be removed. Continue? [Enter]
Squeeze operation may take a while. Continue? [Enter]
Squeezing...
Squeeze of slot0 complete |
Caution Reformatting the Flash memory card will erase all existing files on that Flash memory card. |
Router# format slot0:Format operation may take a while. Continue? [Enter] |
Note When you enter the http://<IP address>/level/<security level>/go/qdm URL, the HTTP server looks for QDM in the Flash file systems in the following order: flash, slot0, slot1, disk0, then disk1. This order becomes important when QDM is installed on two different Flash file systems. When a version of QDM exists on both slot1 and disk0, for instance, QDM will always be loaded from slot1, even if disk0 contains a newer version of QDM. |
Step 3 Enter the following URL into your web browser:
http://www.cisco.com/cgi-bin/tablebuild.pl/qdm
After entering your Cisco.com login user identification and password, you enter the QDM Software Download page.
Step 4 Click the QDM tar file (qdm-2.0.1.tar). The QDM tar file contains the QDM image and is available free of charge.
Step 5 As directed by the instructions on the web page, select the Cisco.com server from which you want to download the tar file. Click your selected server.
Step 6 Save the qdm-2.0.1.tar file to a TFTP server.
If you are installing QDM 2.0.1 on a router running Cisco IOS Release 12.1(1)E, 12.1(2)E, 12.1(3a)E, or 12.1(4)E, proceed to Step 7b. Step 7a is only for routers running Cisco IOS Release 12.1 T or Release 12.1(6)E and later.
Step 7 Copy or extract the tar file onto your router, depending on the IOS release running on your router. If you are running Cisco IOS Release 12.1 T or later or Cisco IOS Release 12.1(6)E or later, the tar file will be copied onto your router (see Step 7a). If you are running Cisco IOS Release 12.1(1)E, 12.1(2)E, 12.1(3a)E, or 12.1(4)E, the tar file should be extracted onto your router (see Step 7b).
a. For Cisco IOS Release 12.1T, 12.1(6)E or later, 12.2, and 12.2T, copy the QDM tar file onto the router using the copy command. During this step, the filename of the tar file must be changed from qdm-2.0.1.tar to qdm.tar:
|
Caution Do not use the archive tar command when installing QDM on a router running Cisco IOS Release 12.1 T, 12.1(6)E or later, 12.2, or 12.2T. |
Router# copy tftp://<tftp-server>/qdm-2.0.1.tar slot0:/qdm.tar
|
Note In this example, <tftp-server> refers to the TFTP server where the QDM tar file is located (the server that the tar file was saved to in Step 6). The example also assumes that the file is saved under the default filename, qdm-2.0.1.tar. If the tar file is saved under a different name, replace the qdm-2.0.1.tar portion of the archive command with the new file name. |
b. For Cisco IOS Release 12.1(1)E, 12.1(2)E, 12.1(3a)E, or 12.1(4)E, use the archive command to extract the QDM tar file:
|
Caution Do not use the copy command when installing QDM on a router running Cisco IOS Release 12.1(1)E, 12.1(2)E, 12.1(3a)E, or 12.1(4)E. |
Router# archive tar /xtract tftp://<tftp-server>/qdm-2.0.1.tar slot0:/qdm.tar
Loading <tftp-server>/qdm.tar from a.b.c.d (via Interface1/0):!
extracting qosmon.jar (xxxxxx bytes)!!!!!!!!CCCCCCCCC
extracting HealthPanel.jar (xxxxxx bytes)!!!!!CCCCCCC
. (directory) -- unable to create (Invalid argument)
extracting ./QOS.html (xxxx bytes)!
extracting ./buffer.html (xxx bytes)
extracting ./cfgprotdisc.html (xxx bytes)
extracting ./class.html (xxx bytes)!
extracting ./cli.html (xxx bytes)
extracting ./empty.html (xxx bytes)
extracting ./grint.html (xxx bytes)
...
[OK - 884736/1769472 bytes]
|
Note In this example, <tftp-server> refers to the TFTP server where the QDM tar file is located (the server that the tar file was saved to in Step 6). The example also assumes that the file is saved under the default filename, qdm-2.0.1.tar. If the tar file is saved under a different name, replace the qdm-2.0.1.tar portion of the archive command with the new filename. |
QDM 2.0 is now installed on your router. To enable QDM, proceed to the "Enabling QDM" section.
If you want to upgrade Cisco IOS releases after installing QDM on a Cisco 7100, Cisco 7200, or VIP-enabled Cisco 7500 series router, follow the normal Cisco IOS software installation instructions to install the new IOS image.
If you upgrade a Cisco IOS image on a Cisco 2600 or 3600 series router after installing QDM, you should be aware of caveat CSCds87579. Caveat CSCds87579 occurs on all Cisco 2600 and 3600 series routers upgrading Cisco IOS releases after installing QDM. The caveat, however, can be prevented if the file is booted from the TFTP server using the boot system flash command (the complete procedure for the fix is detailed in the caveat description below).
If you experience this caveat, the workaround is also documented.
Router# configure terminal
Router-conf# boot system flash [flash-file-system:] [filename]
Router-conf# end
Router# copy running-conf startup-conf
Router% enable
Enter password: xxxxx
Router# configure terminal
Enter configuration command, one per line. End with CNTL-Z
Router# ip http server
Router# ip http port <http-port-number>
|
Note QDM will run properly on the default HTTP port (port 80), which is enabled when
the ip http server command is entered. For security reasons, however, we strongly
recommend running QDM 2.0.1 from the non-standard HTTP port. The ip http
port command is used to specify the non-default HTTP port. Although QDM 2.0.1 can run on the non-default HTTP port, QDM 2.0 can only run on the default HTTP port. If you are currently running QDM 2.0, access lists can be used to ensure security. For instance, the following access list can be configured so that only certain workstations have web-access to the router when the HTTP server is enabled: access-list 101 permit ip host <IP address for station with web access, such as the router running QDM or the network administrator> <IP address of network administrator> You can also upgrade to QDM 2.0.1. For information on the security risk associated with the default HTTP port, see the IOS HTTP Authorization Vulnerability security alert on cisco.com. |
Step 2 Verify that the HTTP web server is running by using the show running-config command:
Router# show running-config
ip http server
ip http port 75 |
Note If you are running QDM from the default HTTP port (port 80), the ip http port line will
not appear in the show running-config command output. QDM can be run from the
default HTTP port; however, we recommend using a non-default port for security reasons.See the note in Step 1 of this procedure for additional information regarding non-standard HTTP ports. |
Router# copy running-config startup-configStep 3 The default authentication mode for QDM is Enable Password mode. If you wish to change the authentication mode, you should do so now. For information on changing the authentication mode, see the "Choosing an Authentication Mode" section. For additional information on QDM or specific aspects of QDM or QoS, see the online Help information within the QDM application.
To launch QDM, open a supported web browser and enter one of the following URLs:
A port number does not need to be specified if QDM is running from the default HTTP port (port 80). If you are running QDM from the default HTTP port, you should be aware of the security concerns regarding the default HTTP port. For information on these concerns, see the Note in Step 1 of the "Enabling QDM" section.
|
Note If you receive a "404 Not Found" error message while trying to launch QDM with one of
the above URLs, try entering the following URL: http://<IP address>:<port number>/level/<privilege level>/archive/<flash file system>:qdm/qdm.shtml where the privilege level is either 1 (Monitor User) or 15 (Administrative User), the port number is the assigned HTTP port number, and the Flash file system is the system where QDM was saved. For information on Monitor Users and Administrative Users, see the "Creating a QDM User Profile" section. This URL assumes that QDM was copied to the TFTP server as qdm.tar. |
The IP address could be any IP address configured on your router, while the port number is the HTTP port number you assigned using the ip http port command in the CLI (See the "Enabling QDM" section for more information on this command). If your router host name is in the Domain Name System (DNS), you can use the router name instead of the IP address. For example, if your router host name in DNS is charlie, your domain name is anydomain, and your assigned HTTP port number is 808, you can access QDM as a Monitor User by entering the following URL:
http://charlie.anydomain.com:808/level/1/go/qdm
|
Note When you enter the http://<IP address>/level/<security level>/go/qdm URL, the HTTP server looks for QDM in the Flash file systems in the following order: flash, slot0, slot1, disk0, then disk1. This order becomes important when QDM is installed on two different Flash file systems. When a version of QDM exists on both slot1 and disk0, for instance, QDM will always be loaded from slot1, even if disk0 contains a newer version of QDM. |
The QDM application should then appear in a separate browser window. The QDM application should be similar in appearance to Figure 1.
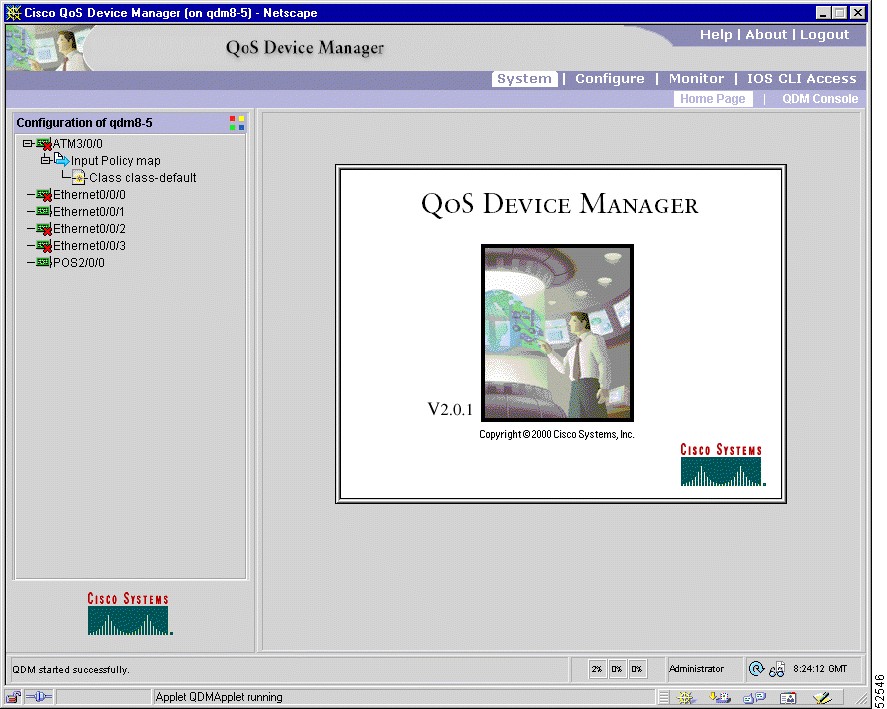
QDM has been successfully launched on your router. For additional information on QDM, see the online help information within the application.
You can log out of QDM by clicking the Logout option in the top right corner of the QDM application or by simply exiting the web browser running the QDM application.
|
Note Logging out of QDM will remove all cached information, including the browser's cached username and password and all non-bookmarked graph settings. |
The Cisco IOS HTTP web server supports three authentication modes:
Router# configure terminal

Enter configuration commands, one per line.

Router(config)# ip http authentication enable
Router# configure terminal

Enter configuration commands, one per line.
Router(config)# ip http authentication local
Router# configure terminal

Enter configuration commands, one per line.

Router(config)# ip http authentication tacacs
This section contains the following topics:
QDM supports two types of user profiles, an Administrative User and a Monitor User. QDM Administrative Users can monitor and make configuration changes to a device. QDM Monitor Users can monitor a device using QDM, but are unable to make configuration changes to a device using QDM.
ip http authentication local
If you want to authenticate QDM in Local Authentication mode but Local Authentication mode is not configured on your Cisco IOS web server, see the "Choosing an Authentication Mode" section of this document.
Step 2 Use the username configuration command to create a user with the desired privilege level. A QDM Administrative User has a privilege level of 15. A QDM Monitor User has a privilege level of 1.
|
Note In QDM, all privilege levels between 1 and 14 are considered Monitor Users. In this document, privilege level 1 is always used to indicate the privilege level of a QDM Monitor User. |
In the following example, a QDM Monitor User is created. The login ID of the user is john and the password is doe, and a privilege level of 1 is specified:
Router(config)# username john privilege 1 password 0 doe
In this example, a QDM Administrative User with a privilege level of 15 is created. The login ID of the user is james and the password is doe:
Router(config)# username james privilege 15 password 0 doe
|
Note After logging on as an Administrative User, your password information is cached,
preventing you from becoming a Monitor User. To log on to QDM as a Monitor
User after logging in as an Administrative User, exit the browser to clear the
cached information. When opening the new browser session, log in as a Monitor
User. For instructions on logging out of your browser, see the "Logging Out of QDM" section. |
ip http authentication enable
If you want to authenticate QDM user profiles in Enable Password mode when Enable Password mode is not configured on your Cisco IOS web server, see the "Choosing an Authentication Mode" section.
Step 2 Use the enable configuration command to create an enable password on the router. In the following example, an enable password is created for an Administrative User (privilege level 15):
Router(config)# enable secret level 15 0 adminuser1
|
Note After logging on as an Administrative User, your password information is cached,
preventing you from becoming a Monitor User. To log on to QDM as a Monitor
User after logging in as an Administrative User, exit the browser to clear the
cached information. When opening the new browser session, log in as a Monitor
User. For instructions on logging out of your browser, see the "Logging Out of QDM" section. |
|
Note In most cases, an enable password with a privilege level of 15 already exists on the router. If you already have a router with an enable password and a privilege level of 15, this password can be used for authenticating QDM Administrative Users. |
Disabling the Cisco IOS HTTP web server disables QDM. To disable the Cisco IOS HTTP web server, use the no ip http server command:
Router% enable

Enter password:xxxxx

Router# configure terminal

Enter configuration command, one per line. End with CNTL-Z

Router# no ip http server
For instructions on uninstalling QDM, see the QDM uninstall instructions within the QDM application. These instructions can be retrieved by clicking the following path from any QDM screen:
Help: Table of Contents: QDM Uninstall Instructions
Caveats describe unexpected behavior in QDM. Severity 1 caveats are the most serious caveats; severity 2 and 3 caveats are less serious. All caveats documented in this section are between severity 1 and severity 3.
|
Note Some QoS features are not supported by QDM 2.0. For a list of QoS features that are not supported by QDM 2.0, see the "Unsupported Features in Quality of Service Device Manager 2.0" section. |
This section describes possibly unexpected behavior for QDM 2.0.1. All caveats listed in this section could occur on QDM 2.0 or QDM 2.0.1:
boot [new-image-name]
Router# configure terminal

Router-conf# boot system flash [flash-file-system:][partition-number:][filename]

Router-conf# end

Router# copy running-conf startup-conf
This section describes the caveats resolved in QDM 2.0.1. All caveats listed in this section could occur on QDM 2.0 but not QDM 2.0.1.
   Configuration failed.

   Action: Modifying traffic class 'abc'

   The IOS CLI returned the following error.

   <A HREF = http:/level/15>Home</A>   <A HREF =

   http:/level/15/exec/->Exec</A>      <A HREF =

   http:/level/15/exec/-/configure/http>Configure</A>

   <HR>
The following features are not supported by the Cisco QDM 2.0 application:
Symptom: A "404 File Not Found" (Netscape Navigator) or "The page cannot be found" (Internet Explorer) message appears when attempting to access QDM.
Possible solutions: Check the following:
Symptom: A "Document contains no data" error is displayed when attempting to launch QDM in a Netscape Navigator web browser.
Possible solution: Insure that 16 vty lines are running. To configure 16 vty lines, enter the line vty 0 15 command on the router in global configuration mode.
The following table lists changes that have been made to this document after the original Installation and Release Notes for Cisco Quality of Service Device Manager 2.0 was printed.
| Date | Modification |
|---|---|
January 22, 2001 | Removed Cisco IOS Release 12.1(5a)E as a supported feature. Added CSCdt24284 in the "Caveats" section. CSCdt24284 is the caveat that describes that editing an ACL is not available using QDM if QDM is on a router running Cisco IOS Release 12.1 E. |
March 26, 2001 | Added Cisco IOS Release 12.1(6)E as an IOS Release that supports QDM 2.0. Note that the tar file is copied onto a router running Cisco IOS Release 12.1(6)E, not extracted. Note also that QDM still does not support Cisco IOS Release 12.1(5a)E. Added CSCdt47846 in the Caveats section. CSCdt47846 is the caveat that describes the problems for QDM when QDM is running in a Netscape Navigator browser on a Windows 2000 Operating System. |
May 7, 2001 | The "Software Supported" section was updated to include Cisco IOS Release 12.2(1) as a supported platform. The note regarding the squeeze command on Cisco 2600 and Cisco 3600 series routers in the "Installing QDM" section was updated to reflect the availability of the squeeze command for these platforms in Cisco IOS Release 12.2(1). |
June 7, 2001 | Added the Cisco 1700 as a supported platform. The Cisco 1700 series router supports QDM 2.0 from Cisco IOS Release 12.2(2)T onward. |
August 27, 2001 | QDM 2.0.1 was released. Several sections of this document, including the "Caveats" section, were updated. |
The following sections describe other sources for documentation available for QDM.
The following sections provide sources for obtaining documentation from Cisco Systems.
You can access the most current Cisco documentation on the World Wide Web at the following sites:
Cisco documentation and additional literature are available in a CD-ROM package, which ships with your product. The Documentation CD-ROM is updated monthly and may be more current than printed documentation. The CD-ROM package is available as a single unit or as an annual subscription.
Cisco documentation is available in the following ways:
If you are reading Cisco product documentation on the World Wide Web, you can submit technical comments electronically. Click Feedback in the toolbar and select Documentation. After you complete the form, click Submit to send it to Cisco.
You can e-mail your comments to bug-doc@cisco.com.
To submit your comments by mail, for your convenience many documents contain a response card behind the front cover. Otherwise, you can mail your comments to the following address:
Cisco Systems, Inc.
Document Resource Connection
170 West Tasman Drive
San Jose, CA 95134-9883
We appreciate your comments.
Cisco provides Cisco.com as a starting point for all technical assistance. Customers and partners can obtain documentation, troubleshooting tips, and sample configurations from online tools. For Cisco.com registered users, additional troubleshooting tools are available from the TAC website.
Cisco.com is the foundation of a suite of interactive, networked services that provides immediate, open access to Cisco information and resources at anytime, from anywhere in the world. This highly integrated Internet application is a powerful, easy-to-use tool for doing business with Cisco.
Cisco.com provides a broad range of features and services to help customers and partners streamline business processes and improve productivity. Through Cisco.com, you can find information about Cisco and our networking solutions, services, and programs. In addition, you can resolve technical issues with online technical support, download and test software packages, and order Cisco learning materials and merchandise. Valuable online skill assessment, training, and certification programs are also available.
Customers and partners can self-register on Cisco.com to obtain additional personalized information and services. Registered users can order products, check on the status of an order, access technical support, and view benefits specific to their relationships with Cisco.
To access Cisco.com, go to the following website:
The Cisco TAC website is available to all customers who need technical assistance with a Cisco product or technology that is under warranty or covered by a maintenance contract.
If you have any problems with QDM, contact the QDM support team via e-mail at qdm-support@cisco.com.
When reporting a case to the QDM support team, please include the following information whenever possible:
If you have a priority level 3 (P3) or priority level 4 (P4) problem, contact TAC by going to the TAC website:
P3 and P4 level problems are defined as follows:
In each of the above cases, use the Cisco TAC website to quickly find answers to your questions.
To register for Cisco.com, go to the following website:
http://www.cisco.com/register/
If you cannot resolve your technical issue by using the TAC online resources, Cisco.com registered users can open a case online by using the TAC Case Open tool at the following website:
http://www.cisco.com/tac/caseopen
If you have a priority level 1 (P1) or priority level (P2) problem, contact TAC by telephone and immediately open a case. To obtain a directory of toll-free numbers for your country, go to the following website:
http://www.cisco.com/warp/public/687/Directory/DirTAC.shtml
P1 and P2 level problems are defined as follows:
![]()
![]()
![]()
![]()
![]()
![]()
![]()
![]()
Posted: Fri Jul 19 09:21:28 PDT 2002
All contents are Copyright © 1992--2002 Cisco Systems, Inc. All rights reserved.
Important Notices and Privacy Statement.