|
|

August 23, 2000
These release and installation notes describe the benefits, system requirements, and installation instructions for Cisco Quality of Service Device Manager (QDM) 1.1.
QDM 1.1 operates on Cisco 7100, 7200, and VIP-enabled Cisco 7500 series routers running Cisco IOS Release 12.1(2)E and Release 12.1(2)E1.
All features and functionality in QDM 1.0 are also in QDM 1.1. QDM 1.1 contains fixes for some caveats that were in QDM 1.0, as well as support for new software features introduced in Cisco IOS Release 12.1(2)E.
For a list of the major software caveats that apply to QDM 1.1, see the "Caveats" section of this document.
These release notes describe the following topics:
Cisco Quality of Service Device Manager (QDM) provides an easy-to-use application for configuring and monitoring advanced IP-based Quality of Service (QoS) functionality within Cisco routers. The QDM application is stored in the Flash memory of the Cisco 7000 family router and can be run from any workstation with proper support (as detailed in the "System Requirements" section of this document). QDM is a browser-based application that runs from Java. The QDM application uploads when the client web browser makes a connection to the embedded web server of the router.
Once the QDM application is uploaded, the online help embedded within the application is designed to make QDM an easy-to-use application. For information on using QDM, consult the online help within the QDM application.
Through the use of a classification wizard, traffic classification is simplified within QDM. QDM simplifies the following traffic classification scenarios:
QDM traffic classification supports packet marking using standards-based marking schemes, including user-defined IP precedence values, IP DSCP values, or QoS group markers.
Once traffic classification has been established, QDM supports a broad range of QoS features that can be applied to each traffic class:
QDM allows users to monitor real-time performance of QoS functionality through the router with the use of graphs and tables. With QDM graphs, users can monitor Quality of Service data by class, policy, or interface. QDM has the ability to display up to four graphs in one frame, and users can run multiple frames simultaneously. Each graph can monitor various statistics, including packet rates, bit rates, byte counts, packet counts, and protocol discovery. The monitoring table functionality of QDM allows users to monitor QoS functionality statistics on a real-time basis and can provide these statistics as often as every 10 seconds.
By default, QDM is able to graph and provide statistics (in a graph or table format) for all objects based on weighted averages. These graphs contain no history and start building when the graphs are launched.
To retrieve statistics for these graphs, use the QoS Metrics History feature. The QoS Metric History feature allows QDM users to retrieve statistics for the previous 5 days.
This section describes the system requirements for QDM 1.1:
QDM 1.1 has the following memory requirements:
 |
Note QDM 1.1 does not impose any incremental memory requirements on the router. |
Cisco Quality of Service Device Manager operates with the following platforms:
|
Note On a Cisco 7500 series router, Quality of Service features can only run on a Versatile Interface Processor (VIP). To run QoS features on a VIP, you must configure Distributed Cisco Express Forwarding on all interfaces running QoS features. |
QDM 1.1 requires Cisco IOS Release 12.1(2)E or Cisco IOS Release 12.1(2)E1.
|
Note Cisco Systems recommends having 16 available virtual terminal (vty) lines for QDM. QDM might not properly install or run on systems with less than 16 virtual terminal lines. |
QDM 1.1 requires one of the following operating systems:
|
Note The Japanese language versions of the Windows 98, Windows NT 4.0 Workstation, and Solaris version 2.6 operating systems support QDM 1.1. |
|
Note QDM 1.1 might operate on a system running the Windows 2000 operating system.
However, Cisco Systems has not tested QDM 1.1 on a system running Windows 2000 and
can not guarantee support for systems running QDM in a Windows 2000 environment. Future versions of QDM will run in a Windows 2000 operating system. |
QDM 1.1 supports the following Web browsers:
|
Note For the QDM 1.1 application, Microsoft Internet Explorer Web browsers generally provide better overall performance than Netscape Navigator Web browsers. |
 |
Caution QDM can theoretically run on all web browsers that support Java, JavaScript, or DHTML. However, QDM has only been successfully tested on the supported web browsers listed in this section of the document. Therefore, Cisco Systems highly recommends that you use a supported web browser to run QDM. Cisco Systems can not guarantee support for web browsers that have not been successfully tested for QDM web browser support. |
The screen size requirement for QDM 1.1 for the desktop area is 1024 by 768 pixels. If your system is configured at a different desktop area size, the QDM screen might not properly fit in the web browser. Because the QDM screen does not properly fit in the web browser, certain graphs might be unreadable and certain functions might be unusable.
To install QDM, follow the instructions in the following sections:
If you are installing QDM 1.1 on your system for the first time, proceed to the Installing QDM.
If you are upgrading from QDM 1.0 to QDM 1.1, simply follow the instructions below. QDM 1.1 will automatically replace QDM 1.0, and all of the saved information from QDM 1.0 will be available in QDM 1.1.
Step 2 Verify that a QDM-supported Cisco IOS release is running by issuing the show version command in EXEC mode:Router> show version
The Cisco IOS releases that support QDM 1.1 are listed in the "Software Supported" section. If you are not running a supported Cisco IOS release, see the following URL:
http://www.cisco.com/kobayashi/sw-center/sw-ios.shtml
To download a supported Cisco IOS release, click Cisco IOS 12.1: Download Cisco IOS 12.1 Software.
|
Note Cisco Connection Online (CCO), including the provided Software Center URL, contains information regarding Cisco IOS Releases. Cisco Systems recommends you research IOS Releases on CCO before making a purchasing decision. |
Step 3 Switch to enable mode on the router:Router> enableEnter password: xxxxxEnsure that the router has 1.5 MB of free Flash memory in order to support QDM. The available flash memory can be in one of the following four flash file systems: slot0, slot1, disk0, or disk1. Use the directory command to verify the amount of free space on a Flash memory card.
Router#
|
Note In these particular installation notes, QDM is stored in slot 0. In instances where slot0 appears in the command-line interface, simply replace the slot0 text in the command with the correct flash file system location (either slot1, disk0, or disk1). |
Router# directory slot0:Directory of slot0:/If 1.5MB (1,572,864 bytes free) of free space is not available on any Flash file system, try one of the following methods to create more Flash file system memory:
1 -rw- 448893 Jan 03 2000 18:06:17 file01.txt
2 -rw- 213273 Jan 03 2000 18:06:17 file02.txt
20578304 bytes total (19733404 bytes free)
Router# squeeze slot0:All deleted files will be removed. Continue? [Enter]
Squeeze operation may take a while. Continue? [Enter]
Squeezing...
Squeeze of slot0 complete |
Caution Reformatting the flash card will erase all existing files on that flash card. |
Router# format slot0:Format operation may take a while. Continue? [Enter] |
Note When you enter the http://<IP address>/level/<security level>/go/qdm URL, the HTTP server looks for QDM in the four Flash file systems in the following order: slot0, slot1, disk0, then disk1. This order becomes important when QDM is installed on two different Flash file systems. When a version of QDM exists on both slot1 and disk0, for instance, QDM will always be loaded from slot1, even if disk0 contains a newer version of QDM. |
Step 4 Type the following URL into your web-browser:
http://www.cisco.com/cgi-bin/tablebuild.pl/qdm
Step 5 Click the following file:
qdm-1.1-1.0.readme
Step 6 As directed by the instructions on the web page, select the CCO server from which you want to download the readme file. Cisco Systems recommends reading the contents of the readme file before performing the QDM installation.
Step 7 After reading the readme file, hit the back button on your web browser twice, or return to the QDM software download page at:
http://www.cisco.com/cgi-bin/tablebuild.pl/qdm
Step 8 Click the QDM tar file (qdm-1.1-1.0.tar).
Step 9 As directed by the instructions on the web page, select the CCO server from which you want to download the tar file. Click your selected server.
Step 10 Save the qdm-1.1-1.0.tar file onto a TFTP server.
Step 11 Extract the QDM archive by issuing the archive tar command:
Router# archive tar /xtract tftp://<path>/qdm1.1-1.0.tar slot0:
Loading <path>/qdm.tar from a.b.c.d (via Interface1/0):!
extracting qosmon.jar (xxxxxx bytes)!!!!!!!!CCCCCCCCC
extracting HealthPanel.jar (xxxxxx bytes)!!!!!CCCCCCC
. (directory) -- unable to create (Invalid argument)
extracting ./QOS.html (xxxx bytes)!
extracting ./buffer.html (xxx bytes)
extracting ./cfgprotdisc.html (xxx bytes)
extracting ./class.html (xxx bytes)!
extracting ./cli.html (xxx bytes)
extracting ./empty.html (xxx bytes)
extracting ./grint.html (xxx bytes)
...
[OK - 884736/1769472 bytes]
|
Note In this example, <path> refers to the path where the QDM tar file is located. The example also assumes that the file is saved under the name default file name, qdm1.0-1.0.tar. If the tar file is saved under a different name, replace the qdm1.1-1.0.tar portion of the archive command with the new file name. |
QDM 1.1 is now installed on your router. To enable QDM, proceed to the next section, "Enabling QDM".
Router# show running-configuration
ip http server
Router% enable
Enter password: xxxxx
Router# configure terminal
Enter configuration command, one per line. End with CNTL-Z
Router# ip http server
Router# copy running-config startup-config
Step 2 The default authentication mode for QDM is enable mode. If you wish to change the authentication mode, you should do so now.
For information on changing the authentication mode, see the"Choosing an Authentication Mode" section. For additional information on QDM, see the online help information within the QDM application.
To launch QDM, open a supported Web browser and enter one of the following URLs:
The IP address could be any IP address configured on your router. If your router hostname is in the Domain Name System (DNS), you can use the router name instead of the IP address.
For example, if your router hostname in DNS is charlie and your domain name is anydomain, you can access QDM as a Monitor User by entering the following URL:
http://charlie.anydomain.com/level/1/go/qdm
For information on Monitor and Administrative users, see the "Creating a QDM User Profile" section.
|
Note When you enter the http://<IP address>/level/<security level>/go/qdm URL, the HTTP server looks for QDM in the four Flash file systems in the following order: slot0, slot1, disk0, then disk1. This order becomes important when QDM is installed on two different Flash file systems. When a version of QDM exists on both slot1 and disk0, for instance, QDM will always be loaded from slot0, even if disk0 contains a newer version of QDM. |
After you enter one of these URLs, the following screen should appear:
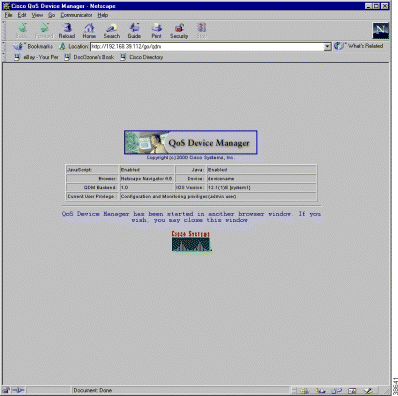
The QDM application should appear in a separate browser window. The QDM application should be similar in appearance to Figure 2:

QDM is now successfully launched on your router. For additional information on QDM, see the online help information within the application.
To log out of QDM, exit and close all browser windows that might be open. For Netscape Navigator browsers, use the Exit option under the File menu. For Microsoft Internet Explorer browsers, use the Close option under the File menu.
You can also log out of QDM by clicking the logout option in the top right corner of the QDM application, or by simply exiting the web browser running the QDM application.
|
Note Clicking the logout option closes the browser window where the QDM application was running. To insure a complete logout, close all web browser windows. |
The Cisco IOS HTTP Web server supports three authentication modes:
1. Enable Password mode
Router# configure terminal

Enter configuration commands, one per line.

Router(config)# ip http authentication enable
2. Local mode
Router# configure terminal

Enter configuration commands, one per line.
Router(config)# ip http authentication local
3. Terminal Access Controller Access Control System (TACACS) mode
Router# configure terminal

Enter configuration commands, one per line.

Router(config)# ip http authentication tacacs
This section contains the following topics:
QDM 1.1 supports two types of user profiles, an Administrative User and a Monitor User. QDM Administrative Users can monitor and make configuration changes to a device. QDM Local Users can monitor a device using QDM, but are unable to make configuration changes to a device using QDM.
ip http authentication local
If you want to authenticate QDM in Local Authentication mode but Local Authentication mode is not configured on your Cisco IOS Web server, see the "Choosing an Authentication Mode" section of this document.
Step 2 Use the username configuration command to create a user with the desired privilege level. A QDM Administrative User has a privilege level of 15. A QDM Monitor User has a privilege level of 1.
|
Note In QDM, all privilege levels between 1 and 14 are considered Monitor Users. In this document, privilege level 1 is always used to indicate the privilege level of a QDM Monitor User. |
In the following example, a QDM Monitor User is created. The login ID of the user is "john" and the password is "doe", and a privilege level of 1 is specified:
Router(config)# username john privilege 1 password 0 doe
In this example, a QDM Administrative User with a privilege level of 15 is created. The login ID of the user is "joe" and the password is "montana":
Router(config)# username joe privilege 15 password 0 montana
|
Note After logging on as an Administrative User, your password information is cached,
preventing you from becoming a Monitor User. To log on to QDM as a Monitor
User after logging in as an Administrative User, exit the browser to clear the
cached information. When opening the new browser session, log in as a Monitor
User. For instructions on exiting your browser, see the "Logging Out of QDM" section. |
ip http authentication enable
If you want to authenticate QDM user profiles in Enable Password mode when enable password mode is not configured on your Cisco IOS web server, see the "Choosing an Authentication Mode" section.
Step 2 Use the enable configuration command to create an enable password on the router. In the following example, an enable password is created for an administrative user (privilege level 1):
Router(config)# enable secret level 1 0 adminuser1
|
Note After logging on as an Administrative User, your password information is cached,
preventing you from becoming a Monitor User. To log on to QDM as a Monitor
User after logging in as an Administrative User, exit the browser to clear the
cached information. When opening the new browser session, log in as a Monitor
User. For instructions on exiting your browser, see the "Logging Out of QDM" section. |
|
Note In most cases, an enable password with a privilege level of 15 already exists on the router. If you already have a router with an enable password and a privilege level of 15, this password can be used for authenticating QDM Administrative Users. |
Disabling the Cisco IOS HTTP Web server disables QDM. To disable the Cisco IOS HTTP Web server, use the no ip http server command:
Router% enable

Enter password:xxxxx

Router# configure terminal

Enter configuration command, one per line. End with CNTL-Z

Router# no ip http server
For instructions on uninstalling QDM, see the QDM Uninstall Instructions within the QDM application. These instructions can be retrieved by clicking the following path from the QDM startup screen:
Help: QDM Uninstall Instructions
Caveats describe unexpected behavior in QDM. Severity 1 caveats are the most serious caveats; severity 2 and 3 caveats are less serious. All caveats documented in this section are between severity 1 and severity 3.
This section contains open caveats for QDM 1.1.
This section describes possibly unexpected behavior by QDM 1.1.
The following features are not supported by Cisco QDM 1.1:
You can access the most current Cisco documentation on the World Wide Web at http://www.cisco.com, http://www-china.cisco.com, or http://www-europe.cisco.com.
Cisco documentation and additional literature are available in a CD-ROM package, which ships with your product. The Documentation CD-ROM is updated monthly. Therefore, it is probably more current than printed documentation. The CD-ROM package is available as a single unit or as an annual subscription.
Registered CCO users can order the Documentation CD-ROM and other Cisco Product documentation through our online Subscription Services at http://www.cisco.com/cgi-bin/subcat/kaojump.cgi.
Nonregistered CCO users can order documentation through a local account representative by calling Cisco's corporate headquarters (California, USA) at 408 526-4000 or, in North America, call 800 553-NETS (6387).
Cisco provides Cisco Connection Online (CCO) as a starting point for all technical assistance. Warranty or maintenance contract customers can use the Technical Assistance Center. All customers can submit technical feedback on Cisco documentation using the web, e-mail, a self-addressed stamped response card included in many printed docs, or by sending mail to Cisco.
Cisco continues to revolutionize how business is done on the Internet. Cisco Connection Online is the foundation of a suite of interactive, networked services that provides immediate, open access to Cisco information and resources at anytime, from anywhere in the world. This highly integrated Internet application is a powerful, easy-to-use tool for doing business with Cisco.
CCO's broad range of features and services helps customers and partners to streamline business processes and improve productivity. Through CCO, you will find information about Cisco and our networking solutions, services, and programs. In addition, you can resolve technical issues with online support services, download and test software packages, and order Cisco learning materials and merchandise. Valuable online skill assessment, training, and certification programs are also available.
Customers and partners can self-register on CCO to obtain additional personalized information and services. Registered users may order products, check on the status of an order and view benefits specific to their relationships with Cisco.
You can access CCO in the following ways:
You can e-mail questions about using CCO to cco-team@cisco.com.
The Cisco Technical Assistance Center (TAC) is available to warranty or maintenance contract customers who need technical assistance with a Cisco product that is under warranty or covered by a maintenance contract.
To display the TAC web site that includes links to technical support information and software upgrades and for requesting TAC support, use www.cisco.com/techsupport.
To contact TAC by e-mail for QDM-related issues, send an e-mail to qdm-support@cisco.com.
To contact TAC by e-mail for other issues, use one of the following:
| Language | E-mail Address |
|---|---|
English | tac@cisco.com |
Hanzi (Chinese) | chinese-tac@cisco.com |
Kanji (Japanese) | japan-tac@cisco.com |
Hangul (Korean) | korea-tac@cisco.com |
Spanish | tac@cisco.com |
Thai | thai-tac@cisco.com |
In North America, TAC can be reached at 800 553-2447 or 408 526-7209. For other telephone numbers and TAC e-mail addresses worldwide, consult the following web site: http://www.cisco.com/warp/public/687/Directory/DirTAC.shtml.
If you have a CCO login account, you can access the following URL, which contains links and tips on configuring your Cisco products:
http://www.cisco.com/kobayashi/technotes/serv_tips.shtml
This URL is subject to change without notice. If it changes, point your Web browser to CCO and click on this path: Service & Support: Technical Assistance Center: Technical Tips.You must have a CCO account to access this link.
The following sections are provided from the Technical Tips page:
If you are reading Cisco product documentation on the World Wide Web, you can submit technical comments electronically. Click Feedback in the toolbar and select Documentation. After you complete the form, click Submit to send it to Cisco.
You can e-mail your comments to bug-doc@cisco.com.
To submit your comments by mail, for your convenience many documents contain a response card behind the front cover. Otherwise, you can mail your comments to the following address:
Cisco Systems, Inc.
Document Resource Connection
170 West Tasman Drive
San Jose, CA 95134-9883
We appreciate and value your comments.
![]()
![]()
![]()
![]()
![]()
![]()
![]()
![]()
Posted: Thu Jul 18 17:14:15 PDT 2002
All contents are Copyright © 1992--2002 Cisco Systems, Inc. All rights reserved.
Important Notices and Privacy Statement.