|
|

This chapter provides a tutorial using the Connectivity Tools Clipboard feature to perform Batch Analysis against the existing connectivity requirement file sets.
The following tasks are performed and described in this tutorial:
Step 1 From the Open Baseline window, select the tutorial_baseline entry. Click on the OK button to load the tutorial_baseline and to create the baseline scenario.
Refer to "Creating and Opening a Baseline" for information about creating and opening a baseline. In this tutorial, the baseline (tutorial_baseline) created in the first tutorial is used. Figure 6-1 shows the Connectivity Solver's Connectivity Tools window after the tutorial_baseline baseline was opened and loaded. By default, when a baseline is opened, an initial baseline scenario is created. It has the same name given to the baseline and is displayed and selected in the Scenarios list.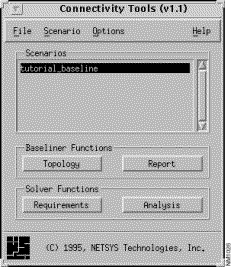
Step 2 Select the tutorial_baseline scenario entry in the Connectivity Tools window's Scenarios list, then click on the Requirements button.
The Requirement Sets window, shown in Figure 6-2, is displayed. This window is used to create, view, load, unload, delete, and undelete end system connectivity requirements.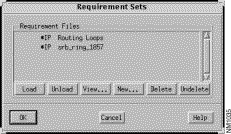
A list of network connectivity requirement file sets, if any exist, containing the connectivity requirements for the tutorial_baseline baseline, is displayed in the Requirement Files list.
Requirement File entries preceded by an asterisk indicate connectivity requirements implicitly derived from the baseline's router configuration files. These connectivity requirement file sets can not be edited or deleted.
The implicitly derived Routing Loops requirement set is provided to find routing loops caused by IP redistribution. When you select the Routing Loops requirement set and then load it for analysis by clicking on the Load button followed by the OK button, a list of all the redistribution IP routing loops detected during analysis is displayed in the Requirements Analysis window. The results are a set of paths showing the identified routing loops. Each path displays a source address set to a port address of a router involved in the loop and a destination, which is a subnet or end point address, identifying the Routing Table destination involved in the routing loop. The path also shows a set of routers involved in a loop.
Step 3 Click on the New button.
The New Requirement Set window, shown in Figure 6-3, is displayed. The new set of protocol dependent (in this case IP) connectivity requirements to be created are saved to the connectivity requirements file set specified in this window.
Step 4 Specify batch_test in the Name field, then click on the OK button.
A name must be assigned to a new set of connectivity requirements. By default, IP is selected as the requirement type.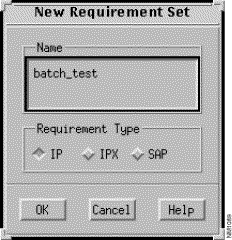
Upon clicking on the OK button, the Requirements window is displayed. No requirements are defined in the batch_test requirement set as yet, therefore the Requirements pane is empty.
The batch_test connectivity requirement set is populated with the requirements you specify in the subsequent steps. A connectivity requirement set can be used to test a network's redundancy (the extent to which multiple paths are available for network traffic.) The batch_test connectivity requirement set will contain a requirement to determine the paths available between three source and three destination end systems.
The batch_test connectivity requirement set will then be analyzed using the Connectivity Tools batch analysis feature and a report on connectivity in the current network configuration will be provided. Next, another batch analysis option will be invoked against the batch_test connectivity requirement set and a report on connectivity after several selected routers are set to a failed state will be provided.
Step 5 Click on the Add button in the Requirements window.
The Add IP Requirements window, shown in Figure 6-4, is displayed. New requirements in the batch_test connectivity requirements set are created using this window. 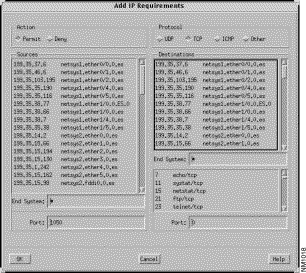
Step 6 Select a range of addresses from the Sources list in one of the following manners:
The three source addresses are now selected, as shown in Figure 6-5.
Step 7 Select the 132.108.43.7 entry in the Destinations list. Next, while pressing Control, select the 132.108.23.6 entry and then the 132.108.17.7 entry from the Destinations list.
The three destination addresses are now selected, as shown in Figure 6-5.
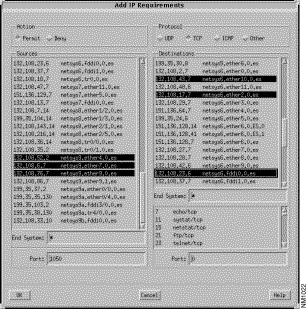
Step 8 Click on the OK button.
Notice the Requirements list, partially shown in Figure 6-6, contains nine IP connectivity requirements consisting of the ordered pairs from the three sources and three destinations.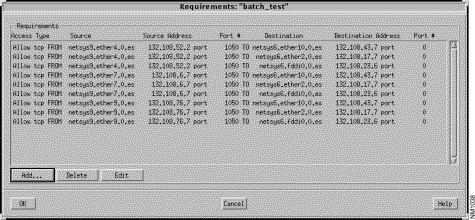
Step 9 Click on the OK button in the Requirements window.
The batch_test connectivity requirements file set is now added to the Requirement Files list in the Requirement Sets window.
Step 10 Select the Options>Show Clipboard menu option in the Connectivity Tools window.
An empty Clipboard window, shown in Figure 6-7, is displayed.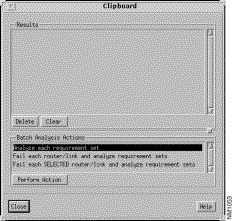
Step 11 Select the Analyze each requirement set option then click on the Perform Action button.
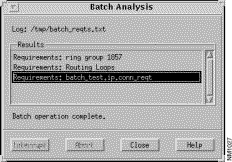
The Batch Analysis window, shown in Figure 6-8, is displayed. Selecting this option causes each of the existing connectivity requirement file sets to be analyzed, one at a time. As each requirement set is analyzed, a message confirming the analysis being performed is displayed in this window and the results of the analysis is briefly displayed in the Requirements Analysis window.
Output from the analysis (exceptions only -- paths with status other than "OK") is saved to the following text files:
The next steps demonstrate batch analysis of the same connectivity requirement sets, although in this case several routers are set to a failed state before the connectivity requirements are analyzed. In this manner, a network's redundancy is analyzed in the context of device failures.
Step 12 Select the Scenario>Create New menu option from the Connectivity Tools window.
Simulating a device failure cannot be performed on the baseline scenario. A new scenario must be created prior to this batch analysis process thereby allowing selected routers to be set to a failed state.
Step 13 Choose the Options>Find Device menu option from the Connectivity Tools window.
The Find Device window is used to populate the Clipboard window for the remaining batch analysis operations.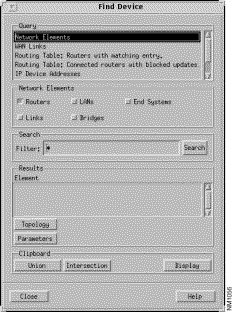
Step 14 Confirm the Network Elements entry is selected in the Query pane and the Routers button is selected in the Network Elements pane.
Step 15 Specify netsys9* in the Search Filter field, then press Return or click on the Search button.
The results of the search (all routers whose names start with netsys9) are displayed in the Results pane, as shown in Figure 6-10.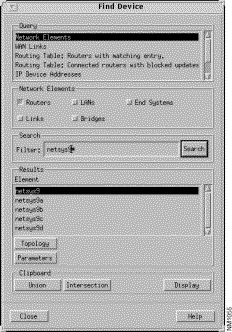
Step 16 Click on the Clipboard Display button to open the Clipboard window, then click on the Clipboard Union button.
The routers listed in the Find Device window's Results list are merged with the set of routers in Clipboard window's Results list (which is empty at this time). If the Clipboard window's Results list had been populated with other routers, only the routers from the Find Device window's Results list not already existing in the Clipboard window's Results list, are added to the Clipboard window. The Clipboard window, after the merging of the two Results lists, is shown in Figure 6-11.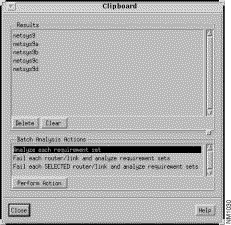
Step 17 Add the router netsys6 to the Clipboard list by specifying netsys6 in the Find Device window's Search field, pressing Return, then clicking on the Clipboard Union button.
The Clipboard window, shown in Figure 6-12, is displayed.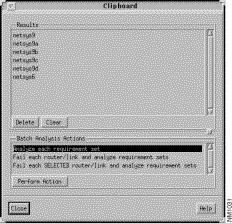
Step 18 Select the "Fail each SELECTED router/link..." batch analysis option, then select the netsys6 and netsys9 routers from the Results list as shown in Figure 6-13. (Use the Control key to make multiple selections.)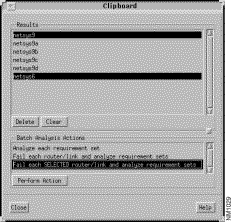
Step 19 Click on the Perform Action button in the Clipboard window.
The first router selected (in this case netsys9) is set to a failed state and then analysis of each of the existing connectivity requirement file sets is performed. The results of the analysis is briefly displayed in the Requirements Analysis window. Upon completion, the next router (in this case netsys6) is set to a failed state and analysis of each of the existing connectivity requirement file sets is again performed. The process continues until all of the selected routers have been processed. The exception results (connectivity requirements in which a status other than "OK" is returned) of the analyses performed are saved as described earlier.
The third batch analysis option, "Fail each router/link and analyze requirement sets", can be used to perform the above analysis (setting each network element to a failed state in turn) for all of the network elements listed in the Clipboard window's Results list.
|
|