|
|

This chapter describes the following tasks to help you find information about CMCCs on your routers:
The options on the ISM Router Management Setup panels apply to all routers that ISM manages. You can override the global setup options by setting up router-specific CMCC options. For more information about setting up router-specific CMCC options, see the section "Setting Up Router CMCC Management Options" in this chapter.
You can set up ISM to monitor the status and performance statistics for the CMCCs that it discovers using the ISM Router Management Setup panel. CMCC management is disabled by default in ISM setup when ISM is first initialized.
ISM uses the CPU Utilization and Free Memory thresholds that you set up on the second ISM Router Management Setup panel to determine the acceptable performance levels for discovered CMCCs on all routers that are monitored by ISM. When these thresholds are exceeded on a router's CMCC, ISM issues a PERF alert for the CMCC on that router if alert generation has been enabled. For information about enabling alert generation, see the section "Managing CMCC Data" in this chapter.
Complete the following tasks to set up ISM to monitor CMCCs:
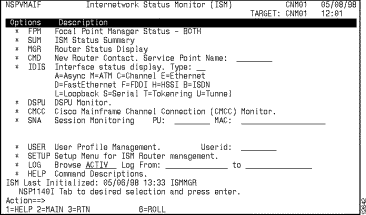
Step 1 On the ISM main menu panel (Figure 7-1), press the Tab key until the cursor is positioned on the * SETUP option and press Enter.
The first ISM Router Management Setup panel is displayed (Figure 7-2).
 Timesaver To go directly to the ISM Router Management Setup panel, type the ismsetup command at any ISM command prompt and press Enter.
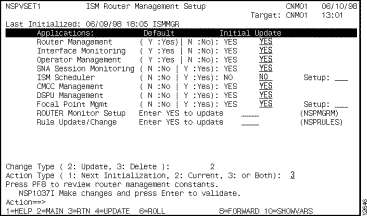
Step 2 In the CMCC Management option, type Y in the Update column.
Yes appears in the Update column beside the CMCC Management option. The CMCC Management option will appear on the ISM main panel with an asterisk beside it to indicate that the CMCC Management application is enabled for all routers.
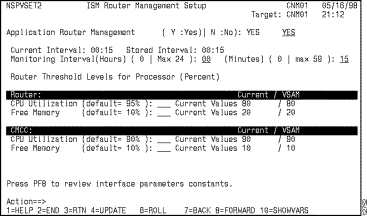
Step 3 To set up global CMCC monitoring thresholds for all routers, press F8.
The second ISM Router Management Setup panel is displayed (Figure 7-3). The default CPU threshold for CMCCs is 90 percent, and the default free memory threshold is 10 percent.
Step 4 To enable Channel interface monitoring, press F8.
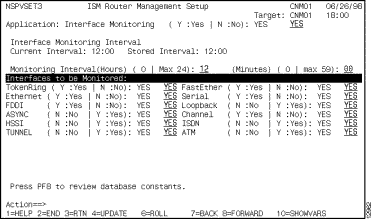
The third ISM Router Management Setup panel is displayed (Figure 7-4).
Step 5 In the Channel option, type Y.
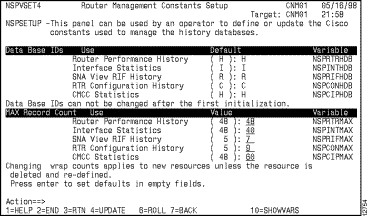
Step 6 If you have not initialized ISM for the first time and want to change the CMCC history database ID, or if you want to change the number of records in the database for new resources, press F8.
The Router Management Constants Setup panel (Figure 7-5) is displayed. The default record counts allow for approximately 24 hours before the database record will wrap for a resource.
Step 7 When you have completed specifying the options, press F2 to return to the first ISM Router Management Setup panel.
Step 8 In the Change Type option, type 2 for Update.
Step 9 In the Action Type option, do one of the following to enable CMCC monitoring and the other setup options that you specified:
Step 10 To confirm the options that you selected, press Enter.
Step 11 To update the ISM router management setup definition according to the Change Type and Action Type options that you selected, press F4.
You must be an operator with ISM enable authority to enable CMCC alert generation or modify other ISM rules.
Complete the following tasks to set up CMCC alert generation for performance and memory thresholds and CMCC recovery:
Step 1 From the ISM main menu panel, press the Tab key until the cursor is positioned on the * SETUP option and press Enter.
The ISM Router Management Setup panel is displayed.
 Timesaver To go directly to the ISM Router Management Setup panel, type the ismsetup command at any ISM command prompt and press Enter.
Step 2 In the Rule Update/Change option, type Yes and press Enter.
The ISM Management Rules Setup panel is displayed (Figure 7-6).
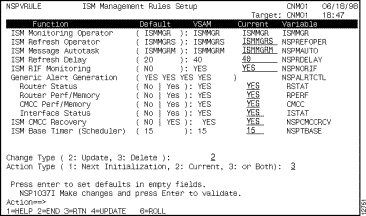
Step 3 In the CMCC Perf/Memory option under Generic Alert Generation, type Yes.
Step 4 In the ISM CMCC Recovery option, type Yes.
Step 5 In the Change Type option, type 2 for Update.
Step 6 In the Action Type option, do one of the following:
Step 7 To confirm the options that you selected, press Enter.
Step 8 To update the ISM management definition according to the Change Type and Action Type options that you selected, press F4.
If you want to override the global thresholds that have been set up in ISM Router Management Setup for a particular router's CMCCs, you can specify individual thresholds on a per-router basis using the ISM CMCC Administration panel. You can also enable or disable CMCC monitoring and data archiving for a specific router.
You can access the router CMCC management options from the ISM main menu panel or the ISM Status Summary panel. The following steps show you how to access the CMCC management options from the ISM main menu panel:
Step 1 From the ISM main menu panel (Figure 7-7), press the Tab key until the cursor is located on the * CMCC option and press Enter.
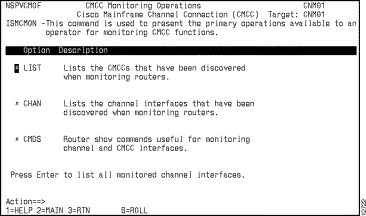
The CMCC Monitoring Operations panel is displayed (Figure 7-8).
Step 2 With the cursor positioned on the * LIST option, press Enter.
The Cisco Mainframe Channel Connections panel is displayed (Figure 7-10).
Step 3 Go on to Step 2 in the section "Setting Up Router CMCC Management Options from the ISM Status Summary Panel."

You can access the router CMCC management options from the ISM Status Summary panel or the ISM main menu panel.
The following steps show you how to access the CMCC management options from the ISM Status Summary panel:
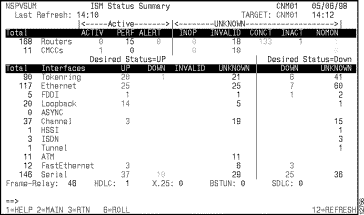
Step 1 On the ISM Status Summary panel (Figure 7-9), press the Tab key until the cursor is positioned in the Total column beside the CMCCs option and press Enter.
The Cisco Mainframe Channel Connections panel is displayed (Figure 7-10).
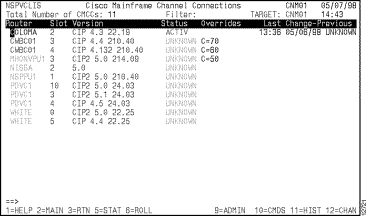
Step 2 Press the Tab key until the cursor is positioned on the router whose CMCC thresholds you want to change, and press F9.
The ISM CMCC Administration panel (Figure 7-11) is displayed with the CMCC management definition for the router that you selected.
Step 3 Specify one of the following options to set up CMCC monitoring for the selected router:
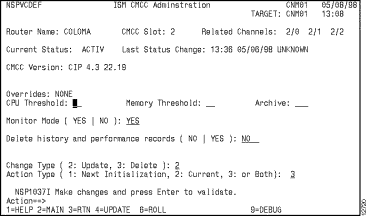
Step 4 To specify the maximum allowable CPU utilization percentage for the CMCCs on the router that you selected, type a value in the CPU Threshold option.
The notation C= with the percentage that you specified is displayed in the Overrides field. ISM will issue a PERF alert for the CMCCs on the router that you selected when the CPU utilization exceeds the percentage that you specified on this administration panel.
Step 5 To specify the minimum allowable percentage of free memory for the CMCCs on the router that you selected, type a value in the Memory Threshold option.
The notation M= with the percentage that you specified is displayed in the Overrides field. ISM will issue a PERF alert for the CMCCs on the router that you selected when the free memory percentage is below the percentage that you specified on this administration panel.
Step 6 Do one of the following:
Step 7 In the Change Type option, type 2 for Update.
Step 8 In the Action Type option, do one of the following to change the monitoring options that you specified:
Step 9 To confirm the options that you selected, press Enter.
Step 10 To update the CMCC management definition according to the Change Type and Action Type options that you selected, press F4.
For information on how to enable or disable CMCC data archiving, see the section, "Setting Up Router CMCC Management Options" in this chapter.
Complete the following tasks to delete history and performance records for a specific router:
Step 1 From the Cisco Mainframe Channel Connections panel (Figure 7-10), select the router whose CMCC data you want to delete and press F9.
The ISM CMCC Administration panel (Figure 7-11) is displayed.
Step 2 In the Delete history and performance records option, type Yes.
Step 3 In the Change Type option, type 2 for Update.
Step 4 To confirm the options that you selected, press Enter.
Step 5 To update the CMCC management definition according to the Change Type and Action Type options that you selected, press F4.
If you specified changes for the current session, the history and performance records for the CMCCs on the router that you selected are deleted from the database when you press F4.
Complete the following tasks to monitor CMCC status from the ISM Status Summary panel:
Step 1 From the ISM main menu panel, press the Tab key until the cursor is positioned on the * SUM option and press Enter.
The ISM Status Summary panel is displayed showing the total number of CMCCs being monitored and the subtotals of CMCCs categorized by status.
 Timesaver To go directly to the ISM Status Summary panel (Figure 7-9), type the ismsum command at any ISM command prompt and press Enter.
Step 2 To view a list of all of the CMCCs by status category, press the Tab key until the cursor is positioned in the status field that you want to view and press Enter.
The Cisco Mainframe Channel Connections panel is displayed showing only the CMCCs with the status that you selected. The status filter is displayed at the top of the panel in the Filter field.
Complete the following tasks to monitor CMCC status from the ISM main menu panel:
Step 1 From the ISM main menu panel (Figure 7-7), press the Tab key until the cursor is positioned on the * CMCC option and press Enter.
The CMCC Monitoring Operations panel is displayed (Figure 7-8).
Step 2 Press the Tab key until the cursor is positioned on the * LIST option and press Enter.
The Cisco Mainframe Channel Connections panel (Figure 7-10) is displayed showing the discovered CMCCs for all of the routers being monitored by ISM.
Complete the following tasks to monitor channel interfaces:
Step 1 Be sure that the Interface Monitoring application and the channel interface type are enabled in ISM Router Management Setup.
Step 2 To monitor the status of all channel interfaces do one of the following tasks:
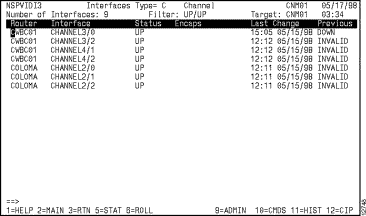
Step 3 To display CMCC status, press F12.
The Cisco Mainframe Channel Connections panel is displayed.
The CMCC hardware and software versions are displayed on several ISM panels:
The first dotted-decimal number is the hardware version, and the second-dotted decimal number is the software version:
CIP 4.3 22.19
Although there are many ways of accessing the Router Command Interface in ISM, some of the ISM applications provide direct access to the command interface and list the commands that are specific to the resource currently being managed. When you are using the CMCC Management application panels in ISM, you can access panels that provide router commands that are specific to managing CMCCs.
Complete the following steps to access the CMCC and Channel Show Commands panel to run router show commands:
Step 1 To access the CMCC and Channel Show Commands panel, do one of the following:
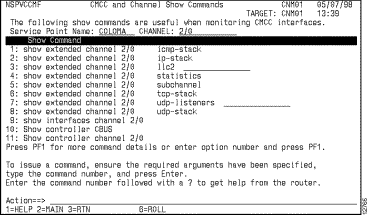
Step 2 Specify the router service point name and channel. This information is automatically specified for you if you selected a router on the Cisco Mainframe Channel Connections panel before opening the CMCC and Channel Show Commands panel.
Step 3 To run a command, type the number that corresponds to the show command that you want to execute at the ISM command prompt, and press Enter.
 Tips
Tips
You need to specify the router service point name and the channel to run the show commands. If you select a router on the Cisco Mainframe Channel Connections panel when you press F10 to open the command interface, ISM automatically specifies the router and channel for you.
To get command help from the router, type the number that corresponds to the show command followed by a "?" and press Enter.
The show controller command is a command to the router that displays all information about the CBUS controller card or controller channel on a Cisco router. This command shows the capabilities of the card and reports any controller-related failures (Figure 7-14).
You can execute the show controller command from either of the following panels:
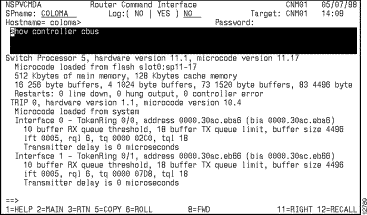
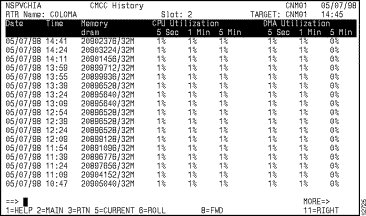
You can view memory and CPU utilization statistics for a CMCC on the CMCC History panel (Figure 7-15). From this panel, you can also run a show controller command (press F5) to display information about the controller card in the router.
To view CMCC memory and utilization statistics from the Cisco Mainframe Channel Connections panel, press the Tab key until the cursor is positioned on the name of the router for which you want to view statistics, and press F11.
The CMCC History Panel is displayed (Figure 7-15). To view additional history statistics, press F11.
Complete the following tasks to view the CMCC resource diagram:
Step 1 From the Cisco Mainframe Channel Connections panel, press the Tab key until the cursor is positioned on the name of the router for which you want resource configuration information, and press F5.
The CMCC Extended Display panel is displayed (Figure 7-16).
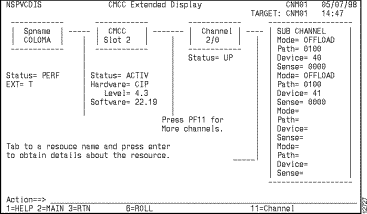
Step 2 To access additional information about a router resource (other than subchannels), press the Tab key until the cursor is positioned in the box of the resource that you want to view and press Enter.
The ISM panel that corresponds to the resource that you selected is displayed. For example, if you press Enter while the cursor is in the Channel 2/0 box, the Interfaces Type panel for channels is displayed.
Step 3 If the router service point has multiple CMCCs, channels or sub-channels, you can do the following to view additional information:
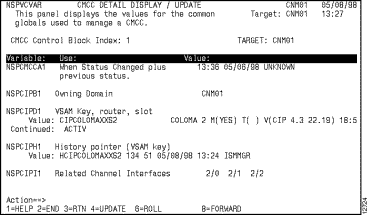
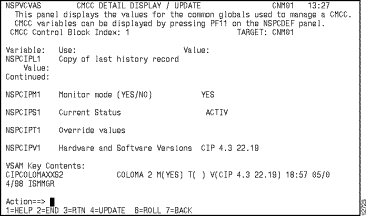
To view CMCC management variables from the ISM CMCC Administration panel (Figure 7-11), press F9. The CMCC Detail Display/Update panels (Figure 7-17 and Figure 7-18) are displayed. To view additional variables, press F8.
|
|