|
|

Table Of Contents
Using Cisco EPOM Flow Provisioning
Using a Provisioning Flow Wizard
Adding or Deleting Subscribers
Adding, Modifying, or Deleting Subscriber Services
Provisioning Other Components by Using Cisco EPOM Wizards
Customizing Cisco EPOM Provisioning Flows
Using Cisco EPOM Flow Provisioning
This chapter is designed for network operators using Cisco EPOM for ongoing provisioning once the network inventory has been set up.
This chapter contains the following topics:
•
Adding or Deleting Subscribers
•
•
About Provisioning Flows
A provisioning flow consists of a number of steps that you perform to complete a task. You can also perform each step by expanding the Cisco BTS 10200 navigation tree, finding the right components, and clicking the appropriate action. A provisioning flow links these steps together for your convenience.
Using a Provisioning Flow Wizard
This section describes the general process for using a wizard; specifics depend on the type of task.
Step 1
Step 2
Step 3
Step 4
Step 5
Step 6
Step 7
Step 8
Adding or Deleting Subscribers
Adding a subscriber involves adding the subscriber termination, equipping the subscriber termination, and then adding the subscriber. The Cisco EPOM Subscriber wizard steps you through these tasks and also allows you to add a media gateway or subscriber profile if they have not yet been added.
Deleting a subscriber reverses the task sequence to add a subscriber. The Cisco EPOM Subscriber wizard steps you through these tasks as well.
Tip
Adding a Subscriber
The Provisioning Flow wizard guides you through each of the steps to add a subscriber.
Step 1
Step 2
Step 3
Step 4
Step 5
Step 6
Deleting a Subscriber
Step 1
Step 2
Step 3
Step 4
Step 5
Step 6
Adding, Modifying, or Deleting Subscriber Services
You can add, modify, or delete subscriber services in two ways:
•
•
Provisioning Other Components by Using Cisco EPOM Wizards
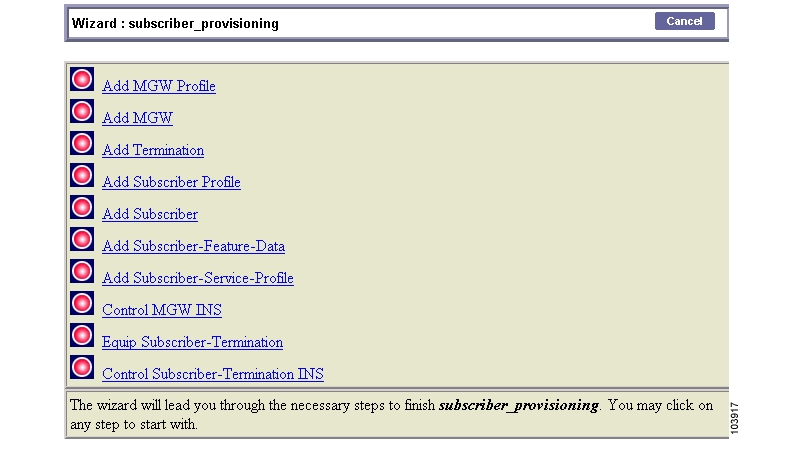
The Provisioning Flow wizards guide you through each of the steps in a multistep provisioning task. Information is carried over from one step to the next. Cisco EPOM provides wizards for these common provisioning tasks:
•
•
•
•
•
•
•
•
•
•
•
•
•
•
•
•
•
Tip
For additional information on provisioning the Cisco BTS 10200, refer to the Cisco BTS 10200 Softswitch documentation.
Customizing Cisco EPOM Provisioning Flows
Cisco EPOM ships with several default navigation trees and provisioning flows that help you to organize frequently used tasks to reduce the need to navigate through multiple windows. (See the "Provisioning Other Components by Using Cisco EPOM Wizards" section.)
Cisco EPOM also allows you to define new provisioning flows (consisting of the tasks necessary to achieve them) and to add them to the list of existing provisioning flows in the left pane. To develop a customized provisioning flow, see the following:
1.
2.
Example of an .xml File
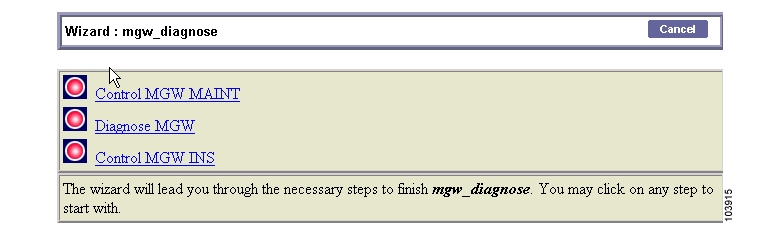
The following example shows the process of creating a new provisioning flow called MTA Diag.
Note
The tasks achieved by this provisioning flow are:
•
•
•
Note
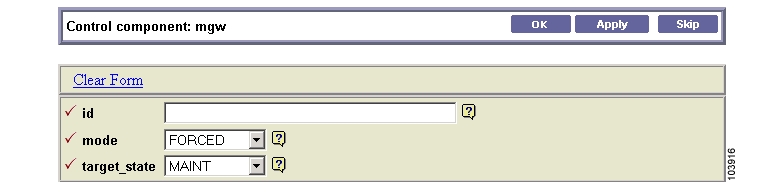
<Provisioning_wizard><step_name="Control MGW MAINT"url="btscompcontrol.jsp?_noun=mgw"help_mssg="Control the mgw into MAINT state"img="bluedot.gif"><provideParameterList><parameter name="mgwId" sourceName="id"/></provideParameterList><takeParameterList><parameter name="mode" sourceName="FIXED" value="FORCED"/><parameter name="target_state" sourceName="FIXED" value="MAINT"/></takeParameterList></step><step_name="Diagnose MGW"url="btscompdiag.jsp?_noun=mgw"help_mssg="When done with diagnosis, click the skip button, I really should not carry you away from this page"img="bluedot.gif"><provideParameterList><parameter name="mgwId" sourceName="id"/></provideParameterList><takeParameterList><parameter name="id" sourceName="mgwId/"><parameter name="test" sourceName="FIXED" value="3"/></takeParameterList></step><step_name="Control MGW INS"url="btscompcontrol.jsp?_noun=mgw"help_mssg="Control the mgw into INS state"img="bluedot.gif"><provideParameterList><parameter name="mgwId" sourceName="id"/></provideParameterList><takeParameterList><parameter name="mode" sourceName="mgwId/"><parameter name="mode" sourceName="FIXED" value="INS"/><parameter name="mgwId" sourceName="id"/></takeParameterList></step>Where,
•
•
•
•
•
–
–
•
–
–
This file is used in the "Creating a Provisioning Flow" task.
Creating a Provisioning Flow
Note
Step 1
Step 2
Step 3
Step 4
<node name="MTA Diagnose">
<url base="btswizard">mgw_diagnose</url>
</node>
Note
Step 5
Step 6
![]()
![]()
![]()
![]()
![]()
![]()
![]()
![]()
Posted: Wed Dec 8 16:03:06 PST 2004
All contents are Copyright © 1992--2004 Cisco Systems, Inc. All rights reserved.
Important Notices and Privacy Statement.