|
|

This chapter contains the following sections:
If you are familiar with installing network software, you can perform the following steps to install the components needed to run Cisco Hub/Ring Manager:
Step 1 Install and load a WINSOCK-compliant TCP stack according to the documentation that came with your TCP/IP package.
Step 2 Install HP OpenView or HP Workgroup Node Manager.
Step 3 Install the HP OpenView patch (included with Cisco Hub/Ring Manager).
Step 4 Install Cisco Hub/Ring Manager for Windows.
If you are not familiar with installing network software, proceed with the step-by-step installation information.
Unless you specify alternative directories during installation, Cisco Hub/Ring Manager uses the following default directories:
Before proceeding, confirm that you have installed the following software components in this order:
To intall Cisco Hub/Ring Manager for Windows, perform the following steps:
Step 1 Insert the diskette labeled "Cisco Hub/Ring Manager (Number 1)" into drive A.
Step 2 From the Program Manager File menu, select Run.
Step 3 In the command line entry field, enter the following:
a:\setup.exe
Click OK, or press the Enter key.
A status window indicates that the setup program is initializing.
The Cisco Hub/Ring Manager Installation dialog box appears, as shown in Figure 2-1.
Step 4 Select the programs you want to install, then click Continue. (See Figure 2-1.)
The Setup window contains checkboxes for Router/Hub Manager and Ring Manager. Confirm that Router/Hub Manager is checked (this is the default). If you want Ring Manager installed, click the Ring Manager checkbox.

You may not need Ring Manager if you are using another management package, such as IBM NetView or IBM LAN Network Manager (LNM), or if you are not managing any Token Ring networks. Ring Manager has its own polling mechanism, so not installing it can speed up other HP OpenView applications and conserve memory in your network management PC.
Be sure Cisco Hub/Ring Manager is installed in the same directory and subdirectories as HP OpenView.
Step 5 When prompted by the Setup message, remove diskette number 1 and insert diskette number 2 into drive A.
Step 6 Follow the instructions displayed on your screen to continue the installation.
A dialog box appears that allows you to update configuration (*.INI) files, as shown in Figure 2-2.
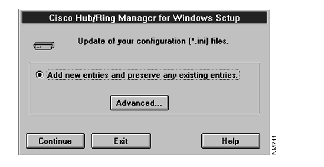
The default adds new entries and preserves any existing entries. This default setting satisfies most needs for updating configuration files.
Step 7 If you do not have special configuration needs, click Continue and skip to Step 9.
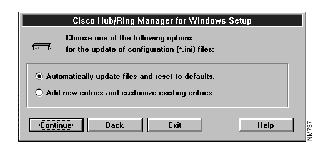
If you want to reset defaults or customize entries, click Advanced. A dialog box appears with options for updating configuration files. (See Figure 2-3.)
Step 8 When you finish updating the configuration files, click Continue.
Step 9 When the installation process is complete, the Setup Successful dialog box appears, as shown in Figure 2-4.

Step 10 To verify proper installation, follow the steps shown in the Setup Successful dialog box. To view your AUTOEXEC.BAT and CONFIG.SYS files, use the DOS type or edit command or the Windows Notepad.
Step 11 Exit Windows and reboot your PC.
This completes the installation of Cisco Hub/Ring Manager for Windows. After you reboot your PC and restart Windows and HP OpenView, the HP OpenView Control menu lists menu items for Ring Manager, Hub/Ring Trap Manager, Hub Manager, Asset Management, Attachment, Identify, Sync. Attachment, Ethernet Manager, and SNMP Manager.
You can skip this section unless you replace or reformat your hard disk or need to reinstall Cisco Hub/Ring Manager for some other reason.
If you have full backups, follow the instructions for your backup program to restore all files.
If you have backups of the customized SYSTEM.INI and OVWIN.INI files, use them to overwrite the default files installed by Microsoft Windows and HP OpenView. Otherwise, follow the procedure in the previous section, "Installing Cisco Hub/Ring Manager," to restore the network management station to operating condition.
This section is for network administrators using Cisco Hub/Ring Manager for the first time. It provides a practice scenario that helps you understand how to set up your network management station.
To benefit the most from this tutorial, make sure that:
To apply this exercise to your own network, fill in Table 2-1. Use addresses that are appropriate for your Internet Protocol (IP) environment. The exercise assumes that you have one router/hub and one network management PC.
Media Access Control (MAC) addresses are optional. The MAC address consists of 12 hexadecimal characters, for example, 7A4A82542722.
| Object | Name | Interfaces | ||||
|---|---|---|---|---|---|---|
| Type | IP Address | Net Mask | Default Gateway | MAC Address | ||
| Router/hub | PCbus0 | |||||
| tok0 or eth0 | ||||||
| PC | - | - | - | |||
After you record the information that identifies the router/hub and the network management PC, you can begin the tutorial, as described in the next section.
To start Cisco Hub/Ring Manager, perform the following steps:
Step 1 Start Windows by entering the following command at the DOS prompt:
win
Step 2 Start HP OpenView by double-clicking on the HP OpenView icon.
If any messages appear, click OK until the default map (UNTITLED) is displayed.
A map is a graphical representation of your network, made up of interconnected hubs, PCs, printers, routers, and other objects. (For additional information, see the HP OpenView Windows User's Guide.)
To insert a router/hub object, perform the following steps:
Step 1 From the Edit menu, select Add.
The Add Object palette appears, as shown in Figure 2-5.
Step 2 Click on the symbol set arrow (the second of three down arrows on the right edge of the palette) to display the list of available symbol sets. Select Compound Object.
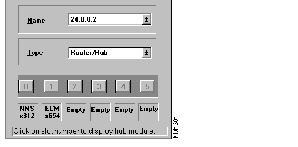
Step 3 Select Router/Hub from the list below Compound Object or by clicking on a router/hub icon. Then click on the map where you would like this object to be located. The object is placed in the map, and the Router/Hub Describe dialog box appears.
You must define at least one interface for the NMS entity and at least one interface for the RTR entity.

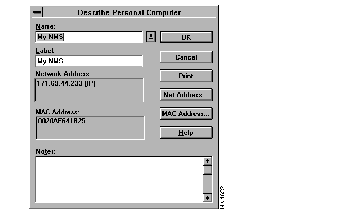
Step 4 In the Router/Hub Describe dialog box Name field, enter a descriptive name for your router/hub. (See Figure 2-6.) This name may contain up to 15 alphanumeric characters, including spaces, and is always displayed in uppercase. The Label field is taken automatically from the Name field and cannot be edited.
Step 5 The dialog box lists the network management processor system (NMS) and router (RTR) components of the router/hub (referred to as entities). The NMS entity communicates with the router/hub's hub SNMP agent, and the RTR entity communicates with the router/hub's router SNMP agent.
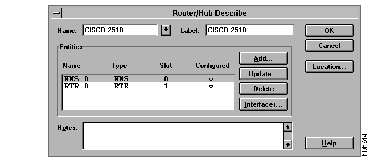
Step 6 With the NMS entity selected, click Interfaces (or double-click on the name of the entity). The Router/Hub Interfaces dialog box appears.
Step 7 If you will not be using Serial Line Internet Protocol (SLIP) to communicate with the RS232 port of the NMS module, skip to Step 11. Otherwise, continue with Step 8 to configure SLIP.
Step 8 In the Type field, click the down arrow and select SL (for SLIP).
Step 9 In the TCP/IP Parameters box, enter the IP Address, Net Mask, and Default Gateway that you configured with SPSET for the SLIP interface of the hub agent. (See the section "Running SPSET" in the chapter "Overview of Cisco Hub/Ring Manager for Windows.")
Step 10 Click Add.
The Interface type (SL_0) is displayed in the Current Interfaces window.
Step 11 In the Type field, click the down arrow and select PC (for PCbus). This interface enables Cisco Hub/Ring Manager to communicate with PC-like firmware running the hub's SNMP agent.
You can optionally specify an identifier of your choice in the Segment field, the telephone number of the system administrator in the Telephone field, and the MAC address of the router/hub in the MAC Address field. If you leave Segment and MAC Address blank, Ring Manager fills them in automatically.
Step 12 In the TCP/IP Parameters box, enter the IP address of the PCbus SNMP agent (hub SNMP agent). This address is 1 greater than the IP address of the router/hub PCbus0 interface. Enter the same net mask that you configured for PCbus0. For Default Gateway, enter the PCbus0 IP address (without adding 1).
Step 13 Click Add.
The Current Interfaces list box displays the Interface type PC_0.
Step 14 Click OK to exit the Interfaces dialog box and return to the Router/Hub Describe dialog box.
You have now defined one or more interfaces for the NMS entity. In the next series of steps, you will define another interface (TR_0 or ET_0) for the RTR entity.
Step 15 From the Router/Hub Describe dialog box, select the RTR entity.
Step 16 Click Interfaces to display the Router/Hub Interfaces dialog box. (See Figure 2-7.)
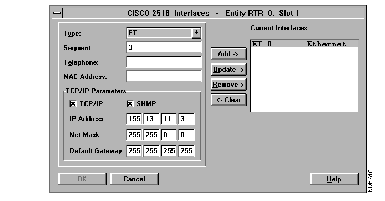
Step 17 In the Type field, click the down arrow and select TR (for Token Ring) or ET (for Ethernet), depending on your router/hub.
You can optionally specify an identifier of your choice in the Segment field, the telephone number of the system administrator in the Telephone field, and the MAC address of the router/hub in the MAC Address field.
Step 18 In the TCP/IP Parameters box, enter the same IP address that you assigned to the router/hub tok0 or eth0 interface. Enter the same net mask that you configured for the Token Ring or Ethernet interface.
Default Gateway is optional and can usually be left blank.
Step 19 Click Add.
The Interface type (TR_0 or ET_0) is displayed in the Current Interfaces window.
Step 20 Click OK to exit the Interfaces dialog box and return to the Router/Hub Describe dialog box.
Step 21 Click OK to exit the Router/Hub Describe dialog box and return to the map.
The router/hub symbol with the name you specified is now part of your network map. If the router/hub is physically connected to the network management PC and communicating with it, the router/hub symbol should soon change from blue to green. (If the router/hub is not operating normally, the symbol changes to another color . See the section "Color-Coding of Map Objects," later in this chapter.)
When you exit the Router/Hub Describe dialog box, Cisco Hub/Ring Manage automatically creates a new submap containing both a router object and a hub object. Double-clicking on the router/hub object displays these router and hub objects individually. (See Figure 2-8.)

The router object represents the router integrated into the router/hub. It is identified by the IP address of the RTR entity, or by a name if you define one in a domain name server in your PC/TCP stack or with the Configure Preferred Name command under Layout in the HP OpenView Autodisovery menu. You must use this router object, not the original router/hub object, to access Cisco Configuration Builder and CiscoWorks.
The hub object represents the hub portion of the Router/Hub. It is identified by the IP address of the NMS entity, or by a name if you define one in a domain name server in your PC/TCP stack or with the Configure Preferred Name command. You cannot edit Describe information for the hub object. Use the original router/hub object instead.
To add your network management PC to the network map, perform the following steps:
Step 1 From the Edit menu, select Add.
The Add Object palette appears. (See Figure 2-5.)
Step 2 Click on the symbol set arrow (the second of three down arrows on the right edge of the palette) to display the list of available symbol sets. Select Computer.
Select a computer object from the list below Computer or by clicking on a computer icon. Then click on the map where you want this object to be located. The object is placed in the map, and its Describe dialog box appears. (See Figure 2-9.)
Step 3 In the Name field, enter a descriptive name for your network management PC. This name may contain up to 64 alphanumeric characters, upper and lowercase, including spaces. The Label field is taken automatically from the first 20 characters of the Name field and cannot be edited.
Step 4 Click Net Address to display the Edit Network Addresses dialog box.
Step 5 Enter the IP address of the PC as specified in Table 2-1.
Step 6 Click OK to return to the Describe dialog box.
The IP address that you entered appears in the Network Address field.
The name of the PC appears below its symbol. The PC symbol remains blue.
To connect the PC to the router/hub, perform the following steps:
Step 1 From the Add Object palette (see Figure 2-5), click the Connecting Line button (the line segment with two vertical endpoints), then select a line type.
Step 2 Click on the center of the router/hub object and drag the line to the center of the PC object.
A line now connects the two objects. Even if you move one of the map objects, the line still connects them.
Step 3 To attach the PC to the hub, select the router/hub symbol in your network map and click the right mouse button.
A popup menu (also called a floating menu) appears.
Step 4 Select Attachment.
The Hub Attachment dialog box for the router/hub appears. (See Figure 2-10.)
Step 5 Click on a slot number to display the module installed in that slot. (The NMS module in slot 0 and the Ethernet or Token Ring module in slot 1 are displayed automatically.)
Step 6 Click on the port that is connected to the device you want to attach. The port's color changes to green.
Step 7 Return to the network map and select the PC object by clicking on it. If necessary, drag the Hub Attachment dialog box or the module display to expose the PC object.
Another way to select the PC object is to click on the Open command button (the opening folder) in the Hub Attachment dialog box. Select the PC from the list.
Step 8 Click on the Attach command button (the plus sign) in the Hub Attachment dialog box. The port symbol changes to blue.
Step 9 Click on slot 0 to display the NMS module.
Step 10 Click on the ADJ LAN port. The port's color changes to green. This attachment enables you to connect the router component to the hub component.
Since the router component does not appear in the Hub Attachment dialog box, its TR or ETH port is represented as an ADJ LAN port on the NMS module in slot 0. This port connects to port 1 of the Token Ring hub module (or to port 2 if port 1 is set to EXT mode on a Cisco 2517), or to any port of the Ethernet hub module.
Step 11 Click on the hub port to which the router component is connected. The port's color changes to green.
Step 12 Click on the Attach command button. Both port symbols change to blue.
Step 13 Double-click the upper left corner of the Hub Attachment dialog box to exit.
Step 14 From the Control menu, select Sync. Attachment. The PC icon on the map soon changes color to indicate its status; this change can take up to several minutes, depending on your polling settings.
For large networks, you may want to divide the map into submaps. A home map contains a submap symbol so that you can glance at the overall network status from the home map. For an explanation of propagation in submaps, refer to the HP OpenView Windows User's Guide. To insert a submap symbol, perform the following steps:
Step 1 From the Edit menu, select Add.
The Add Object palette appears.
Step 2 Click on the symbol set arrow (the second of three down arrows on the right edge of the palette) to display the list of available symbol sets. Select Compound Object.
Step 3 Select a submap symbol from the list below Compound Object or by clicking on a submap icon. Then click on the map where you would like this submap to be located.
The object is placed in the map, and the Describe Submap dialog box appears.
Step 4 Fill in the entries in the dialog box and click OK.
To save your network map, perform the following steps:
Step 1 From the File menu, select the Save As command.
Step 2 Enter PRACTICE as the name of the map and click OK.
The extension .OVM is automatically added to the map name. The title bar displays PRACTICE: UNTITLED.
Step 3 From the Edit menu, select the Rename Submap command.
Step 4 Name the current submap TUTORIAL.
The title bar displays PRACTICE: TUTORIAL.
The default map is displayed when you start Cisco Hub/Ring Manager. To change the default map, perform the following steps:
Step 1 From the Options menu, select Customize HP OpenView.
The Customize HP OpenView dialog box appears.
Step 2 Click Browse to find the preferred map.
Step 3 Click OK.
The default submap is displayed when you start Cisco Hub/Ring Manager. To change the default submap, perform the following steps:
Step 1 From the Edit menu, select Set Home Submap.
The Set Home Submap dialog box appears.
Step 2 Select the preferred submap.
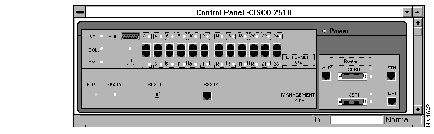
The router/hub Control Panel provides a color-coded graphical representation of the router/hub, its current status, and the status of each module in it. The screen is periodically updated to reflect any changes in a port LED or module. To access the Control Panel, perform the following steps:
Step 1 From your HP OpenView network map, select the router/hub object.
Step 2 Click the right mouse button to display the popup menu.
Step 3 Select Control Panel.
Figure 2-11 shows the Control Panel for a Cisco 2518 router/hub.
From the Control Panel, you can display a popup menu by clicking on any of the areas shown in dotted boxes. The popup menu commands vary depending on the router/hub, the modules installed in it, and the area where you click.
For example, to disconnect a port, perform the following steps:
Step 1 Select a port by clicking with the left mouse button on the dotted box around the port number.
A popup menu listing the available commands appears.
Step 2 Click Disconnect.
A dialog box prompts you to confirm your action. If you click Yes, the following responses occur:
 | Caution To avoid accidental network interruption, be careful to disconnect only the port you want. |
Step 3 Select the port again and click Reconnect to reconnect the port.
From the Control Panel, you can also reset the NMS or router portions of the router/hub:
If Configuration Builder is installed on your HP OpenView PC, you can start it by clicking the area around the word Router and selecting Configuration.
On a Cisco 2518, the Control Panel popup menu includes a choice for Eth Statistics. The Ethernet Statistics window, shown in Figure 2-12, displays real-time, port-level statistical information.
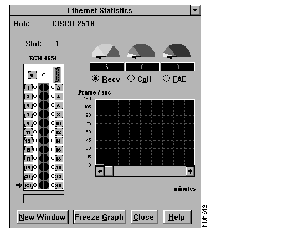
A graphical display of the module indicates LED status for all ports. The Ethernet module is shown as ECM (Ethernet connectivity module). An arrow indicates the port currently being monitored. To monitor a different port on the same module, double-click on the dotted box next to the port number in the Ethernet Statistics window. The arrow moves to the selected port.
Gauges near the top of the window display the current value, in events per second, of three types of events:
Each gauge is divided into a low, normal, and high range according to a low threshold and a high threshold, which you can set in Ethernet Manager. (See the section "Ethernet Manager," later in this chapter.) The upper end of the gauge is 150 percent of the high threshold value. Each time the number of events per second crosses a threshold in either direction, an alert is sent to the network management station.
The boxes below the gauges are counters that indicate the total number of events that have occurred since the window was opened.
A graph below the boxes displays the rate at which events have occurred over a period of time. To select the type of event shown, click one of the option buttons above the graph. The scale for the vertical axis is set by Set Statistics Graph Scale in Ethernet Manager. (See the section "Ethernet Manager," later in this chapter.) The horizontal axis shows the time (in minutes) since the Ethernet Statistics window was opened.
As long as the Ethernet statistics window is open, all events for the selected port are recorded in a log file. Three files are created, one for each event type, for each port whose statistics have been monitored. To display a file, select a port and an event type.
The Ethernet Statistics window remains open even after the Control Panel has been closed, and continues adding events to the log file. You can minimize the window for more screen space.
You can have up to four Ethernet statistics windows open simultaneously. To simultaneously monitor another port on the same module, click on New Window and double-click on the desired port in the new window. To monitor another port either on the same module or in another hub, select the port in the Control Panel and click on Eth Statistics in the popup menu.
After you create your network map and attach all objects and hubs to their ports, you can begin monitoring the network. You, or another person managing the network, can review the Alarm Log (bell icon) and the hub's Control Panel to search for any changes in network status. As the network manager, you may also want to perform certain operations on the objects.
This section summarizes some frequently used monitoring options. Detailed explanations of each of the following topics are included in the chapter "Using Cisco Hub/Ring Manager for Windows."
When you select certain objects in the map and click the right mouse button, a popup menu appears. The menu provides quick access to frequently used operations. (See Table 2-2.)
| Item | Commands |
|---|---|
| Router/hub | Describe... Alarms... Control Panel... Attachment... |
| Router | Describe... Alarms... Attachment... |
| Hub | Describe... (read-only) Alarms... Control Panel... Attachment... Manage Object Unmanage Object |
| PC | Describe... Alarms... Identify... |
| Ring | Describe... Alarms... Ring Configuration... Ring Monitor... Manage Submap Unmanage Submap |
| Submap | Describe... Alarms... Manage Submap Unmanage Submap |
You must configure your Cisco Hub/Ring Manager station in order for it to receive traps from SNMP agents in the router/hub. All traps are displayed, along with alarms, in the HP OpenView Alarm dialog box.
To configure your Cisco Hub/Ring Manager station, perform the following steps:
Step 1 From the Options menu, select Hub/Ring Application Setup.
The Hub/Ring Application Setup dialog box appears.
Step 2 In the Application section, click Trap Manager.
The Trap Config Directory field appears. The directory C:\OV\TRAPCONF\ is specified as the default directory for traps received by Cisco Hub/Ring Manager stations.
Step 3 To change the default, enter the destination directory where the Cisco Hub/Ring Manager station should receive traps.
Step 4 Select Hub Manager in the list box. Enter your preferences for polling time and timeouts.
Step 5 Select Ring Manager in the list box (if installed). Enter your preferences for polling time and timeouts.
Step 6 Click OK to confirm your preferences for Hub/Ring Application Setup.
The Cisco Hub/Ring Manager SNMP agent issues three kinds of traps:
Each trap is defined in a separate file in the \OV\TRAPCONF directory. These files are named TRPgssss.CNF, where g is the generic trap (0-6) and ssss is the specific trap ID. The default file TRP99999.CNF captures incoming traps that are not specifically configured.
You can edit the text for each trap to customize the messages sent to the network management station and the log file. For further information, refer to Cisco Hub/Ring Mananger Alarm Help.
The All Rings window, shown in Figure 2-13, opens automatically when you start Cisco Hub/Ring Manager. You can close it if you do not have any Token Ring networks.
If the All Rings window is minimized, double-click on the icon to maximize it. If it is closed, open it by selecting All Rings under Ring Manager in the Control menu. To access a Ring Manager function, select a ring under Ring Name and click on one of the management function icons above it: Ring Monitor, Ring Configuration, Event Filter, or Ring Events.

Ethernet Manager, found in the Control menu, maintains event and alert logs of network activity and errors at the port level. You can view graphical displays of this activity in the Ethernet Statistics window, described in the section "Control Panel," earlier in this chapter.
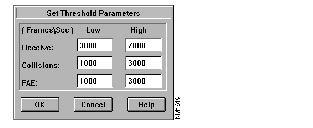
The Set Threshold Parameters dialog box, shown in Figure 2-14, defines alert thresholds at the network level for three types of events: receive events, collisions, and frequency alignment errors (FAE). You can set low and high thresholds in frames per second.
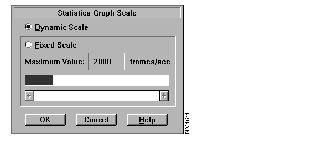
The Set Statistics Graph Scale dialog box, shown in Figure 2-14, sets the vertical scale for the Ethernet Statistics window in frames/sec. The default is Dynamic Scale, which sets the scale automatically depending on the magnitude of the data. If you choose Fixed Scale, you can set the maximum value in the scale yourself using the horizontal scroll bar.
Graphical information displayed in the Ethernet Statistics window is saved in files for future retrieval. These files are in binary format and can be retrieved only by selecting a port and an event type in the Ethernet Statistics window.
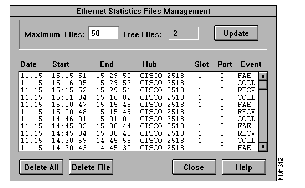
The Ethernet Statistics File Management dialog box, shown in Figure 2-16, is designed for advanced management of statistical files. You do not normally need to change any of the default settings in this dialog box. Ethernet Manager automatically manages the files and deletes the oldest ones as required.
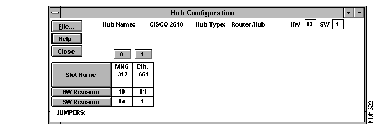
The Hub Configuration window shows a hub's hardware revision, software revision, jumper settings for modules, and jumper settings that have been overridden by software commands.
To access the Hub Configuration window, perform the following steps:
Step 1 From your HP OpenView network map, click on the router/hub object.
Step 2 From the Control menu, select Asset Management.
Step 3 Select Hub Configuration.
The Hub Configuration window appears. (See Figure 2-17.) Click on a slot number to display jumper settings for the module in that slot.
Objects in the network map are color-coded to indicate their network status. An object is green during normal operation, magenta if it has been disconnected by the user, yellow if it is operating but in a warning state, red if a major problem has been detected with it, blue if Cisco Hub/Ring Manager is unable to locate information on it, and wheat-colored (pale yellow) if it is unmanaged.
Alarms indicate status changes in any device on the network. Cisco Hub/Ring Manager tracks all network alarms (also called events). In addition, HP OpenView tracks certain critical and platform-specific alarms.
The Ring Events window displays all Token Ring events and identifies MAC frames that have been sent at the MAC layer. The HP OpenView Alarm Log, in contrast, displays only serious traps and alarms for devices in the network. For additional information, refer to the HP OpenView Windows User's Guide.
To view all ring events and alarms, perform the following steps:
Step 1 Maximize the All Rings window if it is open. If it is closed, select All Rings under Ring Manager in the Control menu to open it.
Step 2 Click the Alarms command button (a bell) in the toolbar to display the Ring Events window. This window displays ring events and network alarms. The Ring Manager Events Filter allows you to select the kinds of events that are reported in the Ring Events window.
Another way to open the Ring Events window is to select Ring Monitor under Ring Manager in the Control menu, and then click on the Events command button in the Ring Monitor window.
To display alarms for a single object in the network, perform the following steps:
Step 1 Select the object in your network map.
Step 2 Click the right mouse button.
The HP OpenView Alarm Log appears. This log displays alarms for the object.
Selective management is the process of identifying and isolating network problems by enabling or disabling management of certain hubs or Hub/Ring Manager applications.
You can choose to manage or not manage any hub in the map or all hubs within a particular submap. Token Rings in an unmanaged submap appear as either unmanaged (pale yellow) or unknown (blue).
You can perform selective hub management from the Hub/Ring Object Manager dialog box (from the Options menu, select Hub/Ring Object Manager). In this dialog box, a diamond represents an object and an octagon represents a submap. Yellow means Unmanage and green means Manage.
You can also select an object, click on the right mouse button, and select Manage Object or Unmanage Object. The hub object turns pale yellow to indicate that it is unmanaged. Selective management becomes the new default for subsequent Cisco Hub/Ring Manager sessions.
To disable management of all hubs in a submap, select the submap symbol, click on the right mouse button and select Unmanage Submap. The submap symbol turns pale yellow to indicate that it is unmanaged. Selective management of submaps is not propagated to other submaps.
Each Cisco Hub/Ring Manager session starts with all applications (Ring Manager, Hub Manager, and Trap Manager) active--that is, polling hubs in the map. Active applications have a checkmark next to Enable Polling under the application's name in the Control menu. (Ethernet Manager does not appear in this list, because it polls only when the Ethernet Statistics window is open.)
To deactivate an application, select the application from the Control menu and then select Disable Polling.
On a Token Ring network, you must update the MAC database after using the layout function, assigning MAC addresses in the Describe dialog box, or changing MAC addresses in the Name Settings dialog box. To update this database, perform the following steps:
Step 1 From the Control menu, select the Ring Manager submenu.
Step 2 Select Sync. MAC Database.
This function is also performed automatically when Ring Manager initializes.
|
|