|
|

Cisco Hub/Ring Manager for Windows is an application for managing Cisco 2517 and Cisco 2519 Token Ring router/hubs and Cisco 2518 Ethernet router/hubs in multivendor LANs and WANs. Its functions include hub/router management, ring management, Ethernet management, and trap management. Cisco Hub/Ring Manager runs on a Windows-based PC platform using HP OpenView 7.2 (version C.02.06 or later) and Microsoft Windows 3.1, Windows 95, or Windows for Workgroups 3.11.
Cisco Hub/Ring Manager for Windows uses the Simple Network Management Protocol (SNMP) to collect and execute information gathered by the hub agent, and presents this information on the network management station. Cisco Hub/Ring Manager provides an easy-to-use graphical user interface for displaying hub information and carrying out control functions. It can access supported hubs through a direct console connection, or by using Transmission Control Protocol/Internet Protocol (TCP/IP) over a Token Ring or Ethernet connection to a hub port. For more information on connection methods, see the section "Connecting a Network Management PC to the Router/Hub" later in this chapter.
A PC must meet the following requirements to act as a network management station for Cisco Hub/Ring Manager for Windows.
Software requirements are as follows:
Hardware requirements are as follows:
A network is a collection of computers and other devices, such as printers, connected to each other so that they can communicate. A network usually also contains file servers, which are computers that control common hard disks shared by one or more users.
Local-area networks (LANs) are networks that are confined to a relatively self-contained area, for example, an office building or university campus. Computers and other devices attached to LANs are called nodes or stations.
There are several types of LANs, differing in media, topology, and transmission protocol. Cisco Hub/Ring Manager is designed to manage Token Ring and Ethernet networks, or a combination of the two.
Token Rings are composed of stations linked together in a ring by cabling. Specifications for the operation of Token Ring networks are set by the IEEE 802.5 standard. Each station in the ring has a nearest active upstream neighbor (NAUN)--the station from which it receives transmissions--and a nearest active downstream neighbor (NADN)--the station to which it sends transmissions.
A token is a control signal that is passed continuously from station to station, in order, around the ring. The token circles the ring until it is captured by a station that wants to transmit data. (A system of priority reservations can permit stations with a higher priority to obtain the token and transmit data before stations with a lower priority.) The station then sends a frame--a unit of data transmission that includes destination and source information, delimiters, headers, data, and check characters. Each downstream station checks to see if the frame is addressed to it. If it is not, it retransmits the frame to the next station. When the frame reaches the station to which it is addressed, the destination station checks the frame for accuracy, copies the information, marks the frame as having been received, and passes it on. When the frame has made a complete circuit and returned to the sending station, it is removed from the ring, and the station releases a new token onto the ring.
In a Token Ring network running at 4 Mbps, only one token or one frame can be on the ring at a time. Networks running at 16 Mbps allow early token release, permitting information to be transmitted before the previous frame has been removed from the ring.
Token Ring networks require addressing functions so that stations can be uniquely identified. The network associates each station with a unique Media Access Control (MAC) layer address. (See the section "MAC Sublayer" later in this chapter.) Addressing is independent of the underlying physical configuration.
One station on each ring acts as the active monitor to resolve special problems, such as tokens and frames that are lost or that circle the ring more than once. The rest of the stations are standby monitors. If the active monitor is turned off or removed from the ring, the standby monitors elect another station as the new active monitor.
A single ring is limited to 250 stations (for data-grade cable), based on the electrical characteristics of the IEEE 802.5 Token Ring adapter. To overcome this limit, you can configure multiple rings. Each ring can be connected to another by a bridge or router.
A bridge transmits frames from one ring to adjacent rings. In the process, the bridge learns which MAC-layer stations belong to each ring, and directs frames according to their destinations. Bridges can also use source routing, in which each frame carries information about the route it is to take. Routers function in a similar way, but can direct frames according to higher-level protocols.
The MAC protocol, which operates at the MAC sublayer in the Open Systems Interconnection (OSI) model, controls the delivery of information and provides address recognition, frame copying, frame control recognition, delimiting of frames, frame status generation and verification, priority management, source routing, timing, and token management.
The MAC sublayer of the IEEE 802.5 protocol stack provides LANs with a rich set of built-in management and security features. Cisco Hub/Ring Manager takes advantage of these built-in MAC-level capabilities.
IEEE 802.5 specifies 25 MAC frames, which are supported by almost all Token Ring adapter cards. This section describes how MAC frames monitor and control the ring.
The process for electing a new active monitor is called monitor contention. Monitor contention is transparent to users and occurs whenever the active monitor leaves the ring or develops an error. When this happens, each node that wants to become the new active monitor transmits a claim token frame. The node with the highest MAC address becomes the active monitor.
The new active monitor begins by issuing a report new active monitor frame. Approximately every 7 seconds thereafter, the active monitor issues an active monitor present (AMP) frame. The AMP frame initiates a succession of standby monitor present (SMP) frames from the other nodes on the ring, in which each node detects and reports its NAUN (the ring poll process). If the active monitor does not receive an SMP from its own NAUN, it sends out a report neighbor notification incomplete frame. Whenever a node detects a change in its NAUN (because nodes have entered or left the ring), it issues a report NAUN change frame. If the active monitor detects an error in its own operation or receives an AMP from another node, it transmits a report active monitor error frame.
When a node detects a serious fault, or when a process (such as monitor contention) is not resolved promptly, the node sends out an alert called a beacon frame every 20 ms. Nodes on the ring that are not sending beacon frames enter beacon repeat mode (repeating the beacon frame that is sent to them). If a beaconing node receives a beacon frame from a node with a higher address than its own, it stops sending its own beacon frame and enters beacon repeat mode. When one of the nodes eventually receives its own beacon frame, it assumes that the problem has been corrected. At this point, the active monitor transmits a ring purge frame to reset the ring. The active monitor also transmits a ring purge frame if it detects a persistently circulating or lost frame. It transmits an AMP frame after the ring purge frame.
Each node on the ring must have a unique address. Therefore each node joining the ring releases a duplicate address test frame. The test frame determines whether the address of the new node is already being used by some other established node.
Before allowing the new node to join, the ring sends lobe test frames down the lobe cable leading from the Token Ring media access unit (MAU), or hub, to the node's Token Ring adapter card. The new node then transmits a request parameter frame to a station called the ring parameter server (RPS). The RPS issues an initialize ring station frame to configure the inserting node's local ring number, physical location, and soft error report timer value. Cisco Hub/Ring Manager can alter any of these parameters by sending a change parameter frame or removing a disruptive node with a remove ring station frame.
Three more MAC frames--request/report ring station address, request/report ring station state, and request/report ring station attachments--enable the network administrator to obtain information directly from an individual node. A node can also issue a transmit forward frame to test whether two nodes can communicate with each other. This test can help isolate faults, such as a break in the cabling.
After insertion into the ring, each node monitors its own performance and logs any errors by sending a report soft error frame to the ring error monitor (REM). Cisco Hub/Ring Manager for Windows logs errors and related events in two places. One source, the Ring Events window, displays in chronological order all Token Ring events and MAC frames detected by the MAC layer. The second source, the HP OpenView Alarm Log, displays only serious traps and alarms for devices in the network. Soft and hard errors are described in the next section, "Errors."
Network management errors fall into two categories, soft and hard.
Soft errors are intermittent faults that temporarily disrupt normal operation of the ring. They are usually fixed by error recovery procedures. Soft errors are indicated by architectural inconsistencies, such as cyclic redundancy checks or timeouts, in received or repeated frames. Each station maintains a set of counters to measure how often the most critical soft errors occur, and periodically reports the station's NAUN and all counter values to the REM. After successfully transmitting the report, the station resets its counters.
Soft errors can be either isolating or nonisolating. Local, or isolating, errors define a limited fault domain, usually a node and its NAUN. General, or nonisolating, errors indicate an error on the entire ring, such as congested traffic.
Isolating errors isolate a problem to the reporting node, its NAUN, or the cabling and access units between them.
Isolating errors include the following:
Nonisolating errors include the following:
Hard errors are permanent faults or breaks in the ring, usually in equipment, that cause it to stop operating normally. A station downstream from the fault recognizes the hard error at the receiver side of its attachment.
Like soft errors, physical faults or breaks can be detected and isolated. For example, if a node does not receive tokens from its NAUN, it starts transmitting beacon MAC frames. The beacon passes around the ring until it reaches the node on the other side of the break. When the nearest upstream node receives the beacon frame and sees its own node address in the NAUN field of the beacon frame, it infers that it is upstream of the break and removes itself from the ring. It then performs a self-test to determine whether it should rejoin the ring. Meanwhile, the ring recovers and operates without that node. After a specified period of time, the node downstream from the break also removes and tests itself. If the self-test fails, it remains off the ring, and the ring recovers. If the node passes the self-test, it reinserts itself into the ring. However, if beaconing continues, the ring must be manually reconfigured to bypass the error.
The ring error monitor server, configuration report server, and ring parameter server collect information from ring stations by means of the MAC protocol and pass it to Cisco Hub/Ring Manager by means of the SNMP protocol.
A ring error monitor (REM) must be present if ring errors are to be monitored and analyzed. The REM collects errors reported by each adapter card that is active on the LAN. This information can be used to detect, diagnose, and correct conditions that degrade LAN performance. The REM has three functions:
A configuration report server (CRS) manages stations in a multiple-ring environment. There must be a CRS on every ring for which stations need to be managed. The CRS has four functions:
When a Token Ring adapter joins the ring, a ring parameter server (RPS) assigns operating parameters to the adapter and to the LAN as a whole. An RPS must reside on every ring where the optional parameters are centrally managed. Among the parameters that the RPS assigns are access priority levels, timers maintained by individual Token Ring adapter cards, and functional class of the node. The RPS has three main functions:
Ethernet LANs are composed of nodes linked in series by cabling. IEEE 802.3 specifications set basic standards for the operation of Ethernet networks.
All Ethernet stations contend for transmit access to the network. When a station transmits a message, it monitors the network to detect collisions caused by other simultaneous transmissions. If the station detects a collision, it waits a random period of time and then retransmits the message. To acknowledge successful communication, the receiving station sends a signal back to the source station.
Ring Manager is a network management tool designed to provide MAC-layer monitoring and control of Token Ring networks. Ring Manager automatically detects all nodes in the network, collects data on hard and soft errors from remote REMs, and maintains event and alert logs of all network activity and errors.
If problems develop in the network, the network administrator can use the Cisco Hub/Ring Manager database to retrieve information such as the physical location of the problem nodes, their NAUNs, and accumulated error counts.
Ring Manager offers the following Token Ring network management features:
Ring Manager works by observing and reporting data and control information circulating around the network. Ring Manager has three main functions:
Ring Manager's automatic discovery feature compares the ring name and ring number, as defined in the Describe dialog box, with what it detects on the ring itself. It sends an alarm when an inconsistency in ring numbering is discovered.
If you do not enter a ring number in the Segment field of a router/hub's Describe dialog box, Ring Manager automatically adds a ring ID in the format network_ID_ring number. For example, for the ring 3F (hex) in the network 192.111.3.0, Ring Manager inserts the ring ID 192.111.3_3F. This feature eliminates the need to enter a segment number when you add a new object to the network map or when you use Cisco Hub/Ring Manager's automatic layout function.
If you do enter a ring number in the Segment Number field, Ring Manager does not overwrite it, but does verify that the Segment Number is consistent with the numbering detected on the ring itself. If the ring number is consistent, Ring Manager automatically assigns it to all hubs on the ring.
To gain the maximum benefit from Ring Manager, prepare by doing the following:
This section lists all events that can appear in the Ring Manager Ring Events window. The events are divided into four categories: node events, ring events, critical events, and soft error events.
Possible node events are:
Some ring events can be reported by any node on the ring; others are reported only by the active monitor. These events refer to ring operation in general, rather than to individual nodes.
Possible ring events are:
Critical events refer to ring operation or to logging activities. They can be reported either by a node on the ring or by the program that logs ring data. Possible critical events are:
Soft errors (described in the section "Soft Errors," earlier in this chapter) can be reported by any node in the ring. Possible soft errors are:
Ethernet Manager is a network management tool that provides MAC-layer monitoring and control of a complex, multi-segment Ethernet network connected by any combination of bridges or routers. Ethernet Manager builds its own database of Ethernet segments and monitors operation of the network, identifying and reporting a wide range of network problems. Ethernet Manager also helps tune the performance of the network by identifying network overload and errors down to the port level.
Ethernet Manager offers the following Ethernet network management features:
Ethernet Manager maintains event and alert logs of all network activity and errors at the port level. The network administrator can define alert thresholds at the network level.
The SNMP agent stores alerts even when the network management station is powered off. When the station is turned on, all alerts are automatically forwarded to Ethernet Manager, appear in the Alarm dialog box, and are logged in the Alarm Log files (OVALINS.*). The Ethernet Statistics dialog box displays a color-coded summary of current network status.
Statistical information is divided into three categories: receive events, collisions, and frequency alignment errors (FAE). FAE events include Jabber Protect Event, Elasticity Buffer Error, Phase Lock Error, Pygmy Packets (Short Event Reception), Non-SFD Packet Event, Partition Event, and Bad Link Event. Information can be stored for hours or days and displayed in graphical format with a user-set scale.
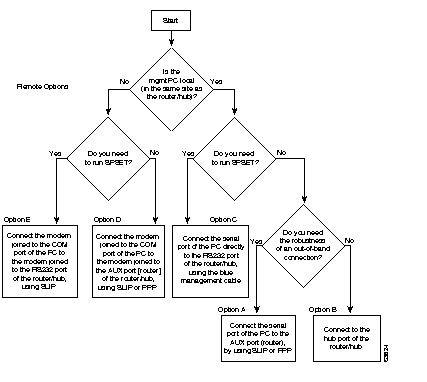
You can connect your network management PC (the one running Cisco Hub/Ring Manager) to a Cisco 2517, Cisco 2518, or Cisco 2519 router/hub in any of five ways, which are summarized in Table 1-1 and described in the following sections. To determine which connection method is best for you, refer to the flowchart in Figure 1-1.
For additional help identifying the best connection method, refer to the next section, "About the Router/Hub," which provides information on the router/hub's ports and connectors.
Cisco 2517, Cisco 2518, and Cisco 2519 router/hubs contain three core components: the router, the network management processor system (NMS), and the Token Ring or Ethernet hub (illustrated in Figure 1-2 for a Cisco 2519). These components are described in detail in the Cisco 2517 and Cisco 2519 Router/Hub User Guide and the Cisco 2518 Router/Hub User Guide. This section summarizes cable connections to the three components.
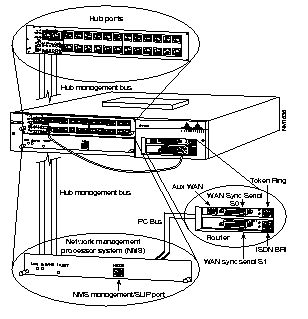
The router component provides complete routing capability and has the following interfaces:
You access the router/hub from your network management PC through a connection to one of the interfaces on the router component or to the serial port of the NMS component, which is labeled "RS232"and conforms to the EIA/TIA-232 standard.
To determine the best connection method for you, identify your networking environment in Table 1-1. Then refer to the other columns to identify cabling and system requirements, connections for each port that you need to connect or configure, and any special considerations that you should know about.
| Networking Environment | Cabling/System Requirements | Port-to-Port Connections | Considerations |
|---|---|---|---|
| A. The router/hub and network management PC are close to each other (serial management connection). |
|
Connect one end of the cable to the AUX port on the router component. Using the included adapter, connect the other end to an available COM port on the PC. | This option provides one of the broadest and most reliable solutions for local network management, and is the preferred connection. |
| B. The router/hub and network management PC are close to each other (Token Ring or Ethernet management connection). |
|
Connect one end of the cable to one of the numbered Token Ring or Ethernet ports on the hub. Connect the other end to the Token Ring or Ethernet port on the PC. | The network management PC depends on the Token Ring for information. Consequently, serious errors affecting the ring itself may not be accessible to Cisco Hub/Ring Manager for Windows. |
| C. The router/hub and network management PC are close to each other (router/hub RS232 port connection). |
|
Connect one end of the cable to the NMS RS232 port. Connect the other end to an available COM port on the PC. | Information is sent more slowly through the RS232 port than a WAN port. Running SPSET can also be difficult.
Consider this method only if options A, B, and D are unavailable. |
| D. The router/hub AUX port is connected to the PC remotely (by modem). |
|
Connect one end of the cable to the AUX port on the router/hub. Connect the other end to the router/hub modem. Connect the other modem to an available COM port on the PC. | This option provides one of the broadest and most reliable solutions for remote network management. |
| E. The router/hub RS232 port is connected to the PC remotely (by modem). |
|
Connect one end of the cable to the NMS RS232 port. Connect the other end to the router/hub modem. Connect the other modem to an available COM port on the PC. | Information is sent more slowly through the RS232 port than a WAN port. Running SPSET can also be difficult.
Consider this method only if options A, B, and D are unavailable. |
If your network management PC and router/hub are near each other, you can connect them in any of three ways.
The recommended connection between a network management PC and the router/hub is through the AUX port (option A in Table 1-1 and Figure 1-3).
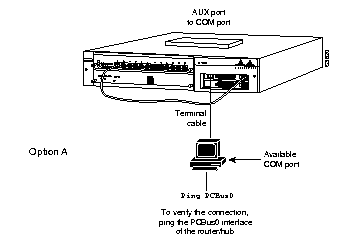
To establish this connection, perform the following steps:
Step 1 Find the flat black cable in the router/hub accessory kit.
Step 2 Connect one end of the cable to the AUX port on your router/hub.
Step 3 Using the included RJ-45-to-DB-25 adapter, connect the other end of the cable to any available COM port on the network management PC. If you have a 9-pin COM port, you may also need to use a DB-25-to-DB-9 adapter, which is not included.
Step 4 Configure the AUX port of the router/hub with an IP address and PPP or SLIP encapsulation.
For example, include the following lines in the router/hub's configuration file (the IP address shown is an example):
This configuration establishes a direct PPP link with a line speed of 38,400 bits per second (bps).
Step 5 Continue with the section "Verifying the Connection," later in this chapter.
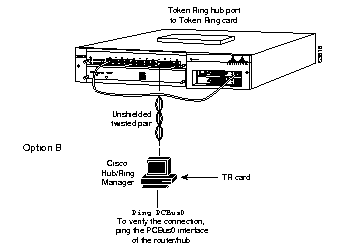
If your network management PC has a Token Ring card (for connection to a Cisco 2517 or Cisco 2519 router/hub) or an Ethernet card (for connection to a Cisco 2518 router/hub), you can connect the PC directly to a LAN port (option B in Table 1-1 and Figure 1-4). This connection has the disadvantage that serious errors on the ring can interrupt the connection.
To establish this connection, perform the following steps:
Step 1 Connect one end of a twisted-pair cable (Token Ring cable for a Token Ring connection, 10BaseT cable for an Ethernet connection) to one of the numbered ports on the router/hub.
Step 2 Connect the other end of the cable to the Token Ring or Ethernet port on the network management PC.
Step 3 Continue with the section "Verifying the Connection," later in this chapter.
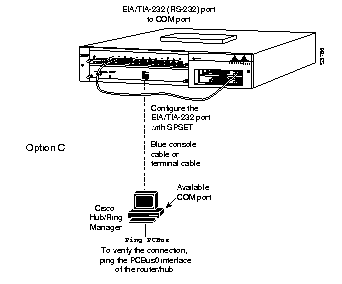
If your network management PC and router/hub are close to each other, you can connect them directly through the router/hub's management port, labeled RS232 (option C in Table 1-1 and Figure 1-5). Because information is sent more slowly through the management port, you should consider this connection only if a connection through the AUX port is unavailable. To establish this connection, perform the following steps:
Step 1 Find the blue management cable in the router/hub accessory kit.
Step 2 Connect one end of the cable to the management (RS232) port of the router/hub.
Step 3 Connect the other end of the cable to an available COM port on the network management PC.
Step 4 Run SPSET, as described in the section "Running SPSET" later in this chapter.
If you connect one modem to the network management PC and another modem to the router/hub's AUX port or RS232 port, you can manage the router/hub from a remote location, using SLIP or PPP (options D and E in Table 1-1). (See Figure 1-6 and Figure 1-7.) Connection to the AUX port provides higher-speed communication and is recommended for remote management.
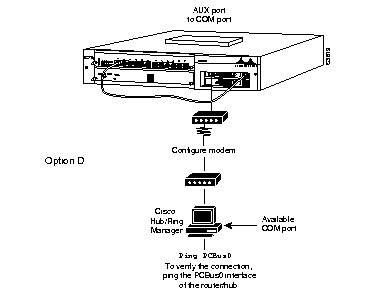
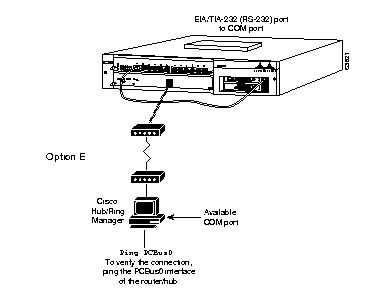
At the router/hub end of the connection, you need a modem, a serial cable, and an RJ-45-to-DB-25 adapter. The adapter connects the serial cable to the router/hub AUX or RS232 RJ-45 port. At the network management PC end, you need a modem and a serial cable.
You also need communications software, such as Windows Terminal, and a TCP/IP stack running on the network management PC.
To connect and configure a modem at the network management PC for a remote connection, perform the following steps:
Step 1 Follow the instructions that came with your modem to connect the telephone line and modem cables.
Step 2 Configure your PC's TCP/IP software for a PPP or SLIP connection, following the instructions in your TCP/IP documentation.
The IP addresses of the PC and the router AUX port (if you are connecting to it) must belong to the same network.
Step 3 Configure the modem strings in the TCP/IP software according to your TCP/IP and modem documentation. The modem should use the settings shown in the first row of Table 1-2.
| Platform | Communications Software | Baud Rate | Stop Bits | Port Selection | Word Length | Parity Check |
|---|---|---|---|---|---|---|
| Network management PC | TCP/IP software | 2400 or higher | 1 | COMx | 8 | None |
| Router/hub RS232 port | SPSET | 2400
| 1 | EIA/TIA-232 | 8 | None |
To configure the modem connected to your router/hub, perform the following steps:
Step 1 Using the serial cable, connect the modem to a terminal or a PC running a communications or terminal emulation application.
Step 2 Enter the following command to configure the modem:
AT&FE0Q1S0=1&W&Y
This string is made up of the following commands:
Step 3 Add additional modem commands to provide compression, error correction, or flow control, if necessary. Refer to your modem documentation.
Step 4 As an alternative, you can use Telnet to connect to one of the interfaces on the router/hub and add the modem configuration command to line number 2001 (which specifies tty-1), as in the following example:
telnet 149.99.1.1 2001
AT
AT&FEQ1S=1&W&Y
When your console displays OK, the router/hub modem is prepared to receive a remote connection.
Step 5 Remove the cable from the terminal or PC and cable the modem to the router/hub AUX or RS232 port, using the RJ-45-to-DB-25 adapter. If your PC has a 9-pin COM port, you may also need to use a DB-25-to-DB-9 adapter, which is not included.
If you are connecting to the router/hub AUX port, configure this port with an IP address and PPP or SLIP encapsulation. For example, include the following lines in the router/hub configuration file (the IP address shown is an example):
configure terminal
!
interface Async1
 ip address 149.99.1.1 255.255.0.0
 encapsulation ppp
async mode dedicated
!
line aux 0
 modem ri-is-cd
 stopbits 1
 rxspeed 38400
 txspeed 38400
 flowcontrol hardware
!
end
This sample configuration establishes a direct PPP link with a line speed of 38,400 bps.
To establish the remote connection, perform the following steps:
Step 1 Open a terminal emulation session from the PC.
Step 2 Dial the modem connected to the router/hub.
Step 3 If you are connecting to the RS232 port of the router/hub, you must run SPSET to configure certain parameters. Continue with the next section, "Running SPSET." If you are connecting to the AUX port, you do not need to run SPSET. Continue with the section "Verifying the Connection," later in this chapter.
In order to use a local or remote connection to the RS232 port of the router/hub, you must run the SPSET program to configure IP addresses.
To run SPSET, perform the following steps:
Step 1 Establish a local or remote connection from the network management PC to the router/hub RS232 port.
Step 2 When the connection is established, stop the SNMP agent software by pressing Ctrl-E.
If Ctrl-E does not stop the agent software, enter hellottt (which wakes up the SNMP agent) and then press Ctrl-E.
Step 3 When you see the <<C>> prompt, enter the following command:
spset
The Main menu appears.
Step 4 From the Main menu, select General Setup.
The General Setup menu appears.
Step 5 Select Serial Mode: SLIP from the General Setup menu.
Step 6 Set baud rate, stop bits, port selection, word length, and parity checking as specified in Table 1-2.
Your General Setup menu should now look like Figure 1-8.
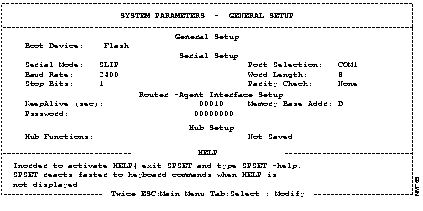
SPSET -help at the prompt. (To exit SPSET, press the Escape key twice from the General Setup menu.) Keep in mind that SPSET responds faster to keyboard commands when online help is not displayed.
Step 7 Press Escape to return to the Main menu and select IP Setup.
Step 8 From the IP Setup menu, select the IP address.
The System Parameters menu appears, as shown in Figure 1-9.
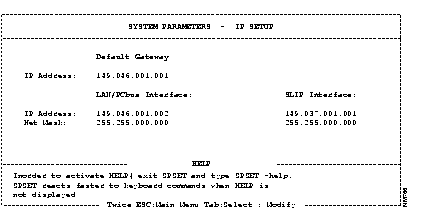
Step 9 Set the IP address and subnet mask of the SLIP interface.
Step 10 Press Escape to return to the Main menu and select Exit with Save.
The <<C>> prompt returns.
Step 11 Reset the router by entering the following command at the prompt:
RESET
Step 12 Reconfigure the terminal emulation session to a speed of 2400 bps if it is operating at a different speed.
Step 13 Stop the agent software by pressing Ctrl-E.
Step 14 Restart the agent software by entering agent at the prompt.
Step 15 Continue with the next section, "Verifying the Connection."
From the network management PC, use a DOS or Windows ping command to verify connectivity:
For more information, refer to the Cisco 2517 and Cisco 2519 Router/Hub User Guide or the Cisco 2518 Router/Hub User Guide.
Continue with the chapter "Installing Cisco Hub/Ring Manager for Windows."
|
|