|
|

Table Of Contents
Adding Redirect Virtual Server
Editing Redirect Virtual Servers
Managing Server Farms
The managing Server Farms page has two sections Server Fams and NAT Pools, for more details see:
Server Farms
A server farm (or server pool) is a collection of servers that contain the same content. You can specify the server farm name when you configure the server farm and add real servers.
Related Topics:
–
Adding Redirect Virtual Server
–
Viewing Server Farms
Figure 5-1 Server Farms Page
To view Server Farms:
Step 1
Step 2
Or:
Step 1
Step 2
From this section, you can access functions to do the following:
•
•
•
Adding Server Farms
To add Server Farms:
Step 1
Step 2
Step 3
Or:
Step 1
Step 2
•
General
In the General tab, the following details are displayed:
Real Server
In the Real Servers tab, the following details are displayed:
From this page, you can click Add to add new named or unnamed real server. For more information on adding named and unnamed real servers, see
•
•
Health Checkup
In the Health Checkup tab, the following details are displayed:
Redirect Virtual Server
In the Redirect Virtual Server tab, the following details are displayed:
Name
The name of the redirect virtual server.
SSL Port
SSL port number; the range is from 1 to 65535.
Status
Status of the redirect virtual server.
From this page, you can access functions to do the following:
•
•
Editing Server Farms
To edit selected Server Farm details:
Step 1
Step 2
Step 3
Step 4
Or:
Step 1
Step 2
Step 3
•
General
In the General tab the following details are displayed:
Real Server
In the Real Servers tab the following details are displayed:
From this section, you can click Edit to edit a real server. For more information on editing real servers see "Editing a Real Server" section.
Health Checkup
In the Health Checkup tab, the following details are displayed:
Redirect Virtual Server
In the Redirect Virtual Server tab, the following details are displayed:
Name
The Name of the redirect virtual server.
SSL Port
SSL port number; the range is from 1 to 65535.
Status
Status of the redirect virtual server.
From this section click Edit to edit a redirect virtual server. For more information on editing Redirect Virtual Servers see "Editing Redirect Virtual Servers" section.
Viewing Server Farm Node
To view Server Farm Nodes:
Step 1
Step 2
Step 3
Or:
Step 1
Step 2
Step 3
From the Server Farm Node page, you can access functions to do the following:
•
•
–
–
•
•
Adding Named Real Server
To add a named Real server.
Step 1
Step 2
Step 3
Step 4
Step 5
Or:
Step 1
Step 2
Step 3
Step 4
Adding Unnamed Real Server
To add an unnamed Real Server.
Step 1
Step 2
Step 3
Step 4
Step 5
Or:
Step 1
Step 2
Step 3
Step 4
Editing a Real Server
To edit a Real server.
Step 1
Step 2
Step 3
Step 4
Step 5
Or:
Step 1
Step 2
Step 3
Step 4
From this page, you can click Delete to delete a Real Server.
Adding Redirect Virtual Server
To add a Redirect Virtual Server:
Step 1
Step 2
Step 3
Step 4
Step 5
Or:
Step 1
Step 2
Step 3
Step 4
The following fields are displayed:
Editing Redirect Virtual Servers
To edit a Redirect Virtual Server:
Step 1
Step 2
Step 3
Step 4
Step 5
Or:
Step 1
Step 2
Step 3
Step 4
The following fields are displayed:
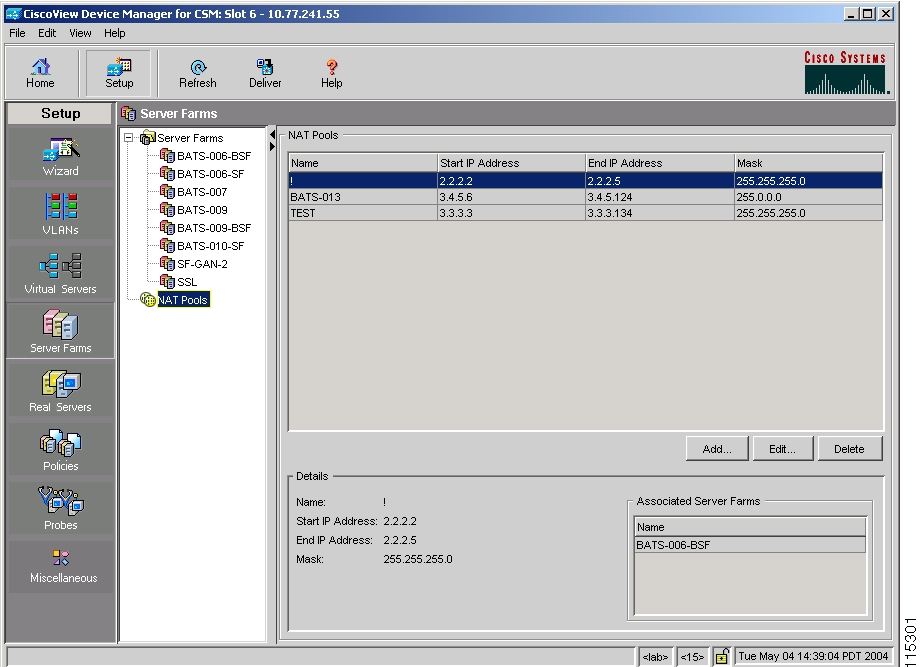
NAT Pools
When you configure client Network Address Translation (NAT) pools, NAT converts the source IP address of the client requests into an IP address on the server-side VLAN. You can configure NAT pool with range of IP Addresses. To configure NAT pool with single IP Address, you can give Starting IP and Ending IP as the same.
Related Topics:
Viewing NAT Pools
Figure 5-2 NAT Pools
To view NAT Pools:
Step 1
Step 2
Step 3
Or:
Step 1
Step 2
From this section, you can access functions to do the following:
•
•
•
Adding NAT Pools
To add NAT Pools:
Step 1
Step 2
Step 3
Step 4
Step 5
Or:
Step 1
Step 2
Step 3
Step 4
Name
The name of the NAT Pool.
Start IP Address
The start IP Address of the NAT Pool.
End IP Address
The end IP Address of the NAT Pool.
Mask
The mask IP of the NAT Pool.
Note
Editing NAT Pools
To edit NAT Pools:
Step 1
Step 2
Step 3
Step 4
Step 5
Or:
Step 1
Step 2
Step 3
Step 4
![]()
![]()
![]()
![]()
![]()
![]()
![]()
![]()
Posted: Thu Oct 6 22:46:30 PDT 2005
All contents are Copyright © 1992--2005 Cisco Systems, Inc. All rights reserved.
Important Notices and Privacy Statement.