cc/td/doc/product/rtrmgmt/cvdmcsm
hometocprevnextglossaryfeedbacksearchhelp
PDF

Table Of Contents

Managing Real Servers

Viewing Named Real Servers

Viewing Named Real Servers Node

Viewing Unnamed Real Servers

Viewing an Unnamed Real Servers Node

Adding a Real Server

Editing a Real Server


Managing Real Servers


Real servers are physical devices that are assigned to a server farm and provides services that are load balanced.

This section includes the following topics:

Viewing Named Real Servers

Viewing Named Real Servers Node

Viewing Unnamed Real Servers

Viewing an Unnamed Real Servers Node

Adding a Real Server

Editing a Real Server

Viewing Named Real Servers

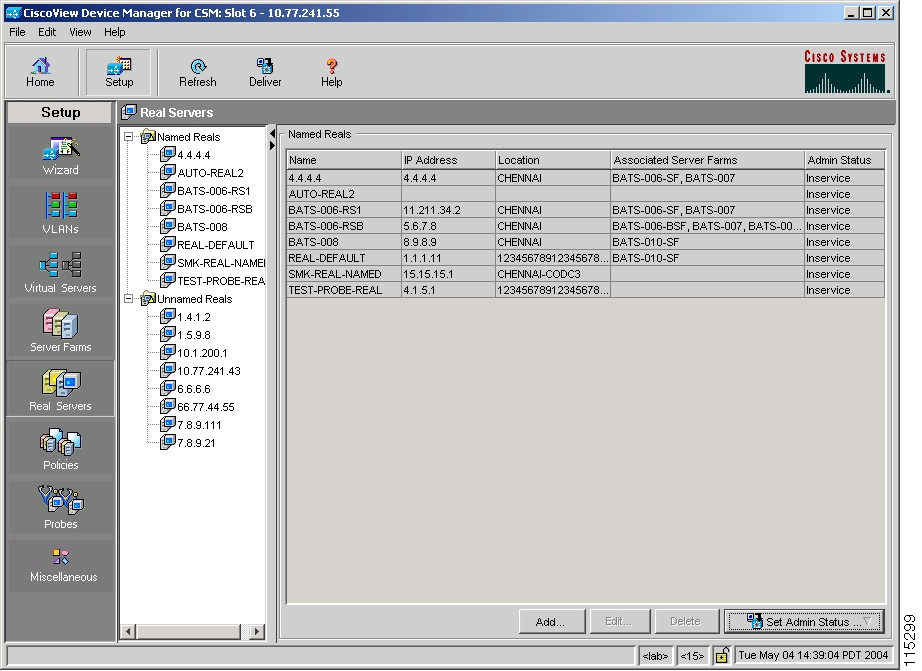
Figure 6-1 Named Real Servers Page

You can view information about all the existing Real Server details on the device.

To view Named Real Servers:


Step 1 Click Home at the top of the window.

Step 2 Click Real Servers under Services Dashboard.

Or:


Step 1 Click Setup from the task bar.

Step 2 Click Real Servers from the left-most pane.

The following fields appear.

Field
Description

Name

The name of the Real Server.

IP Address

The IP Address of the Real Server.

Location

The location of the Real Server.

Associated Server Farms

The real server associated with the server farms.

Admin Status

Status of the real server.

Add

Lets you add a new Real Server.

Edit

Lets you edit a Real Server.

Delete

Lets you delete a Real Server.

Set Admin Status

Lets you set the admin status.

When you select the options you will be prompted with a confirmation box. Click on Yes to set the appropriate admin status. Select No to keep the admin status unchanged.


:


From the Real Server page, you can access functions to do the following

Add a new Real Server. For more information, see "Adding a Real Server" section.

Edit a Real Server. For more information, see "Editing a Real Server" section.

Click the Delete button to delete a named Real Server.

Viewing Named Real Servers Node

To view Named Real Servers Node.


Step 1 Click Home at the top of the window.

Step 2 Click Real Servers under Services Dashboard.

Step 3 Select a named Real Server.

Or:


Step 1 Click Setup from the task bar and click Named Real Servers in the left-most pane.

Step 2 Select a named Real Server.

The following files appear:

Field
Description

Real Server Name

The name of the Real Server.

Location

The location of the Real Server.

Real Server IP Address

IP address of the Real Server.

Admin Status

Status of the Real Server.

Server Farm

The name of the Server Farm to which the real server is associated.

Port

The port number of the real server.

Min. Connections

The minimum connections for the real server.

Max. Connections

The maximum connections for the real server.

Weight

The weight of the real server.

Admin Status

The admin status of the real server with respect to the server farm.

Operational Status

The operational status of the real server with respect to the server farm.

Set Admin Status

Lets you set the admin status.

When you select the options you will be prompted with a confirmation box. Click on Yes to set the appropriate admin status. Select No to keep the admin status unchanged.

Details

The details pertaining to the named real server.


Viewing Unnamed Real Servers

To view Unnamed Real Servers.


Step 1 Click Home at the top of the window.

Step 2 Click Real Servers under Services Dashboard.

Step 3 Click Unnamed Real Servers in the left-most pane.

Or:


Step 1 Click Setup from the task bar.

Step 2 Click Unnamed Real Servers in the left-most pane.

The following fields appear:

Field
Description

Real

The name or IP address of the Real Server.

Associated Server Farms

The Server Farm associated with the Real Server.


Note You can create unnamed real servers only inside a server farm.


Viewing an Unnamed Real Servers Node


Note You can congfigure Unnamed Real Servers only within a Server Farm.


To view Unnamed Real Servers Node.


Step 1 Click Home at the top of the window.

Step 2 Click Real Server under Services Dashboard.

Step 3 Select an unnamed Real Server.

Or:


Step 1 Click Setup from the task bar and click Unnamed Real Servers in the left-most pane.

Step 2 Select an unnamed Real Server.

The following fields appear:

Field
Description

Real Server IP Address

IP address of the Real Server.

Server Farm

The name of the Server Farm to which the real server is associated.

Port

The port number of the real server.

Min. Connections

The minimum connections for the real server.

Max. Connections

The maximum connections for the real server.

Weight

The weight of the real server.

Admin Status

The admin status of the real server with respect to the server farm.

Operational Status

The operational status of the real server with respect to the server farm.

Set Admin Status

Lets you set the admin status.

When you select the options you will be prompted with a confirmation box. Click on Yes to set the appropriate admin status. Select No to keep the admin status unchanged.

Details

The details pertaining to the named real server.


Adding a Real Server

To add Real Servers.


Step 1 Click Home at the top of the window.

Step 2 Click Real Server under Services Dashboard.

Step 3 Click the Add button provided at the end of the table to create a new Real Server.

Or:


Step 1 Click Setup from the task bar and click Real Servers in the left-most pane.

Step 2 Click the Add button provided at the end of the table to create a new Real Server.

The following fields appear:

Field
Description

Name

Enter the name of the Real Server.

IP Address

Enter the IP Address of the Real Server.

Location

Enter the location of the Real Server.

Status

Specify the status.


Editing a Real Server

To edit Real Server information:


Step 1 Click Home at the top of the window.

Step 2 Click Real Server under Services Dashboard.

Step 3 From the table, select the Real Server that you want to modify.

Step 4 Click the Edit button provided at the end of the table to edit a Real Server.

Or:


Step 1 Click Setup from the task bar, click Real Servers in the left-most pane.

Step 2 From the table, select the Real Server that you want to modify.

Step 3 Click the Edit button provided at the end of the table to edit a Real Server.

The following fields appear:

Field
Description

IP Address

Enter the IP Address of the Real Server.

Location

Enter the location of the Real Server.

Service

Specify the status.


hometocprevnextglossaryfeedbacksearchhelp

Posted: Thu Oct 6 23:35:03 PDT 2005
All contents are Copyright © 1992--2005 Cisco Systems, Inc. All rights reserved.
Important Notices and Privacy Statement.