cc/td/doc/product/rtrmgmt/cupm/cupm10
hometocprevnextglossaryfeedbacksearchhelp
PDF

Table Of Contents

Administering Provisioning Manager

Viewing Licensing Information

Licensing Process

Launching Cisco Unified Operations Manager IP Phone Details

Managing Log Files

Changing the Log Level

Changing the Maximum Log File Size

Maintaining Data

Enabling Data Purging

Provisioning Manager Database Backup and Restore

Scheduling Synchronizations

Searching Inventory

Using Inventory Search

Creating Search Reports

Viewing System Reports


Administering Provisioning Manager


This chapter includes the following topics:

Viewing Licensing Information

Launching Cisco Unified Operations Manager IP Phone Details

Managing Log Files

Maintaining Data

Scheduling Synchronizations

Searching Inventory

Viewing System Reports

Viewing Licensing Information

The License Status Information page displays the following:

Unavailable features—Any features in Provisioning Manager that you do not have access to, because you do not have the appropriate license or because you have reach the limit for the use of the feature.

Features in overdraft state—Any features that you are using that have exceeded their allowable use limit.

All valid features—List of features and their corresponding use limit (Available), overuse allowed (Overdraft), current use (Used) and date of expiration (Expiry).


Step 1 Select System Administration > License Information. The License Status Information page appears.


Licensing Process

The Provisioning Manager license file includes support for at least 1,000 phones. You can purchase incremental licenses for additional phone support and register up to 30,000 phones with a single Provisioning Manager. For each incremental license that you purchase, you will receive a PAK, and you must use that PAK to obtain a license file.

This process applies to new installations and license upgrades.

1. Obtain a Product Authorization Key (PAK)—The PAK is used to register Provisioning Manager, and any additional device support that you might purchase for Provisioning Manager, on Cisco.com, and it contains resource limitations. See Obtaining a PAK.

2. Obtain a license file—A license file is sent to you after you register the PAK on Cisco.com. See Obtaining a License File.

3. Copy the license file to the server where Provisioning Manager is to be installed. If Provisioning Manager is already installed and you are upgrading your license file, you must register the license file with Provisioning Manager. See Registering a License File with Provisioning Manager.

Obtaining a PAK

The PAK is located on the software claim certificate that is shipped with theProvisioning Manager product CD.

Obtaining a License File


Step 1 Register the PAK and the MAC address of the system where Provisioning Manager is installed with Cisco.com at http://www.cisco.com/go/license. You will be asked to log in. You must be a registered user of Cisco.com to log in.


Note The MAC address is required because licensing uses node-locking technology. The license file can only be used with the MAC address that you supply. The license file will be emailed to you. After you obtain a license file, register the license with the Provisioning Manager server.


The license file will be emailed to you. After you obtain a license file, register the license with the Provisioning Manager server.


Registering a License File with Provisioning Manager


Step 1 Copy the license file to the Provisioning Manager server, in the folder <Installation directory>\license.

The system validates the license file and updates the license. The updated licensing information appears on the Licensing Status Information page.

Step 2 The license should automatically take effect in a few minutes. If it does not, select System Administration > License Information.

Step 3 Click PERFORM AUDIT. You will see the phones that you are licensed to update.

Step 4 If you purchased more than one license, repeat Step 1 to install each additional license.


Launching Cisco Unified Operations Manager IP Phone Details

If you have purchased Cisco Unified Operations Manager (Operations Manager) and are running it, you can setup Provisioning Manager to launch the IP Phone Details dialog box from Operations Manager. The IP Phone Details dialog box is launched from a subscriber record.

Before using this feature, you must first configure Provisioning Manager (see Configuring Provisioning Manager to Open Cisco Unified Operations Manager IP Phone Details).

After performing the configuration procedure, a Details button appears on the subscriber record. The Details button launches the IP Phone Details dialog box from Operations Manager (see Opening the Cisco Unified Operations Manager IP Phone Details Dialog Box).

Configuring Provisioning Manager to Open Cisco Unified Operations Manager IP Phone Details


Step 1 On the Provisioning Manager system, go to the <Installation directory>/sep folder.


Note If you accepted the default location during installation, the installation directory is C:\CUPM.


Step 2 Open the ipt.properties file.

Step 3 In the ipt.properties file change the following properties:

dfc.ipt.operationsmanager.host: <hostname>—Enter the Operations Manager system host name or IP address.

dfc.ipt.operationsmanager.port: <port>—Enter the port number that Operations Manager uses.

Step 4 Save and close the file.

Step 5 Stop Provisioning Manager. On the Provisioning Manager system, select Start > All Programs > Cisco Unified Provisioning Manager > Stop Cisco Unified Provisioning Manager.

Step 6 Start Provisioning Manager (Start > All Programs > Cisco Unified Provisioning Manager > Start Cisco Unified Provisioning Manager).


Opening the Cisco Unified Operations Manager IP Phone Details Dialog Box


Step 1 Open the subscriber record for the desired subscriber (see Accessing a Subscriber Record, page 3-1).

Step 2 Click the Phone that you want to see the details for. The Details button is one of the buttons displayed.

Step 3 Click the Details button. The Operations Manager login page appears. Valid Operations Manager credentials are required to view the IP Phone Details dialog box.

Step 4 Log into Operations Manager. The IP Phone Details dialog box from Operations Manager appears.


Managing Log Files

Provisioning Manager writes application log files for the Service Enabling Platform (SEP) module (sep.log) and the Network Interface and Configuration Engine (NICE) service (nice.log). The log files are located in the <Installation Directory>/sep/logs folder.

You cannot disable logging. However, you can:

Collect more data when needed by increasing the logging level

Return to the default logging level (NORMAL)

Following are the available logging levels:

DETAIL (provides the most information)

LOW

NORMAL

HIGH

EMERGENCY

Log files are backed up every hour, or when they reach their maximum log size limit. The default size limit is 20 Mb (see Changing the Maximum Log File Size). The files are saved in the format sep.log.<date stamp>-<timestamp>.


Tip The log files are not automatically purged. To save space, it is recommended that you periodically delete the old log files.


Changing the Log Level


Step 1 On the Provisioning Manager system, go to the <Installation directory>/sep folder.


Note If you accepted the default location during installation, the installation directory is C:\CUPM.


Step 2 Open the dfc.properties file.

Step 3 Change the dfc.log.level property to the desired level. Following are the available logging levels:

DETAIL

LOW

NORMAL

HIGH

EMERGENCY

Step 4 Save the changes.

Step 5 Restart the Provisioning Manager services. Changes will not take effect until Provisioning Manager is restarted.

a. On the Windows desk top, select Start > Control Panel > Administrative Tools > Services the Services window appears.

b. Right-click the following services and select Start.

cupm JBossService

cupm NiceService


Changing the Maximum Log File Size


Step 1 On the Provisioning Manager system, go to the <Installation directory>/sep folder.


Note If you accepted the default location during installation, the installation directory is C:\CUPM.


Step 2 Open the dfc.properties file.

Step 3 Change the dfc.log.maxsize property to the desired size (default is 20 Mb).

Step 4 Save the changes.

Step 5 Restart the Provisioning Manager services. Changes will not take effect until Provisioning Manager is restarted.

a. On the Windows desk top, select Start > Control Panel > Administrative Tools > Services the Services window appears.

b. Right-click the following services and select Start.

cupm JBossService

cupm NiceService


Maintaining Data

Enabling Data Purging

You can configure Provisioning Manager to purge data at a scheduled interval.

Provisioning Manager retains the following types of data:

Order—When an order is placed for any product provisioning (for example; phone, line, voicemail or any bundle), an order data object is created and stored in the system.

ServiceAction—Are objects that get created during when the application communicate with the device for product provisioning.

Workflow—After an order is placed for a product, it goes through a workflow (approval, shipping, and receiving) before going to the service activator.


Note Data will be purged when the retention time or retention count criteria is met. For example, if the data is older than the retention time it will be removed. Also, if the data amount exceeds the retention count, it will be removed.


Step 1 Select System Administration > Data Maintenance. The Data Maintenance Configuration page appears.

Step 2 Select the checkbox in the row for the data you want to schedule for purging.

Step 3 In the Retention Time column, change the number of days for which you want to retain the data (default is seven days).

Step 4 In the Retention Count column, select the amount of data that you want to retain.


Note Retention count is the number of objects that you want Provisioning Manager to keep and not purge. For example, if there are 1000 total orders and the retention count is 100, Provisioning Manager will purge 900 orders and keep the latest 100 orders.


The default settings for the Retention Count are:

Orders—100

ServiceAction—100

Workflow—50

Step 5 (Optional) If you want to export the purged data to a file before it is removed, in the Export Before Purge field select Yes, then enter a directory location at which to store the data.


Note Only Orders and Workflow data is exported. ServiceAction data cannot be exported.


Step 6 Select a purge interval (the default is 24 hours).

The Purging Information pane displays the time of the next scheduled purge and the last purge.

Step 7 Click Update.


Provisioning Manager Database Backup and Restore

Backing Up the Provisioning Manager Database


Step 1 Shut down Provisioning Manager:

a. On the Windows desktop, select Start > All Programs > Cisco Unified Provisioning Manager > Stop Cisco Unified Provisioning Manager.


Note Alternately, you can stop the postgres process; go to Control Panel > Administrative Tools > Services > cupmPostgreSQL, select the service and click Stop.


Step 2 In a backup folder, make copies of the following files and directories (preferably on a different file server, also it is recommended that you burn the backup data onto a CD):

<Installation directory>\install.log

<Installation directory>\pgsql\data

<Installation directory>\sep\dfc.properties

<Installation directory>\sep\dfc.keystore

<Installation directory>\jboss-4.0.3SP1\server\cupm\conf\login-config.xml


Note If you accepted the default location during installation, the installation directory is C:\CUPM.


Step 3 Restart Provisioning Manager (Start > All Programs > Cisco Unified Provisioning Manager > Start Cisco Unified Provisioning Manager).


Restoring the Provisioning Manager Database


Note These instructions assuming that you are backing up and restoring on the same system.


Step 1 Shut down Provisioning Manager (see the Backing Up the Provisioning Manager Database).

Step 2 Place copies of the the backup files into their original folders. Make sure you use the original names of the files and folders, and place the files in the same folders they were originally backed up from.


Note You must restore on the same drive that you backed up from. If you backed up from drive C:\, you must restore on drive C:\."


Step 3 Change the permission of the database directory.

a. Open Windows Explorer.

b. Right click the <Installation directory>/pgsql/data folder.


Note If you accepted the default location during installation, the installation directory is C:\CUPM.


c. Click Properties.

d. Click the Security tab.

e. Click Advanced.

f. Click cupmuser (if it is not present, add it).


Note Two cupmuser may appear, one will have Deny in the Type column. If there are two, delete the cupmuser that displays Deny in the Type column.


g. Click Edit ....

h. Select all the checkboxes in the Allow column, except for the following:

Full Control

Delete Subfolder and Files

Take Ownership

ChangePermission

i. Make sure the following checkbox is not selected: Apply these permissions to objects and/or containers within this container only.

j. Click OK.

k. Make sure the following checkbox is not selected: Allows inheritable permissions from the parent to propagate to this object and all child objects. Include these with entries explicitly defined here.

If this check box is selected, unchecking the box causes a warning dialogue box to appear. Click Remove.

l. Select the following checkbox: Replace permission entries on all child objects with entries shown here that apply to child objects.

m. Click OK.

Step 4 Start and stop the postgres service.

a. Go to Control Panel > Administrative Tools > Services > cupmPostgreSQL.

b. Click Start. Make sure that the service can be started.

c. Click Stop.

Step 5 Restart the system.


Note You should perform a subscriber synchronization to all Call Processors and Unified Message Processors, and a Domain synchronization before placing any orders.


Scheduling Synchronizations

Besides running synchronizations on demand through the appropriate Provisioning Manager functional area, you can set up scheduled synchronizations. You schedule synchronizations for the following:

Call Processors (see Synchronizing Call Processors, page 5-4)

Unified Message Processors (see Synchronizing Unified Message Processors, page 5-7)

Domains (see Synchronizing Domains, page 5-11)

You do not use Provisioning Manager to set up scheduled synchronizations. You must use the Scheduled Tasks functionality that comes with your Windows system.


Step 1 On the Windows desktop, select Start > Programs > Accessories > System Tools > Scheduled Tasks. The Scheduled Tasks window opens.

Step 2 Double-click Add Scheduled Task. The Scheduled Task wizard appears.

Step 3 Click Next.

Step 4 In the next page, click Browse.

Step 5 Browse to the file C:\CUPM\sep\build\bin\sync.bat (this is the correct location if you accepted the default location during installation).

Step 6 Select how often you want the synchronization to run. Click Next.

Step 7 Select the time and day when you want the synchronization task to start. Click Next.


Note You should run synchronizations during off-peak network usage periods.


Step 8 Enter the password (and confirm) for the system's administrator user. Click Next.

Step 9 Click Finish. The new scheduled task appears in the Scheduled Tasks window.

Step 10 Right-click the new scheduled task and select Properties.

Step 11 In the Run field, at the end of the string (after sync.bat), enter one or more of the following commands:

callprocessor—Runs infrastructure and subscriber synchronizations for all Call Processors in the system.

messageprocessor—Runs infrastructure and subscriber synchronizations for all Unified Message Processors in the system.

domain—Runs synchronizations for all the domains in the system. The order of Domains synchronizations depends on the value set on the syncPrecedence property for the corresponding domain instances.

all—Runs infrastructure and subscriber synchronizations for all Call Processors and Unified Message Processors. The order of synchronizations is callprocessor, messageprocessor, and domain.


Note You can also use these commands in a command prompt to start a synchronization. Run the commands at the following location: <CUPM_DIR>/sep/build/bin/sync.bat.


Step 12 Click OK.


Searching Inventory

If you are assigned the Administration authorization role you can browse the Provisioning Manager network and service inventory. You can view different types of network or service related data in a tree-base selector.

The following objects appear in the selector:

Global Resources—List infrastructure data stored in Provisioning Manager. Some examples are, Route Partition, Call Search Space, Call Pickup Group.

Product Catalog—Lists the products present in Provisioning Manager.

Subscribers—List all subscribers and their locations in Provisioning Manager.

Domain specific directory numbers, phones, rules and Services Areas.

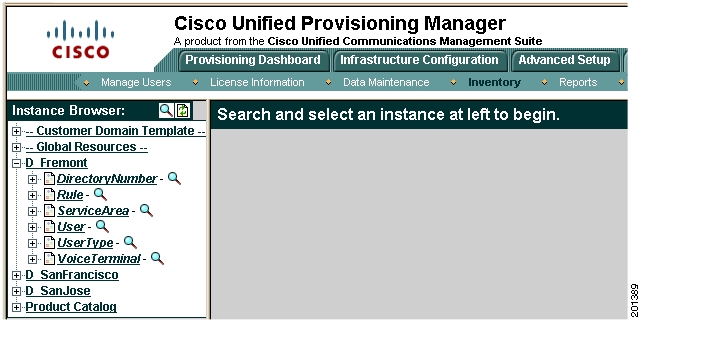
This section provides information for browsing and searching Provisioning Manager inventory, using the Instance Browser and search functionality of the Inventory Manager.

Using Inventory Search

Creating Search Reports

Figure 7-1 shows an example of the Inventory Search page.

Figure 7-1 Inventory Search


Step 1 Select System Administration > Inventory. A new page appears.

Step 2 Do one of the following:

If you want to browse Provisioning Manager's inventory, click Browse. The Instance Browser appears. For information on the Instance Browser, see Using Inventory Search.

If you want to perform a search of Provisioning Manager's inventory, click Search. The Search Reports page appears. In this page you can do the following:

Perform a search using a sample report.

Create a new Search report to perform a search.


Using Inventory Search

You can search for inventory objects using basic or advanced searches. You use basic searches to find instances of an object based on its properties. Advanced searches are used to specify more detailed search criteria. You can include multiple constraints, such as customers, properties, associations, and namespaces, to limit the search results. You can also specify what properties you want the search to return. You can save advanced searches as reports, and organize them into categories. Reports can be created only by Administrators.

The following sections describe how to run basic and advanced searches:

Performing Basic Searches

Performing Advanced Searches

Return Values

Performing Basic Searches

Using the Instance Browser, you can run a basic search for instances of a particular object. In a basic search, the search parameters are based on the properties of the class.

The first step to searching for an instance is specifying the class that it is based on. You can specify search criteria and how the results are displayed by:

Specifying a keyword or partial keyword. You can use asterisks (*) as wildcards.

Specifying whether the results are displayed according to the class name or label property.

Restricting the search to a particular domain.

Including and/or excluding abstract, association, and interface classes.

After you have located the class that the instance is based on, you can narrow your search by specifying search criteria based on the class properties. The number of searchable properties varies from class to class.


Step 1 Select System Administration > Inventory. A new page appears.

Step 2 Click Browse. The Instance Browser appears.

Step 3 Click the Search icon (). The Class Search dialog box appears.

Step 4 Either enter a class or choose a class from the list. The Instance Search screen appears.

Step 5 Complete the fields if you have search parameters you want to specify.

Step 6 Click Search. The results appear in the Found matches section.


Performing Advanced Searches

You can perform advanced searches to find inventory instances within a specified object class. An advanced search can be saved for future use.

Performing advanced searches consists of the following steps:


Step 1 Select System Administration > Inventory. A new page appears.

Step 2 Do one of the following:

Click Browse, select a class using a basic search, then click Advanced.

Click Search, click the New icon (), and then select a class.

Step 3 Add any applicable constraints. You can constrain searches using properties, associations, namespaces, or customers.

Step 4 Create a list of properties to return in the search from a list of available properties. The search results include only those instances that contain the selected properties.

Step 5 Specify associated properties to return in the search, if applicable, by building the path to the properties. The search results will include only those instances with the selected properties.

Step 6 Specify associated objects to return in the search, if applicable, by building the path to the objects. The search results will include only those instances with the selected objects.

Step 7 Specify whether to include or exclude Namespaces and Object Classes in the search results.

Step 8 Run the search. The search results are displayed.


Detailed instructions for selecting the above constraints and return objects and properties can be found in the following sections:

Constraints

Defining Property Constraints

Defining Association Constraints

Defining Namespace Constraints

Associated Properties to Return

Associated Objects to Return

Constraints

Use the Add Constraint section to define the constraints for the search.

The following constraints are available for advanced searches:

Properties—To restrict the results to objects that meet specified property criteria. You can set the properties constraint to be case sensitive or case insensitive. You can specify that either all or part of the value must be matched to return results.

Associations—To restrict the results to objects that are (or are not) associated with other objects using a specified association path. Association paths allow the relation between the source object and the queried objects to span multiple association classes.

Namespaces—To restrict the results to objects contained (or not contained) in specified namespaces.

Customers—To restrict the results to objects that are associated with specific customers.

Defining Property Constraints

You can define searches to select only the objects that meet specified property constraints. For example, you can define a constraint in which only instances that have a specific model number are included in the search results. In this case, the property constraint acts as a filter when searching for a specific object property.

When defining property constraints, the following conditions are available:

Equals—To specify a value that is equivalent in value to the selected property.

Contains—To specify a value that is contained within the value of the selected property.

Not equal to—To specify a value that is not equivalent in value to the selected property.

Does not contain—To specify a value that is not contained within the value of the selected property.

In range—To specify a value that has a Date property that is within the specified range. This operator can only be used when Date properties have been specified for an object, and where reportable=true is set in the class definition properties.

After you select the operator, you can either specify a value, or leave the field blank. If you specify a value, it becomes the default value, although users who execute the search can change the value if required. Leaving the field blank allows a user who is executing the search at a later time to specify a value for that property constraint.

To define property constraints:


Step 1 In the advanced Instance Search screen, select a property from the Add Constraint list.

Step 2 Click Add. The available conditions appear in a list.

Step 3 From the available conditions list, select the appropriate operator and click Add. The Property list appears in the Add Constraint section.

Step 4 Select the appropriate property. The Value field appears in the Add Constraint section.

Step 5 In the Value field, do one of the following:

Specify a default value for the constraint.

Leave the field blank so that users can specify their own constraints.

Step 6 If you want the search to be case-insensitive, enable Ignore Case.

Step 7 Click Add. The constraint appears in the Selected Constraints section.

Step 8 Repeats Steps 1 through 7 to add additional constraints.

Step 9 If you have defined multiple constraints, specify the and or or operands as required in the Operand column.


Defining Association Constraints

You can define searches to select objects that are, or are not, associated with other objects. For example, you can define a search for Lines that are associated with Voice Terminals of a certain type, excluding Voice Terminals of another type. Additionally, you can sort within a range; for example, you can search for all Phones with 2 to 6 Lines.

When defining association constraints, the following conditions are available:

Associated with—Used to specify the object instance and association path associating the search class with another object instance.

Not associated with—Used to specify the object instance to not associate with for the search class.

Associated with range—Used to specify the range of object instances to associate with the search class. If you select this condition, you must complete the appropriate association, condition, and quantity information.

After the operator is selected, you must select an object instance for the constraint. Each operator has a different procedure for selecting object instances to associate with.

To define constraints using the associated with operator:


Step 1 From the Add Constraint list, select Associations.

Step 2 Click Add. The available conditions appear in a list.

Step 3 From the available conditions list, select Associated with.

Step 4 Click Add. The constraint is added to the Add Constraint section.

Step 5 In the Add Constraint section, in the Instance field, click the Search icon (). The Instance and Association Path dialog box appears.

Step 6 In the To Class list, select the class that the object instance is associated with, and click Apply.

Step 7 In the By Association list, select the appropriate association, and then click Apply. The Participating As list appears.

Step 8 Select the appropriate role for the class, and then click Apply. To Class appears.

Step 9 To specify another class in the To Class field, repeat Steps 6 through 8.

Step 10 To restrict the constraint to a specific object instance, click the Search icon () and search for that instance. By default, the constraint is not restricted to a particular instance.

Step 11 Click Add to save your selections. The selected path is displayed.

Step 12 To add the constraint as defined, click Add. The Selected Constraints section displays the Instance and Association Path information.

Step 13 If you have defined multiple constraints, select the and or or operands as required in the Operand column.


To define constraints using the associated with range operator:


Step 1 From the Add Constraint list, select Associations.

Step 2 Click Add. The available conditions appear in a list.

Step 3 From the available conditions list, select the Associated with range condition, then click Add. The constraint is added to the Add Constraint section.

Step 4 From the Association list, select the association class that you want to search with.

Step 5 From the Condition list, select the condition to satisfy in the search.

Step 6 In the Quantity field, enter the number of instances the condition must meet, then click Add. The constraint is displayed in the Selected Constraints section.

Step 7 Repeat Steps 1 through 6 to add additional constraints.

Step 8 If you have defined multiple constraints, select the and or or operands as required in the Operand column.


Defining Namespace Constraints

Use namespace constraints to restrict the search to or exclude specific namespaces.


Step 1 From the Add Constraint list, select namespace, then click Add. Namespace appears in the Add Constraint section.

Step 2 Do one of the following:

To specify a namespace to search in, select Equals.

To exclude a namespace from the search, select Not Equal To.

Step 3 The Value list appears, displaying the available namespaces.

Step 4 From the Value list, select the namespace, then click Add. The constraint appears in the Selected Constraints section.

Step 5 Repeats Steps 1 through 4 to add additional constraints.

Step 6 If you have defined multiple constraints, select the and or or operands as required in the Operand column.


Return Values

By default, the namespace, object class, and object values for each instance are displayed in the results of an advanced search. In addition to the default values, you can select other values for the advanced search to display.

Properties to Return

The Properties to Return section lists the available properties of the object class being searched, and those properties that you want the search to return. Using the Properties to Return section, you can expand the search to display a list of property values.


Step 1 In the Properties to Return section, from the Available list, select a property then click Add. These properties are displayed in the Selected list.

Step 2 After adding all the desired properties, click Apply.


Associated Properties to Return

The Associated Properties to Return section identifies the associated object class properties that you want the search to return. Using the Associated Properties to Return section, you can extend the search to include a list of associated object property values.


Step 1 In the Associated Properties section, click Add. The Associated Property Path screen appears.

Step 2 In the To Class list, select the object class.

Step 3 Click Apply. The By Association list appears.

Step 4 Select the appropriate association. Click Apply. The Participating as list appears.

Step 5 Select the appropriate role for the class. Click Apply. The Select Property of lists appear.

Step 6 Do one of the following:

From the To Class list, select the object class. Click Apply. Repeat Steps 2 and 3 after you have added the classes that you require.

From the Select Property of list, select the properties of the class that you chose in Step 2. Click Apply.

The Associated Property Path screen appears with the selected path displayed.

Step 7 Click Add. The new associated property is displayed in the search screen.


Tip To remove a property, select the Remove checkbox, then click the Remove button.


Associated Objects to Return

The Associated Objects to Return section identifies the associated object classes that you want the search to return. Using the Associated Objects to Return section, you can extend the search to include a list of associated objects of a specific class.


Step 1 Click Add in the Associated Objects section. The Associated Object Class Path window appears.

Step 2 In the To Class list, select the object class, then click Apply. The By Association list appears.

Step 3 Select the appropriate association, then click Apply. The Participating as list appears.

Step 4 Select the appropriate role for the class, then click Apply. The To Class list appears.

Step 5 Do one of the following:

If you need to continue the path, repeat Steps 2 through 4.

If you are done, click Add.

The new associated property is displayed in the search screen.


Tip To remove a property, select the Remove checkbox, then click the Remove button.


Creating Search Reports

You can save advanced searches (see Performing Advanced Searches) for future use. These are called Search Reports. Also, Provisioning Manager provides you with sample search reports that you can use, or you can create your own. The sample search reports are not editable.

You can save an advanced search at any time.


Step 1 Select System Administration > Inventory > Search. The Search Reports page appears.

Step 2 Click the New icon (). The Class Search dialog box appears.

Step 3 Either enter a class in the search field or click one of the displayed classes. The Instance Search page appears.

Step 4 Enter the desired search criteria. For instructions on using the Instance Search page, see Performing Advanced Searches.

Step 5 Click Save. The Save Search page appears.

Step 6 Enter a name for the report and choose a category for it.

Step 7 Click Save. You are returned to the Advanced Search page, where you can initiate the search.


Running Search Reports

Once you have saved a search as a Search report, you can run it. Before running a Search report , you can choose to have the search results displayed in the current browser window or in a new window.


Step 1 Select System Administration > Inventory > Search. The Search Reports page appears.

Step 2 Click the report that you want to run. Either one of the sample search reports, or a search report that you created. The Inventory Search page appears, displaying the constraints that have been defined.

Step 3 Change the constraint values if required.

Step 4 To display the search results in a separate browser window, select Open results in a new window.

Step 5 Do one of the following:

To execute the search and display the search results, click Search.

To execute the search and write the search results to an Excel spreadsheet, click Excel.

The search results are displayed as specified.


Editing Search Reports


Step 1 Select System Administration > Inventory > Search. The Search Reports page appears.

Step 2 Click the Edit icon () next to the Search report that you want to edit. The Instance Search for the report appears.

Step 3 Make the appropriate changes. For instructions on using the Instance Search page, see Performing Advanced Searches.


Deleting Search Reports


Step 1 Select System Administration > Inventory > Search. The Search Reports page appears.

Step 2 Click the Edit icon () next to the Search report that you want to delete. The Instance Search for the report appears.

Step 3 In the Search Options section, click Delete.

Step 4 In the confirmation box, click OK.


Viewing System Reports

Provisioning Manager contains a set of preconfigured reports. Following are the available reports:

Service Area Report

Resource Configuration Report

Service Configuration Report

Directory Number Inventory Report


Step 1 Select System Administration > Reports.

Step 2 Click one of the following available reports:

Service Area Report

Resource Configuration Report

Service Configuration Report

Directory Number Inventory Report

A report is displayed.


hometocprevnextglossaryfeedbacksearchhelp

Posted: Wed Mar 14 16:23:21 PDT 2007
All contents are Copyright © 1992--2007 Cisco Systems, Inc. All rights reserved.
Important Notices and Privacy Statement.