|
|

Table Of Contents
Working with System-Defined Groups
Creating Access Rights for a Device Group
User Access Rights for a Device Group
Understanding Device Properties
Device Property Performance Monitors
Active Monitor Device Properties
Passive Monitor Device Properties
Active/Performance Monitors Scan Properties
Configuring Network Interfaces on a Device
Suspending and Resuming Single Device Polling
Editing Multiple Devices with Bulk Field Change
.Creating Custom Context menus
.Creating Custom Context Menus
Managing Devices
In Cisco netManager, devices are virtual representations of resources (computers, servers, and so on) that are connected to your computer through a Local Area Network (LAN), a wireless network, or even over the Internet. Cisco netManager watches these devices through the network connection. When those network resources cannot be reached by Cisco netManager, the device is considered down and an action can be configured to fire.
You can add devices by importing device credentials using a seed file, or manually adding individual devices. For more information, see the following topics:
•
"Adding a New Device" section
•
IP Phone Discovery
Cisco netManager performs an auto-discovery on all IP phones every four hours to detect if SIP and SCCP IP Phone are associated with a managed Cisco Unified Communications Manager or Cisco Unified Communications Manager Express. Cisco netManager also verifies registration status of all detected IP phones with Cisco Unified Communications Manager or Cisco Unified Communications Manager Express.
Note
Device Services
Cisco netManager associates active monitors with devices on your network. Active monitors query the network services installed on a device and then wait for a response. These monitors query the services running on a network resource, checking to make sure that the FTP server, web server, email server, etc., are up and responding. Active monitors include DNS, SNMP, Telnet, Ping, TCPIP, and NT Service. If a response is either not received or is not what is expected, the service is considered down. If the query is returned as expected, the service is considered up. If any one service on a device is down, then the device as a whole is considered down.
For a more information about service monitors, see Chapter 8, "Using Active Monitors."
About the Devices Tab
This view provides an overview of all the devices in your network.
With a look and feel similar to Windows Explorer, the My Network tree helps you keep your complex network organized and performing properly. Devices are organized by device group, and appear in the list in alphabetical order based on the name of the folder or the display name of the device. For more information on the type of information displayed, see "Device List" section.
During discovery, device groups are created for each subnetwork that is found on the network that was scanned. At the top level of the My Network tree, all devices of the entire scan are contained in the All devices folder. The second folder is the All routers folder and contains all devices that can function as a router. The folders below All devices and All routers are specific device groups that are categorized by associated device rules. For more information on these groups, see "Understanding Device Groups" section.
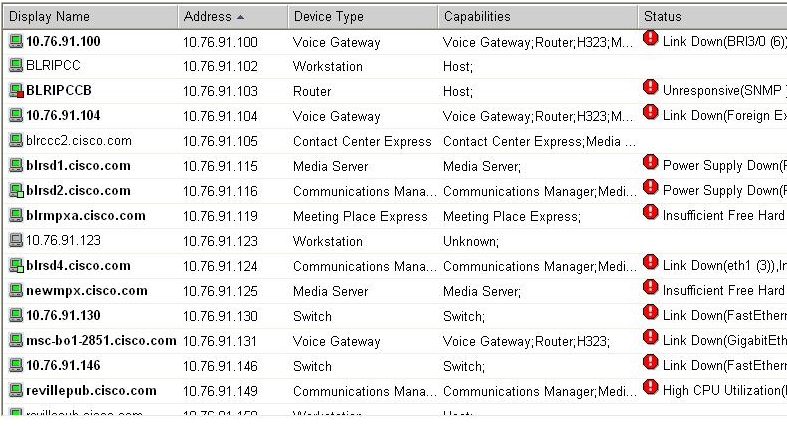
Device List
Each device on the list provides information about its device type, capabilities, and status. The capabilities column indicates the different roles that the device is capable of. For example, if a device has the capability of being a router and an H323 gateway, the column would list both router and H323 Gateway. The Status column describes any faults or events on the device. For a description of each event listed in the Status column, see List of Events, page 14-17.
Note
Figure 5-1 shows an example of a device list.
Figure 5-1 Device List
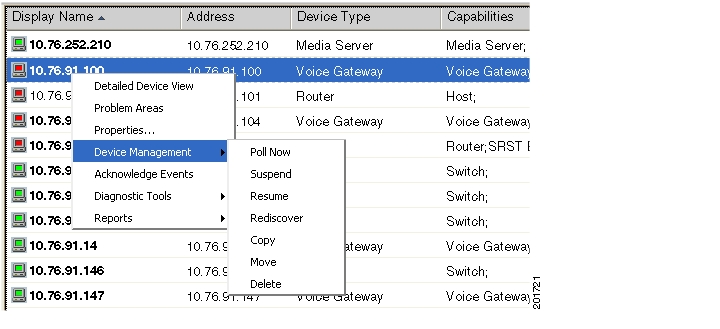
Context-Sensitive Menu
A context-sensitive menu is available on the web interface of the Devices tab. The context-sensitive menu comes up when you right-click a device or device group. This menu contains a list of tools that can be used on the device or device group. The type of tools that are available depends on the type of device you have selected. For more information on the standard network tools available, see Launching Network Tools, page 17-12.
Figure 5-2 shows an example of the Context-sensitive Menu.
Figure 5-2 Context-Sensitive Menu
Devices Toolbar
The Device Toolbar provides you ways to add devices and groups.
Figure 5-2 shows an example of the Device Toolbar.
Figure 5-3 Device Toolbar
•
•
•
•
Device States and Icons
Each folder in the My Network tree has a device state indicator on the folder icon. This indicator shows the worst state across all of the devices contained in that folder.
The following icons appear in the device list when viewing the contents of a device group.
Understanding Device Groups
A group consists of objects, where objects refer to devices and groups. Each group has a set of properties (such as a name, description, permission, and so on), but what define a group are its associated rules. Rules determine the membership of a group, which may change whenever the rule is evaluated.
The following types of groups are supported:
•
•
•
Note
•
Working with System-Defined Groups
The system-defined groups are visible to all users, and are the default groups that are administered by Cisco netManager. If a device has multiple capabilities, the device will be listed under all appropriate groups. For example, if a device can function as a router, H323 gateway and a MGCP gateway, it will be listed in all those groups.
Note
Note
The following system-defined groups come preconfigured:
•
•
•
•
•
•
•
•
•
•
•
•
•
•
•
•
•
•
•
•
Creating a Device Group
To create a static device group:
Step 1
•
•
Step 2
Step 3
Step 4
Modifying Group Properties
Step 1
•
•
Step 2
Step 3
Step 4
Step 5
Creating a User-Defined Group
Step 1
Step 2
Step 3
Step 4
Step 5
Step 6
Modifying Group Access Rights for a User
Step 1
Step 2
Step 3
Renaming a Device Group
To rename a device group, right-click on the group in the My Network tree, click Properties, then change the name in the Group Name box.
Using Dynamic Groups
This feature provides the ability to create device groups based on whatever criteria users choose, without having to create device shortcuts. Dynamic groups can be created for specific device types, device attributes, active monitors, or anything else that is stored for individual devices in the database. Dynamic groups act as SQL queries that run on the Cisco netManager database, and can display real-time data if viewed through a report that is set to automatically refresh.
Cisco netManager is pre-configured with dynamic group examples. You can view these examples from the Dynamic Group Examples folder, under the My Network tree in the Devices tab.
All of the Dynamic Group Examples are active, so if you have devices that meet the criteria, you will see the device displayed within the group. In the web interface, the dynamic group display is refreshed every 2 minutes. A group is also refreshed when you select it.
To view or edit the criteria for a dynamic group, right-click the group name, then select properties.
Note
To configure dynamic groups:
Step 1
Step 2
Step 3
In addition to the pre-configured dynamic groups, we have provided several sample filters for you to create some dynamic groups.
Tip
Dynamic Group Examples
The following table lists several dynamic group filters that you can use to create dynamic groups for your devices. To use these examples, select the text of the filter, and then copy and paste the text into the Filter box of the Dynamic Group dialog box.
Note
Creating Access Rights for a Device Group
An important part of creating a device group is configuring the appropriate access rights for that group. Group access rights ensure that only those users with specific rights are allowed to view and modify a device group.
Step 1
Step 2
Note
User Access Rights for a Device Group
Device Group Access Rights lets the administrator determine which device groups certain web users are allowed to view or edit.
The following is a list of operations and the group access rights that must be assigned for the user to perform those operations:
•
•
•
•
•
•
•
•
•
•
Understanding Device Properties
You can modify individual device properties by right-clicking a device in the Device List, then selecting Properties.
The Device Summary page displays basic information about a device, including:
•
•
•
•
The icon associated with the device, over a colored shape that indicates the worst state of any of the active monitors on the device, is displayed to the left of Device Name. The icon can be changed on the Device Properties - General page.
Additional attributes associated with the device (Location, Contact and Description as well as any custom attributes) are displayed below the device icon. Attributes can be added, modified or removed from the Device Properties - Attributes page.
Notes display any associate with the device. Notes are managed on the Device Properties - Notes page.
The following topics give an overview of the device properties available to use and modify.
•
•
•
•
General Device Properties
The General section of the Device Properties dialog box provides, and lets you modify, basic information for the selected device.
•
•
–
–
–
Note
•
•
•
•
•
Device Property Performance Monitors
The performance monitors section of the Device Properties dialog box lets you configure and manage performance monitors for the selected device. To get to this dialog box, right-click on a device from the device list, and select Properties > Performance Monitor. For more information, see Chapter 10, "Using Performance Monitors."
Note
If you select a specific performance monitor without configuring the monitor manually, the default collection type is automatically selected. The collection type refers to the item on the current device that is being monitored (this does not pertain to the custom WMI and SNMP monitors that may appear). For Cisco devices all performance monitors, except Interface Utilization and Ping Latency and Availability, will be enabled by default.
Performance monitors will be associated with the device based on its capabilities:
Note
For all other devices, the following performance monitors will be associated:
•
•
•
•
•
Configure—Click to configure collection interval (in minutes).
Note
Library—Click for options to create (New), edit, copy, or delete Performance Monitor Library items to use on all devices.
Enable Custom Performance Monitors (for this device only)—Use this section of the dialog box to add customized Active Script, SNMP, or WMI performance monitors can be used on this device only. The monitors added here do not appear in the Performance Monitor Library, and cannot be used on other devices unless it is manually created for that device.
•
•
•
For information on the Active Script Performance Monitor, please see Adding Custom Performance Monitors to the Performance Monitor Library, page 10-7.
Active Monitor Device Properties
Use the Active Monitors dialog box to display and manage active monitors for a device. To get to this dialog box, right-click a device from the device list, and select Properties > Active Monitor. Monitors may have been added during initial discovery, when Cisco netManager first added the device to the database
You can do the following from this dialog box:
•
•
•
•
For more information, see Chapter 8, "Using Active Monitors."
Passive Monitor Device Properties
Some elements on a network may not provide a clear up or down status when queried. For example, a message may get logged to the system's Event log by another application (such as an antivirus application alerting when a virus is found). Because these messages/events can occur at any time, a Passive Monitor Listener listens for them and notifies Cisco netManager when they occur.
To configure the passive monitor for a device, right-click on a device from the device list, and select Properties > Passive Monitor. This dialog box displays all passive monitors configured for this device.
You can do the following from this dialog box:
•
•
•
•
For more information, see Chapter 9, "Using Passive Monitors."
Device Property Actions
You can select an action policy to use on a device or configure alerts specifically for this device. To get to this dialog box, right-click on a device from the device list, and select Properties > Actions.
Select a policy from the Apply this Action policy pull-down menu. You can also create a new, or edit an existing action policy by clicking the Browse button next to the pull-down menu box.
Configured alerts appear in the Apply individual actions list, displaying the action type that is to be fired and the state change that will trigger the action. You may have multiple actions on a single device.
This dialog box displays all actions configured for this device. You can do the following:
•
•
•
•
For more information, see Chapter 7, "Using Actions."
Device Property Credentials
The Credentials dialog box displays Windows and SNMP credentials information for the current device. To get to this dialog box, right-click on a device from the device list, and select Properties > Credentials.
Devices that are SNMP-manageable devices appear on the map view with an icon with a white star in the top right corner.
•
•
•
For more information, see the "Credentials Overview" section.
Device Property Polling
Polling is the term used for monitoring discovered devices in Cisco netManager. The Polling dialog box lets you configure polling options and/or schedule maintenance times for the selected device. To get to this dialog box, right-click on a device from the device list, and select Properties > Polling.
•
•
•
•
•
•
–
–
–
For more information, see Chapter 6, "Polling."
Device Property Notes
The Notes dialog box provides an option to enter free-form messages to the device database. To get to this dialog box, right-click on a device from the device list, and select Properties > Notes.
The first line of the notes box displays information about when the device was added to the database. If viewing the notes on a shortcut, the date and time the device was added to the database are displayed.
You can customize the notes with any information you want to include about the device. For example, you may want to record historical information about a device, physical location information, or perhaps notes relating to the actions configured for the device.
About Device Property Menus
In the Cisco netManager console, you can use the Menu dialog to create a custom context menu for a device. After a new option has been configured, it appears on the context menu when you right-click the device in the device list.
When you select the new menu item, the associated command is launched with the arguments that were included in the device's custom menu configuration.
•
•
•
•
•
Note
Device Property Custom Links
In the Cisco netManager web interface, you can use this dialog box to create a custom link for a device.
After a custom link has been configured and added to the Device Status workspace page, it appears in the Device Custom Links report on the Device Status page for the selected device.
You can do the following from this dialog box:
•
•
•
Note
Device Property Attributes
The Attributes dialog box lists attributes that are associated with a device, such as contact person, location, serial number, etc. To get to this dialog box, right-click on a device from the device list, and select Properties > Attributes. The first attributes in the list are added by Cisco netManager when the device is added to the database, either by the Device Discovery wizard, or through another means.
You can do the following from this dialog box:
•
•
•
Adding a New Device
Note
•
•
To manually add a new device follow the procedure below. To add multiple devices using a file, see Importing Devices from a File.
Step 1
•
•
Step 2
Step 3
Step 4
Step 5
Note
Active/Performance Monitors Scan Properties
This dialog box appears when you add a single device or import devices from a file.
Select the active and performance monitors that you want Cisco netManager to scan for during discovery. After they are discovered, Cisco netManager will configure the new devices with the monitors found.
The top list displays active monitors that have been defined in the Active Monitor Library with the Use in Discovery option selected. The bottom list displays all performance monitors defined in the Performance Monitor Library. For more information about performance monitors, see Chapter 9, "Using Passive Monitors."
•
Note
During discovery, interface monitors are added after the scan, only if a device has multiple physical interfaces. If a device only has 1 interface, then no interface monitors are added, even if the interface monitor is selected to be scanned. Loopback interface doesn't count.
•
•
•
Note
•
Configuring Network Interfaces on a Device
The Network Interface dialog box displays all network interfaces currently configured for the device.
Cisco netManager monitors all interfaces listed here, displaying the worst state of the interfaces as the device status.
Step 1
Step 2
Step 3
Step 4
•
•
•
•
Step 5
Adding Attributes to a Device
Step 1
Step 2
Step 3
•
•
•
Step 4
Step 5
Adding Notes to a Device
Step 1
Step 2
Step 3
•
You can customize the notes with any information you want to include about the device. For example, you may want to record historical information about a device, physical location information, or notes relating to the actions configured for the device.
Note
Step 4
Changing a Device IP Address
Step 1
Step 2
Step 3
Changing a Device Name
Changing the name of a device changes how it appears in the list views.
Step 1
Step 2
Step 3
Importing Devices from a File
Step 1
•
•
Step 2
If you select Server, you only need to enter the filename; for example, seed.csv. The file is assumed to be present in the <CNM_Install_Dir>\importFiles directory.
If you select Local, enter the full path of where the file can be found, or browse the file system and select the file using the Browse tab.
Step 3
Note
Step 4
Step 5
Note
Sample CSV Files
Sample CSV 2.0 File
;; This file is generated by the export utility; If you edit this file, be sure you know what you are doing;Cisco Systems NM data import, source = export utility; Version = 2.0;Type = Csv;; Here are the columns of the table.; Columns 1 and 2 are required.; Columns 3 through 19 are optional.; Col# = 1: Name (including domain or simply an IP); Col# = 2: RO community string; Col# = 3: RW community string; Col# = 4: Serial Number; Col# = 5: User Field 1; Col# = 6: User Field 2; Col# = 7: User Field 3; Col# = 8: User Field 4; Col# = 9; Name = Telnet password; Col# = 10; Name = Enable password; Col# = 11; Name = Enable secret; Col# = 12; Name = Tacacs user; Col# = 13; Name = Tacacs password; Col# = 14; Name = Tacacs enable user; Col# = 15; Name = Tacacs enable password; Col# = 16; Name = Local user; Col# = 17; Name = Local password; Col# = 18; Name = Rcp user; Col# = 19; Name = Rcp password;; Here are the rows of data.;123.45.118.156,public,,FHH080600dg,,,,,,,,,,,,,,,123.45.118.150,public,,FHH0743W022,,,,,,,,,,,,,,,10.88.13.18,public,,,,,,,,10.88.13.65,public,,,,,,,,10.88.11.175,public,,,,,,10.88.11.124,public,,,,,,10.88.11.153,publicSample CSV 3.0 File
; This file is generated by DCR Export utilityCisco Systems NM Data import, Source=DCR Export; Type=DCRCSV; Version=3.0;;Start of section 0 - Basic Credentials;;HEADER: management_ip_address,host_name,domain_name,device_identity,display_name,sysObjectID,dcr_d evice_type,mdf_type,snmp_v2_ro_comm_string,snmp_v2_rw_comm_string,snmp_v3_user_id,snmp_v3_ password,snmp_v3_engine_id,snmp_v3_auth_algorithm,rxboot_mode_username,rxboot_mode_passwor d,primary_username,primary_password,primary_enable_password,http_username,http_password,ht tp_mode,http_port,https_port,cert_common_name;123.10.118.84,,,,123.10.118.84,unknown,0,999980341,public,,,,,,,,,,,administrator,cisco,ht tp,80,,10.16.83.82,10.76.93.82,,,srst-sw,unknown,0,279568149,public,private,,,,,,,,,,,,,,,10.16.81.71,10.76.91.71,,,10.16.91.71,unknown,0,268437969,public,,,,,,,,,,,,,,,,10.16.81.183,10.76.91.183,,,10.76.81.183,1.3.6.1.4.1.9.1.26,0,268437597,public,,,,,,,,,,,, ,,,,10.16.83.75,,,,ipif-skate.cisco.com,unknown,,999990341,public,,,,,none,,,Administrator,voi ce,,Administrator,voice,,,,10.16.81.30,10.76.91.30,,,10.16.81.30,unknown,0,268437960,public,,,,,,,,,,,,,,,,10.16.81.146,10.76.91.146,,,10.16.81.146,unknown,0,278546113,,,ipcom,ipcom,,MD5,,,,,,,,,,,10.16.81.72,10.76.91.72,,,10.16.81.72,unknown,0,268437990,public,,,,,,,,,,,,,,,,123.20.118.3,,,,172.20.118.3,unknown,0,268437990,public,,,,,,,,,,,,,,,,10.16.81.149,10.16.81.149,,,10.16.81.149,unknown,0,999990341,public,private,,,,none,,, Administrator,cisco,,Administrator,cisco,,,,Sample of a List of IP Addresses
10.16.83.18,10.16.83.65,10.16.81.175,10.16.81.124,10.16.81.153,10.16.81.130,10.16.81.151,10.16.81.67,10.16.81.83Rediscovering Devices
This task rediscovers all the devices in the network. You would want to perform this task if device credentials, capabilities, etc., are changed. During rediscovery, if device capabilities have changed, associated monitors and data inventory are updated. If a device is unreachable, the device status will be updated accordingly. This can be a time-consuming task that will allow you navigate the web interface, but not perform any operations.
To rediscover devices:
Step 1
Step 2
Note
Suspending and Resuming Single Device Polling
This task permanently suspends or resumes polling on a specific device.
Step 1
Step 2
Device Types
In the left-hand pane of the Cisco netManager console interface, the Device Types (icons representing the types of devices you may have on your network) appear.
Click the tab at the bottom of the pane to switch from Device Types (Basic) to Device Types (Advanced).
You can select a device type in the Device Properties General dialog box on the console or web interface. When you change a device type on an existing device, you are only changing the icon that represents the device; you are not adding additional information and settings to the device. All other changes will have to be done manually. For more information about selecting a specific device types for existing devices, see "Changing Device Types" section.
Configuring Device Types
If you want Device Discovery to use a special icon when it finds this device, make sure you have run the MIB extractor.
Step 1
Step 2
Step 3
Step 4
Step 5
Step 6
Device discovery finds and maps devices using the SNMP identifiers to locate the specified devices. To scan for devices, you must also enter the proper community name.
You can use multiple identifiers. For example, suppose a manufacturer named Acme makes three devices: the Acme 4500, the Acme 4501, and the Acme 4502. You could define one device type to represent any Acme device in the 4500 series; in the SNMP Object box, you would enter the three SNMP identifiers for the Acme 4500, 4501, and 4502. The Scan tool uses the icon for any of the three devices.
You need to separate multiple SNMP object identifiers by using semicolons. The last number in the identifier can be an asterisk, can be a range using hyphens, or can contain multiples separated by commas. For example:
1.3.6.1.4.1.311.1.1.3.1.3
1.3.6.1.4.1.311.1.1.3.1.3;1.3.6.1.4.1.311.1.1.3.1.4
1.3.6.1.4.1.311.1.1.3.1.3,4
1.3.6.1.4.1.311.1.1.3.1.1,3-4
1.3.6.1.4.1.311.1.1.3.1.*
Step 7
Step 8
Step 9
Step 10
Step 11
Step 12
Step 13
Step 14
Step 15
Changing Device Types
Device Types act like templates for new devices, containing device properties (such as active and passive monitors, menu items, etc.) and represented by different icons in Device Properties.
When you change a device type on an existing device, you are only changing the icon that represents the device, and not adding additional information and settings to the device. If you rediscover the device, the icon will change back to the original device type. All other changes will have to be done manually.
To change a device type icon on an existing device:
Step 1
Step 2
Step 3
Editing Multiple Devices with Bulk Field Change
The Bulk Field Change feature gives you the ability to make changes to multiple devices and device groups. You must have administrative privileges to the devices or device groups that you want to make changes to.
To edit multiple devices:
Step 1
Note
Step 2
•
•
•
•
•
•
•
•
•
•
•
•
•
•
•
Step 3
Step 4
Using Acknowledgements
When a device state changes, regardless of any action that has been placed on the device, Cisco netManager uses the Acknowledgement feature to make you aware that the state change occurred. The device name appears in bold in the Device List.
After the device is in Acknowledgement mode, it will remain so until you actively acknowledge it.
Note
To acknowledge a state change, select the device or devices you want to acknowledge, right-click, then click Acknowledge Events. For a list of events, see List of Events, page 14-17.
Credentials Overview
The Credentials system stores login or community string information for Windows (WMI Active Monitors and WMI Performance Monitors) and SNMP devices in the Cisco netManager database. The system supports SNMP v 1, 2, and 3.
Credentials are configured in the Credentials Library (found on the web interface menu at Go > Configure > Credentials Library) and used in several places throughout the application. They can be associated to devices in Device Properties > Credentials or through the Credentials Bulk Field Change option.
A device needs SNMP credentials applied to it before SNMP-based Active Monitors will work. Similarly, NT Service Checks must have Windows credentials applied.
.Creating Custom Context menus
You can create custom context menus for Cisco netManager in the console. When you create a custom context menu, it is available in the right-mouse menu for devices. When the menu item is selected, the associated command is executed with the arguments that were entered in the menu configuration options.
To create a custom menu:
Step 1
Step 2
Step 3
Step 4
Step 5
Step 6
.Creating Custom Context Menus
You can create custom context menus for Cisco netManager in the console. When you create a custom context menu, it is available in the right-mouse menu for devices. When the menu item is selected, the associated command is executed with the arguments that were entered in the menu configuration options.
To create a custom menu:
Step 1
Step 2
Step 3
Step 4
Step 5
Step 6
![]()
![]()
![]()
![]()
![]()
![]()
![]()
![]()
Posted: Fri Dec 21 15:01:29 PST 2007
All contents are Copyright © 1992--2007 Cisco Systems, Inc. All rights reserved.
Important Notices and Privacy Statement.