This chapter describes how to access inventory details about Cisco DSLAM chassis and each of the cards within the chassis. This chapter also describes the Chassis Summary Data window where you can view summary information about chassis, modules, PVCs, subscribers, and other managed objects. Additionally this chapter describes the Interface Summary window through which you can view data about specific interfaces.
You can view inventory information about a Cisco DSLAM and the cards in the DSLAM. You view the inventory information through the Chassis Inventory window and the Module Inventory window. The following sections describe how to open the inventory information windows:
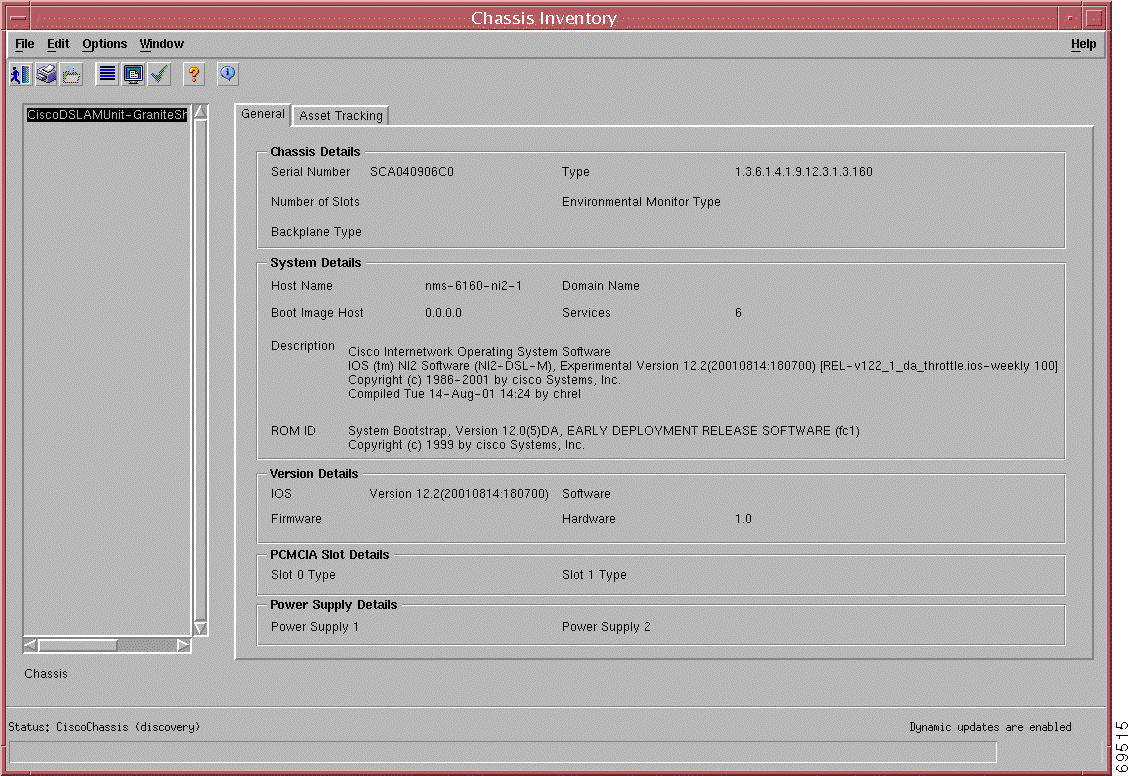
You open the Chassis Inventory window to view inventory information for a selected chassis. The Chassis Inventory window has two tabs, the General tab and the Asset Tracking tab. The General tab provides general details about the specific chassis, and the Asset Tracking tab provides various identification numbers relevant to the specific chassis.
To view the Chassis Inventory window, complete the following steps:
Step 1 From the Map Viewer window, within the Physical view, right-click the chassis whose inventory information you want to view.
Step 2 Choose Cisco DSL Manager > Chassis > Inventory from the object menu.
The Chassis Inventory window opens. (See Figure 9-1.)
Figure 9-1 Chassis Inventory Window—General Tab
Step 3 Select a chassis from the list on the left (the first chassis object is selected by default.)
Note The General and Asset Tracking tabs are display-only.
Viewing the Chassis Inventory Window—General Tab
The General tab contains the following five areas:
Chassis Details
System Details
Version Details
PCMCIA Slot Details—Area not used.
Power Supply Details—Area applicable only for Cisco 6260 power entry modules (PEMs).
The fields in this tab are described in Table 9-1.
Table 9-1 Chassis Inventory Window—General Tab Field Descriptions
Field
Description
Chassis Details
Serial Number
Displays the ID of the selected chassis.
Number of Slots
Not used.
Backplane Type
Not used.
Type
Displays the chassis type.
Environmental Monitor Type
Not used.
System Details
Host Name
Displays the host name for the selected chassis.
Boot Image Host
Displays the IP address of the host, which supplies the software currently running.
Description
Describes the IOS and Cisco EMF software type for the selected DSLAM.
ROM ID
Displays the system boot trap description and version identifier.
Domain Name
Displays the domain portion of the domain name for the host.
Services
Displays the number of services potentially offered by the selected chassis.
Version Details
IOS
Displays the version of the Cisco IOS commands in the selected chassis.
Firmware
Not used.
Software
Not used.
Hardware
Displays the version of the selected chassis.
PCMCIA Details
PCMCIA Slot Details
The PCMCIA Details area is not used.
Power Supply Details
Power Supply Details
The Power Supply Details area contains two fields—Power Supply 1 and Power Supply 2. These fields display information about the two PEMs that can be installed on a Cisco 6260 DSLAM.
Note Refer to the Cisco 6260 Power Entry Module FRU Installation and Replacement Notes for detailed information about the PEMs.
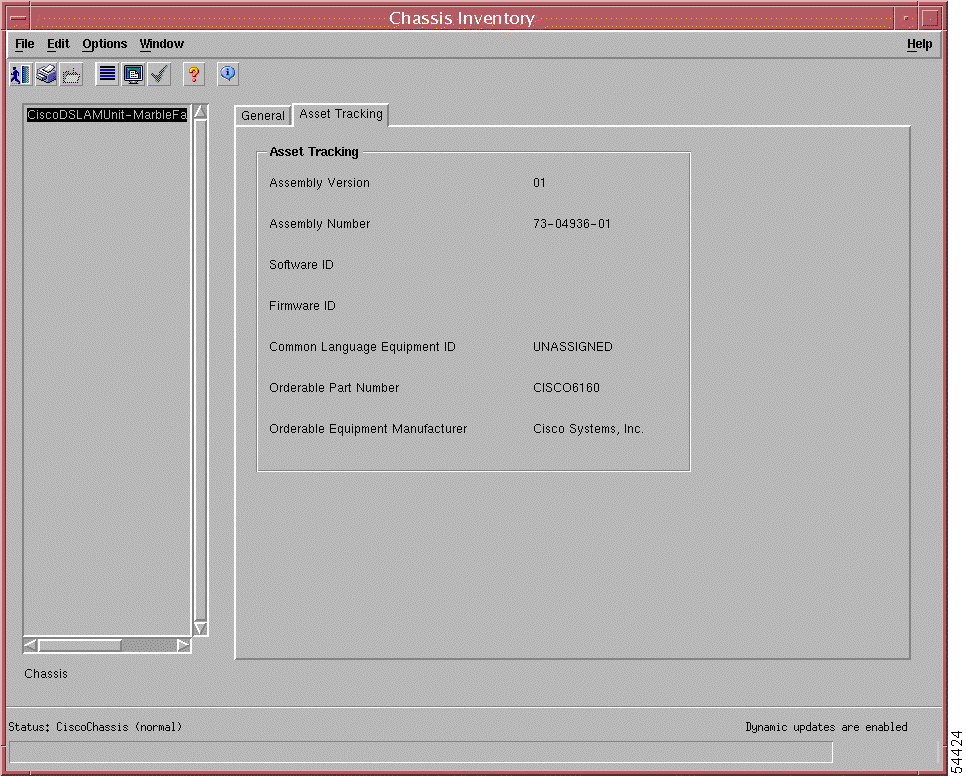
Viewing the Chassis Inventory Window—Asset Tracking Tab
The Chassis Inventory Window Asset Tracking tab displays information about the hardware. (See Figure 9-2.)
The fields in this tab are described in Table 9-2.
Table 9-2 Chassis Inventory Window—Asset Tracking Tab Field Descriptions
Field
Description
Assembly Version
Displays the number assigned by the manufacturer that uniquely identifies the component.
Assembly Number
Displays the manufacturing assembly number, which is the hardware identification.
Software ID
Not used.
Firmware ID
Not used.
Common Language Equipment ID
Not used.
Orderable Part Number
Represents the number used to reorder this component (part number).
Original Equipment Manufacturer
Displays the original equipment manufacturer of the chassis.
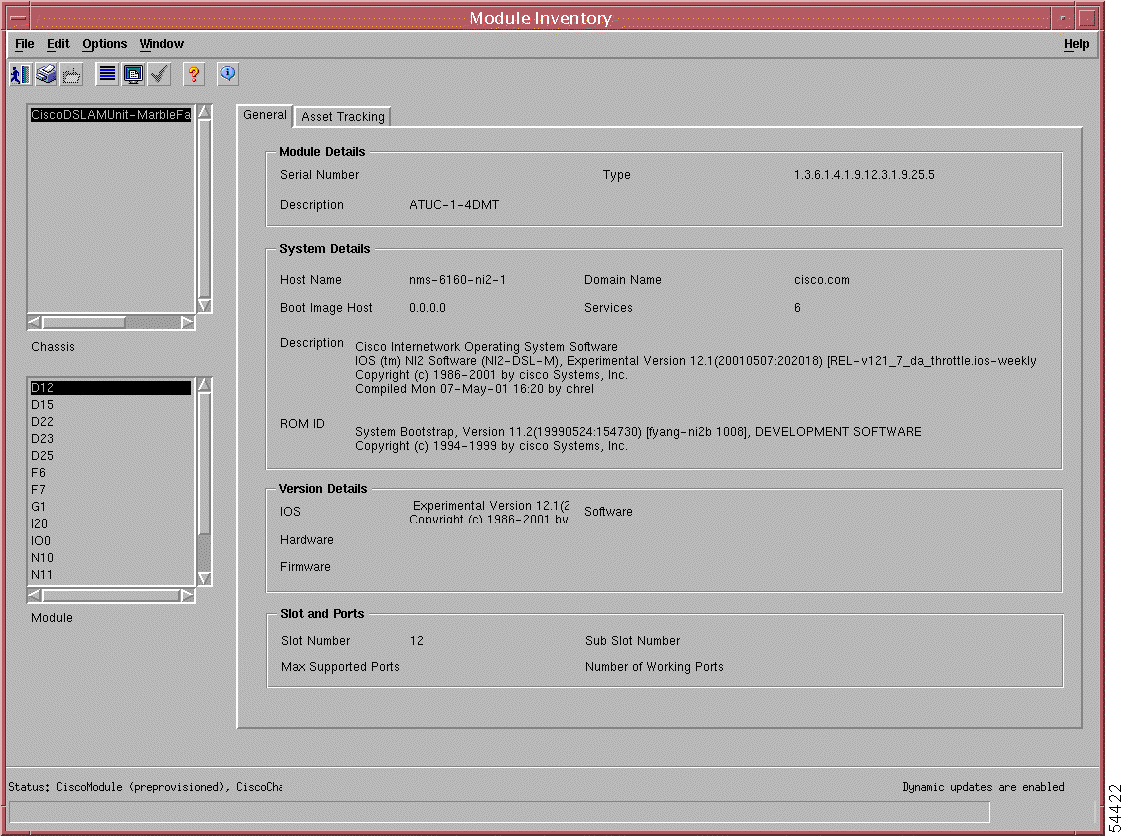
Viewing the Module Inventory Window
The Module Inventory window has two tabs, General and Asset Tracking. The General tab provides general details about the specific card, and the Asset Tracking tab provides various identification numbers relevant to the specific card.
To view the Module Inventory window, complete the following steps:
Step 1 From the Map Viewer window, within the Physical view, right-click a card such as a line card or NI-2 card) whose inventory information you want to view.
Step 2 Choose Cisco DSL Manager > Module > Inventory from the object menu.
The Module Inventory window opens. (See Figure 9-3.)
Figure 9-3 Module Inventory Window—General Tab
The chassis and card that you selected is highlighted in the list boxes on the left side of the window. The status information for the selected card displays on the right.
Note The General and Asset Tracking tabs are display only.
Viewing the Module Inventory Window—General Tab
The General tab contains four areas:
Module Details
System Details
Version Details
Slot and Ports
The fields in this tab are described in Table 9-3.
Table 9-3 Module Inventory Window—General Tab Field Descriptions
Field
Description
Module Details
Serial Number
Displays the serial number for the selected card.
Description
Displays a description of the selected card.
Type
Displays the type of the selected card.
System Details
Host Name
Displays the host name for the selected card.
Boot Image Host
Displays the IP address of the host, which is the source of the software that is currently running.
Description
Describes the IOS and Cisco EMF software for the selected module.
ROM ID
Displays the system boot trap description and version identifier.
Domain Name
Displays the domain portion of the domain name for the host.
Services
Displays the number of services available for the selected card.
Version Details
IOS
Displays the version of the Cisco IOS commands in the selected card.
Hardware
Not used.
Firmware
Not used.
Software
Displays the software version installed in the card. No information appears if data is not available.
Slot and Ports
Slot Number
Displays the current slot number location of the selected card within the chassis.
Max. Supported Ports
Not used.
Sub Slot Number
Displays the sub slot number of the selected card (not used).
Number of Working Ports
Displays the number of currently operational ports on the selected card (not used).
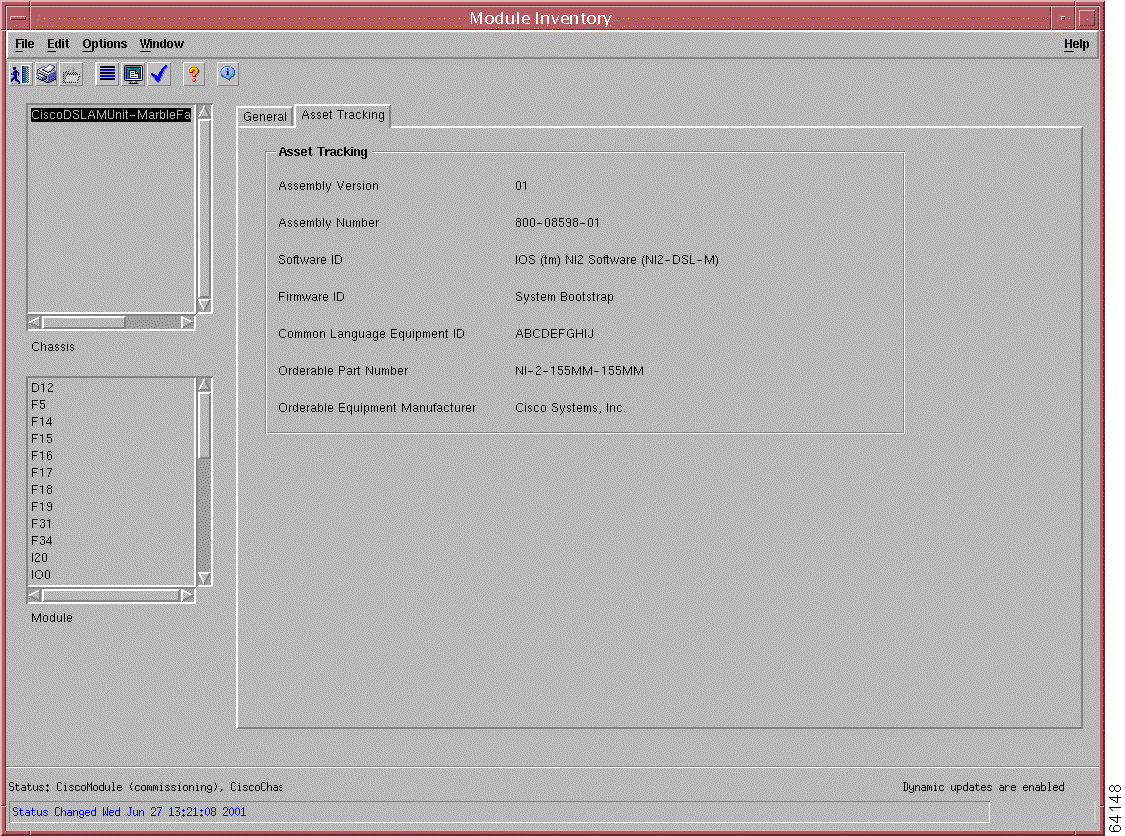
Viewing the Module Inventory Window—Asset Tracking Tab
The Asset Tracking tab contains one area, Asset Tracking. (See Figure 9-4.)
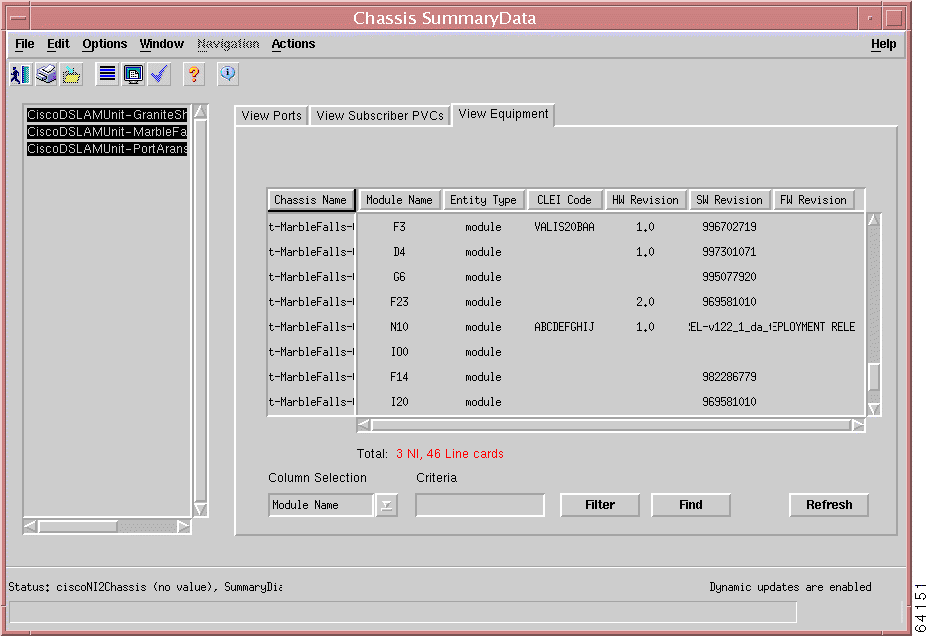
You can view specific data about a chassis, modules, PVCs, subscribers, and so forth in the Chassis Summary Data window. The Chassis Summary Data window is shown in Figure 9-5. You can navigate to the Chassis Summary window from a site, a shelf, or a chassis, but not from a module or an interface.
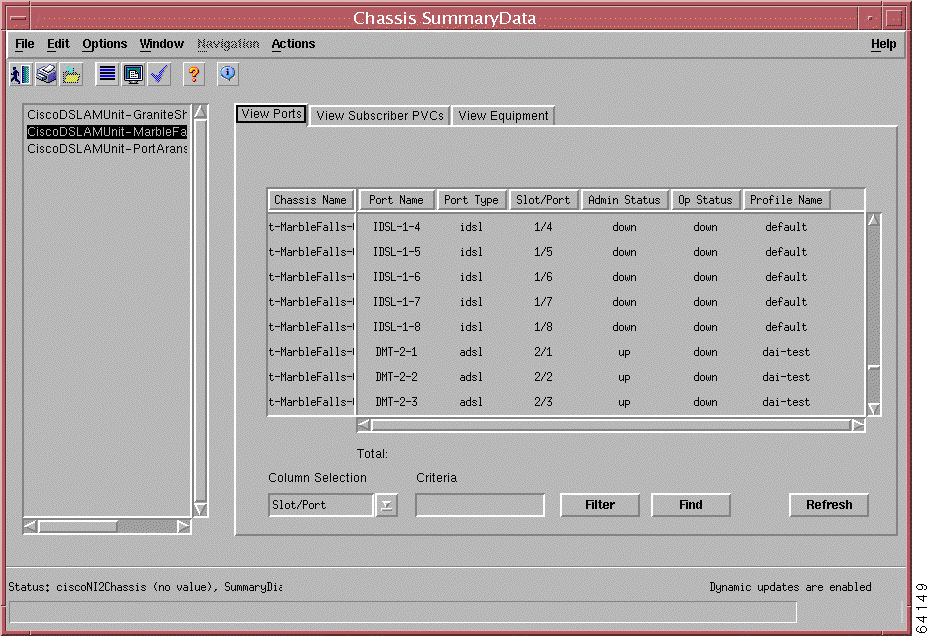
Figure 9-5 Chassis Summary Data Window—View Ports Tab
You can open the Chassis Summary Data window in three ways:
From the site level—To view all the DSLAMs in a site
From the shelf level—To view the summary data about one specific DSLAM and any subtended DSLAMs from within the Subtend hierarchy view
From the chassis level—To view the summary data about one specific DSLAM
You use the same basic steps to filter and find information in each of the tabs. These steps are described in the sections that follow.
The Chassis Summary Data window has three tabs—View Ports, View Subscriber PVCs, and View Equipment—which are described in the following sections. By specifying your search criteria, you can use the Filter and Find buttons to display different types of information about specific objects. The information for the chassis that you select displays in the table in the selected tab.
Using the Filter Operation
To filter summary data about an object, complete the following steps:
Step 1 In the Column Selection field, use the down arrow to select the object type and column name that you want to filter.
Step 2 In the Criteria field, enter the alphanumeric character on which you want to filter, for example enter DMT to filter for DMT line cards.
You can enter one or more characters in the Criteria field. For example, if you are looking for the words composition, compound, or compost, you can enter either c, co, com, or comp; all three words would remain visible in the display area. Only words such as concrete or contact would display if you enter only c or co.
Note The filter is case sensitive.
Step 3 Click Filter.
The Chassis Summary Data window displays only the objects that match your selection in the Column Selection field based on the criteria that you entered in the Criteria field. Data displays in alphanumeric and ascending order.
Using the Find Operation
You can search more specifically by using the Find button, as follows:
Step 1 In the Column Selection field, use the down arrow to select the object type and column name that you want to find.
Step 2 In the Criteria field, enter the alphanumeric character for which you want to search; for example, you might enter a hardware revision number to search all chassis that have that hardware revision.
The Criteria field operates in the same way for both the Filter and the Find operations.
Step 3 Click Find.
The Chassis Summary Data window highlights the first record that matches that criteria in the designated column at the top of the table.
Step 4 Continue to click Find to display subsequent records that match the specified criteria.
Once the display reaches the bottom of the list, it starts over.
Using the Sort Operation
You can sort the data by pressing any of the column headings. In most of the columns, sorting is in ascending alphanumeric order. The Chassis column sorts the data in the original order that the server sent the data to the client.
Viewing Data in the Chassis Summary Data Window—View Ports Tab
Complete the following steps to open the Chassis Summary Data window and view data about specific ports:
Step 1 From the left side of the Map Viewer window, right-click the site, shelf, or chassis object for which you want to view summary data.
Step 2 Choose Cisco DSL Manager > Chassis > Chassis Summary from the object menu.
The Chassis Summary Data window opens to the View Ports tab. (See Figure 9-6.)
Figure 9-6 Chassis Summary Data Window—View Ports Tab
If you opened the Chassis Summary window from a site, all of the DSLAMs for that site display in the list box on the left side of the window.
The View Ports tab contains data under the following column names:
Chassis Name—Displays summary data about selected DSLAM
Port Name—Displays summary data about selected port
Port Type—Displays summary data about selected interface
Slot/Port—Displays summary data about selected port or slot
Admin Status—Displays summary data about the administrative status of the selected object
Op Status—Displays summary data about the operational status of the selected object
Profile Name—Displays summary data about the selected type of xDSL profile
When you click Refresh, CDM retrieves information about the selected DSLAM or DSLAMS from the server and displays that information in the window. CDM caches the data locally so that you can filter and find information quickly. The original display of the data is sorted by chassis ID in the Chassis Name column.
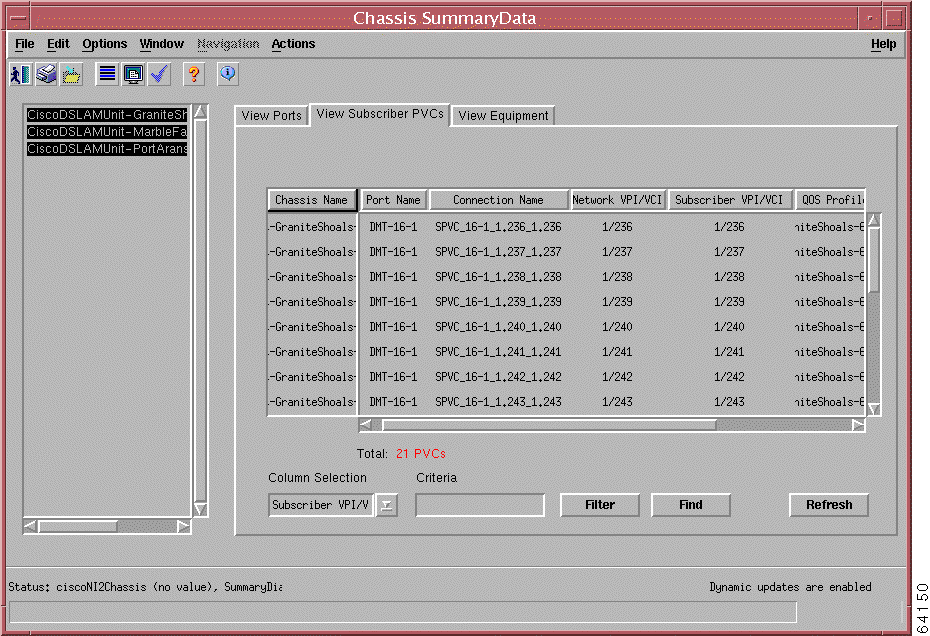
Viewing Data in the Chassis Summary Data Window—View Subscriber PVCs Tab
Complete the following steps to view data in the View Subscriber PVCs tab:
Step 1 From the left side of the Map Viewer window, right-click the site, shelf, or chassis object for which you want to view summary data.
Step 2 Choose Cisco DSL Manager > Chassis > Chassis Summary from the object menu.
The Chassis Summary Data window opens.
Step 3 Click the View Subscriber PVCs tab. (See Figure 9-7.)
Figure 9-7 View Subscriber PVCs Tab
The View Subscribers PVCS tab contains data that is represented by the following column names:
Chassis Name—Displays summary data about selected DSLAM
Subscriber ID—Displays summary data about the subscriber ID of the selected object
Port Name—Displays all ports
Connection Name—Displays the PVC name
Network VPI/VCI—Displays summary data about the network side virtual path identifier or virtual channel identifier
Subscriber VPI/VCI—Displays summary data about the subscriber side virtual path identifier or virtual channel identifier
QoS Profile—Displays summary data about the quality of service profile for the selected object
DLCI—Displays summary data about the data link connection identifier for the selected object
NSAP Address—Displays summary data about the network service access point for the selected object
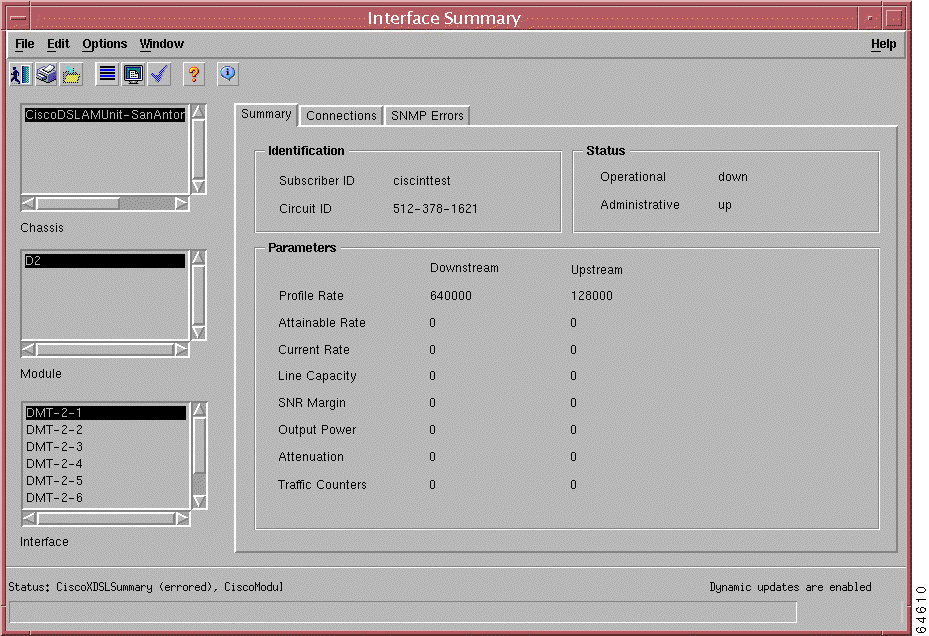
The Interface Summary window opens. (See Figure 9-9.)
Figure 9-9 Interface Summary Window—Summary Tab
The Interface Summary window contains three tabs—Summary, Connections, and SNMP Errors. The fields in these tabs are described in the following sections.
Viewing the Interface Summary Window—Summary Tab
The Interface Summary Window Summary tab contains three areas:
Identification
Status
Parameters
The fields in the Interface Summary window Summary tab are described in Table 9-5.
Table 9-5 Interface Summary Window—Summary Tab Field Descriptions
Field
Description
Identification
Subscriber ID
Displays the subscriber ID associated with the interface.
Circuit ID
Displays the circuit ID associated with the interface.
Status
Operational
Displays the operational status of the interface.
Administrative
Displays the administrative status of the interface.
Parameters
Profile Rate
Not used.
Attainable Rate
Displays the downstream and upstream parameters of the attainable rate for that interface.
Current Rate
Displays the downstream and upstream parameters of the current rate for that interface.
Line Capacity
Displays the downstream and upstream parameters of the line capacity for that interface.
SNR Margin
Displays the downstream and upstream parameters of the signal-to-noise ratio margin for that interface.
Output Power
Displays the downstream and upstream parameters of the output power for that interface.
Attenuation
Displays the downstream and upstream parameters of the attenuation values for that interface.
Traffic Counters
Displays a count of the receive cells on the ATM interface profile rate, based on the maximum rate that is specified in the xDSL profile.
Viewing the Interface Summary Window—Connections Tab
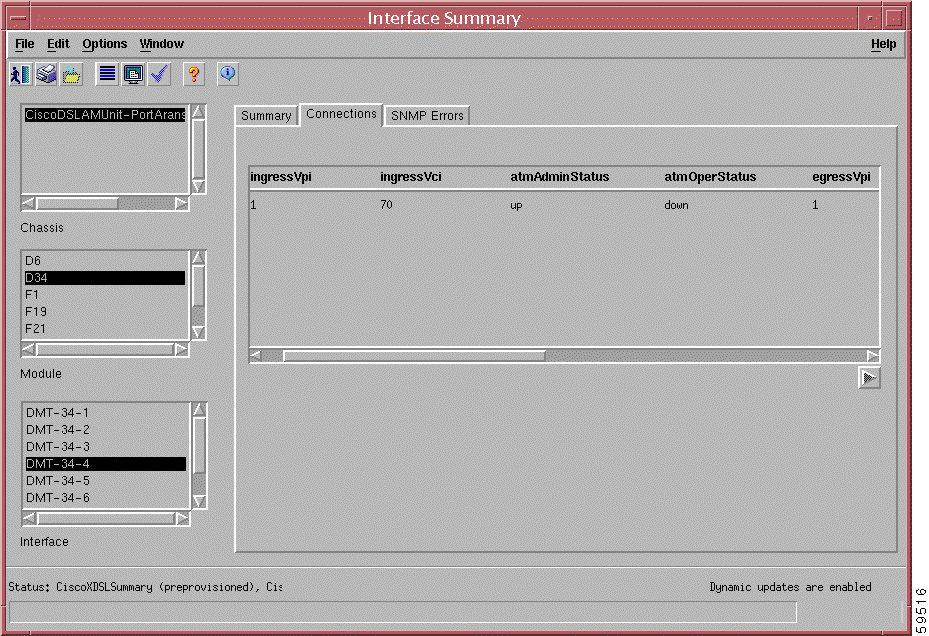
The Interface Summary window Connections tab displays connections information about an interface. (See Figure 9-10.)
Use the scroll bar to scroll to each of the columns in the Connections tab. The columns in the Interface Summary window Connections tab are described in Table 9-6.
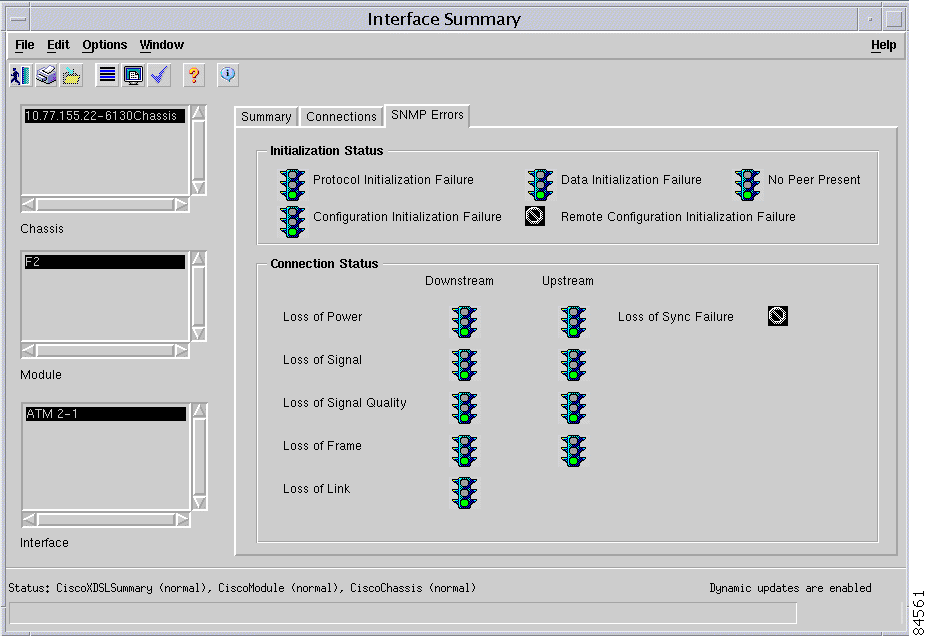
The SNMP Errors tab displays traffic signal icons to indicate status. Red indicates errors; green indicates normal; yellow indicates a warning status. Table 9-7 describes the fields in the Interface Summary window SNMP Errors tab. A circle with a slash through it indicates that the field is not significant for the current conditions.
Table 9-7 Interface Summary Window—SNMP Errors Tab Field Descriptions
Field
Description
Initialization Status
Protocol Initialization Failure
Displays red light for protocol initialization failure; displays green light if no protocol initialization failure.
Configuration Initialization Failure
Displays red light for configuration initialization failure; displays green light if no configuration initialization failure.
Data Initialization Failure
Displays red light for data initialization failure; displays green light if no data initialization failure.
Remote Configuration Initialization Failure
Displays red light for remote configuration initialization failure; displays green light if no remote configuration initialization failure.
No Peer Present Failure
Displays red light if no peer present; displays green light if peer is present.
Connection Status
Loss of Power
Displays red light for loss of power for downstream and upstream connections; displays green light if no loss of power.
Loss of Signal
Displays red light for loss of signal for downstream and upstream connections; displays green light if no loss of signal.
Loss of Signal Quality
Displays red light for loss of signal quality for downstream and upstream connections; displays green light if no loss of signal quality.
Loss of Frame
Displays red light for loss of frame for downstream and upstream connections; displays green light if no loss of frame.
Loss of Link
Displays red light for loss of link for downstream and upstream connections; displays green light if no loss of link.
Loss of Sync Failure
Displays red light for Loss of Sync Failure ; displays green light if there is no Loss of Sync Failure.