Note SONET information is equivalent to OC-3 interface information.
Viewing Chassis Fault Management Status
You can view chassis availability details in the Chassis Fault Management window. Complete the following steps to open the Chassis Fault Management window:
Step 1 From the left side of the Map Viewer window, within the Physical view, right-click a chassis whose fault management status you want to view.
Step 2 Choose Cisco DSL Manager > Chassis > Fault Management from the object menu.
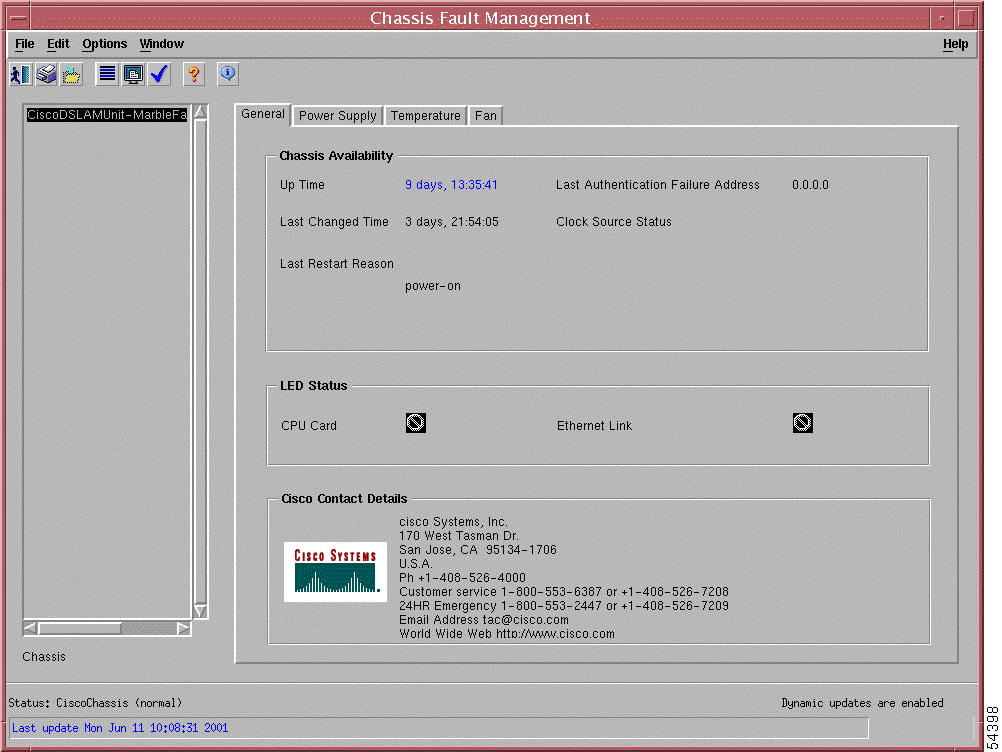
The Chassis Fault Management window opens. (See Figure 7-1.)
The chassis that you selected is highlighted in the list box on the left side of the Chassis Fault Management window.
The Chassis Fault Management window has four tabs:
General
Power Supply
Temperature
Fan
Note Only the General tab applies to CDM for Cisco DSLAMs for this release; the other three tabs are
not used.
The General tab contains three areas—Chassis Availability, LED Status (which is not applicable for this release of CDM), and Cisco Contact Details. The fields in the General tab are described in Table 7-1.
Table 7-1 Chassis Fault Management Window—General Tab Field Descriptions
Field
Description
Chassis Availability
Up Time
Displays the up time since the last reset
Last Changed Time
Displays the time when the chassis was last modified.
Last Restart Reason
Displays the reason for the last restart.
Last Authentication Failure Address
Displays the last authorization failure IP address for the selected chassis.
Clock Source Status
Not used.
LED Status
CPU Card
Not used.
Ethernet Line
Not used.
Cisco Contact Details
Displays contact information for Cisco.
Viewing Generic Interface Status
The generic Interface Status window displays status information for any selected interface. To view interface status information, follow these steps:
Step 1 From the left side of the Map Viewer window, within the Physical view, right-click the line card whose interface status you want to view.
Step 2 Choose Cisco DSL Manager > Interface > Status > XDSL > Generic from the object menu.
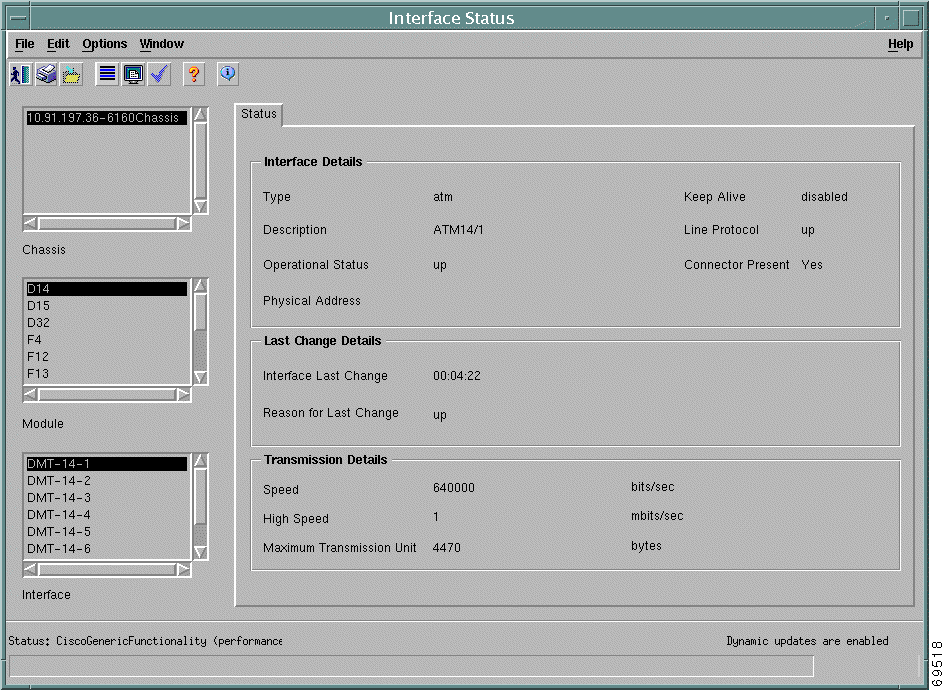
The Interface Status window opens. (See Figure 7-2.)
Figure 7-2 Interface Status Window
The chassis, card, and interface that you selected is highlighted in the list boxes on the left side of the Interface Status window.
The corresponding details for the selected card display on the right. The Status tab contains three areas:
Interface Details
Last Change Details
Transmission Details
The fields in these three areas are described in Table 7-2.
Table 7-2 Interface Detail Area Field Descriptions
Field
Description
Interface Details
Type
Displays the interface type.
Description
Displays a text string description of the interface.
Operational Status
Displays the current operational status of the interface.
Physical Address
Not used.
Keep Alive
Indicates whether keepalives are enabled on this interface.
Line Protocol
Indicates whether the line interface protocol is operating.
Connector Present
Specifies whether the interface has a physical connector. True indicates that a physical connector is present; False indicates that a physical connector is not present.
Last Change Details
Interface Last Change
Displays the value of the system up time at the time the interface entered its current operational state.
Reason for Last Change
Specifies the reason for the last status change of the interface.
Transmission Details
Speed
Displays an estimate of the current bandwidth for the interface in bits per second.
High Speed
Displays an estimate of the current bandwidth for the interface in units of 1,000,000 bits per second.
Maximum Transmission Unit
Identifies the size of the largest packet that can be sent or received on the interface, specified in bytes.
Viewing T1/E1 Interface Status
The T1/E1 Interface Status window displays status information for a selected T1 or E1 interface. To view the T1/E1 Interface Status window, complete the following steps:
Step 1 From the left side of the Map Viewer window, within the Physical view, right-click the NI-2 line card whose T1 or E1 status you want to view.
Step 2 Choose Cisco DSL Manager > Interface > Status > T1/E1 from the object menu.
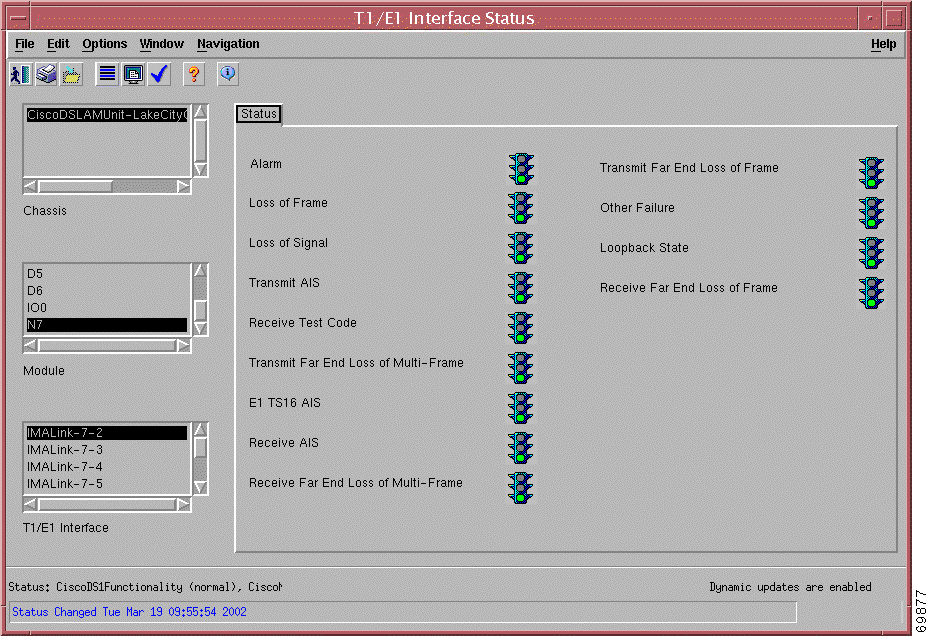
The T1/E1 Interface Status window opens. The T1/E1 Interface Status window has one tab, the Status tab. (See Figure 7-3.)
Figure 7-3 T1/E1 Interface Status Window
The chassis, card, and T1/E1 interface that you selected is highlighted in the list boxes on the left side of the window. If not, click the appropriate interface from the list box on the left to highlight it.
The status information for the selected T1 or E1 interface displays on the right.
Note Black boxes with slashed circles indicate that CDM was unable to retrieve any values for that
field. Red indicates an error; green indicates that the status is OK.
The Status tab displays T1/E1 interface status information. The fields in this window are described in Table 7-3.
Table 7-3 T1/E1 Interface Status Window Field Descriptions
Field
Description
Alarm
Indicates the presence or absence of defects in the line.
Loss of Frame
Indicates the presence or absence of frame loss in the line.
Loss of Signal
Indicates the presence or absence of signal loss in the line.
Transmit AIS
Indicates whether an alarm signal is being transmitted.
Receive Test Code
Indicates whether the line is receiving a test pattern.
Transmit Far End Loss of Multi-Frame
Indicates whether loss of multi-frame is being transmitted by the far end.
E1 TS16 AIS
Indicates the presence or absence of E1 or TS16 alarm signal.
Receive AIS
Indicates whether a remote alarm signal is being transmitted.
Receive Far End Loss of Multi-Frame
Indicates the presence or absence of loss of multi-frame in the far end line.
Transmit Far End Loss of Frame
Indicates the presence or absence of loss of multi-frame by the near end line.
Other Failure
Indicates the presence or absence of some other failure in the line.
Loopback State
Indicates whether a received signal is looped back.
Receive Far End Loss of Frame
Indicates the presence or absence of a loss of frame in the far end line.
Viewing DS3/E3 Interface Status
The DS3/E3 Interface Status window displays status information for a selected DS3 or E3 interface. To view the DS3/E3 Interface Status window, complete the following steps:
Step 1 From the left side of the Map Viewer window, within the Physical view, right-click the NI-2 line card whose DS3 or E3 status you want to view.
Step 2 Choose Cisco DSL Manager > Interface > Status > DS3/E3 from the object menu.
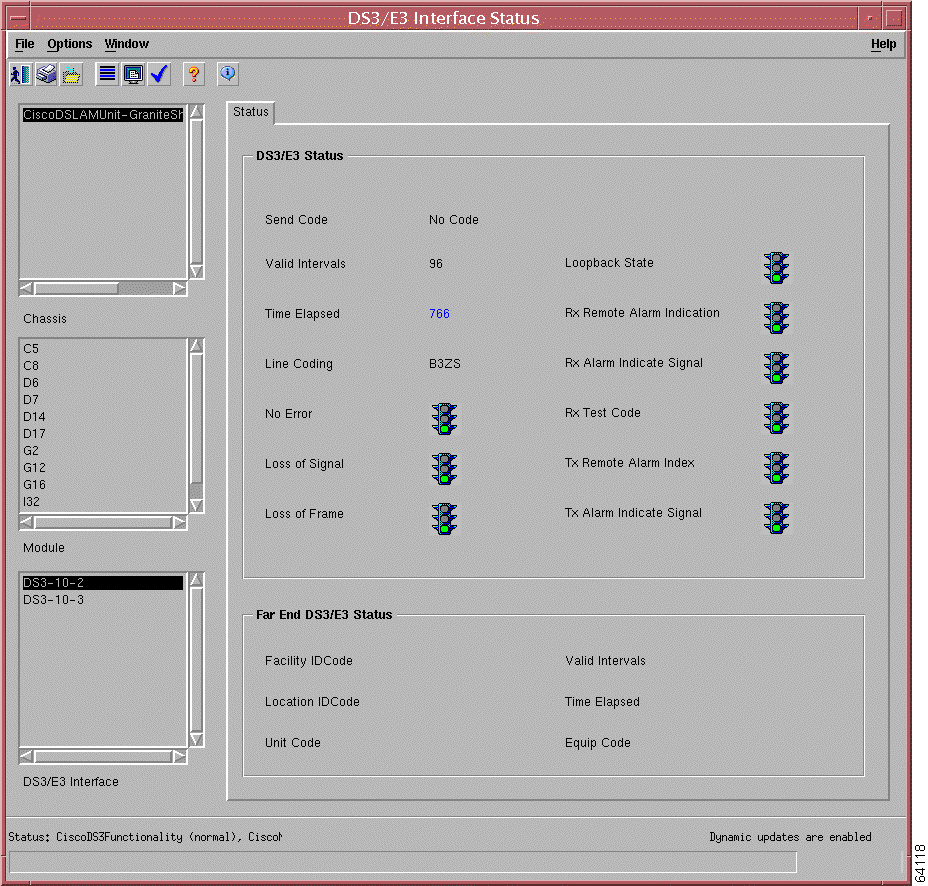
The DS/E3 Interface Status window opens. The DS3/E3 Interface Status window has one tab, the Status tab. (See Figure 7-4.)
Figure 7-4 DS3/E3 Interface Status Window
The chassis, card, and DS/E3 interface that you selected is highlighted in the list boxes on the left side of the window. If not, click the appropriate DS3 interface from the list box on the left to highlight it.
The status information for the selected DS3 or E3 interface displays on the right.
Note Black boxes with slashed circles indicate that CDM was unable to retrieve any values for that
field. Traffic lights display green if the status is OK; yellow if the status is Warning; and red if
the status is Errored.
The Status tab displays DS3/E3 interface status information. The Status tab contains two areas—DS3/E3 Status and Far End DS3/E3 Status. The fields in this window are described in Table 7-4.
Table 7-4 DS3/E3 Interface Status Window Field Descriptions
Field
Description
DS3/E3Status
Send Code
Indicates the type of code that the device is sending the DS3/E31 interface. Send codes are optional for E3 interfaces. Possible values are as follows:
No Code—Sending looped or normal data
Line Code—Sending a request for a line loopback
Payload Code—Sending a request for a payload loopback (for example, all DS1/E1s in a DS3/E3 frame)
Reset Code—Sending a loopback deactivation request
DS1 Loop Code—Requesting to loop back a particular DS1/E1 within a DS3/E3 frame
Test Pattern—Sending a test pattern
Valid Intervals
Displays the number of previous intervals for which valid data is stored.
Time Elapsed
Displays the time elapsed (in seconds) since the beginning of the current error-measurement period.
Transmit Clock Source—Allows you to specify the source of the transmit clock.
Loop Timing—Indicates that the recovered receive clock is used as the transmit clock. You can set this option to:
Free Running—Indicates that a local clock source is used.
Network Derived—Indicates that the recovered receive clock from another interface is used as the transmit clock source.
Line Coding
Displays the type of line coding used in the interface.
No Error
Indicates no alarm is present.
Loss of Signal
Indicates the loss of signal condition.
Loss of Frame
Indicates the loss of frame condition.
Loopback State
Indicates that the interface is looping the received signal.
Rx Remote Alarm Indication
Receiving a remote alarm indication failure signal.
Rx Alarm Indicate Signal
Receiving a remote alarm indication signal.
Rx Test Code
Indicates reception of a test pattern.
Tx Remote Alarm Index
Transmitting a remote alarm index signal.
Tx Alarm Indicate Signal
Transmitting an alarm indication signal.
Far End DS3/E3 Status
Facility ID Code
Displays the code that identifies a specific far-end DS3 path.
Location ID Code
Displays the far-end location identification code that describes the specific location of the equipment.
Unit Code
Displays the far-end code that identifies the equipment location within a bay.
Valid Intervals
Specifies the number of previous far-end intervals for which valid data was collected.
Time Elapsed
Specifies how much time has elapsed after the current far-end measurement began.
Equip Code
Displays the far-end equipment code that describes the specific piece of equipment.
1 E3 = wide area digital transmission scheme that is used predominantly in Europe and carries data at a rate of 34.368 Mbps.
Viewing ATM Interface Status
The ATM Interface Status window displays status information for a selected ATM interface. To open the ATM Interface Status window, complete the following steps:
Step 1 From the left side of the Map Viewer window, within the Physical view, right-click either an NI-2 card or a line card whose ATM status you want to view.
Step 2 Choose Cisco DSL Manager > Interface > Status > ATM from the object menu.
The ATM Interface Status window opens. The ATM Interface Status window has one tab, the Status tab. (See Figure 7-5.)
Figure 7-5 ATM Interface Status Window
The chassis and interface that you selected is highlighted in the list boxes on the left side of the window. If not, click the appropriate interface from the list box on the left to highlight it. The relevant ATM interface status displays in the Status tab on the right. The Status tab contains five areas:
ATM Transmit Status
ATM Receive Status
Physical Layer Status
ATM Port Status
Action
The fields in this window are described in Table 7-5.
Note The interfaces listed in the ATM Interface list box are DMT, ATM, and ADSL interfaces.
Table 7-5 ATM Interface Status—Status Tab Field Descriptions
Field
Description
ATM Transmit Status
Available Cell Rate
Indicates the available cell rate, specified in cells per second, for traffic that is sent out through the interface for this service category. This value is the bandwidth available for connections. For guaranteed service categories, this value decreases as a result of connection setup and increases as a result of connection release. For nonguaranteed service categories, this value does not change as a result of connection setup and connection release.
Allocated Cell Rate
Indicates the allocated cell rate, specified in cells per second, for traffic that is sent out the interface for this service category. This value is the bandwidth that is allocated to connections. For guaranteed service categories, this value increases as a result of connection setup and decreases as a result of connection release. For nonguaranteed service categories, this value is always 0.
LED Status
Indicates the transmit LED color for the selected port.
Maximum Cell Transfer Delay
Indicates the maximum cell transfer delay estimated to be experienced by cells of connections transmitted out this interface or this service category.
Peak To Peak Cell Delay Variation
Indicates the estimated peak to peak cell delay variation for cells of this service category that are transmitted out of this interface.
Cell Loss Ratio
Indicates the estimated cell loss ratio for cells of this service category that are transmitted out of this interface.
ATM Receive Status
Available Cell Rate
Indicates the available cell rate, specified in cells per second, for traffic that is received by the interface for this service category. This value is the bandwidth that is available for connections. For guaranteed service categories, this value decreases as a result of connection setup and increases as a result of connection release. For nonguaranteed service categories, this value does not change as a result of connection setup and connection release.
Allocated Cell Rate
Indicates the allocated cell rate, specified in cells per second, for traffic that is received by the interface for this service category. This value is the bandwidth allocated to connections. For guaranteed service categories, this value increases as a result of connection setup and decreases as a result of connection release. For nonguaranteed service categories, this value is always 0.
LED Status
Indicates the receive LED color for the selected port.
Physical Layer Status
Physical Interface Status
Not used.
Clock Source Status
Not used.
Physical Port Type
Indicates the physical layer medium on the port. The type is one of the following port types:
other
cpu
Ethernet
OC-3 Utp
OC-3 single-mode fiber
OC-3 multimode fiber
OC-12 single-mode fiber
DS3
E3
ATM Port Status
Number of VPCs
Displays the number of VPCs (PVCs and SVCs) that are configured for use at this ATM interface. At the ATM UNI, the configured number of VPCs (PVCs and SVCs) can range from 0 to 256 only.
Number of VCCs
Displays the number of VCCs (PVCs and SVCs) that are configured for the ATM interface.
Number of PVCs
Displays the number of PVCs at this interface.
Number of PVPs
Displays the number of permanent virtual paths at this interface.
Number of PCs
Displays the number of permanent connections (virtual channels or virtual paths) of this service category that are currently allocated to the interface.
Number of SCs
Displays the number of signalled connections (virtual channels or virtual paths) of this service category that are currently allocated to the interface.
Total Connections
Displays the number of existing connections at this interface.
Admin Address
Not used.
ATM Address Type
Displays the type of primary ATM address that is configured for use at the ATM interface.
Configured VP Interface
Displays the number of configured VP interfaces at this physical interface.
SVC Minimum VCI
Displays the minimum value in the range of values from which VCIs are assigned to new SVCs. As this value increases, the number of VCIs that are available for PVCs increases. This value applies to each VPI of the physical interface and each logical port.
Active SVPs
Displays the number of active, switched virtual paths at this interface.
Active SVCs
Displays the number of active, switched virtual connections at this interface.
Click to instruct CDM to identify the connections that are currently configured for the selected interface. An action log opens that lists all connections that CDM found on the selected interface.
Note You must have passwords set for this function to work.
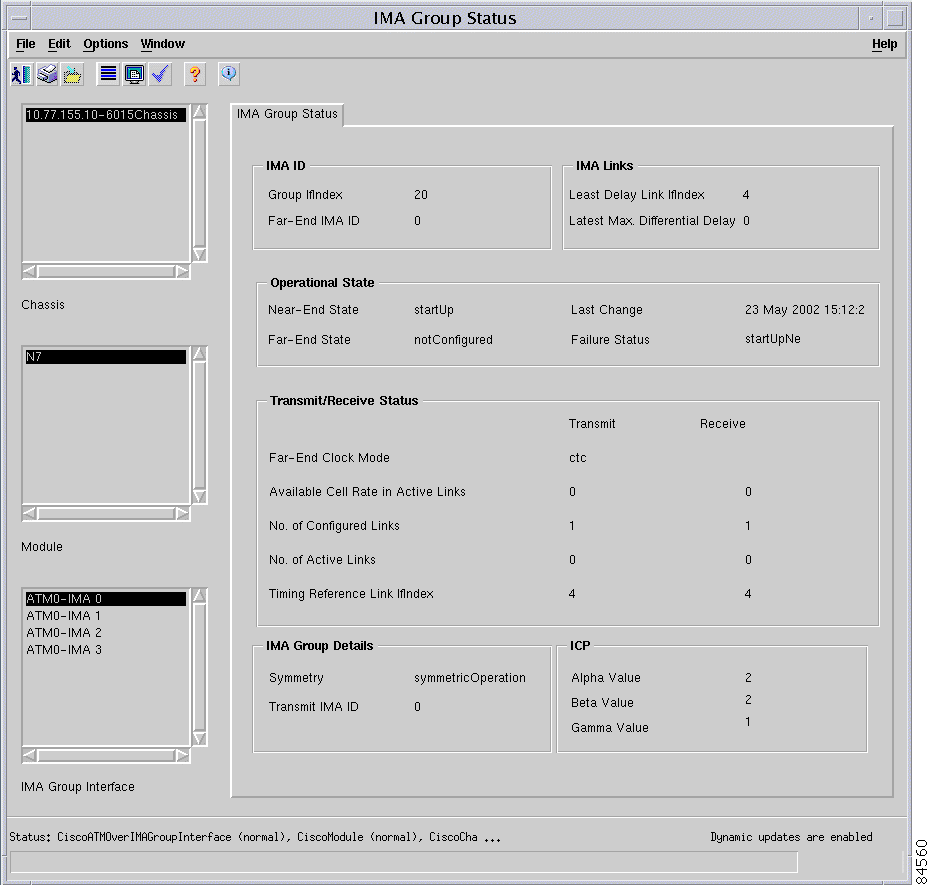
Viewing IMA Group and Link Status on Cisco 6015, 6160, and 6260 DSLAMs
The IMA Group Status window displays the status data for IMA groups. The IMA Link Status window displays status information about the IMA links. These windows are described in the following sections:
Complete the following steps to open the IMA Group Status window and view status about the IMA group settings:
Step 1 From the left side of the Map Viewer window, from within the Component Managed or the IMA hierarchy view, right-click the NI card or IMA group whose status you want CDM to display.
Step 2 Choose Cisco DSL Manager > Interface > Status > IMA Group from the object menu.
The IMA Group Status window opens. (See Figure 7-6.)
Figure 7-6 IMA Group Status Window
This window contains the following areas:
IMA ID
IMA Links
Operational State
Transmit/Receive Status
IMA Group Details
ICP
Step 3 From the Module list box on the left, click the NI card whose IMA group status you want to view if that NI card is not already highlighted.
The fields in the IMA Group Status window are described in Table 7-6.
Table 7-6 IMA Group Status Window Field Descriptions
Field
Description
IMA ID
Group Ifindex
Displays the interface index for the IMA group.
Far-End IMA ID
Specifies the far-end IMA group ID.
IMA Links
Least Delay Link Ifindex
Specifies the interface index of the link that is configured in the IMA group and has the smallest link propagation delay. The distinguished value of zero may be used if no link has been configured in the IMA group, or if the link with the smallest link propagation delay has not yet been determined.
Latest Max Differential Delay
Displays the latest maximum differential delay (in milliseconds) that the network observes between the links that have the least and most link propagation delay, among the receive links that are currently configured in the IMA group.
Operational State
Near-End State
Displays the current state of the near-end transmit link.
Far-End State
Displays the current state of the far-end transmit link.
Last Change
Not used.
Failure Status
Displays the local failure status of a link belonging to an IMA group.
Transmit/Receive Status
Far-End Clock Mode
Displays the transmit clocking mode—Transmit or Receive—that the far-end IMA group is using.
Available Cell Rate in Active Links
Displays in two columns—Transmit or Receive—the current cell rate (truncated value in cells per second) that this IMA group provides in the transmit or receive direction, considering all the transmit links in the Active state.
No. of Configured Links
Displays in two columns—Transmit or Receive—the number of links that are configured to transmit or receive in this IMA group.
No. of Active Links
Displays in two columns—Transmit or Receive—the number of links that are configured to transmit or receive and are currently Active in this IMA group.
Timing Reference Link Ifindex
Displays in two columns—Transmit or Receive—the following values:
The interface index of the transmit timing reference link to be used by the near end for IMA data cell clock recovery from the ATM layer. The distinguished value of zero may be used if no link has been configured in the IMA group, or if the transmit timing reference link has not yet been selected.
The interface index of the receive timing reference link to be used by the near end for IMA data cell clock recovery toward the ATM layer. The distinguished value of zero may be used if no link has been configured in the IMA group, or if the receive timing reference link has not yet been detected.
IMA Group Details
Symmetry
Displays the symmetry mode adjusted during the group start-up.
symmetricOperation (1)
asymmetricOperation (2)
asymmetricConfiguration (3).
Transmit IMA ID
Specifies the IMA ID currently in use by the near-end IMA function. Valid ranges are (0..255)
ICP
Alpha Value
This indicates the 'alpha' value used to specify the number of consecutive invalid ICP cells to be detected before moving to the IMA HUNT state from the IMA SYNC state. Valid values are (1..2)
Beta Value
This indicates the 'beta' value used to specify the number of consecutive errored ICP cells to be detected before moving to the IMA HUNT state from the IMA SYNC state. Valid values are (1..5)
Gamma Value
This indicates the 'gamma' value used to specify the number of consecutive errored ICP cells to be detected before moving to the IMA HUNT state from the IMA SYNC state. Valid values are (1..5)
Viewing the IMA Link Status Window
Complete the following steps to open the IMA Link Status window and view status about the IMA group settings:
Step 1 From the left side of the Map Viewer window, from within the IMA hierarchy or the Component Managed view, right-click the NI card or IMA link whose status you want CDM to display.
Step 2 Choose Cisco DSL Manager > Interface > Status> IMA Link from the object menu.
The IMA Group Link Status window opens. (See Figure 7-7.)
Figure 7-7 IMA Link Status Window
This window contains the following areas:
IMA Group
IMA Link—Transmit and Receive
Step 3 From the Module list box on the left, click the NI card whose IMA link status you want to view if that NI card is not already highlighted.
The fields in the IMA Link Status window are described in Table 7-7.
Table 7-7 IMA Link Status Window Field Descriptions
Field
Description
IMA Group
IMA Group Index
Specifies a unique value for the IMA group index.
IMA Link—Transmit
Transmit Link ID
Specifies a unique ID for the transmit link.
Near-End State
Displays the current operational state of the near-end IMA group state machine.
Far-End State
Displays the current operational state of the far-end IMA group state machine.
IMA Link—Receive
Receive Link ID
Specifies a unique ID for the receive link.
Near-End State
Displays the current operational state of the near-end IMA group state machine.
Far-End State
Displays the current operational state of the far-end IMA group state machine.
Near-End Failure Status
Displays the current link failure status of the near-end receive link.
Far-End Failure Status
Displays the current link failure status of the far-end receive link as reported via ICP cells.
The ADSL Interface Status window displays status information for a selected ADSL line card. To open the ASDL Interface Status window, complete the following steps:
Step 1 From the left side of the Map Viewer window, within the Physical view, right-click the ADSL line card whose interface status you want to view.
Step 2 Choose Cisco DSL Manager > Interface > Status > XDSL > ADSL from the object menu.
The ADSL Interface Status window opens. (See Figure 7-8.) The ADSL Interface Status Window has two tabs—Line and Channel.
Figure 7-8 ADSL Interface Status Window—Line Tab
Step 3 From the list boxes on the left, select the relevant chassis, card, and DMT interface.
The status information for the selected DMT line card displays on the right.
Viewing the ADSL Interface Status Window—Line Tab
The ADSL Interface Status window Line tab displays line status information for the selected line card. The Line tab contains one area—Downstream/Upstream Parameters. The fields in this tab are described in Table 7-8.
Table 7-8 ADSL Interface Status window—Line Tab Field Descriptions
Attribute
Description
SNR Margin
Displays the noise margin as seen by the ATU-C1 (downstream) and ATU-R2 (upstream) with respect to its received signal in tenth-dB.
Attenuation
Displays the measured difference in the total power that is being transmitted by the peer ATU and the total power received by this ATU-C (downstream) and ATU-R (upstream) in tenth-dB.
Output Power
Displays the measured total output power that is being transmitted by the ATU-C (downstream) and ATU-R (upstream) in tenth dB.
Attainable Rate
Displays the maximum rate that is currently attainable by the ATU (downstream) and ATU-R (upstream) in bps.
Loss of Signal Quality
Indicates ATU-C (downstream) and ATU-R (upstream) failure due to loss of signal quality. Loss of signal quality is declared when the noise margin falls below the minimum noise margin, or the bit-error-rate exceeds 10-7.
Loss of Frame
Indicates ATU-C (downstream) and ATU-R (upstream) failure due to not receiving a valid frame.
Loss of Link
Indicates ATU-C failure due to inability to link with the ATU-R.
Loss of Power
Indicates ATU-C (downstream) and ATU-R (upstream) failure due to a loss of power.
Loss of Signal
Indicates ATU-C (downstream) and ATU-R (upstream) failure due to a loss of signal.
Protocol Initialization Failure
Indicates ATU-C failure during initialization due to incompatible protocol used by the peer ATU.
Configuration Initialization Failure
Indicates ATU-C failure during initialization due to the peer ATU not being able to support requested configuration.
Data Initialization Failure
Indicates ATU-C failure during initialization due to bit errors that are corrupting the startup exchange data.
No Peer ATU Present
Indicates ATU-C failure during initialization due to no activation sequence detected from peer ATU.
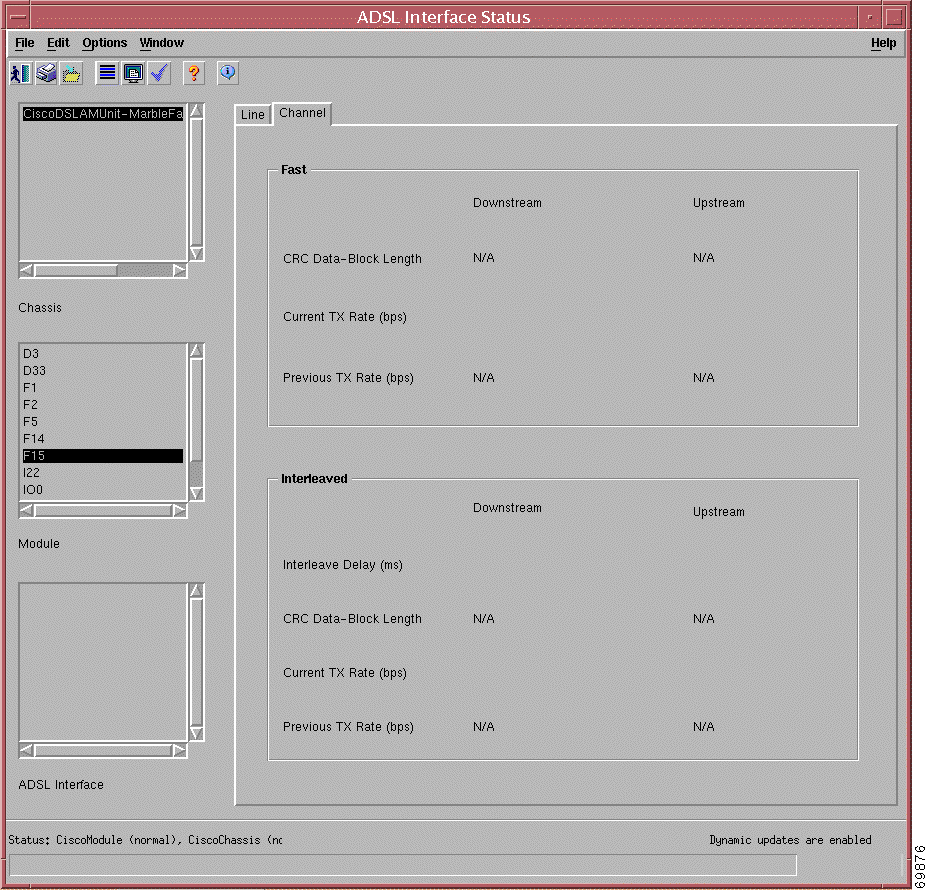
Viewing the ADSL Interface Status Window—Channel Tab
The ADSL Interface Status window Channel tab displays fast and interleaved channel status information for the selected DMT line card. The Channel tab opens includes two areas, Fast and Interleaved. (See Figure 7-9.)
Figure 7-9 ADSL Interface Status Window—Channel Tab
The fields on the ADSL Interface Status window Channel tab are described in Table 7-9.
Table 7-9 ADSL Interface Status Window—Channel Tab Field Descriptions
The DMT Interface Status window displays status information for a selected DMT line card. To open the DMT Interface Status window, complete the following steps:
Step 1 From the left side of the Map Viewer window, within the Physical view, right-click the DMT line card whose interface status you want to view.
Step 2 Choose Cisco DSL Manager > Interface > Status > XDSL > DMT from the object menu.
The DMT Interface Status window opens. (See Figure 7-10.) The DMT Interface Status Window has two tabs—Line tab and Channel tab.
Figure 7-10 DMT Interface Status Window—Line Tab
Step 3 From the list boxes on the left, select the relevant chassis, card, and DMT interface.
The status information for the selected DMT line card displays on the right.
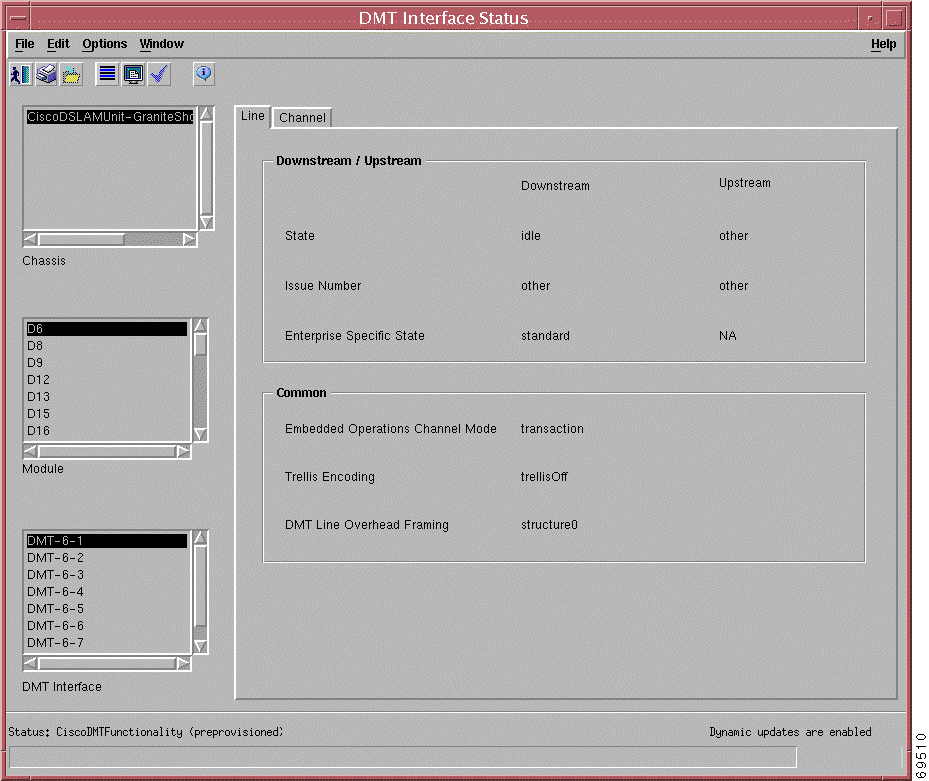
Viewing the DMT Interface Status Window—Line Tab
The DMT Interface Status window Line tab displays line status information for the selected DMT line card. The Line tab contains two areas—Downstream/Upstream and Common. The fields in this tab are described in Table 7-10.
Table 7-10 DMT Interface Status window—Line Tab Field Descriptions
Attribute
Description
Downstream/Upstream
State
Indicates the current state of the DMT transceiver. The current state changes dynamically. The possible values displayed for downstream status are as follows:
Other—Unknown or other state
PowerUp—DMT transceiver not yet configured
Configure—DMT transceiver being configured
Idle—Awaiting activation request from upstream
Tone—Requesting upstream to be silent
Activating—Activation in progress
Training—Transceiver training in progress
Analyzing—Channel analysis in progress
Exchange—Exchanging final operating parameters
SteadyState—Normal operating mode
NotResponding—DMT transceiver not responding
The possible state values displayed for upstream status are as follows:
Other—Unknown or other state
Activating—Activation in progress
Training—Transceiver training in progress
Analyzing—Channel analysis in progress
Exchange—Exchanging final operating parameters
Steady State—Normal operating mode
Issue Number
Reports the issue number of the standard. The standard is determined by whether the downstream DMT ADSL transceiver is currently operating. The issue number is determined by the hardware and is transmitted by the downstream device in C-MSGS1 during initialization. The upstream device transmits the issue number in an R-MSGS1 message during initialization. The possible issue numbers include:
Other—unknown or other
t1413Issue1—ANSI T1.413 Issue 1
t1413Issue2—ANSI T1.413 Issue 2
t1413Issue3—ANSI T1.413 Issue 3
gdmtIssue1—ITU G.dmt Issue 1
etsiIssue1—ETSI DMT Issue 1
Enterprise Specific State
Specifies the enterprise-specific status of the downstream device, either other or standard. If this field displays other and the downstream device is unrecognized, this status is unknown. If this fields displays other and the downstream device is recognized, this status specifies the enterprise-specific state of the downstream device.
Common
Embedded Operations Channel Mode
Reports whether the embedded operations channel can support autonomous data streaming mode or only transaction mode. After initialization, unknown is reported until sufficient autonomous eoc messages transmit to determine the true capability of both ATUs. The possible values displayed and the corresponding meaning are as follows:
Unknown—Embedded operations mode is unknown
Transaction—Embedded operations channel only operates in original transaction mode
Streaming—Embedded operations channel supports autonomous data streaming mode and original transaction mode
Trellis Encoding
Reports whether the DMT line is using trellis coding. Use of trellis coding is determined at line initialization with C-MSGS1 and R-MSGS1 exchanges and does not change until the line is reinitialized. The possible values displayed are as follows:
trellisOn
trellisOff
DMT Line Overhead Framing
Represents the negotiated overhead framing structure being used downstream and upstream from the following possible settings:
0 = Full Asynchronous. Full-overhead framing with asynchronous bit-to-modem timing (enabled synchronization control mechanism).
1 = Full Synchronous. Full-overhead framing that uses synchronous bit-to-modem timing, a disabled synchronization control mechanism.
2 = Reduced Separate Fast. Reduced-overhead framing that has separate fast and sync bytes. Bytes exist in fast and interleaved latency buffer respectively (64 kbps framing overhead).
3 = Reduced Merged Fast. Reduced overhead framing with merged fast and dsync byte, using either the fast or interleaved latency buffer (32 kbps framing overhead). This is the recommended setting.
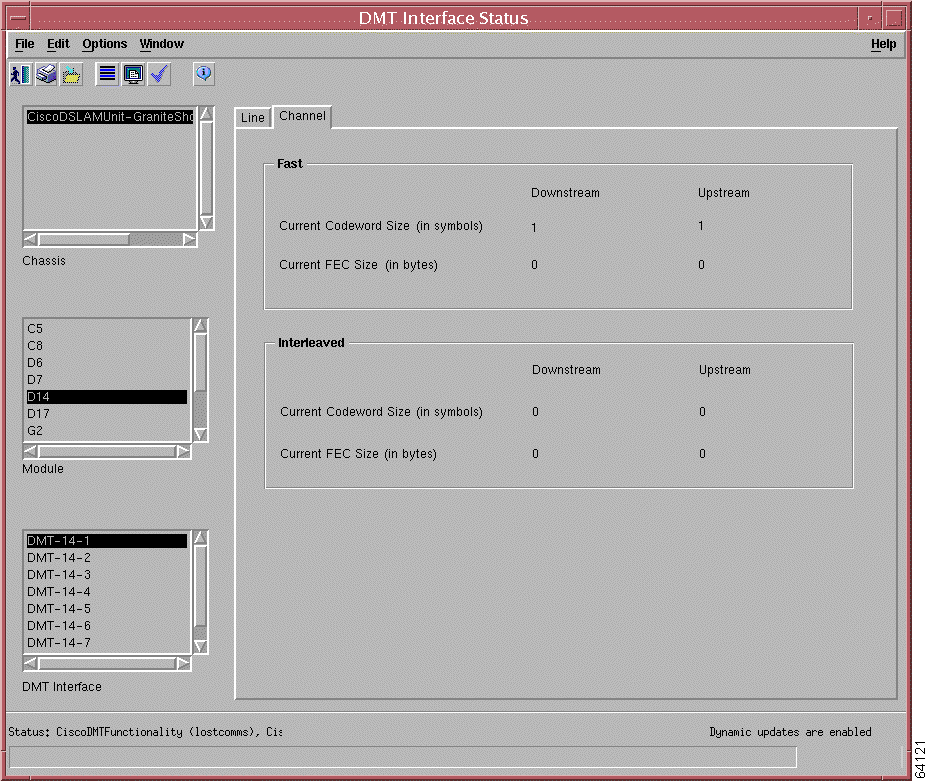
Viewing the DMT Interface Status Window—Channel Tab
The DMT Interface Status window Channel tab displays fast and interleaved channel status information for the selected DMT line card. The Channel tab opens includes two areas, Fast and Interleaved. (See Figure 7-11.)
Figure 7-11 DMT Interface Status Window—Channel Tab
The Fast and Interleaved areas have the same information, but for different types of channels. Both areas display the attributes that are described in Table 7-11.
Table 7-11 DMT Interface Status Window Fast and Interleaved Areas
Field
Description
Fast
Current Codeword Size
Displays the number of symbols per codeword that the downstream device is using for downstream or upstream messages on an fast channel during the training sequence. The downstream device or the upstream device can fall back from this value based on the aggregate data rate achieved during training.
Current FEC Size
Displays the number of FEC1 redundancy bytes per codeword. The codeword size affects FEC operation.
Interleaved
Current Codeword Size
Displays the number of symbols per codeword that the downstream device is using for downstream or upstream messages on an interleaved channel during the training sequence. The downstream or the upstream device can fall back from this value based on the aggregate data rate achieved during training.
Current FEC Size
Displays the number of FEC2 redundancy bytes per codeword. The codeword size and interleave depth affect FEC operation.
After you deploy a Synchronous Optical Network (SONET) interface, you can access status information for that interface in the SONET Interface Status window. (See the "Deploying Objects" section for deployment instructions.)
Note SONET and OC-3 interfaces are the same component.
Note The SONET Interface Status window Virtual Tributary tab is not used.
Complete the following steps to view SONET interface status:
Step 1 From the left side of the Map Viewer window, within the Physical view, right-click the NI-2 card whose SONET status you want to view.
Step 2 Choose Cisco DSL Manager > Interface > Status > SONET from the object menu.
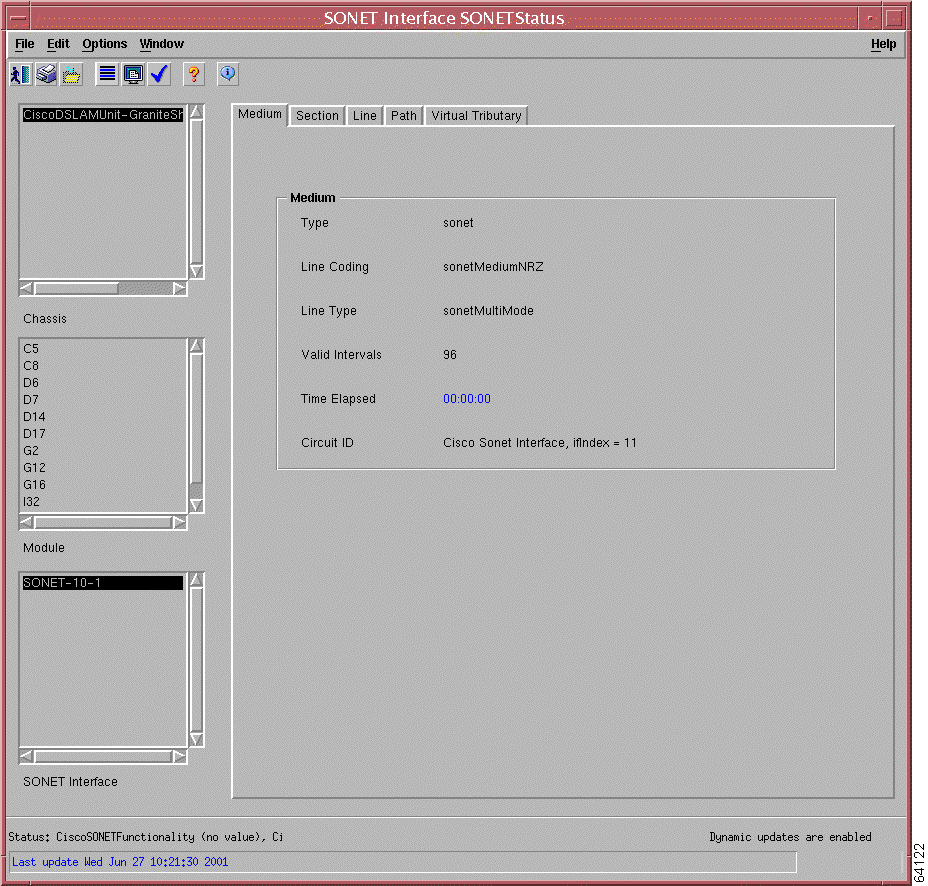
The SONET Interface Status window opens. (See Figure 7-12.)
Figure 7-12 SONET Interface Status Window—Medium Tab
Step 3 From the Module list box on the left, click the NI card whose SONET interface status you want to see.
The window opens to the Medium tab, and the chassis, card, and SONET interface (OC-3 interface) that you selected are highlighted in the list boxes on the left side of the window. The status information for the selected SONET interface displays on the right.
The SONET Interface Status window contains the following tabs:
Medium
Section
Line
Path
Virtual Tributary—not used
These tabs are described in the following sections.
Viewing the SONET Interface Status Window—Medium Tab
The Medium tab provides information about the physical medium. The Medium tab contains one area, Medium. The fields in this tab are described in Table 7-12.
Table 7-12 SONET Interface Status Window—Medium Tab Field Descriptions
Field
Description
Type
Displays SONET to indicate that SONET is operating over the interface.
Line Coding
Displays the type of line coding that the interface is using.
Line Type
Displays the line type of the interface.
Valid Intervals
Displays the number of previous intervals for which valid data has been stored.
Time Elapsed
Displays the time elapsed (in seconds) since the beginning of the current error-measurement period.
Circuit ID
Displays the vendor circuit identifier.
Viewing the SONET Interface Status Window—Section Tab
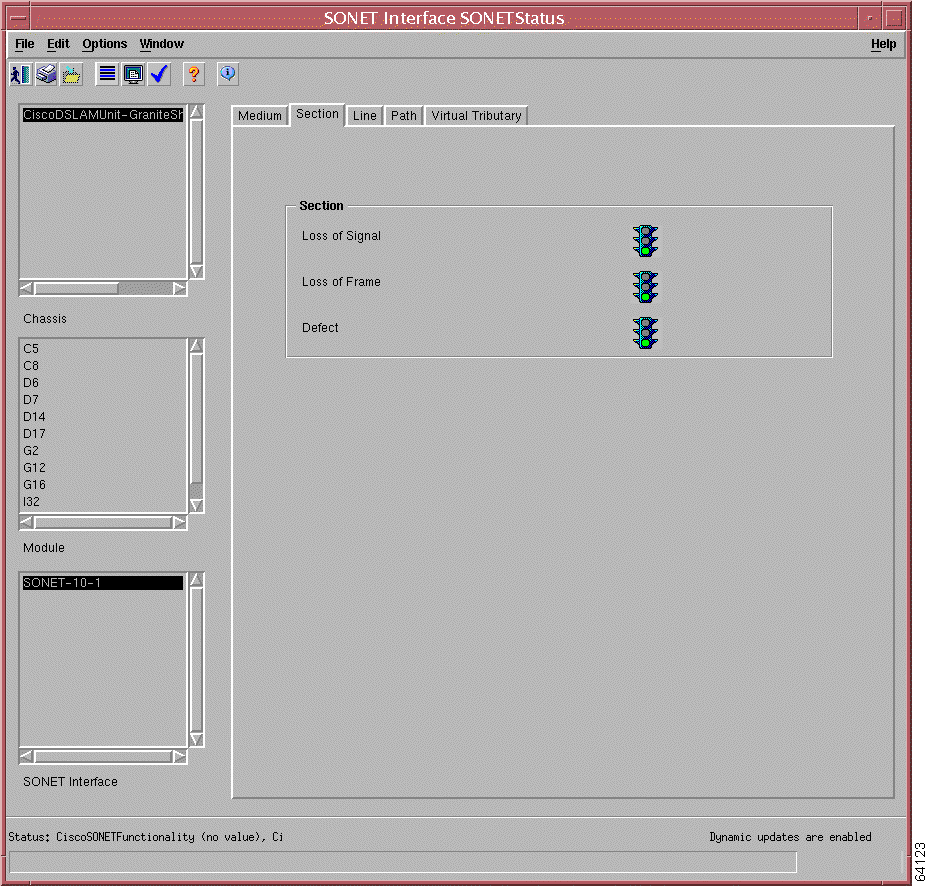
The SONET Interface Status window Section tab opens, which details errors that the software encounters during framing, scrambling, error monitoring, and section maintenance. The Section tab has one area, Section. (See Figure 7-13.)
Figure 7-13 SONET Interface Status Window—Section Tab
The Section area displays the fields that are described in Table 7-13.
Table 7-13 SONET Interface Status Window—Section Tab Field Descriptions
Field
Description
Loss of Frame
Displays green light to indicate no loss of framing failures since agent reset.
Loss of Signal
Displays green light to indicate no loss of signal failures since agent reset.
Defect or No Defect
Transition from red to green (failure to no alarm state) when no defects (for example, LOF) are received for more than 10 seconds.
Viewing the SONET Interface Status Window—Line Tab
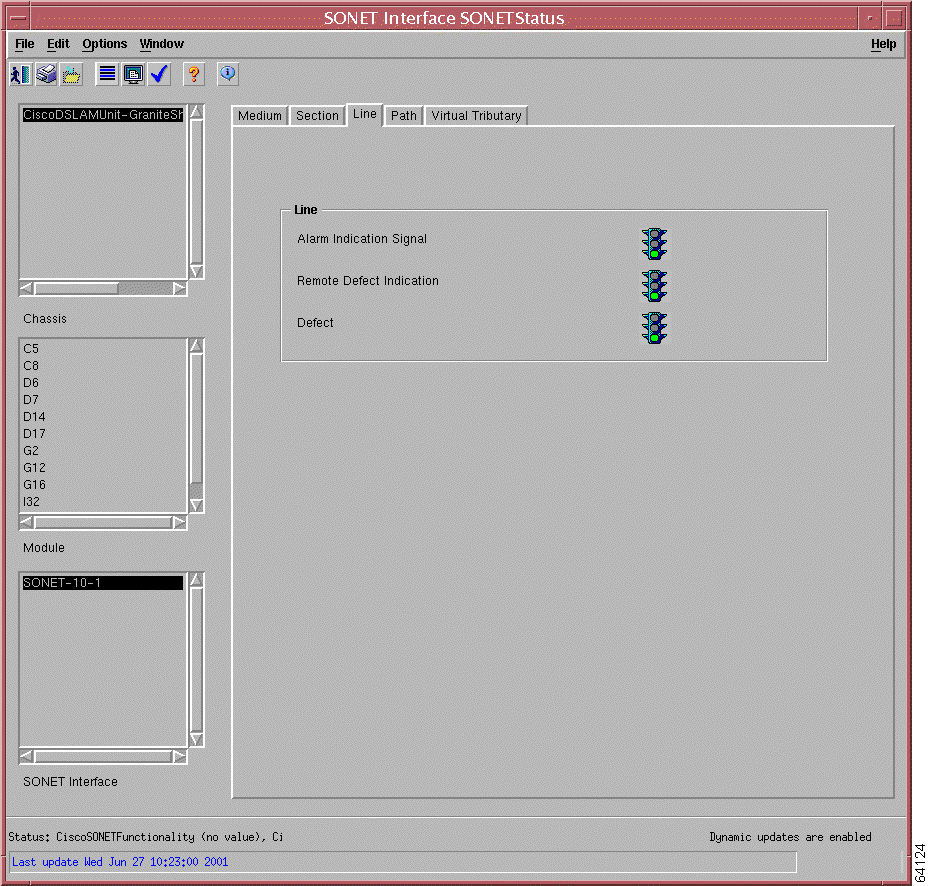
The SONET Interface Status window Line tab opens, which details errors encountered during multiplexing or synchronization. The Line tab has one area, Line. (See Figure 7-14.)
Figure 7-14 SONET Interface Status Window—Line Tab
The Line tab displays the fields that are described in Table 7-14.
Table 7-14 SONET Interface Window—Line Tab Field Descriptions
Field
Description
Alarm Indication Signal Errors
A green light indicates that no line signal errors are detected.
Remote Defect Indication Errors
A green light indicates that no remote defect errors have been detected.
Defect or No Defect
Transition from red to green (failure to no alarm state) when no defects (for example, LOF) are received for more than 10 seconds.
Viewing the SONET Interface Status Window—Path Tab
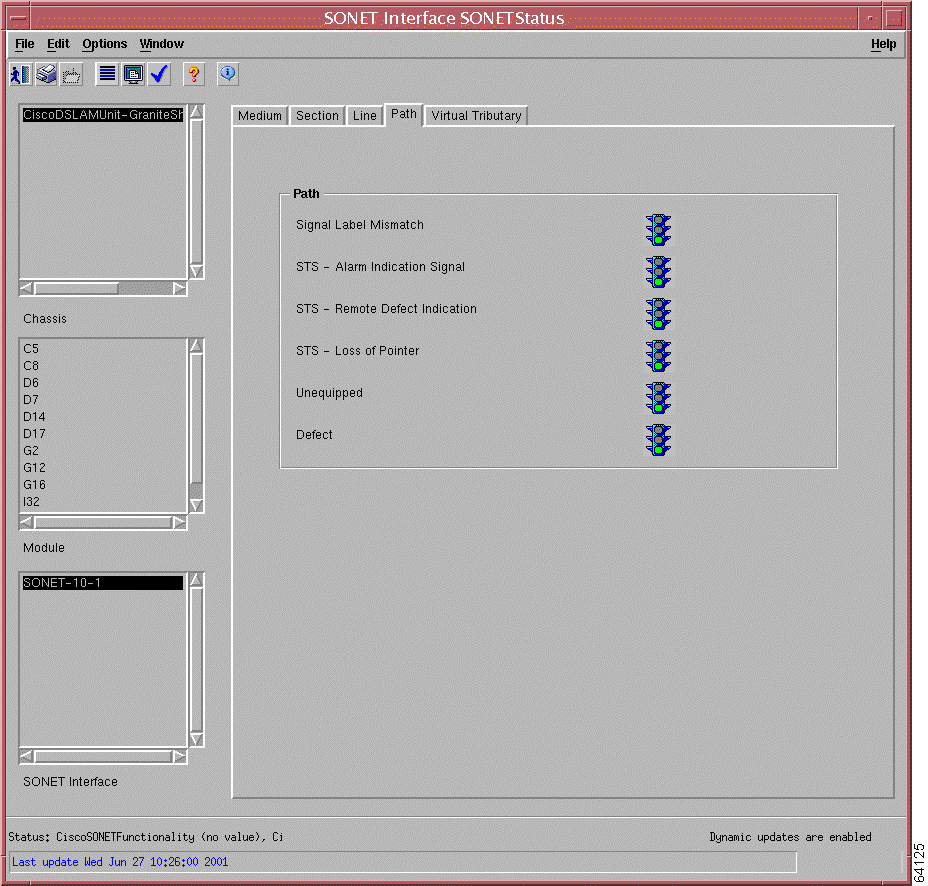
The SONET Interface Status window Path tab opens, which displays errors encountered while mapping signals into the format required by the Line layer. The Path tab has one area, Path. (See Figure 7-15.)
Figure 7-15 SONET Interface Status Window—Path Tab
The fields in this tab are described in Table 7-15.
Table 7-15 SONET Interface Status Window—Path Tab Field Descriptions
Field
Description
Signal Label Mismatch
Displays a red light to indicate incorrect payload type signal label mismatch on a SONET line.
STS—Alarm Indication Signal
Displays a red light to indicate that the path alarm indication signal errors are disabled.
STS—Remote Defect Indication
Displays a red light to indicate that the path remote defect indication errors are disabled.
STS—Loss of Pointer
Displays a red light to indicate that the path loss of pointer errors are disabled.
Unequipped
Displays a red light to indicate STS payload unequipped—No path-originating equipment.
Defect or No Defect
Transition from red to green (failure to no alarm state) when no defects (for example, LOF) are received for more than 10 seconds.
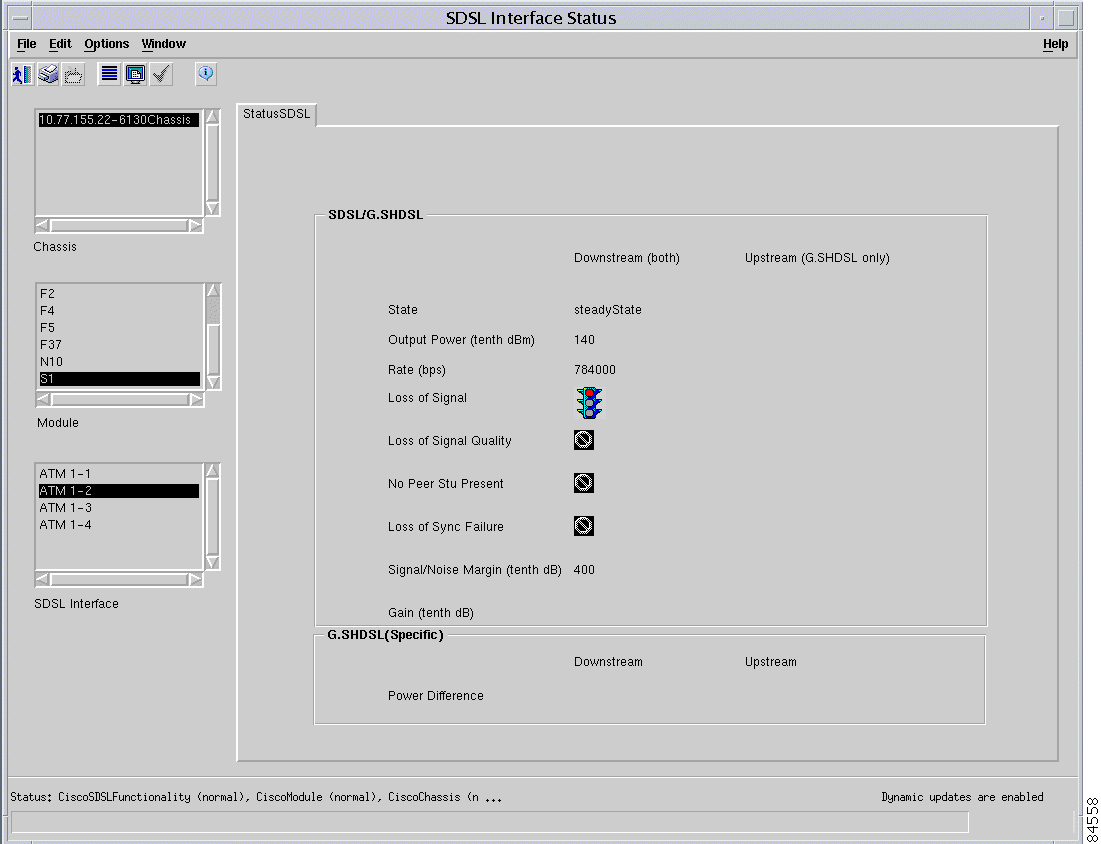
Viewing SDSL and G.SHDSL Interface Status
The SDSL Status window displays status information for a selected SDSL or G.SHDSL card. To view the SDSL Status window, follow these steps:
Step 1 In the Map Viewer window, within the Physical view, right-click an SDSL card or a G.SHDSL card whose interface status you want to view.
Step 2 Choose Cisco DSL Manager > Interface > Status > XDSL > SDSL from the object menu.
Step 3 Highlight the relevant chassis, card, and SDSL or G.SDSHL interface from the list boxes on the left side of the window.
The status information for the selected SDSL or G.SDSHL line card displays in the window. In the SDSL/G.SHDSL area, the Downstream column applies to both SDSL and G.SHDSL line cards. The Upstream column applies only to G.SHDSL line cards.
Table 7-16 describes the fields that are located in the SDSL Interface Status window. The values in the Downstream column refer to both SDSL and G.SHDSL. The values in the Upstream column relate only the G.SHDSL line cards.
Table 7-16 SDSL Interface Status Window Field Descriptions
Field
Description
SDSL/G.SHDSL
State
Specifies the state of the STU-C transceiver. Valid values are:
other(1)
idle(2)—Administratively down
training(3)—Transceiver training in progress
steadyState(4)—Nominal mode of operation
testing(5)—Transceiver in loopback or running BERT
downloading(6)—STU-C code download in progress
downloadingFailed(7)—STU-C code download failed
Output Power
Specifies the measured total output power transmitted by this STU-C. This is the measurement that was reported during the last activation sequence.
Rate
Specifies the rate the STU-C transceiver was able to obtain following training.
Loss of Signal
Displays red light for Loss of Signal; displays green light if no Loss of Signal.
Loss of Signal Quality
Displays red light for Loss of Signal Quality; displays green light if no Loss of Signal Quality.
No peer Stu present
Displays red light for no peer stu present; displays green light if peer stu present.
Loss of Sync Failure
Displays red light for Loss of Sync Failure ; displays green light if there is no Loss of Sync Failure.
Signal/Noise Margin
Specifies the signal/noise margin that this STU-C uses for its receive signal.
Gain
Specifies gain applied to this STU-C receiver.
G.SHDSL
Power Difference
Displays the measured difference in the total power transmitted by the peer STU-C and the total power received by this STU-C.
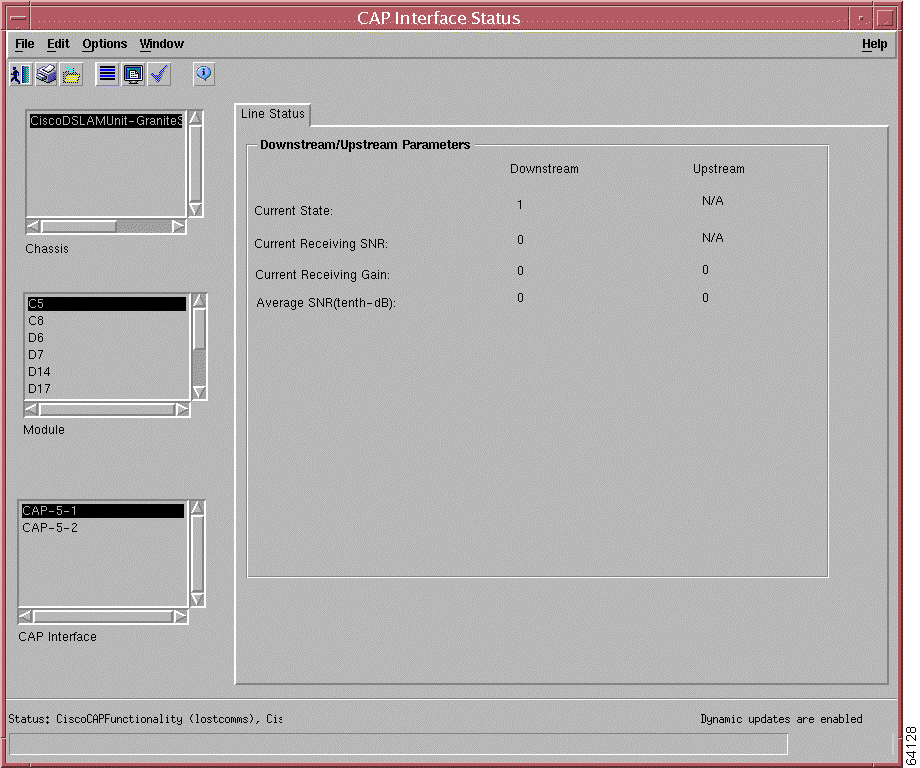
Viewing FlexiCAP Interface Status
The CAP Interface Status window displays status information for a selected flexiCAP card. To view the CAP Interface Status window, follow these steps:
Step 1 From the Map Viewer window, within the Physical view, right-click the flexiCAP card whose status you want to display.
Step 2 Choose Cisco DSL Manager > Interface > Status> > XDSL > CAP from the object menu.
The CAP Interface Status window opens. (See Figure 7-17.)
Figure 7-17 CAP Interface Status Window
The relevant chassis, card, and flexiCAP interface that you selected displays in the list boxes on the left side of the window.
The status information for the selected line card displays on the right.
Table 7-17 describes the fields that are located in the CAP Interface Status Window.
Table 7-17 CAP Interface Status Window Field Descriptions
Field
Description
Current State
Specifies the state of the ATU-C transceiver.
Current Receiving SNR
Specifies the signal-to-noise ratio for the upstream (receive side) data channel.
Current Receiving Gain
Specifies the measure of loop attenuation over the entire DSL frequency spectrum. The card uses an algorithm to boost receiver gain so that attenuation can be corrected for proper support of a given receive data rate.
Average SNR (tenth-dB)
Specifies the average signal-to-noise ratio for the upstream (receive side) data channel.
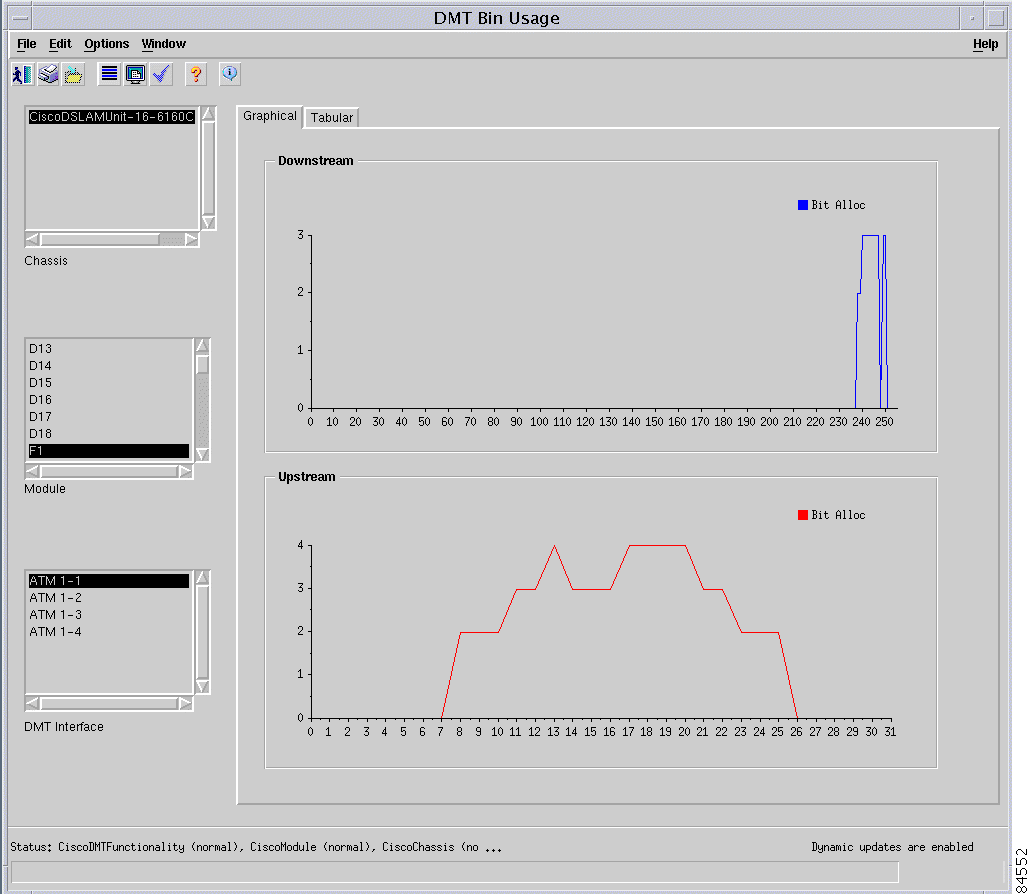
The DMT Bin Usage Graphical tab displays a graphicalrepresentation of the bit allocation per bin for downstream and upstream channels.
Step 1 From the Map Viewer window, within the Physical view, right-click the flexiCAP card or DMT card whose status you want to display.
Step 2 Choose Cisco DSL Manager > Interface > Status> > XDSL > DMT Bin Usage from the object menu.
The DMT Bin Usage window opens. (See Figure 7-17.)
Figure 7-18 CDMT Bin Usage Window—Graphical Tab
Step 3 From the list boxes on the left, select the relevant chassis, card, and DMT interface.
The graphical display of the bit allocation per bin for downstream and upstream channels will be displayed.
Note DSLAMs support DMT bin data for only one interface at a time. A user can launch multiple instances
of the dialog, but only one should be launched for each chassis. If more than one instance for the same
chassis is launched the results given may be inacurate.
DMT Bin Usage Window—Tabular Tab
The DMT Bin Usage window Tabular tab displays the tabular display of the bit allocation and transmission gain per bin for downstream and upstream channels.
Step 1 From the Map Viewer window, within the Physical view, right-click the flexiCAP card or the DMT card whose status you want to display.
Step 2 Choose Cisco DSL Manager > Interface > Status> > XDSL > DMT Bin Usage from the object menu.
The DMT Bin Usage window opens. (See Figure 7-17.)
Step 3 Select the Tabular tab.
The DMT Bin Usage window—Tabular Tab opens
Figure 7-19 DMT Bin Usage Window—TabularTab
Step 4 From the list boxes on the left, select the relevant chassis, card, and DMT interface.
The tabular display of the bit allocation and transmission gain per bin for downstream and upstream channels is displayed.
Note The values in the displayed table represent the same data that is used to draw the graphs in the DMT Bin
Usage Graphical tab.
Note DSLAMs support DMT bin data for only one interface at a time. A user can launch multiple instances
of the dialog, but only one should be launched for each chassis. If more than one instance for the same
chassis is launched the results given may be inacurate.