|
|

This chapter describes how to maintain your Cisco EMF and CDM software system at its peak level of performance.
This chapter includes the following sections:
This section includes the following topics:
The system log file records all system-generated messages for each DSLAM chassis that is configured on the network. The DSLAM logs system messages and sends these messages to the Cisco EMF or CDM software system console. The DSLAM node software, IOS, saves system log messages in an internal buffer that can store up to 1,024 messages.
The system message logging facility allows you to do the following tasks:
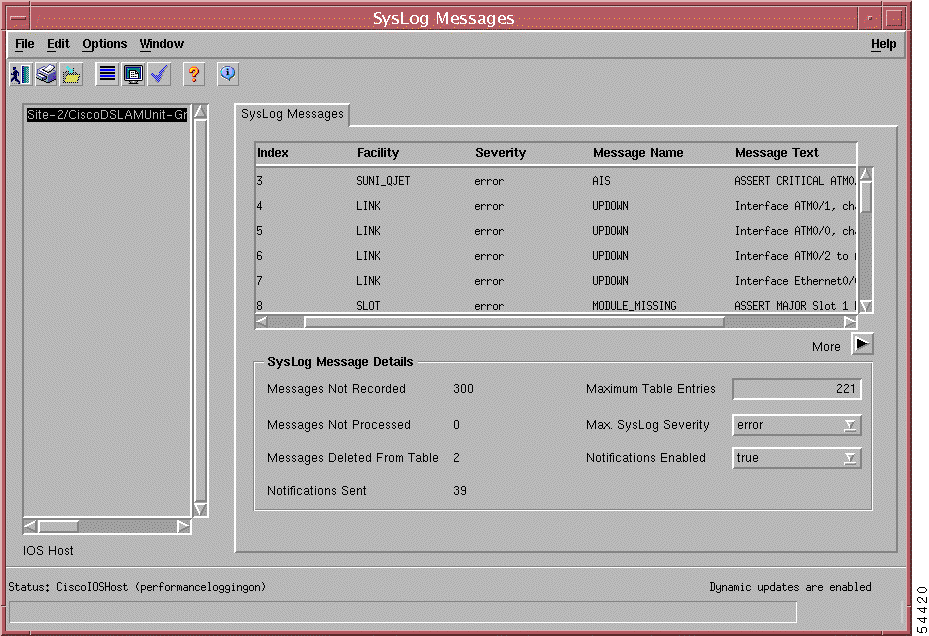
You can view or print system log information from the SysLog Messages window, which is shown in Figure 6-1. The SysLog Messages window contains a list of network elements from which you select the element whose error and status messages you want to view. Examples of messages that can appear in the SysLog Messages window for a network element include alarm messages or loss of traffic messages.
To configure the system log messages details in the SysLog Messages window, complete the following steps:
Step 2 Choose Cisco DSL Manager > Chassis > Tools > Logging > View Error Log. from the object menu.
The SysLog Messages window opens. (See Figure 6-1.)
The SysLog Messages area at the top of the SysLog Messages window includes a number of columns; use the scroll bar to view all of the columns. CDM displays the relevant information about each syslog message in these columns. Table 6-1 describes the fields in this window.
Step 3 From the list box on the left side of the window, select the chassis whose system log you want to view.
Step 4 Configure the parameters on the right side of the SysLog Messages Details area:
a. In the Maximum Table Entries field, enter the number of events you want to view at one time; this value sets the upper limit on the number of entries the table can contain.
b. In the Max. SysLog Severity field, use the down arrow to select the severity level of events you want to view; the agent ignores any message for events whose severity is lower than this level.
See Table 6-2 for definitions of the severity levels.
c. In the Notifications Enabled field, use the down arrow to select your preference for alarm notification, as follows:
Step 5 Click Save to save your settings.
The list of events appear in the SysLog Messages area as shown in Figure 6-1.
Table 6-1 defines the fields in the SysLog Messages window.
| Field | Description |
|---|---|
| SysLog Messages | |
Displays the name of the facility that generated the message. |
|
Displays the level of severity of the error (see Table 6-2). |
|
| SysLog Message Details | |
Displays the number of messages that have not been recorded. |
|
Displays the number of messages that have not been processed. |
|
Displays the number of messages that have been deleted from the table. |
|
Enter the upper limit on the number of entries that the table can contain. |
|
Use the down error to select the level of events you want the agent to display (see Table 6-2 for a list of severity levels). The agent will ignore any message for events whose severity is lower than this level. |
|
Use the down arrow to select true to enable notifications, or false to not enable notifications. |
|
In the SysLog Messages window Max SysLog Severity field, you can select a severity range for the events that you want to view. Table 6-2 describes the severity levels.
The Emergency level is the most severe type of message that the system generates (the level that you set in the Max SysLog Severity field); the Debug severity level is the least severe type of message. For example, if you select a maximum severity level of
 |
Note After you configure or change the parameters, the system does not dynamically update the list of events in the SysLog Messages area. Only the syslog messages that the system generates since you configured the parameters display in the SysLog Messages area. |
|
Note CDM logs user-initiated events in the Command History window (see the following section, Viewing and Configuring the Command Log Window, for more information.) |
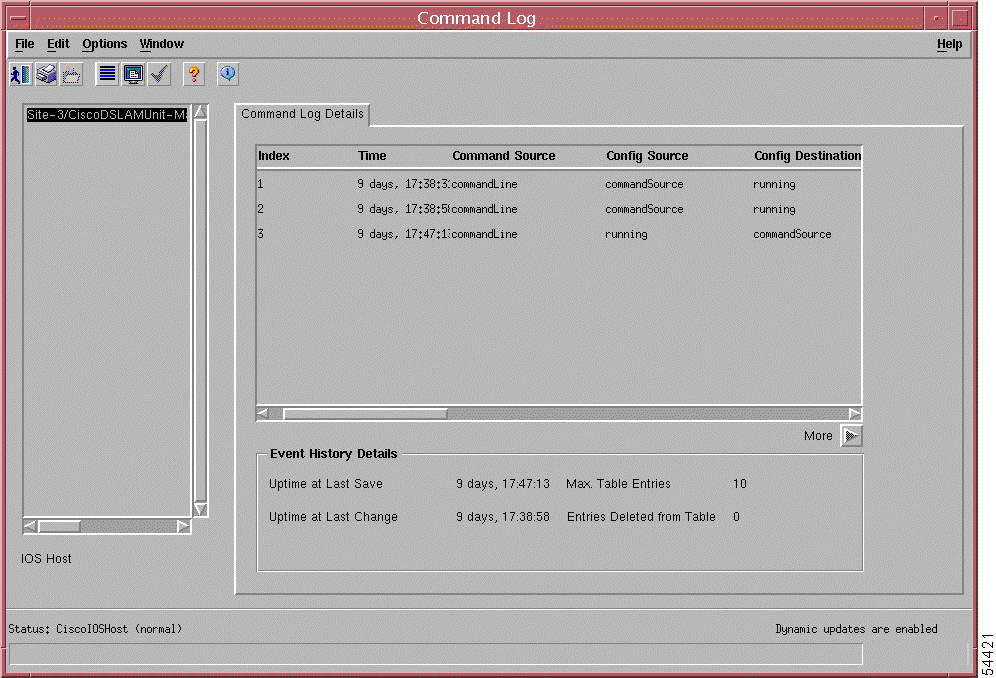
The Command Log window reflects the data that is in the Command History file, which is a system-generated file. Each time a user makes a configuration change to a network element, the system creates an entry in the Command History file.
From the Command Log window, which is shown in Figure 6-2, you can view the details of each configuration entry including the following event information:
To open and configure the Command Log window opens. (See Figure 6-2.) Complete the following steps to open the Command Log window:
Step 2 Choose Cisco DSL Manager > Chassis > Tools > Logging > View Command History.
The Command Log window opens. (See Figure 6-2.)
Step 3 From the list box on the left side of the window, select the chassis whose command history events you want to view.
Step 4 Use the scroll bar at the bottom of the Command Log Details area to view all of the columns.
Step 5 Click the Refresh button in the toolbar, then click the arrow next to More to add entries to the table.
|
Note After you configure or change the parameters, CDM does not dynamically update the list of events in the Command Log Details area. Only the messages that CDM generates since you configured the parameters display in the Command Log Details area. |
Table 6-3 describes the fields that display events in the Command Log Details area.
| Column Name | Description |
|---|---|
| Command Log Details | |
Displays the value of sysUpTime when the event occurred. In the example in Figure 6-2, the configuration had been running for 9 days, 17 hours, 38 minutes, and 3 seconds. |
|
Displays the source of the command that instigated the event, for example the command line or snmp. |
|
Displays the configuration data source for the event, for example, running configuration or command source. |
|
Displays the configuration data destination for the event, for example, running configuration or startup configuration. |
|
Displays the terminal type from which the event was logged, either virtual or not applicable. |
|
Displays the number of the terminal from which the event was logged. |
|
Displays the name of the logged in user of the terminal from which the event was logged. |
|
Displays the hard-wired location of the terminal or remote host from which the event was logged. |
|
Displays the Internet address of the connected system or system from which the request originated. |
|
Displays the configuration file name of the storage file server. |
|
| Command Log Details | |
Displays the value of sysUpTime when the running configuration was last saved. |
|
Displays the value of sysUpTime when the running configuration was last changed. |
|
Displays the maximum number of entries that can be held in the table. |
|
Displays the number of times that a new event caused the oldest event at that time to be deleted in order to make room for the new event. |
|
Setting Telnet passwords is the same process as setting IOS CLI security passwords. You need to make sure you have configured your Telnet passwords in CDM. Setting the Telnet passwords allows you to open a Telnet window from the CDM GUI and communicate with the DSLAM using IOS commands. If you have not already set the security password for a DSLAM, complete the following steps to check Telnet passwords:
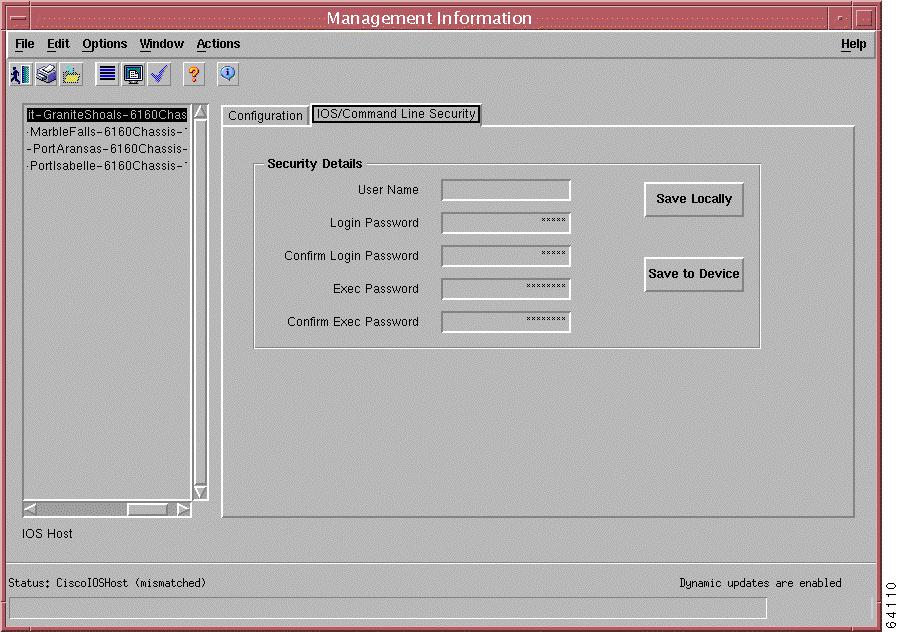
Step 2 Choose Cisco DSL Manager > Chassis > Administration > Management Information from the object menu.
The Management Information window opens. (See Figure 6-3.)
In the IOS/Command Line Security tab, you are informing CDM what the IOS passwords are so that CDM can run IOS scripts.
Step 3 Click the IOS/Command Line Security tab opens. (See Figure 6-3.)
Step 4 Enter your login password in the Login Password field.
Step 5 Enter the password again in the Confirm Login Password field.
Step 6 Enter the executive password in the Exec Password field.
Step 7 Enter the executive password again in the Confirm Exec Password field.
The procedure here is parallel to that in IOS, when you use the enable command and then enter the exec password to go into the executive mode.
Step 8 Click Save Locally to save your passwords locally to CDM.
Step 9 Click the Save icon in the toolbar.
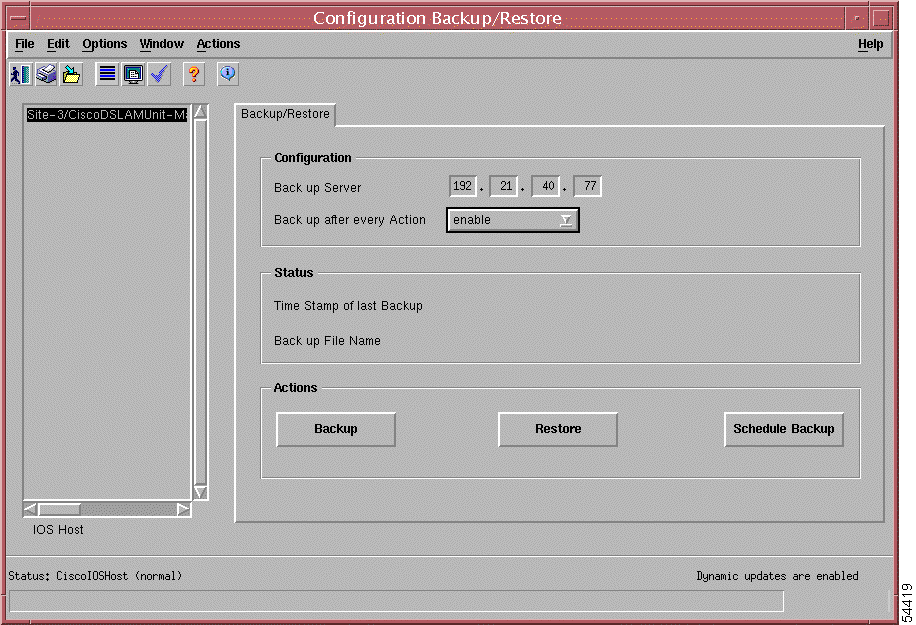
To back up configuration data from your DSLAM, you can upload the currently running Cisco DSLAM configuration and save it as a file to any TFTP server. You can download this file later from the TFTP server to a specified Cisco DSLAM.
Cisco recommends that you perform backups on a regular basis to recover configuration information in the unlikely event of a hardware failure. For example, if an NI-2 card fails, you can install a new NI-2 card in the chassis, click the Restore button in the Configuration Backup/Restore window, and the system restores the configuration data. The Configuration Backup/Restore window is shown in Figure 6-4.
It is important that you back up configuration data on a regular basis because all configuration changes made between the last backup and the time of the failure will be lost.
|
Note The backup/restore feature is not intended for use as a configurable tool. The system uses the same file
each time you back up the configuration data. Backup/Restore is configured on a per chassis basis. When you click the Backup button, the running configurations of the DSLAM is copied onto the TFTP server. When you click the Restore button, the system restores the most recently saved running configuration to a Cisco DSLAM. |
To open the Configuration/Backup Restore window and perform a backup and restore of your configuration data, follow these steps:
Step 2 Choose Cisco DSL Manager > Chassis > Administration > Configuration Backup/Restore from the object menu.
The Configuration Backup/Restore window opens. (See Figure 6-4.)
Step 3 From the list on the left side of the window, select the chassis, or multiple cards, for which you want to back up or restore configuration data.
Step 4 Configure the parameters in the Configuration area as follows:
a. In the Back Up Server field, enter the TFTP IP address of the backup server.
b. Leave the Back Up After Every Action field blank, or use the down arrow to select Disable.
The Time Stamp of Last Backup field is Display only. This field displays the time that the system last backed up the configuration data.
The Back Up File Name is Display only. This field displays the name of the last backed up file. The file name does not change. The file name is based on the chassis IOS Host name and IP address, and is used for each backup session.
|
Note At this time, you must save the information that you entered before you click Backup, Restore, or Schedule Backup in the following steps. If you do not save the information that you entered, CDM uses the information that was previously entered and saved in this file instead of the information that you just entered. |
Step 5 Choose File > Save from the menu bar or click the Save icon in the toolbar.
Step 6 Perform one of the following actions depending on your purpose:
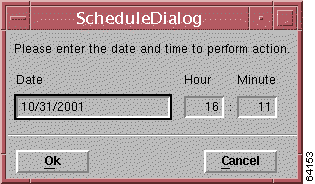
If you click Schedule Backup, the Schedule Dialog dialog box opens. (See Figure 6-5.)
Step 7 Enter the date (mm/dd/yyyy) and time (24-hour format, for example, 4:00 p.m. is 16:00) that you want the system to perform the backup.
Step 8 Click OK to save the new date and time.
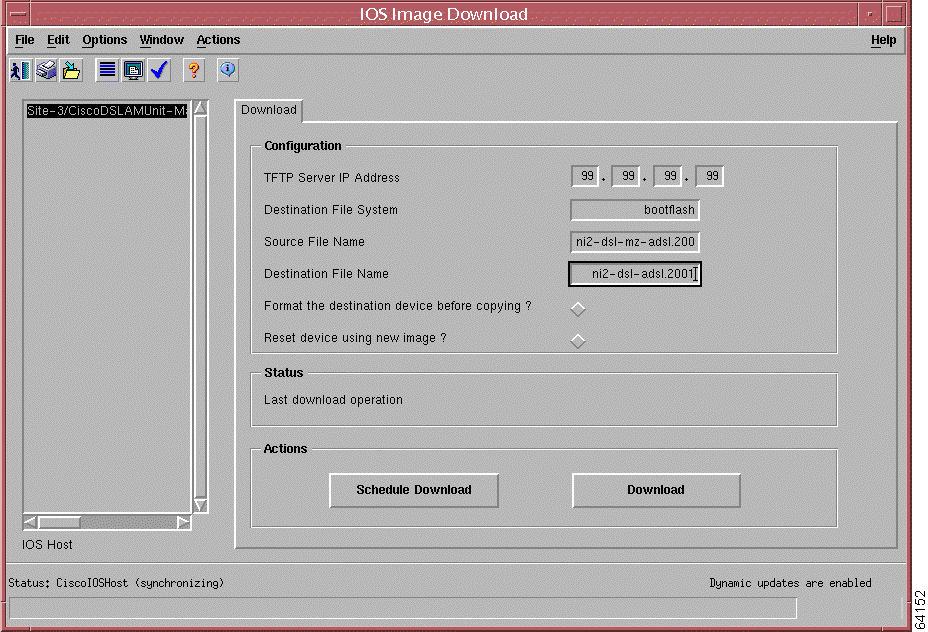
When Cisco releases a new version of Cisco IOS, you can download the new version of the software onto a DSLAM chassis. From the IOS Image Download window, you define the parameters to maintain the most current Cisco IOS software on the DSLAM chassis in your network.
|
Note Before you download a new Cisco IOS software image you must configure the SNMP information. To verify whether the SNMP information is configured, open the SNMP Management window (see the "Enabling SNMP Trap Generation" section on page 2-47). |
To download a new Cisco IOS software image, complete the following steps:
Step 2 Choose Cisco DSL Manager > Chassis > Administration > IOS Image Download from the object menu.
The IOS Image Download window opens. (See Figure 6-6.)
The chassis that you selected is highlighted in the list box on the left side of the window.
Step 3 Configure the Cisco IOS image download values as follows:
a. In the TFTP Server IP Address field, enter the IP address of the TFTP server that contains the Cisco IOS image software you want to download.
b. In the Destination File System field, enter the destination file system name; valid values are bootflash or flash.
c. In the Source File Name field, enter the name of the source file; you can specify the Cisco IOS image download source file name.
d. In the Destination File Name field, enter the path and file name of the destination file.
You can specify the name for the file as it is stored in the file system of CDM.
e. In the Format the destination device before copying? field, click the diamond if you want to erase the software on the chassis before the new software is downloaded.
If you do not click this option to format the destination device, the file does not get overwritten and you might run out of space; it is best to format the destination device.
f. In the Reset device using new image? field, click the diamond if you want to reset the chassis to start using the new software.
The Last download operation field is Display only. This fields displays the date and time of the last download.
|
Note At this time, you must save the information that you have entered before you click Download or Schedule Download. If you do not save the information that you have entered, the software returns an error message when you attempt to download or schedule a download. |
Step 4 Choose File > Save from the menu bar or click the Save icon in the toolbar.
Step 5 Click Schedule Download to schedule the download to be performed at a later time.
Step 6 Click Download to perform the download immediately.
When you click Schedule Download, the Schedule Dialog dialog box opens. (See Figure 6-7.)
Step 7 Enter the date (mm/dd/yyyy) and time (24-hour format, for example, 4:00 p.m. is 16:00) you want the system to perform the download, and then click OK.
You can save the configuration by issuing a write mem command from the Chassis Configuration window. You do this by choosing writeMem from the Actions menu in this window to save the running configuration.
You can also save the running configuration by following these steps:
Step 2 Choose Cisco DSL Manager > Technology Commands > Save Running Config from the object menu.
A Telnet window opens and displays the results of saving the configuration. You must have user name and password set to the DSLAM.
Step 3 Click Close to close the telnet window.
Another way to save the configuration to flash is as follows:
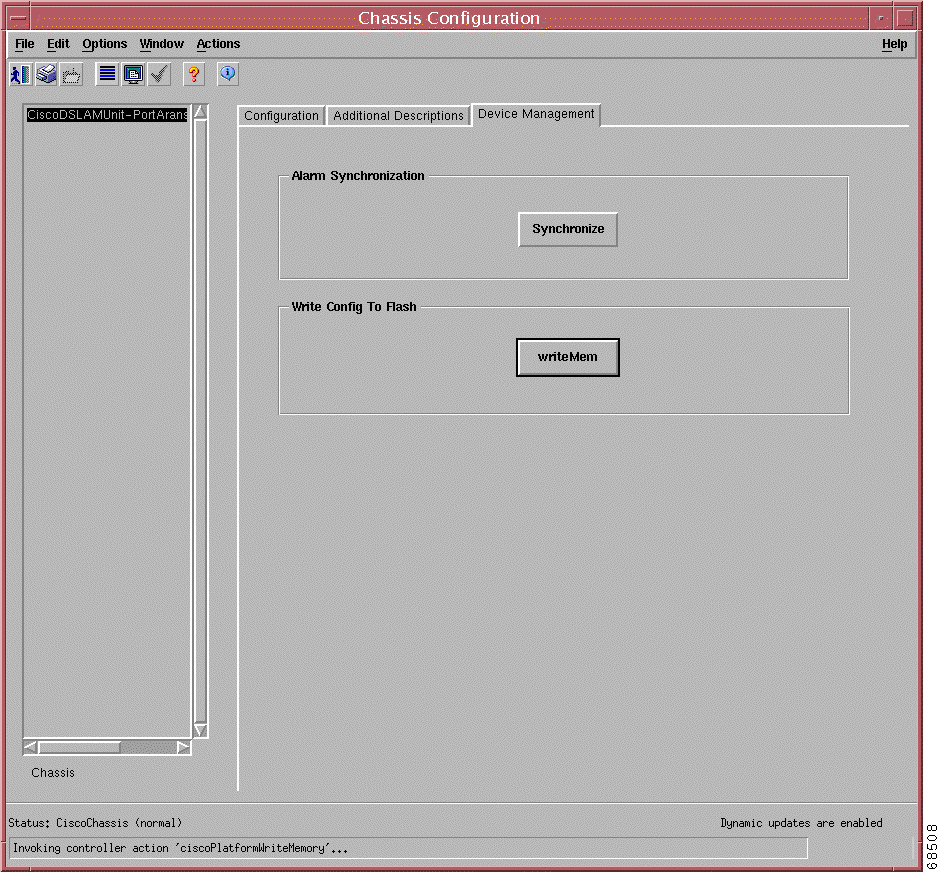
The Chassis Configuration window opens. (See Figure 6-8.)
Step 2 In the Write Config To Flash area, click writeMem.
You can synchronize all alarms for a DSLAM by using the Alarm Synchronization feature. Doing this initiates a search for all traps on a DSLAM, displays them in the Event Browser, and populates the Map Viewer window hierarchy views to reflect all discovered alarms.
Complete these steps to synchronize all alarms:
The Chassis Configuration window opens. (See Figure 6-9.)
Step 2 In the Alarm Synchronization area, click Synchronize.
For more information about populating alarms in the map hierarchy view, see the "Using the Map Hierarchy Views" section. For more information about viewing alarms in the Event Browser and alarm descriptions, see "Viewing Alarms and Events."
![]()
![]()
![]()
![]()
![]()
![]()
![]()
![]()
Posted: Fri Jan 24 05:41:59 PST 2003
All contents are Copyright © 1992--2002 Cisco Systems, Inc. All rights reserved.
Important Notices and Privacy Statement.