This chapter describes how to use the CiscoWorks Blue Maps Motif-based applications from a UNIX-based network-management workstation. This chapter introduces the common elements of the Maps Motif applications (DLSw, RSRB, and APPN/SNASw).
This chapter includes the following main sections:
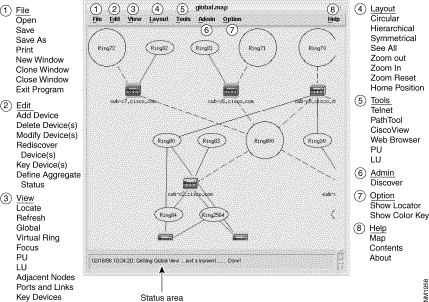
The main window of each Maps application consists of the following elements, as shown in Figure 4-1.
Title bar—Displays the map title in this format: View_Protocol_Name.map
The following are sample map titles:
Key_Devices_DLSw_Heritage.map
Global_RSRB_Heritage.map
Global_APPN_cwb-c2.cisco.com.map
Menu bar—Provides a series of menu items that provide access to the Maps application windows and options. The following are the standard menus:
File—Lets you open, save, and close maps.
Edit—Lets you change items on a map.
View—Lets you select from various views of the network.
Layout—Lets you change the way the devices are displayed on a map.
Tools—Lets you start associated tools, such as a Telnet client, or a web browser.
Admin—Lets you perform discovery.
Option—Lets you show and hide the Locator window and color key.
Help—Displays the Maps online help.
Status area—Displays status messages about the application.
The Locator window, smaller than the main window, is a navigational aid that shows a miniature representation of your entire network and lets you control which portion of the network appears in the main window.
Using the Menu Bar
Use the items on the menu bar to change the way you view the map, or to change the type of information to view, and to run special tools. This section describes how to use the items on the Maps application menu bar. Figure 4-1 shows the main window of a sample Maps application. (Not all options in Figure 4-1 appear in every Maps application.)
Figure 4-1 Sample Maps Application—Main Window with Menu Options
Using the File Menu
Use the items on the File menu to change the information displayed on a map. Table 4-1 lists the items on the File menu.
Table 4-1 Items on the File Menu
Menu Item
Purpose
Open
Displays the Map File Selector window from which you can open a previously saved network map file.
Save
Saves the network map file is currently displayed in the Maps application main window; saves the positions of the map icons when you rearrange them.
Save As
Saves the current network map file under a different name.
Print
Prints a snapshot of the current screen to a printer. Remember to first set the PRINTER environment variable.
New Window
Opens a blank main window for the Maps application.
Clone Window
Opens a new main window identical to the current main window. The second window displays the same network map that is displayed in the first window. Having two identical windows is useful when comparing different parts of the network or navigating to another map while keeping the current map.
Close Window
Closes the current window.
Exit Program
Exits the Maps application.
Using the Edit Menu (DLSw and RSRB only)
Use the items on the Edit menu to change the information in the database. Table 4-2 lists the items on the Edit menu.
Table 4-2 Items on the Edit Menu
Menu Item
Purpose
Add Device
Manually adds a device to the Maps database by prompting you to specify its host name or IP address and its read community string. If the device is running DLSw or RSRB, the device is added to the appropriate map display.
Delete Device(s)
Deletes selected devices from the Maps database and removes the device from the corresponding map.
Modify Device(s)
Modifies the read community string for selected devices.
Rediscover Device(s)
Queries selected devices to update the Maps database and the displayed network map.
Key Device(s) (DLSw only)
Displays a list of all DLSw routers so you can select one or more routers to be key devices.
Define Aggregate Status (DLSw only)
For the DLSw key devices view, lets you define the Status criteria for aggregated peer connections.
Using the View Menu
Use the items on the View menu to control the way devices are displayed on the map. Table 4-3 lists the items on the View menu
Table 4-3 Items on the View Menu
Menu Item
Purpose
Locate
Locates a specific device on the map by prompting you to type either the device's host name or its IP address.
Refresh (RSRB, DLSw only)
Refreshes the displayed map with the most recent information from the Maps database.
Global
Displays a map of your entire network. Use the mouse pointer to move the black frame within the Locator window to display the framed area of the map in the main map window.
Virtual Ring (RSRB only)
Displays a view of the network from the viewpoint of a selected virtual ring.
Focus (RSRB, DLSw only)
Displays a view of the network from the viewpoint of a specific router.
PU (RSRB, DLSw only)
Displays a session connectivity (dependency) view for a PU by prompting you to enter a PU name in the format PUNAME.DOMAIN.
LU (RSRB, DLSw only)
Displays a session connectivity (dependency) view for an LU by prompting you to enter an LU name in the format LUNAME.DOMAIN.
Adjacent Nodes (APPN/SNASw only)
Displays the selected network node and its adjacent nodes (that are just one hop away from a selected node).
Ports and Links (APPN/SNASw only)
Displays the selected network node and its ports (such as Ethernet and Token Ring) and its links from the ports to adjacent nodes.
Key Devices (DLSw only)
Displays a key devices view of the network, which shows the following items:
The routers marked as key devices
The aggregate of peer connections
Using the Layout Menu
Use the items on the Layout menu to change the way information is displayed on a map. Table 4-4 lists the items on the Layout menu
Table 4-4 Items on the Layout Menu
Menu Item
Purpose
Circular
Displays devices in a circular pattern.
Hierarchical
Displays devices in a hierarchical pattern.
Symmetrical
Displays devices in a symmetrical pattern.
See All
Makes all devices visible in the main window.
Zoom Out
Displays a wide-angle view in the main window.
This menu item is not available on HP-UX.
Zoom In
Displays a close-up view in the main window.
This menu item is not available on HP-UX.
Zoom Reset
Resets the view to the default zoom setting.
Home Position
Resets the frame in the Locator window to the upper-left corner of the window.
.
Using the Tools Menu
Use the items on the Tools menu to start related network management tools. Table 4-5 lists the items on the Tools menu:
Table 4-5 Items on the Tools Menu
Menu Item
Purpose
Telnet4500.
Starts a Telnet client at your workstation so that you can log in to a Cisco router or another workstation. If you first select a router icon, Telnet logs you in to that selected router.
The xterm program must be in the PATH.
PathTool
If CiscoWorks is installed, starts the Path Tool application, which enables you to view and analyze the path between two devices so that you can:
Analyze the path to collect utilization and error data.
Display the IP devices encountered between the source and the destination devices, the link speeds connecting these SNMP devices, and the interface names.
After prompting you for two addresses or host names (an origin and a destination), PathTool displays a map of the network from the origin to the destination.
If you select one router, that router is the source.
If you select two or more routers, the first is the source and the second is the destination.
CiscoView
If CiscoView is installed, starts the CiscoView application, which is a GUI-based device-management application that provides dynamic status, statistics, and comprehensive configuration information on Cisco products.
CiscoView allows you to display a graphical representation of each network device, display configuration and performance information, examine the status of interfaces, and perform minor troubleshooting tasks. For a list of Cisco devices you can manage with this application, refer to the CiscoView Release Notes.
Web Browser
Starts a web browser at your workstation so you can use the CiscoWorks Blue Maps web interface.
PU
Displays a list of PUs. Use the PU Filter window to select the criteria for determining which PUs to display.
LU
Displays a list of LUs. Use the LU Filter window to select the criteria for determining which LUs to display. The APPN/SNASw application does not display an LU filter; instead, it displays the entire LU list.
Using the Admin Menu
Use the discover item on the Admin menu to start the Maps discovery process. Table 4-6 lists the items on the Admin menu.
Table 4-6 Items on the Admin Menu
Menu Item
Purpose
Discover
Starts the discovery process, which looks for routers in your network that are enabled for DLSw, RSRB, or APPN/SNASw.
Select Seed File to start discovery from a seed file of router names.
Select Database to start discovery from a network management system database.
Using the Option Menu
Use the items on the Option menu to display or hide the Locator window and the color key. Table 4-7 lists the items on the Option menu
Table 4-7 Items on the Option Menu
Menu Item
Purpose
Show Locator
Displays the Locator window with the main window. You can move the black frame in the Locator window to change the displayed area in the main window.
Show Color Key
Displays a key to the icon colors used on the maps at the bottom of the main window.
:
Selecting Multiple Items
You can select several map icons or several items in a list at one time.
Selecting Multiple Map Icons
You can select several map icons at one time, perhaps when you want to delete several devices from the map, or rediscover several devices at one time. There are two ways to select multiple icons. You can drag a box around the icons, or you can select each icon separately.
Dragging a Box Around the Icons
To select multiple map icons by dragging a box around them, use the following procedure:
Step 1 Hold the left mouse button down while pointing in an open area near the icons that you want to select.
Step 2 Move the mouse pointer on the screen to form a rectangle encompassing the icons you want selected. You will see a black box form as you drag the mouse pointer. The icons should be inside the rectangle.
Step 3 Release the mouse button. The icons within the rectangle are now selected.
Clicking the Icons
To select multiple map icons by clicking them, use the following procedure:
Step 1 Click the first map icon with the left mouse button.
Step 2 While holding down the Shift key, click the next map icon with the left mouse button.
Step 3 Continue clicking all the icons you want with the left mouse button while holding down the Shift key.
Step 4 Release the Shift keyand the left mouse button. Now all the icons you clicked are selected.
You can now go on to select an item from the menu bar, such as Edit > Rediscover Device(s) or Edit > Delete Device(s) to perform the action on all the selected devices.
Selecting Multiple Items in a List
You can select several menu items, perhaps to select several routers to be key routers. To select multiple menu items, use the following procedure:
Step 1 Click the first menu item with the left mouse button.
Step 2 While holding down the Shift key, click the next menu item with the left mouse button.
Step 3 Continue clicking all then menu items you want with the left mouse button while holding down the Shift key.
Step 4 Release the Shift key and the left mouse button. Now all the menu items you clicked are selected.
Selecting Multiple Dependency Routers
You might want to select several items from a list when you want to display a PU List window that contains PUs from a set of routers.
Step 1 From the menu bar, select Tools > PU.The PU Filter window is displayed.
Step 2 From the PU Filter window, select By Dependency.
Step 3 While holding down the Shift key, select the routers whose PUs you want to list.
Step 4 Continue selecting routers with the left mouse button, while holding down the Shift key, until you have selected all the routers you want.
Step 5 Select Apply. The PU List window now displays the PUs dependent on the routers you selected.
Using the Popup Menus
Many icons and links on a DLSw, RSRB, and APPN/SNASw map have unique popup menus. When you click the icon (a router or ring, for example) with the right mouse button, a popup menu is displayed. For more information about these popup menus, see the following "Displaying the Popup Menus" sections in the following chapters:
There are several ways to select single or multiple devices:
You can select a single device by clicking it.
You can select several devices by clicking one device, pressing the Shift key, and then clicking each of the additional devices.
You can select several adjacent devices by clicking and dragging a frame around them.
You can rediscover the selected devices to update their status by selecting Edit > Rediscover Device(s) from the menu bar.
You can delete them as a group by selecting Edit > Delete Device(s) from the menu bar.
Locating a Device Using the Locator Window
Use the Locator window to locate a device on the map. If the Locator window is not displayed, select Option > ShowLocator from the menu bar on the main window to display the locator window, which shows you a miniature representation of the network. A black frame delimits a subset of the network that is actually displayed in the main window.
You can move the black frame in one of the following ways:
You can click inside the frame and drag the frame to another part of the network in the Locator window.
You can click anywhere outside the frame to move the frame to the center of the map.
As you move the frame in the Locator window, you can look for the device you want in the main window. When you find the device you want, you can display the focus view for that router, or use one of the other Maps functions.
Selecting Alternate Views
In addition to the default global view, each application offers a set of alternate views. An alternate view is a perspective of the network as seen by a single router of your choice. There are two ways to access an alternate view:
Point to a device and press the right mouse button for a popup menu. The options include the views currently applicable to that router. From the router popup menu, you can select the view you want.
Select a view from the View menu. You will be prompted for the name of the router whose alternate view you want to see. From the View menu, you can select a view.
The alternate views available depend on the application:
DLSw
RSRB
APPN/SNASw
Global view
Global view
Global view
Focus view
Focus view
Adjacent Nodes view
Key Devices view
Virtual Ring view
Ports and Links view
Accessing the Online Help System
This section explains how to access the online help system. Use the Maps help system to accomplish the following tasks:
Get help on specific tasks you want to perform with a Maps application
Understand the purpose of specific fields or buttons in windows
Map applications come with a HyperHelp viewer window that displays help topics.
You can get help by doing one of the following:
Selecting Help > Contents from the menu bar of any Maps application
Clicking a Help button within an application window
Navigating Online Help Topics
You can navigate help topics in the HyperHelp viewer window in a variety of ways:
Click the Help Topics button to display the main contents for the Maps applications. From this window you can click any topic of interest and view a detailed listing of relevant help topics.
Click any help topic of interest within the HyperHelp Viewer window.
Click one of the Browse buttons to navigate backward and forward and view other related help topics.
Click the Back button to return to a previously displayed help topic.
Click the Find button to perform a full-text search.
Searching for a Topic with the Find Dialog Box
The HyperHelp viewer provides a superior search capability through the Find dialog box. Click the Find button to access the Find dialog box. The Find dialog box lets you quickly locate occurrences of text in almost any combination.
When you enter the desired characters in the text entry field at the top of this dialog box, corresponding words appear in a list in the middle of the dialog box, and related topics are displayed in the bottom portion of the box.
You can search for words that contain text strings that begin or end with, appear in, or contain exactly the characters that are typed.
Saving a Custom Topology
To save a custom topology for later use, select File > Save As from the menu bar and enter a name for the topology. When you re-open the topology file, you will see an exact representation of the saved map. Saving is done automatically when you switch views or end the application normally.
Terminating the Applications
To terminate the application, select File > Exit Program from the menu bar. The application terminates