|
|

This chapter describes the CiscoWorks Blue Maps remote source-route bridging (RSRB) application.
This chapter includes the following main sections:
If you prefer to view the RSRB information from a web browser, see "Using the CiscoWorks Blue Home Page."
The RSRB Maps application discovers Cisco IP-based, RSRB-enabled routers in your network and displays them in a map. Using the RSRB Maps application, you can do the following tasks:
RSRB Maps provides the following main views of your network devices:
From these RSRB map views, you can obtain additional RSRB-related information by selecting the popup menu associated with a device on the map.
This section describes how to start the RSRB application. You can start the RSRB application from the following locations:
To start RSRB from a network management system:
You can start RSRB from any valid user account. The installation process establishes a sample default user account named cwblue. The user cwblue does not have a starting password. You can either assign a password to cwblue or log in as root and change to cwblue.
To start the RSRB application from a system prompt, enter the commands shown below:
You can log in to a remote UNIX host from your local UNIX workstation, export the remote host display to your local workstation, and then run the application from the remote host. To start the remote host's RSRB application from your local workstation, use the following procedure:
Step 2 Log in to the remote UNIX host.
Step 3 Set your DISPLAY environment variable to export the display from the remote host to your local workstation. Depending on which shell you are using, enter the following commands:
Step 4 To start RSRB, enter the following commands:
This section describes how to locate and select devices on the RSRB map. There are two methods for locating a device on the map:
To locate a device from the View menu you must know the device's IP address or device name. Then use the following procedure:
Step 2 Select either By Name or By IP Address.
Step 3 Enter the IP address or name.
Step 4 Click Locate. RSRB displays the part of the map that contains the selected device and highlights the device.
If a set of devices on any map is not up-to-date because automatic update is disabled or set to an infrequent interval, and you have not chosen to list target devices in a seed file, you can add and delete devices manually. From the Edit menu, you can select either Add Device(s) or Delete Device(s).
When you add or delete a device, RSRB prompts you for the device's host name or IP address and read community string. If the device is found to belong on this map, the application places a new device on the map or removes an existing device, depending on the menu item you selected.
If a Cisco device does not appear on the map, but you know that it exists in the network, add the device using Edit > Add Device from the Maps menu bar.
After you add or delete a device from the map, save that device in your seed file with the cwb create seed command:
Where seed_file_name is the name of the seed file.
 |
Note The device appears on the RSRB map only if the RSRB protocol is running on the router and is at the prerequisite Cisco IOS release, and if it is appropriate to that view. |
Each icon on the RSRB map has an associated popup menu. To activate the menu, click the icon with the right mouse button. Table 6-1 lists the popup menus associated with each map icon.
Table 6-1 Popup Menus on the RSRB Map
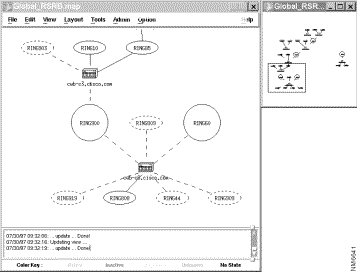
RSRB presents a global (high-level) view of the applicable network devices. The global view presents an up-to-date view of virtual rings (displayed as circles), physical rings (displayed as ovals), pseudo-rings (displayed as dotted ovals), RSRB-enabled peers and their status, physical links (displayed as solid lines), and virtual links (displayed as dashed lines). Dashed lines also show connections to non-RSRB rings.
The global view is displayed when you start the RSRB application. To display the global view at any other time, select View > Global from the RSRB menu bar. The global view is displayed, as shown in Figure 6-1.
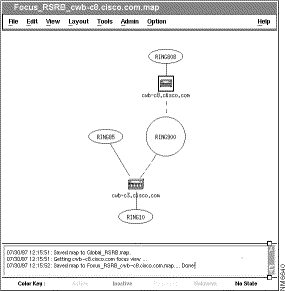
The focus view displays a subset of the network from the viewpoint of a single router, called the focus router. The following sections describe the ways you can display the focus view for a router. Figure 6-2 shows the focus view for router cwb-c8.cisco.com.
To display the focus view for a router from the View menu, use the following procedure:
Step 2 Click the router with the right mouse button.
Step 3 From the popup menu, select Focus View.
To display the focus view for a router from the View menu, use the following procedure:
Step 2 In the Focus View Prompt window, enter the device name of the router.
Step 3 Click OK.
To display the focus view for a selected router from the View menu, use the following procedure:
Step 2 Click the router with the left mouse button to select it.
Step 3 Select View > Focus from the menu bar. The Focus View Prompt window is displayed.
Step 4 In the Focus View Prompt window, click OK.
Once you locate a router on the map, you can find and display information about that router's peer routers in the network using the following procedure:
Step 2 Click the router with the left mouse button.
Step 3 Select View > Focus.
Step 4 Click OK in the Focus Peer Prompt window.
Step 5 In the focus view, select a peer router with the right mouse button.
Step 6 From the popup menu, select Peer Info.
A virtual ring is a defined combination of RSRB routers, the connections between them, and the real Token Rings attached to the routers. There are three ways to display the virtual ring view. You can display the virtual ring view from the popup menu or from the View menu, with or without the virtual ring selected.
To display the virtual ring view from a popup menu, use the following procedure:
Step 2 Click the ring with the right mouse button.
Step 3 From the popup menu, select Virtual Ring View.
To display the virtual ring view from the View menu, use the following procedure:
Step 2 In the Virtual Ring Prompt window, enter the virtual ring's number.
Step 3 Click OK.
You can also display the virtual ring view from the View menu using the following procedure:
Step 2 Click the ring with the left mouse button.
Step 3 Select View > Virtual Ring. The Virtual Ring Prompt window is displayed.
Step 4 In the Virtual Ring Prompt window, click OK.
You can display information about each Token Ring in the network. The ring information includes the following items:
Before you display the ring information, you must display the focus view for the router to which the Token Ring is attached. To display the ring information, use the following procedure:
Step 2 Click the router with the right mouse button.
Step 3 From the popup menu, select Focus View. The focus view is displayed.
Step 4 From the focus view, select the ring.
Step 5 Click the right mouse button.
Step 6 From the popup menu, select Ring Info. The Ring Information window is displayed.
You can retrieve the dependency view information for a PU or LU. Maps gets the PU and LU information from the VTAM at the mainframe and displays them. You can display information about specified PUs and LUs, and you can see their dependency paths through the network to the VTAM host. There are several ways to retrieve PU and LU information, depending on whether you know the PU or LU name, and on what you want to do with the PU or LU once you locate it.
|
Note PUs connecting to the mainframe using the RSRB protocol and a CIP or 3172 connection to the mainframe will not benefit from the correlation feature of Maps. Consequently, Maps will be unable to determine on which routers these PUs depend for connectivity to the mainframe. |
If you know the name of the PU or LU, you can use the View menu on the Maps menu bar to locate a PU or LU and display a dependency view. To view an LU or a PU from the View menu, use the following procedures:
Step 2 From the View menu, select PU to view a PU, or select LU to view an LU. The PU/LU Prompt window is displayed, as shown in Figure 6-3.
Step 3 In the PU/LU Prompt window, enter the PU name or LU name in the format NAME.DOMAIN.
Step 4 Click OK. Maps displays a Dependency view.
If you prefer to select the PU names from a filtered list, you can use the PU item on the Tools menu. This menu lets you set up filtering criteria to search for a PU name based on VTAM information or on its router or Token Ring dependency. From the Maps application's menu bar, select Tools > PU to display the PU Filter window, as shown in Figure 6-4.
The PU Filter window (Figure 6-4) lets you configure a filter to use when selecting the PUs to display in a PU List window. Select PUs the following ways:
The PU List window is displayed, showing all the PUs filtered as you requested. The PU List window is described in the "Using the PU List Window" section.
You can filter the PU List based on the PU name, PU state, and PU type.
Step 2 In the PU Name field, enter all of a PU name, or just part of a PU name and wildcards. The PU List will contain PUs with names that match the filter criteria:
Step 3 In the PU State field, select one or more PU states. The PU window will contain the names of PUs that match one of the PU states you select.
Step 4 In the PU Type field, select one or more PU types. The PU window will contain PUs whose type matches one of the PU types you select.
Step 5 Click Apply.
Use the following procedure to filter PUs by dependency:
Step 2 Select one or more routers from the Routers field in the PU Filter window.
Step 3 Click Apply. The PU List window displays the PUs dependent on the selected routers or Token Rings.
You can select Get All PUs to display a PU List that contains all PUs discovered by SNA View.
You can view the list of all PUs that depend on a specific Token Ring in your network. You must know which Token Ring supports the PU, and you must first display the focus view for the router to which that Token Ring is attached. Then you can use the Token Ring's popup menu to display a PU List window. To display the PU List window from a Token Ring, use the following procedure:
Step 2 Click the router with the right mouse button.
Step 3 From the popup menu, select Focus View.
Step 4 In the focus view, select the Token Ring (an oval) whose PUs you want to view.
Step 5 Click the right mouse button.
Step 6 From the Token Ring's popup menu, select PU List. The PU List window is displayed as described in the "Using the PU List Window" section.
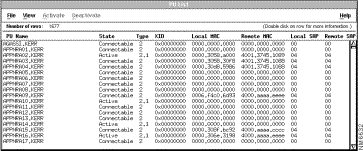
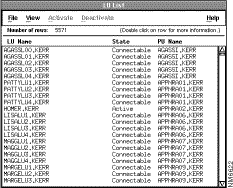
This section describes how to use the functions of the PU List window, shown in
Figure 6-5. The PU List window shows a list of all the PU names that satisfy a set of PU filter criteria.
The PU List window is static; select View > Refresh to update the status.
From the PU List window, you can perform the following tasks:
You can activate a PU from the PU List window. This action is comparable to using the VTAM command VARY NET,ACT,ID=PU_name.
|
Note Before you activate a PU, you must enable PU activation. An SPO subtask must be running in the mainframe, as described in the CiscoWorks Blue Maps and SNA View Workstation Installation and Administration Guide. Notify your network administrator. After you enable PU and LU activation, select a PU or LU to activate the menu. Otherwise it remains inactive. |
To activate a PU from the PU List window, use the following procedure:
Step 2 From the PU List window menu bar, select Activate.
Step 3 From the Activate menu, select one of the following:
You can deactivate an active PU from the PU List window. This action is comparable to issuing the VTAM command VARY NET,INACT,ID=PU_name. To activate a PU from the PU List window, use the following procedure:
Step 2 From the PU3 Activate menu, select one of the following:
From the PU List window, display a list of LUs attached to a PU using the following procedure:
Step 2 From the PU List menu bar, select View > Show LU List. The LU List window is displayed.
From the PU List window, you can display a dependency view of the path from the PU back toward the VTAM host. To display a dependency view, use the following procedure:
Step 2 From the PU List menu bar, select View > Dependency. Maps displays the PU dependency view, as shown in Figure 6-6.
Step 3 The PU dependency view is static. Select View > Refresh to update the status.
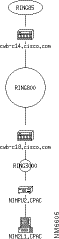
The PU dependency view shows the network components from the PU itself, back toward the mainframe to the host network connection. The PU dependency view shown in Figure 6-6 includes the following network components, from the top down:
From the PU List window, you can configure a new PU filter to display a new set of PU names in the PU List window. To configure a new PU List filter, use the following procedure:
Step 2 Select your filtering option:
Step 3 Click Apply.
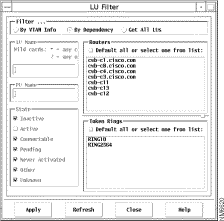
You can use the LU item on the Tools menu to set up filtering criteria to search for an LU name based on VTAM information or on its router or Token Ring dependency. From the Maps application's menu bar, Tools > LU to display the LU Filter window, as shown in Figure 6-7.
The LU Filter window, shown in Figure 6-7, lets you configure a filter to use when selecting the LUs to display in an LU List window. Select LUs in the following ways:
You can filter the LU List based on the LU name, PU name, or LU state.
Step 2 In the LU Name field, enter all or part of an LU name (and wildcards). The LU List contains LUs with LU names that match the filter criteria:
Step 3 In the LU State field, select one or more LU states. The LU window will contain the names of LUs that match one of the LU states you select.
Step 4 In the LU Type field, select one or more LU types. The LU window will contain LUs whose type matches one of the LU types you select.
Step 5 Click Apply.
You can filter the LU List based on the router or Token Ring dependency. From the LU Filter window, select By Dependency. Then select one or more routers from the Routers field in the LU Filter window, or select one or more Token Rings from the Token Ring box. The LU List window will contain the LUs dependent on the selected routers or Token Rings.
You can select Get All LUs to display an LU List that contains all LUs discovered by SNA View.
This section describes how to use the functions of the LU Filter window, shown in
Figure 6-8. The LU List window shows a list of all the LU names that satisfy the same LU filter criteria.
The LU List window is static; select View > Refresh to update the status.
From the LU List window, you can perform the following tasks:
You can activate an inactive LU from the LU List window. This action is comparable to issuing the VTAM command VARY NET,ACT,ID=LU_name.
|
Note Before you can activate an LU, enable LU activation. An SPO subtask must be running in the mainframe, as described in the CiscoWorks Blue Maps and SNA View Workstation Installation and Administration Guide. Notify your network administrator. After you enable PU and LU activation, select a PU or LU to activate the menu. Otherwise it remains inactive. |
To activate an LU from the LU List window, use the following procedure:
Step 2 From the LU List menu bar, select Activate.
Step 3 From the Activate menu, select one of the following:
You can deactivate an active LU from the LU List window. This is comparable to issuing the VTAM command VARY NET,INACT,ID=LU_name. To deactivate an LU from the LU List window, use the following procedure:
Step 2 From the LU List menu bar, select Deactivate.
Step 3 From the Deactivate menu, select one of the following:
From the LU List window you can display a dependency view of the path from the LU back toward the VTAM host. To display an LU dependency view, use the following procedure:
Step 2 From the LU List menu bar, select View > Dependency. Maps displays the LU dependency view, as shown in Figure 6-9.
Step 3 Because the LU dependency view is static, select View > Refresh to update the status.
The LU dependency view shows the network components from the LU, back toward the mainframe to the host network connection. The LU dependency view shown in Figure 6-9 includes the following network components, from the top down:
From the LU List window, you can configure a new LU filter to display a new set of LU names in the LU List window. To configure a new LU List filter, use the following procedure:
Step 2 Select a filtering option:
Step 3 Click Apply.
The colors and symbols on an RSRB map are explained below:
Table 6-2 shows the icons that can appear on an RSRB map.
| Icon | Description |
|---|---|

|
|

|
|

|
|

|
|

|
|

|
|

|
|

|
|

|
|

|
|

|
![]()
![]()
![]()
![]()
![]()
![]()
![]()
![]()
Posted: Wed Jun 25 08:15:08 PDT 2003
All contents are Copyright © 1992--2003 Cisco Systems, Inc. All rights reserved.
Important Notices and Privacy Statement.