The DLSw Maps application discovers Cisco IP-based, DLSw-enabled routers in your network and displays them in a map, so you can perform the following tasks:
View graphical representations of individual peer routers
View the network from the perspective of a few key routers
View DLSw-related network changes
Get information about DLSw peer routers, peer connections, and circuits
View logical connections between network devices
DLSw Maps provides the following main views of your network devices:
The key devices view shows just the routers you designate as key devices. For each key router, all of its peers are represented by a single icon. This resulting icon shows the aggregation of the peers it represents.
The global view shows all routers in the DLSw network with their peer connections and rings.
The focus view shows the DLSw network from a specified router, which is called the focus router. The focus router, its peers, peer connections, and associated rings appear on this map.
The PU and LU views show the devices in the network path from a PU or LU back toward the VTAM host.
From these DLSw map views, you can obtain additional DLSw-related information by selecting the popup menu associated with a device on the map. Data-link switching plus (DLSw+) network entities, such as border nodes, backup nodes, and group numbers, are shown as regular DLSw nodes on the map.
Starting the DLSw Application
This section describes how to start the DLSw application. You can start the DLSw application from the following locations:
Network management system
Workstation system prompt
Remote workstation
Starting DLSw from a Network Management System
To start DLSw from a network management system:
On SunNet Manager, select Tools > CWB-DLSW from the menu bar.
On HP-OV and NetView for AIX, select CWBlue > DLSW from the menu bar.
Starting DLSw from a System Prompt
You can start DLSw from any valid user account. The installation process establishes a sample default user account named cwblue. The user cwblue does not have a starting password. You can either assign a password to cwblue or log in as root and change to cwblue. Then start the DLSw application.
To start the DLSw application from a system prompt, you can use the cwb start dlsw command. The command sets up all the environment variables, starts the DLSw monitor and poller daemons, and then calls the dlsw executable. To start the DLSw application, enter the following commands:
cd /opt/CSCOcb/bin
./cwb start dlsw
Starting DLSw from a Remote Workstation
You can log in to a remote UNIX host from your own local UNIX workstation, export the remote host display to your local workstation, and then run the application from the remote host. To start the remote host's DLSw application from your local workstation, use the following procedure:
Step 1 At your local UNIX workstation, enter the following command:
xhost +
Step 2 Log in to the remote UNIX host.
Step 3 Set your DISPLAY environment variable to export the display from the remote host to your local workstation. Depending on which shell you are using, use one of these commands.
From the K shell (ksh):
setenv DISPLAY
export DISPLAY=IP_address:0.0
From the C shell (csh) or TC shell (tcsh):
setenv DISPLAY IP_address:0.0
Step 4 To start DLSw, enter the following commands:
cd /opt/CSCOcb/bin
./cwb start dlsw
DLSw Initial Startup Sequence
This section describes what happens when you start DLSw for the first time (or when you select View > Key Devices from the menu bar).
When it first starts, DLSw tries to display a special view called the key devices view. The key devices view displays the routers you designated as "key devices." Key devices are explained in the CiscoWorks Blue Maps and SNA View Workstation Installation and Administration Guide.
If no devices are designated as key devices, the key devices view is empty. DLSw determines whether there are any routers enabled for DLSw in the Maps database. Depending on whether there are DLSw--------enabled routers in the database, DLSw proceeds as described in the following sections:
If the key devices view is empty and there are no DLSw routers in the Maps database, then discovery was not done. DLSw displays the following message:
Key devices discovery needs to be performed.
Please create a seed file with "key" tags in it.
After that, select Admin->Discover->Seed File.. on that seed file.
OK?
Ask your network administrator to run a discovery process, as described in the CiscoWorks Blue Maps and SNA View Workstation Installation and Administration Guide.
DLSw Routers Are in the Database
If the key devices view is empty, but DLSw routers exist in the Maps database, then discovery was done but no key routers were designated. DLSw displays the message window shown in Figure 5-1.
Figure 5-1 No Key Routers Defined
Report this problem to your network administrator, who will use the processes outlined in the CiscoWorks Blue Maps and SNA View Workstation Installation and Administration Guide to designate key routers.
Locating Devices on the DLSw Map
The following sections provide information on locating and selecting devices on the DLSw map.
There are two methods for locating a device on the map:
If you know the IP address or host name of the device, you can select View > Locate from the menu bar.
If you do not know the exact IP address or host name, you can use the Locator window.
Locating a Device Using the View Menu
To locate a device from the View menu you must know the device's IP address or host name. Then use the following procedure:
Step 1 From the DLSw menu bar, select View > Locate.
Step 2 Select either By Name or By IP Address.
Step 3 Enter the IP address or host name of a router.
If you enter a host name, you must specify the name in the same form shown on the map: the device name is case-sensitive. If you want to locate a device by name, that device name must be in either the seed file or the network management database during discovery. There is no domain-name lookup provided.
If you enter an IP address, it can be any IP address configured on the device.
Step 4 Click Locate. DLSw displays the part of the map that contains the selected device and highlights the device.
Adding and Deleting Devices on a DLSw Map
If the set of devices on any map is not up-to-date because automatic update is disabled or set to an infrequent interval, and you have not chosen to list target devices in a seed file, you can add and delete devices manually. From the Edit menu, you can select either Add Device or Delete Device(s).
When you add or delete a device, the DLSw application prompts you for the device's host name or IP address and read community string. If the device is found to belong on this map, the application immediately adds a new device to the map or removes an existing device, depending on the menu item you selected.
If a Cisco device does not appear on the map, but you know it exists in the network, add the device using Edit > Add Device from the Maps menu bar.
After you add or delete a device from the map, you can save that device in your seed file with the cwb create seed command:
cd /opt/CSCOcb/etc
./cwb create seed -s seed_file_name
Where seed_file_name is the name of the seed file.
Note The device you add appears on the DLSw map only if the DLSw
protocol is running on the router and it is at the prerequisite Cisco
IOS software level, and if it is appropriate to that view.
Displaying Popup Menus on a DLSw Map
Each icon on the DLSw map has an associated popup menu. To activate the menu, click the icon with the right mouse button. Table 5-1 lists the popup menus associated with the icon.
Table 5-1 Popup Menus on the DLSw Map
Icon
Popup Menu Items
Router
Information—Displays information about the selected known router, including the DLSw version, the version of Cisco IOS that the router is running, DLSw performance information, and circuit information.
Peer Statistics—Displays a list of the selected router's peer routers. When you select a peer router, you will see detailed statistics about that peer router. The Peer Statistics option is available in the focus view and global view only.
Circuit List—Displays the Circuit List window for a known router. After you select the filter criteria, it displays a list of circuits that meet these criteria. You can double-click the displayed circuits to view more detailed information about the circuit and its component devices and links.
Rediscover—Rediscovers the router information and updates the router information in the Maps database.
Focus View—When selected from a discovered router, displays the focus view for the selected router.
Telnet—Starts a Telnet client that logs you in to the selected device.
Aggregated Peer Router
Focus View—Displays a focus view map for the key router.
Aggregate Summary—Displays information about the aggregated peer connection.
Aggregated Peer Connection
Focus View—Displays a focus view map for the key router.
Aggregate Summary—Displays information about the aggregated peer connection.
Viewing the Network Devices
The DLSw map presents several views of your DLSw network devices:
The key devices view of the network shows an up-to-date view of all DLSw-enabled key peer routers as well as their connections to each other and to their peer routers. For each key router, all the peer routers are represented by an icon called an aggregated peer router. The connection between each key router and its aggregated peer router is represented by a connection called an aggregated peer connection. To display the key devices view, see the "Displaying the Key Devices View of the Network" section.
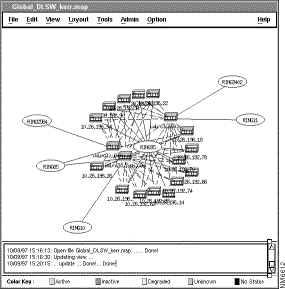
The global (high-level) view of the network shows an up-to-date view of all the DLSw------------enabled peer routers and their status. It also shows all the DLSw peer connections and their status, all Token Rings (displayed as ovals), all pseudo-rings (displayed as dotted ovals), and all physical links (displayed as solid lines). To display the global view, see the "Displaying the Global View of the Network" section.
The focus view for a router shows an up-to-date view of all the DLSw-enabled peer routers that are peer routers to a selected router called the focus router. The focus view also shows the DLSw peer connections for the focus router, and their status, the Token Rings (displayed as ovals) for the focus router, the pseudo-rings (displayed as dotted ovals) for the focus router, and the physical links (displayed as solid lines) for the focus router. Dashed lines reflect connections to non-DLSw rings. To display the focus view, see the "Displaying a Focus View of a Router" section.
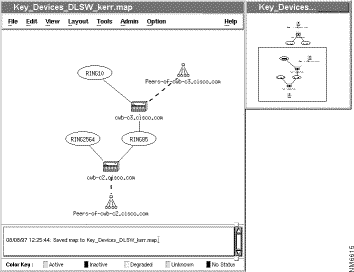
Displaying the Key Devices View of the Network
The key devices view is displayed when you start the DLSw application. To display the key devices view at any other time, select View > Key Devices from the DLSw menu bar. The key devices view is displayed, as shown in Figure 5-2.
Figure 5-2 Key Devices View of the Network
The key devices view displays the key routers in the network. For any one key router, all its peer routers are displayed as a single icon that represents the aggregation of those peer routers. From any one key router, all the peer connections to its peer routers are displayed as a single peer connection. The color of the aggregated peer router and aggregated peer connection reflects the status of the links that make up the aggregated peer connection.
From the key devices view, you can select an aggregated peer router icon or aggregated peer router icon with the right mouse button. Select Focus View from the menu to display a focus view for the key router.
Optionally, you can select an aggregated peer router icon or an aggregated peer connection icon then select Aggregate Summary from its popup menu to review information about the individual peer connections that make up the aggregation.
Displaying the Global View of the Network
To display the global view, select View > Global from the DLSw menu bar. The global view is displayed, as shown in Figure 5-3.
Figure 5-3 Global View of a DLSw Network
Displaying a Focus View of a Router
The following information describe the ways in which you can display the focus view for a router.
Displaying the Focus View from a Popup Menu
To display the focus view for a specific router from the View menu, use the following procedure:
Step 1 Locate the router in the main window.
Step 2 Click the router with the right mouse button.
Step 3 From the popup menu, select Focus View.
Displaying the Focus View from the View Menu
To display the focus view for a router from the View menu, use the following procedure:
Step 1 From the DLSw menu bar, select View > Focus.
Step 2 Type in the device name of the router.
Step 3 Click OK.
Displaying the Focus View from the View Menu with a Router Selected
To display the focus view for a selected router from the View menu, use the following procedure:
Step 1 Locate the router in the main window.
Step 2 Click the router with the left mouse button to select it.
Step 3 Select View > Focus.
Step 4 Click OK in the Focus Peer Prompt window.
Displaying Information about a DLSw Peer Router
Once you locate a router on the map, you can display information about that router by using the following procedure:
Step 1 Locate the router in the main window.
Step 2 Click the router with the right mouse button.
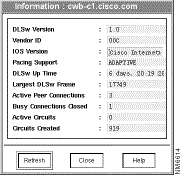
Step 3 Select Information from the router's popup menu. The DLSw application displays the Peer Information window, as shown in Figure 5-4.
Figure 5-4 Router Information Window
The Peer Information window contains information about the router, including the DLSw and Cisco IOS versions, connections, and circuits.
In the Peer Information window, you can click Refresh to update the view.
Table 5-2 describes the fields in the Peer Information window.
Table 5-2 Peer Information Fields
Field
Description
DLSw Version
Version of DLSw used between local and remote peers.
Vendor ID
Name of the DLSw vendor and its ID.
IOS Version
Cisco IOS release running on the router.
Pacing Support
Receiving window size. The possible values are NONE, ADAPTIVE, and FIXED.
DLSw Up Time
Elapsed time since the DLSw router entered the active state.
Largest DLSw Frame
Largest frame size (including DLC header and information field but not any MAC-level or framing octets) that this DLSw router can forward on any path through itself.
Active Peer Connections
Number of transport connections that are not in the disconnected state.
Busy Connections Closed
Number of times transport connections in this node exited the connected state with some non-zero number of active circuits on the transport connection.
Active Circuits
Current number of circuits that are not in the disconnected state.
Circuits Created
Total number of circuits added or reactivated upon exiting the disconnected state table.
Displaying Information about a Peer Connection
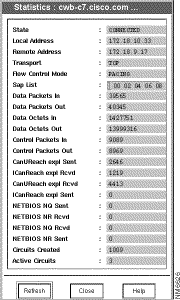
A peer connection is the connection from one peer DLSw router to another. Once you locate a router in the focus view or global view, you can display information about the selected router's peer connections to other peer routers. To display peer statistics, use the following procedure:
Step 1 Locate the router in the main window in the focus view or global view.
Step 2 Click the router with the right mouse button.
Step 3 Select Peer Statistics from the router's popup menu. If the router has more than one peer connection, the Select Peer window is displayed.
Step 4 Select the peer connection you want to see and click Get.
The DLSw application displays a Peer Statistics window that contains routing statistics for the peer connection, as shown in Figure 5-5.
In the Information window, you can click Refresh to update the view.
Figure 5-5 Peer Statistics Window
Table 5-3 describes the fields in the Peer Statistics window:
Table 5-3 Fields of the Peer Statistics Window
Field
Description
State
State of the transport connection.
Local Address
Local transport address for this transport connection.
Remote Address
Remote transport address of the transport connection.
Transport
Transport domain of the transport connection.
Flow Control Mode
Flow control mechanism in use on the transport connection. Values are UNDETERMINED, PACING, and OTHER.
Sap List
Supported SAP list received in the capabilities exchange message from the peer DLSw router.
Data Packets In
Number of Switch-to-Switch Protocol (SSP) messages of type DGRMFRAME, DATAFRAME, or INFOFRAME received on this transport connection.
Data Packets Out
Number of SSP messages of type DGRMFRAME, DATAFRAME, or INFOFRAME transmitted on this connection.
Data Octets In
Number of octets in SSP messages of type DGRMFRAME, DATAFRAME, or INFOFRAME received on this transport connection.
Data Octets Out
Number of octets in SSP messages of type DGRMFRAME, DATAFRAME, or INFOFRAME transmitted on this connection.
Control Packets In
Number of SSP messages received on this transport connection which were not of type DGRMFRAME, DATAFRAME, or INFOFRAME.
Control Packets Out
Number of SSP messages transmitted on this transport connection which were not of type DGRMFRAME, DATAFRAME, or INFOFRAME.
CanUReach expl Sent
Number of CanUReach_ex messages sent on the transport connection.
ICanReach expl Rcvd
Number of ICanReach_ex messages received on the transport connection.
CanUReach expl Rcvd
Number of CanUReach_ex messages received on the transport connection.
ICanReach expl Sent
Number of ICanReach_ex messages sent on the transport connection.
NETBIOS NQ Sent
Number of NetBIOS_NQ_ex messages sent on the transport connection.
NETBIOS NR Rcvd
Number of NetBIOS_NQ_ex messages received in the transport connection.
NETBIOS NR Sent
Number of NETBIOS_NR_ex messages sent on this transport connection.
NETBIOS NQ Rcvd
Number of NetBIOS_NQ_ex messages received in the transport connection.
Circuits Created
Number of times that circuits entered a circuit-established state (not counting transitions from circuit-restart).
Active Circuits
Number of currently active circuits on this transport connection.
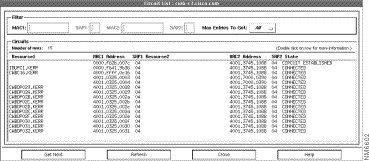
Displaying Information about a Circuit from the Circuit List
A DLSw circuit is the end-to-end association of two PUs passing through one or two DLSw routers. Once you locate a router on the DLSw map, you can display circuit information about that router. To display a router's circuit list, use the following procedure:
Step 1 Locate the router in the main window.
Step 2 Click the router with the right mouse button.
Step 3 Select Circuit List from the router's popup menu. The Circuit List window is displayed, as shown in Figure 5-6.
Figure 5-6 Circuit List Window
The Circuit List window displays a list of the circuits that pass through the selected router, as shown in Figure 5-6. For each circuit, the Circuit List window displays the name, MAC, and service access point (SAP) for the host network connection and for the PU on the circuit (the host and the remote PU).
In the Information window, click Refresh to get a more up-to-date view.
Table 5-4 describes the fields in the Circuit List window.
Table 5-4 Fields of the Circuit List Window
Field
Description
Filter
Enter MAC and SAP addresses and click Get Next to obtain a new set of circuits based on the new MAC and SAP addresses.
Resource1
PU name of the resource associated with the router in the title bar.
MAC1 Address
MAC address of Resource1.
SAP1 Address
SAP address of Resource1.
Resource2
PU name in the circuit associated with the peer router.
MAC2 Address
MAC address of Resource2.
SAP2 Address
SAP address of Resource2.
State
State of the circuit connection, which can be DISCONNECTED, CIRCUIT START, RESOLVE PENDING, CIRCUIT PENDING, CIRCUIT ESTABLISHED, CONNECT PENDING, CONTACT PENDING, CONNECTED, DISCONNECT PENDING, HALT PENDING, HALT PENDING NOACK, CIRCUIT RESTART, or RESTART PENDING.
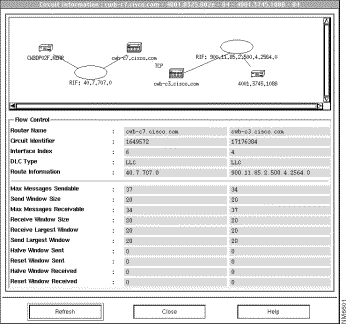
Step 4 Double-click a circuit (one row of information) in the Circuit List window to display a Circuit Information window, which shows a diagram of the entire circuit and lists information about the peer routers in the circuit, as shown in Figure 5-7.
Figure 5-7 Circuit Information Window
Table 5-5 describes the fields in the Circuit Information window.
Table 5-5 Fields of the Circuit Information Window
Field
Description
Router Name
Device name of the DLSw router.
Circuit Identifier
Circuit identifier assigned by this DLSw node to this circuit. The first four octets are the Data Link Control (DLC) port ID, and the second four octets are the data link correlator.
Interface Index
Entry index of the local interface through which the PU can be reached.
DLC Type
DLC protocol in use between the DLSw node and the PU. The possible values are QLLC, SDLC, LLC, NA, or Other.
Route Information
If source-route bridging is in use between the DLSw node and the PU, this is the routing information field describing the path between the two devices. Otherwise the value would be an octet string of zero length.
Max Messages Sendable
Number of paced Switch-to-Switch Protocol (SSP) messages that this DLSw router is authorized to send on this circuit before it must stop and wait for an additional flow control indication from the partner DLSw router.
Send Window Size
Current window size that this DLSw is using in its role as a data sender. This is the value by which the router can increase the number of messages it is authorized to send if it receives a flow control indication with the bits specifying a repeat window.
Max Messages Receivable
Current number of paced SSP messages that this DLSw router has authorized the partner DLSw router to send on this circuit before the partner DLSw must stop and wait for an additional flow control indication from this DLSw router.
Receive Window Size
Current window size that this DLSw router uses in its role as a data receiver. This is the number of additional paced SSP messages that this DLSw router can authorize its DLSw partner router to send if this DLSw router sends a flow control indication with the bits specifying a repeat window.
Receive Largest Window
Largest receive window size granted by this DLSw router during the current activation of this circuit. This is not the largest number of messages granted at any time, but the largest window size as represented by FCIND operator bits.
Send Largest Window
Largest send window size (with respect to this DLSw router) granted by the partner DLSw router during the current activation of this circuit.
Halve Window Sent
Number of Halve window operations this DLSw has sent on this circuit, in its role as a data receiver.
Reset Window Sent
Number of Reset window operations this DLSw router has sent on this circuit, in its role as a data receiver.
Halve Window Received
Number of Halve window operations this DLSw router has received on this circuit, in its role as a data sender.
Reset Window Received
Number of Reset window operations this DLSw router has received on this circuit, in its role as a data sender.
Displaying a Focus View from an Aggregated Peer
While in the key devices view, you can display a focus view of a key router from its aggregated peer router or its aggregated peer connection by using the following procedure.
Step 1 Locate an aggregated peer router in the main window.
Step 2 Click the router with the right mouse button.
Step 3 Select Focus View from the router's popup menu. The application displays the focus view for the key router that is the peer to the routers represented by the selected aggregated peer router.
Displaying a Summary of Aggregated Peer Connections
While in the key devices view, you can display summary information about the peer connections that are represented by an aggregated peer router icon or aggregated peer connection icon.
Step 1 Locate an aggregated peer router or aggregated peer connection in the main window.
Step 2 Click the icon with the right mouse button.
Step 3 Select Aggregate Summary from the icon's popup menu. The Aggregate Summary window is displayed, as shown in Figure 5-7.
Figure 5-8 Aggregate Summary Window
The Aggregate Summary window displays the summary of aggregated peer connections. This aggregation does not include connections to other key device
Table 5-6 describes the fields in the Aggregate Summary window.
Table 5-6 Fields of the Aggregate Summary Window
Field
Description
Total Non-Key Peer Connections
Total number of peer connections aggregated into this icon. This count does not include connections to key devices.
Number of Active
Number of active peer connections aggregated into this icon.
Number of Inactive
Number of inactive peer connections represented by this icon.
Number of Degraded
Number of degraded peer connections represented by this icon.
Number of Unknown
Number of unknown peer connections represented by this icon.
Using the View Menu
You can change the view by selecting one of the following items from the View menu:
Locate finds a specific device on the map. Select View > Locate and enter either the device name or IP address of the device and click Locate. The specified device is selected in the map. The IP address should be in dotted decimal format, such as 75.122.10.147.
Refresh updates the status of the displayed map from the maps database. The monitor daemon refreshes the map automatically.
Global displays a high-level view of DLSw-enabled Cisco devices. The map presents the status of devices and links.
Focus displays information for a specific device. Select Focus and enter the name of a router, or point to a single peer (a router icon), click the right mouse button, and select View > Focus. Either action displays the selected peer's perspective of the network, with the in-focus router in a black box.
Key Devices displays a key devices view of the network, which contains all the routers that were designated as key devices, all their peer routers, and the peer connections between the peer routers and the key routers.
PU or LU displays the path to the host for a PU or LU. Specify the PU or LU name in the form NAME.DOMAIN.
Viewing Dependent PUs and LUs
You can retrieve the dependency view information for a PU or LU. Maps gets the PU and LU information from the VTAM at the mainframe and displays the PU and LU information at the workstation in logical maps. You can display information about specified PUs and LUs, and you can see their dependency paths through the network to the VTAM host. There are several ways to retrieve PU and LU information, depending on whether you know the PU or LU name, and on what you want to do with the PU or LU once you locate it.
If you know the PU or LU name, and you want a quick path to the dependency view, you can select PU or LU from the View menu. This method is explained in the "Viewing PUs and LUs from the View Menu" section.
Select PU or LU from the Tools menu and use the Filter window to select a PU or LU to view; you need not remember the PU or LU name. This method, which is explained in the "Viewing PUs from the Tools Menu" section and the "Viewing LUs from the Tools Menu" section, lets you display dependency views as well as activate and deactivate the PUs and LUs.
Viewing PUs and LUs from the View Menu
If you know the name of the PU or LU, you can use the View menu on the Maps menu bar to display a dependency view. To view a PU or an LU from the View menu, use the following procedure:
Step 1 From the DLSw application's menu bar, select View. The View menu is displayed.
Step 2 From the View menu, select PU to view a PU, or select LU to view an LU. The PU/LU Prompt window is displayed, as shown in Figure 5-9.
Figure 5-9 PU/LU Prompt Window
Step 3 From the PU/LU Prompt window, enter the PU name or LU name in the format NAME.DOMAIN.
Step 4 Click OK. Maps displays a dependency view for the selected PU or LU.
Viewing PUs from the Tools Menu
If you would rather select the PU names from a filtered list, you can use the PU item on the Tools menu, which lets you set up filtering criteria to search for a PU name, based on VTAM information, or on its router or Token Ring dependency. From the Map application's menu bar, select Tools > PU to display the PU Filter window, as shown in Figure 5-10.
Filtering the PU List
When you select PU from the Maps Tools menu, the application displays the PU Filter window, as shown in Figure 5-10. This window lets you configure a filter to be used in selecting which PUs to display in a PU List window. Select PUs the following ways:
By VTAM Info to configure the filter to select PUs based on VTAM criteria.
By Dependency to configure the filter to select PUs based on the routers on which the PUs are dependent.
Get All PUs to see all discovered PUs.
Click Apply to display all the PUs filtered as you requested. The PU List window is described in the "Using the PU List Window" section.
Figure 5-10 PU Filter Window
Filtering PUs by VTAM Information
You can filter the PU List based on the PU name, state, and type.
Step 1 From the PU Filter window, select By VTAM Info.
Step 2 In the PU Name field, enter all of a PU name, or just part of a PU name and wildcards. The PU List will contain PUs with names that match the filter criteria:
Use NAME to search for a specific PU
Use NAME.DOMAIN to search for a specific PU in a specific domain
Use NAME.* or NAME to get a list of PUs with the same name in all domains
Use NAM* to get a list of PU names that start with the same characters (NAM, in this case) in all domains
Step 3 In the PU State field, select one or more PU states. The PU List window will contain the names of PUs that match one of the PU states you select.
Step 4 In the PU Type field, select one or more PU types. The PU List window will contain PUs whose type matches one of the PU types you select.
Step 5 Click Apply.
Filtering PUs by Dependency
Use the following procedure to filter PUs by dependency:
Step 1 From the PU Filter window, select By Dependency to filter the PU List based on the router dependency.
Step 2 Select one or more routers from the Routers field in the PU Filter window.
Step 3 Click Apply. The PU List window displays the PUs dependent on the selected routers.
Getting all PUs
Select Get All PUs and then click Apply to display a PU List that contains all discovered PUs.
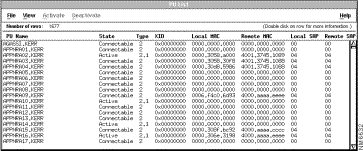
Using the PU List Window
This section describes how to use the functions of the PU List window, as shown in Figure 5-11. The PU List window shows all the PU names that satisfy the same set of PU filter criteria.
The PU List window is static; select View > Refresh to update the status.
Figure 5-11 PU List Window
From the PU List window, you can do the following:
Update the current filter information by selecting View > Refresh.
Note Some nodes may appear in the PU list with an unknown type and
status. This status appears when VTAM returns the IST453I message
in response to a D NET,ID command for a
node. Message IST453I indicates that the node is unknown to
VTAM; this can occur when a major node is inactivated or when a
node is activated, but VTAM is not ready to return information for
the node when Maps queries it. This situation should not occur for
switched PUs, unless the switched PU major node is inactivated.
Activating a PU
You can activate a PU from the PU List window. This action is comparable to using the VTAM command VARY NET,ACT,ID=PU_name.
Note Before you can activate a PU, you must enable PU activation and an
SPO subtask must be running in the mainframe, as described in the
CiscoWorks Blue Maps and SNA View Workstation Installation and
Administration Guide. Notify your network administrator. After you
have enabled PU and LU activation, select a PU or LU to activate the
menu. Otherwise it remains inactive.
To activate a PU from the PU List window, use the following procedure:
Step 1 Select an inactive PU from the PU List window.
Step 2 From the PU List window menu bar, select Activate.
Step 3 From the Activate menu, select one of the following:
Default activates the PU as if you had issued the VTAM command VARY NET,ACT,SCOPE=COMP,ID=PU_name.
All activates the PU and its LUs regardless of the ISTATUS value, which is the status with which the PU was configured through VTAM.
Only activates the selected PU, but no LUs, regardless of their ISTATUS values (the status with which the PU was configured through VTAM).
Deactivating a PU
You can deactivate an active PU from the PU List window. This is comparable to issuing the VTAM command VARY NET,INACT,ID=PU_name.
To deactivate a PU from the PU List window, use the following procedure:
Step 1 Select an active PU from the PU List window.
Step 2 From the PU List window menu bar, select Deactivate.
Step 3 From the Deactivate menu, select one of the following:
Quiesce deactivates the PU and any subordinate resources when all current sessions are terminated.
Immediate deactivates the PU and any subordinate resources immediately, disrupting active sessions.
Forced deactivates the PU forcibly; this form of deactivation is recommended for PUs that do not respond to other deactivation methods.
Listing the LUs Dependent on a PU
From the PU List window you can display a list of LUs attached to a PU. To display an LU list, use the following procedure:
Step 1 Select a PU from the PU List window.
Step 2 From the PU List menu bar, select View > Show LU List. The LU List window is displayed.
From the PU List window you can display a dependency view of the path from the PU back toward the VTAM host. To display a dependency view, use the following procedure:
Step 1 Select a PU from the PU List window.
Step 2 From the PU List menu bar, select View > Dependency. Maps displays the PU dependency view, as shown in Figure 5-12.
Figure 5-12 PU Dependency View
Step 3 Because the PU dependency view is static, select View > Refresh to update the status.
The PU dependency view shows the network components from the PU itself, back toward the mainframe to the host network connection. The PU dependency view shown in Figure 5-12 includes the following network components, starting at the top:
Host network connection
RIF from the peer router to the host network connection
First peer router (cwb-c3.cisco.com)
Peer connection (dotted line between cwb-c3.cisco.com and cwb-c5.cisco.com)
Second peer router (cwb-c5.cisco.com)
RIF from the PU to the peer router
PU (XZAPHOD.CPAC)
Choosing Another PU Set
From the PU List window, you can configure a new PU filter to display a new set of PU names in the PU List window. To configure a new PU List filter, use the following procedure:
Step 1 From the PU List menu bar, select View > Filter.
You can use the LU item on the Tools menu to set up filtering criteria to search for an LU name based on VTAM information or on its router or Token Ring dependency. From the Map application's menu bar, select Tools > LU to display the LU Filter window, as shown in Figure 5-13.
Figure 5-13 LU Filter Window
Filtering the LU List
The LU Filter window lets you configure the filter to use when selecting the LUs to display in an LU List window, as shown in Figure 5-13. Select LUs in the following ways:
By VTAM Info to configure the filter to select LUs based on VTAM criteria.
By Dependency to configure the filter to select LUs based on the routers on which the LUs are dependent.
You can filter the LU List based on the LU name, PU name, and LU state.
Step 1 From the LU Filter window, select By VTAM Information.
Step 2 In the LU Name field, enter all of an LU name, or just part of an LU name and wildcards. The LU List contains LUs with names that match the filter criteria:
Use NAME.DOMAIN to search for a specific LU in a specific domain.
Use NAME.* or NAME to get a list of LUs with the same name in all domains.
Use NAM* to get a list of LU names that start with the same characters (NAM, in this case) in all domains.
Step 3 In the LU State field, select one or more LU states. The LU List window will contain the names of LUs that match one of the LU states that you select.
Step 4 In the LU Type field, select one or more LU types. The LU List window will contain LUs whose type matches one of the LU types that you select.
Step 5 Click Apply.
Filtering LUs by Dependency
You can filter the LU List based on the router dependency. Select one or more routers from the Routers field in the LU Filter window. The LU List window will contain the LUs dependent on the selected routers.
Getting all LUs
From the LU Filter window, you can select Get All LUs to display an LU List that contains all LUs discovered by SNA View.
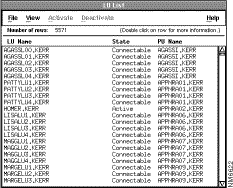
Using the LU List Window
This section describes how to use the functions of the LU List window, as shown in Figure 5-14. The LU List window shows all the LU names that satisfy the same LU filter criteria.
The LU List window is static; select View > Refresh to update the status.
Figure 5-14 LU List Window
From the LU List window, you can perform the following actions:
Refresh the current filter information by selecting View > Refresh.
Activating an LU
You can activate an LU from the LU List window. This is comparable to issuing the VTAM command VARY NET,ACT,ID=LU_name.
Note Before you can activate an LU, you must enable LU activation and
verify that an SPO subtask is running in the mainframe, as described
in the CiscoWorks Blue Maps and SNA View Workstation Installation
and Administration Guide. Notify your network administrator. After
you enable PU and LU activation, select a PU or LU to activate the
menu. Otherwise it remains inactive.
To activate an LU from the LU List window, use the following procedure:
Step 1 Select an inactive LU from the LU List window.
Step 2 From the LU List menu bar, select Activate.
Step 3 From the Activate menu, select one of the following:
Default activates an LU as if issuing the VTAM command VARY NET,ACT,SCOPE=COMP,ID=LU_name.
All activates an LU regardless of its ISTATUS value.
Deactivating an LU
You can deactivate an active LU from the LU List window. This is comparable to issuing the VTAM command VARY NET,INACT,ID=LU_name. To deactivate an LU from the LU List window, use the following procedure:
Step 1 Select an active LU from the LU List window.
Step 2 From the LU List menu bar, select Deactivate.
Step 3 From the Deactivate menu, select one of the following:
Quiesce deactivates the LU when all current sessions are terminated.
Immediate deactivates the LU immediately, disrupting active sessions.
Forced deactivates the LU forcibly; this action is recommended for LUs that do not respond to other deactivation methods.
Displaying a Dependency View from an LU
From the LU List window you can display a dependency view of the path from the LU back toward the VTAM host. To display an LU dependency view, use the following procedure:
Step 1 Select an LU from the LU List window.
Step 2 From the LU List menu bar, select View > Dependency.
Step 3 Maps displays the LU dependency view, as shown in Figure 5-15.
Step 4 Because the LU dependency view is static, select View > Refresh to update the status.
Figure 5-15 LU Dependency View
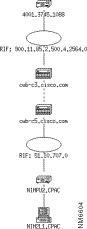
The LU dependency view shows the network components from the LU itself, back toward the mainframe to the host network connection. The LU dependency view, shown in Figure 5-15, includes the following network components, starting at the top:
Host network connection
RIF between the peer router and the host network connection
First peer router (cwb-c3.cisco.com)
Peer connection (dotted line between cwb-c3.cisco.com and cwb-c5.cisco.com)
Second peer router (cwb-c5.cisco.com)
RIF between the PU and the peer router
PU (NIMPU2.CPAC)
LU (NIM2L1.CPAC)
Choosing Another LU Set
From the LU List window, you can configure a new LU filter to display a new set of LU names in the LU List window. To configure a new LU List filter, use the following procedure:
Step 1 From the LU List menu bar, select View > Filter.
The LU Filter window is displayed.
Step 2 Choose a filtering option: By VTAM Info, By Dependency, or Get All LUs. (These options are explained in the "Filtering the LU List" section.
Step 3 Click Apply.
Interpreting Colors and Symbols on a Map
The colors and symbols on a DLSw map are explained below:
Green—Device or link is up and running
Red—Device or link is down, or aggregated link is above critical threshold
Yellow—Device or link performance is degraded or pending, or aggregated link is between critical and marginal thresholds
Black—Physical link; no status is reported
Blue—Status of device or link is unknown
Solid line—Physical link
Dashed line—Logical link
DLSw Icons
Table 5-7 shows the icons that can appear on a DLSw map.
Table 5-7 DLSw Icons
Icon
Description
Token Ring
Routing information field (RIF)
Known DLSw router
Green—Managed by SNMP
Blue—Not managed by SNMP
Focus router
Router not known to CiscoWorks Blue Maps (not discovered)