|
|

Table Of Contents
Configuring Broadband Access Center
Configuring the Class of Service
Selecting Configuration Options
Adding and Modifying a License
Installing RDU Custom Extensions
Modifying Publishing Plug-In Settings
Configuring Broadband Access Center
This chapter describes the Broadband Access Center (BAC) configuration tasks that you perform by selecting the options in the Configuration menu:
•
Configuring the Class of Service
•
•
Configuring the Class of Service
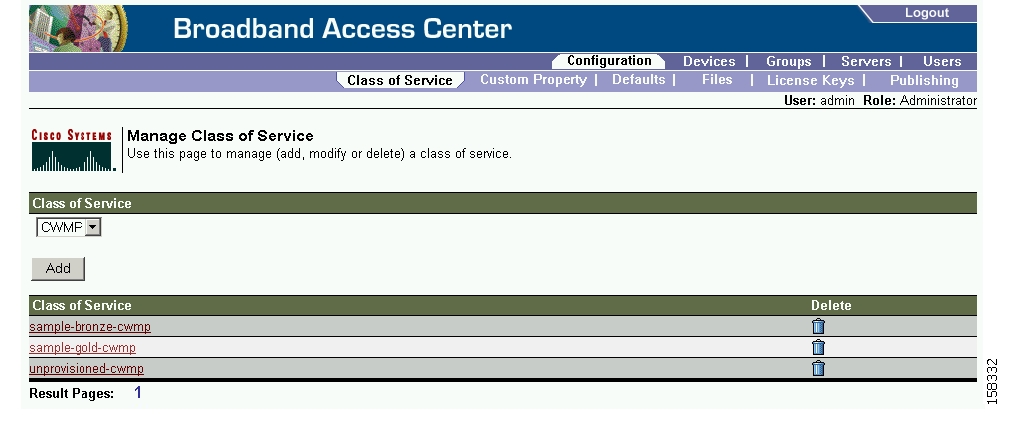
By using the BAC administrator user interface, you can configure the Classes of Service offered to your customers. You can use the administrator user interface to add, modify, view, or delete any selected Class of Service. Start with the Manage Class of Service page, as shown in Figure 17-1.
Figure 17-1 Manage Class of Service Page
Table 17-1 identifies the fields and buttons shown in Figure 17-1.
Table 17-1 Manage Class of Service Page
Class of Service
A drop-down list that identifies the technology classes of service that you can search for. Available selections, as they appear on screen, include:
•
Note
Add
Lets you add a new Class of Service.
Class of Service list
Displays the names of Class of Service objects.
Delete
Lets you delete selected Classes of Service.
Table 17-2 identifies the fields and buttons shown in the Add Class of Service page.
Adding a Class of Service
To add a specific Class of Service:
Step 1
Step 2
Step 3
Step 4
For example, assume that you want to create a new Class of Service called Gold-Classic for CWMP. You might enter provisioned-cwmp as the Class of Service Name, and choose CWMP from the service type drop-down list.
Step 5
Step 6
Step 7
For example, choose as property name /IPDevice/connectionRequestMethod. Choose Discovered from the Property Value drop-down list and then continue with the rest of this procedure.
Note
IPDeviceKeys.CONNECTION_REQUEST_METHOD.
Multiple Property Name:Property Value pairs could appear on this page. You use the Delete button to remove any unwanted pairs from the class of service.Step 8
Step 9
After submitting the Class of Service, the Manage Class of Service page appears to show the newly added Class of Service.
Modifying a Class of Service
You modify your Classes of Service by selecting the various properties and assigning appropriate property values. When creating a Class of Service for the first time you select all of the appropriate properties and assign values to them. If you make a mistake, or your business requirements for a certain Class of Service change, you can either change the property value before submitting your previous changes or delete the Property Name:Property Value pair altogether.
Note
To add, delete, or modify Class of Service properties:
Step 1
Step 2
Step 3
Step 4
•
–
–
•
–
–
•
–
–
Note
Step 5
Step 6
The modified Class of Service will be available in the Manage Class of Service page.
Deleting a Class of Service
You can delete any existing Class of Service but, before you attempt to do so, you must ensure that there are no devices associated with that Class of Service.
Tip
To delete a Class of Service:
Step 1
Step 2
Step 3
) for the correct Class of Service, and a confirmation dialog box appears.
Note
Step 4
If you try to delete a Class of Service with devices associated with it, this error message is displayed:
The following error(s) occurred while processing your request.
Error: Class Of Service [sample-COS] has devices associated with it, unable to delete

Please correct the error(s) and resubmit your request.
The specific Class of Service is specified within the error message. In this example this is represented by sample-COS.
Configuring Custom Properties
Custom properties let you specify additional customizable device information to be stored in the RDU database. The Custom Property configuration page is found under the Configuration menu, and you use this page to add or delete custom properties.
Caution
After the custom property is defined, you can use it in this property hierarchy. See Authoring Configuration Templates, page 5-12, for how to use the property hierarchy. Properties can be configured on the following objects for use in the property hierarchy:
•
•
•
•
•
Additionally, properties can be configured on Group and Group Type objects, but they will not be part of the property hierarchy.
To configure custom properties:
Step 1
Step 2
•
–
–
–
–
•
–
–
–
Configuring Defaults
The Defaults page, found under the Configuration option, lets you access the default settings for the overall system, including the Regional Distribution Unit (RDU), and the CWMP technology.
Selecting Configuration Options
The procedure for configuring specific default types is identical. Complete this procedure to access the desired defaults page and then refer to the appropriate section within this chapter for a description of the various page components.
Step 1
Step 2
Step 3
The appropriate defaults page appears.
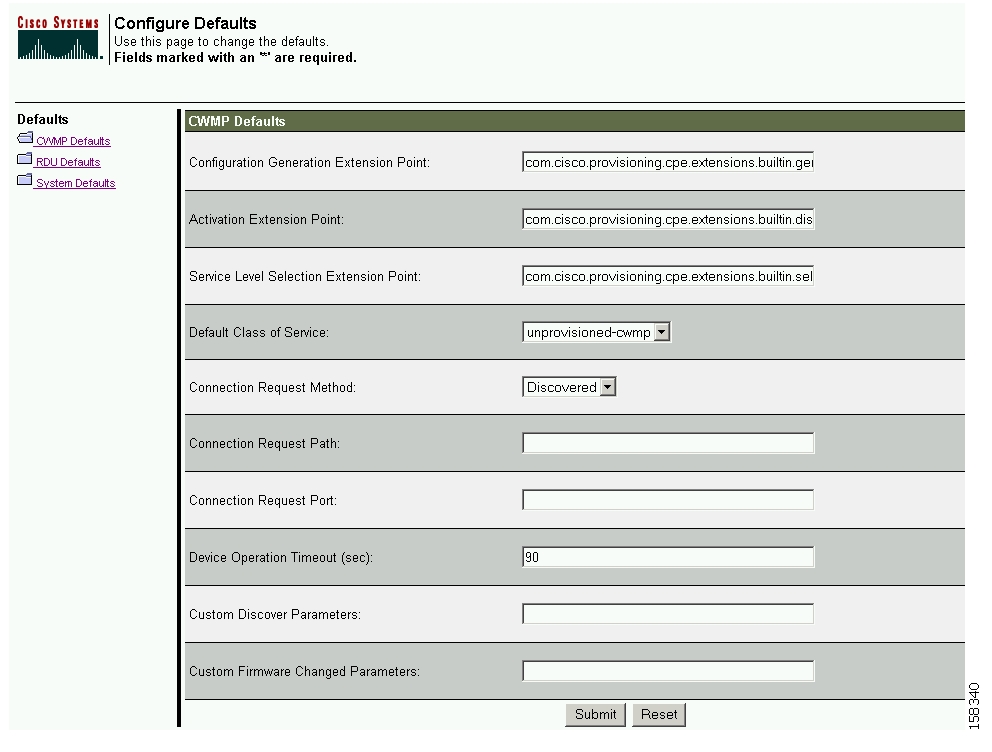
CWMP Defaults
The CWMP Defaults page ( Figure 17-2) displays a list of CWMP technology configuration settings.
Figure 17-2 Configure CWMP Defaults Page
Table 17-4 describes all fields and buttons appearing in Figure 17-2.
RDU Defaults
When you click the RDU defaults link, the RDU Defaults page (see Figure 17-3) appears. Use this page to configure settings affecting RDU operations.
Figure 17-3 Configure RDU Defaults Page
Table 17-4 describes all fields and buttons appearing in Figure 17-3.
Note
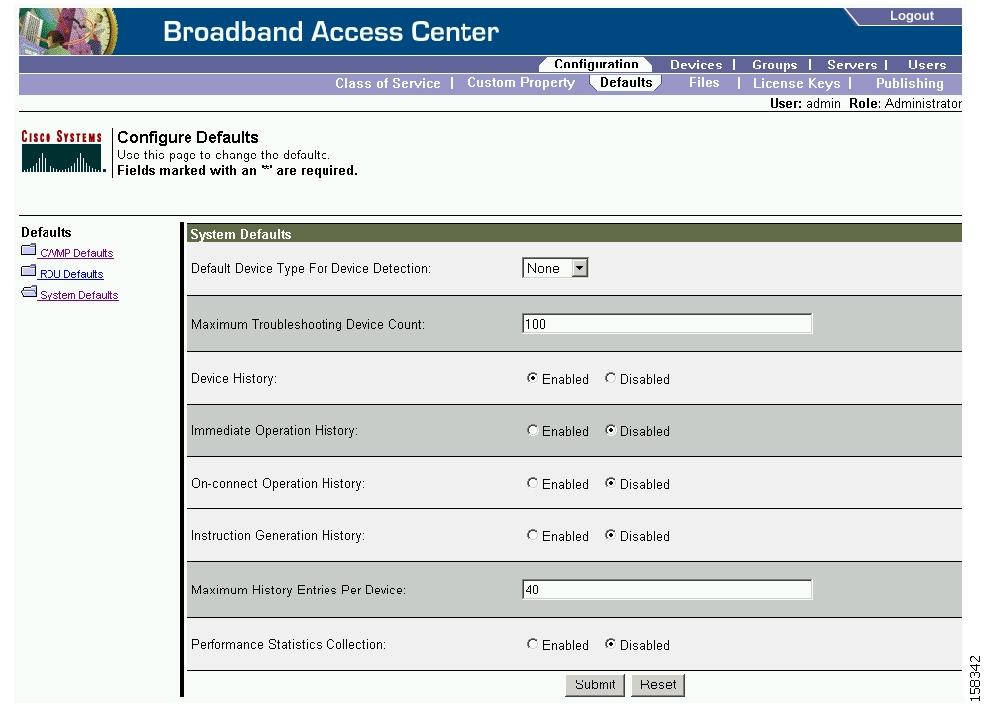
System Defaults
When you click the Systems Defaults link, the System Defaults page (see Figure 17-4) appears.
Figure 17-4 System Defaults Page
Table 17-5 describes all fields and buttons appearing in Figure 17-4.
Table 17-5 Configure System Defaults Page
Default Device Type for Device Detection
Identifies the default device type for a device not previously registered in the RDU. The options include:
•
•
If the device detection extension is unable to identify the device type, the "default type" (CWMP or None) specifies the device type. If you set the Default Device Type as None, the device record is not added to the RDU.
Note
Maximum Troubleshooting Device Count
Identifies the maximum number of devices that you can troubleshoot at any one time. The default number is 100.
Device History
Identifies if logging device record and device configurations is enabled or disabled.
Immediate Operation History
Identifies if logging of history of device operation initiated from the API using immediate mode is enabled or disabled.
On-Connect Operation History
Identifies if logging of history of device operation initiated from the API using on-connect mode is enabled or disabled.
Instruction Generation History
Identifies if logging the history of device instruction generation is enabled or disabled.
Maximum History Entries Per Device
Defines the maximum number of entries of device history that will be stored for each device. The default number of entries is 40.
Performance Statistics Collection
Determines if statistics collection is enabled. See Monitoring Performance Statistics, page 11-12, on performance statistics.
Submit
Activates or implements the changes you have made.
Reset
Returns all settings to their previous settings.
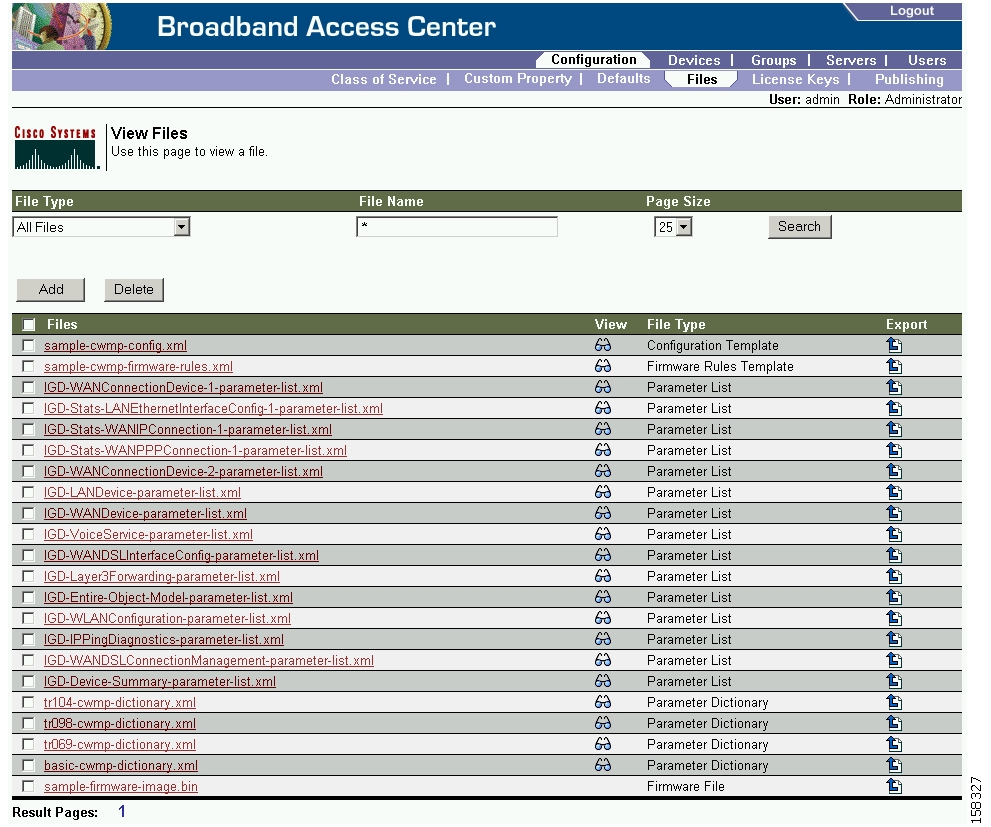
Managing Files
By using the BAC administrator user interface, you can manage the template files and the parameter dictionaries for dynamic generation for CWMP files, or software images for devices (see Figure 17-5). You can add, delete, replace, or export any file type, including:
•
•
•
•
•
•
Note
Figure 17-5 Manage Files Page
Table 17-6 identifies the fields and buttons shown in Figure 17-5.
Adding Files
To add an existing file to the RDU database:
Step 1
Step 2
Step 3
Step 4
Note
Step 5
Step 6
The View Files page appears to indicate that the file has been added.
Viewing Files
To view the contents of a file:
Step 1
Step 2
Step 3
Step 4
) corresponding to the File Type you had specified for a search.
The View File page appears.
Replacing Files
To replace an existing file:
Step 1
Step 2
Step 3
Step 4
Note
Step 5
Note
Step 6
Exporting Files
You can copy files to your local hard drive by using the export function.
Note
To export a file:
Step 1
Step 2
Step 3
Step 4
) and you are prompted to either open the file or save it. To export XML files, such as templates, clicking the Export icon displays the file content. Therefore, you must right-click the Export icon and select Save Target As.
Step 5
Deleting Files
Complete this procedure to delete an existing file:
Step 1
Step 2
Step 3
Step 4
Step 5
Step 6
Caution
Note
Managing License Keys
Software licenses are used to activate specific features or to increase the functionality of your installation. Each license is available as either a permanent license or an evaluation license.
•
•
Caution
When you upgrade from an evaluation license to a permanent license, you do not have to re-install the software or reconfigure BAC. You simply have to provide the permanent license via the BAC administrator user interface.
The Manage License Keys page ( Figure 17-6) displays a list of licenses that have been entered for your implementation. This BAC release supports both evaluation and permanent licenses for the CWMP-compliant devices, and DPEs. The status of each available license appears as active, expired, or identifies the expiration date.
Note
Figure 17-6 Manage License Keys Page
Adding and Modifying a License
To add, modify, or upgrade a license:
Step 1
Step 2
Step 3
Step 4
Step 5
Managing RDU Extensions
Creating a custom extension is essentially a programming activity that can, when used in conjunction with the BAC administrator user interface, allow you to augment BAC behavior or add support for new device technologies.
Managing extensions includes:
•
Note
Writing a New Class
This procedure is included to better illustrate the entire custom extension creation process. You can create many different types of extensions; for the purposes of this procedure a Publishing Extension is used.
To write the new class:
Step 1
Step 2
Step 3
Installing RDU Custom Extensions
After a Jar file is created, use the administrator user interface to install it:
Step 1
Note
Step 2
Step 3
Step 4
Note
Step 5
Step 6
Viewing RDU Extensions
You can view the attributes of all RDU extensions directly from the View Regional Distribution Unit Details page. This page displays details on the installed extension Jar files and the loaded extension class files.
Publishing Provisioning Data
BAC has the capability to publish the provisioning data it tracks to an external datastore in real time. To do this, a publishing plug-in must be developed to write the data to the desired datastore. The Manage Publishing page identifies information such as the plug-in name, its current status (whether it is enabled or disabled), and switch to enable or disable it.
You can enable as many plug-ins as required by your implementation but care must be exercised because the use of publishing plug-ins can decrease system performance.
Note
Publishing Datastore Changes
To enable or disable a publishing plug-in:
Step 1
Step 2
Step 3
Modifying Publishing Plug-In Settings
These settings are a convenient way for plug-in writers to store plug-in settings in the RDU for their respective datastore. To modify the publishing plug-in settings:
Step 1
Step 2
Step 3
Table 17-7 identifies the fields shown in the Modify Publishing Plug-Ins page.
Step 4
Step 5
![]()
![]()
![]()
![]()
![]()
![]()
![]()
![]()
Posted: Thu Aug 31 23:56:25 PDT 2006
All contents are Copyright © 1992--2006 Cisco Systems, Inc. All rights reserved.
Important Notices and Privacy Statement.