|
|

Table Of Contents
Using the Administrator User Interface
Viewing Device Provisioning Engines
Viewing Regional Distribution Unit Details
Using the Administrator User Interface
This chapter describes the administration tasks performed from the Broadband Access Center (BAC) administrator user interface. These tasks mainly involve monitoring the actions of various BAC components and include:
Note
The procedures described in this chapter are presented in a tutorial manner. Wherever possible, examples are included to illustrate the possible results of each procedure.
For details on server configurations, see Configuring Broadband Access Center, page 17-1.
User Management
Managing users involves adding, modifying, and deleting users who administer BAC. Depending on your user type, you can use this menu to add, modify, and delete users. This menu displays all users configured to use BAC and identifies their user types.
There are three types of BAC users: an Administrator, a Read/Write user, and a Read-Only user. Each has different levels of access, with unique permissions to ensure access control and the integrity of provisioning data.
The assigned user type appears near the top right corner of every screen on the administrator user interface.
Administrator
BAC recognizes only one administrator and allows this user to view, add, modify, delete device data, and create other users. As an Administrator, you can also change other users' permissions from Read/Write to Read Only, and vice-versa. In addition, you have the ability to change the passwords of any other user type.
You cannot delete the "Administrator" user.
Read/Write User
As a Read/Write user, you can perform the same functions as the administrator except creating other users, changing the user types of others, or changing their passwords. Read/Write users can change their own password.
Read-Only User
As a Read-Only user, you have basic access including the ability to change your password and to view, but not change, device data. You cannot perform any action that is considered disruptive. You cannot, for example, perform reset or regenerate instructions.
This section contains instructions for managing BAC users including:
Note
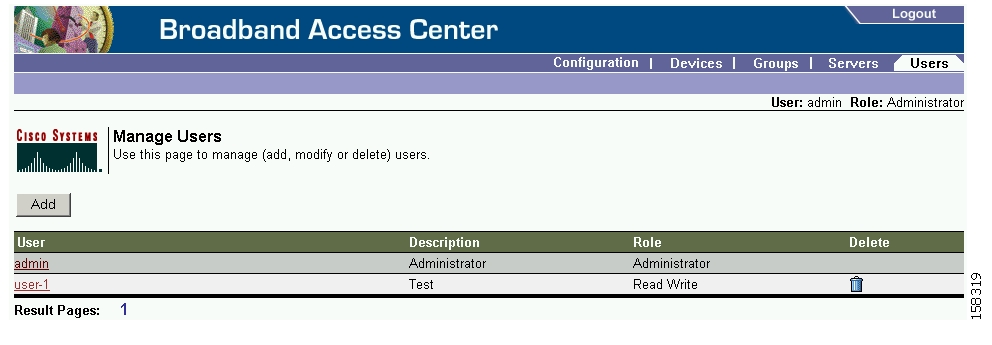
Adding a New User
Adding a new user is a simple process of entering the user's name and creating a password. However, while creating a new user you do have to determine which type of user it will be: a Read/Write user or a Read-Only user. BAC comes with one Administrator user already created; you cannot create an Administrator as a new user.
To add a new user:
Step 1
Step 2
Figure 16-1 Manage Users Page
Step 3
Step 4
Step 5
Tip
Step 6
The Manage Users page appears with the new user added.
Note
Modifying Users
Although any user type can modify their password and user description, only the administrator can modify any other user's information.
To modify user properties:
Step 1
Step 2
Step 3
Step 4
The Manage Users page appears with the modified user information.
Deleting Users
Only the administrator can delete any other user that appears in the Manage Users page. You cannot delete the default user, called admin.
To delete a user:
Step 1
Step 2
) corresponding to the user you want to delete.
Step 3
The Manage Users page appears without the deleted user.
Device Management
Use the Devices menu to provision and manage TR-069-enabled devices. You can:
•
•
•
•
•
•
•
Manage Devices Page
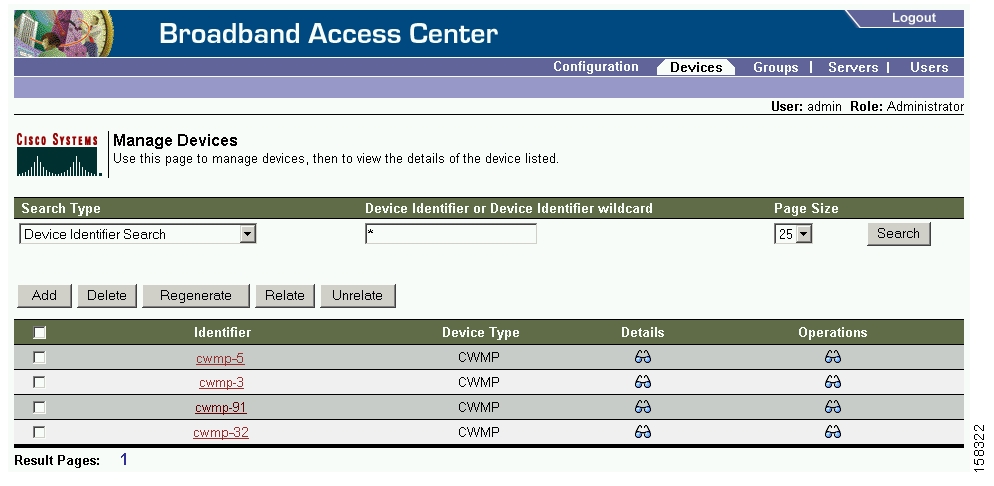
The Manage Devices page appears when you click Devices on the Main menu or the Primary Navigation bar. This page, shown in Figure 16-2, contains the fields and controls necessary to perform all device management functions.
Figure 16-2 Manage Devices Page
Searching for Devices
By using BAC, you can search for device information in a number of different ways.
To select the search type, from the Manage Devices page, click the Search Type drop-down list. Subsequent search pages contain screen components that may be unique to the search type selected.
The Manage Device page utilizes two separate but related areas to generate search results that let you perform many device management functions. These areas are the Search Type drop-down list, which defines which search to perform, and search value field, which qualifies the search type. You can perform these searches:
•
•
•
•
•
•
•
Some searches that you can perform allow the use of a wildcard character (*) to enhance the search function. BAC provides specific wildcards for each search, as described in Table 16-1.
In addition, a Page Size drop-down lets you limit the number of search results displayed per page. You can select 25, 50, or 75 results for display. When the number of search results is greater than the selected page size, paging controls appear in the lower left corner of the page. These controls let you scroll forward or backward one page at a time, or to select a specific page.
Note
Device Management Controls
These buttons are located directly below the search function fields and are generally used in conjunction with the search function. For example, you might search for devices belonging to a specific group of devices in order to perform some sort of management function. The following buttons are available, although each management function may not be available depending on the search type used.
Add
The Add button lets you add a new device to the RDU database. See Adding Device Records, for the appropriate instructions.
Delete
The Delete button lets you delete any selected device(s) from the RDU database. See Deleting Device Records, for the appropriate instructions.
Regenerate
Use the Regenerate button to force immediate regeneration of instructions for selected device(s).
Relate
The Relate button lets you associate a device (by using its Device ID) with a specific group (referred to as Node in the API).
Unrelate
The Unrelate button cancels the relationship between a selected device and the group that the device is currently related to.
Searching for devices returns results under the following headings or links that appear on the page:
Identifier
Identifies all devices matching the search criteria. Each of the identifiers displayed has a link to another page from which you can modify the device.
Device Type
Displays the available device type; in this case, CWMP.
Details
Displays all available details for the selected device. See Viewing Device Details, for additional information.
Operations
Displays a drop-down list of available device operations. See Performing Operations on Device, for additional information.
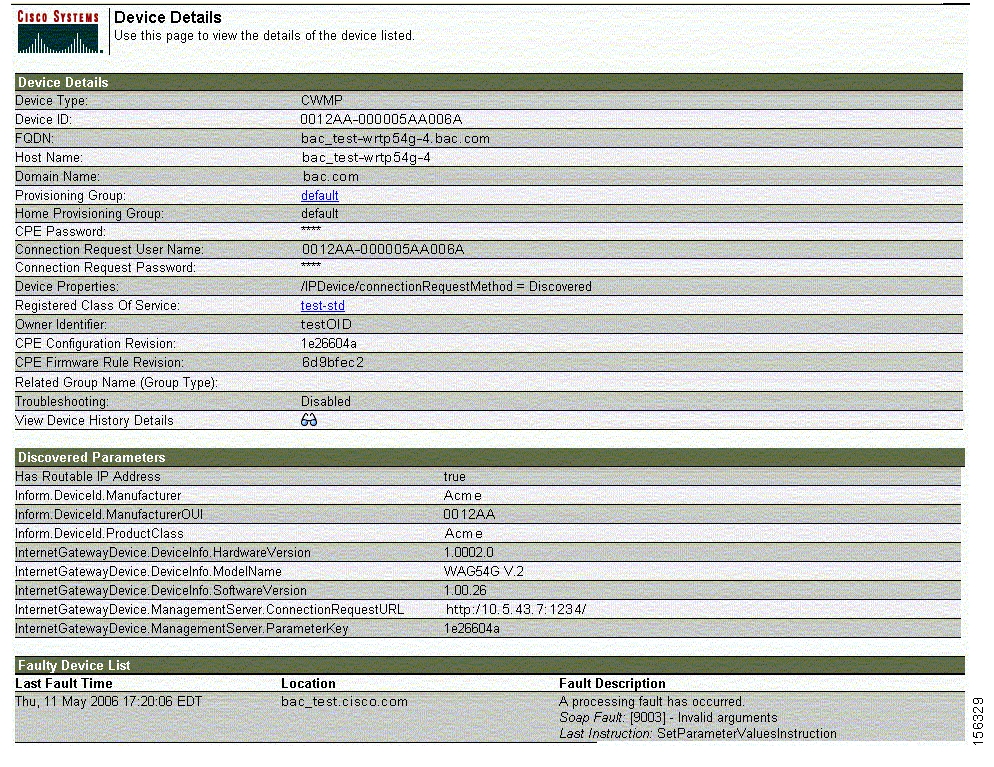
Viewing Device Details
You can view the details of any device identified in the search results.
To view any device details, click the View Details icon (
) corresponding to the device you want to view, and the Device Details page appears. Figure 16-3 provides a sample Device Details page.
Figure 16-3 Device Details Page
Table 16-2 identifies the fields shown in Figure 16-3.
Table 16-2 Device Details Page
Device Type
Identifies the device type.
DeviceID
Identifies the device identifier.
FQDN
Identifies the fully qualified domain name for the selected device. For example, IGW-1234.ACME.COM is a fully qualified domain name.
Host Name
Identifies the host. For example, in the FQDN description above, IGW-1234 is the hostname.
Domain Name
Identifies the domain within which the host resides. For example, in the FQDN description above, ACME.COM is the domain name.
Provisioning Group
Identifies the provisioning group to which the device has been pre-assigned or assigned automatically.
Home Provisioning Group
Identifies the provisioning group to which the device should belong.
CPE Password
Identifies the password used to authenticate the device when establishing a connection to BAC. This password is used only for HTTP-based authentication of the customer premises equipment (CPE). For security purposes, it returns a string with asterisk (*) characters regardless of the actual value unless the password has not been set, in which case an empty value is displayed.
Connection Request User Name
Identifies the username used to authenticate a ConnectionRequest from BAC to the CPE.
Connection Request Password
Identifies the password used to authenticate a ConnectionRequest from BAC to the CPE. For security purposes, this parameter returns an empty string regardless of the actual value.
Device Properties
Identifies any properties, other than those that appear on this page, that can be set for this device. This field includes the display of custom properties.
Registered Class of Service
Identifies the Class of Service assigned to this device. If a different Class of Service has been selected for the device by extension, an additional field with Selected Class of Service appears.
Owner Identifier
Identifies the device. This may be a user ID, and account number, or may be blank.
CPE Configuration Revision
Identifies the configuration rules revision number, which is set for the device ParameterKey following a successful configuration synchronization.
CPE Firmware Rule Revision
Identifies the firmware rules revision for this CPE.
Related Group Name (Group Type)
Identifies the group(s) name and type to which this device is related. See Group Management, for additional information.
Troubleshooting
Identifies if CPE troubleshooting is enabled or disabled.
Note
View Device History Details
Provides a link to the history of configuration changes on the CPE.
Note
Has Routable IP Address
Identifies if a device is generally reachable; that is, if the source IP address of the last request was the same as the WAN IP address reported by the CPE in the Inform message.
Inform.DeviceId.Manufacturer
Identifies the manufacturer of the CPE reported in the last Inform message.
Inform.DeviceId.ManufacturerOUI
Identifies the unique identifier of the manufacturer of the CPE reported in the last Inform message.
Inform.DeviceId.ProductClass
Identifier a manufacturer's product or class of product over which the SerialNumber parameter is unique. The device reports this parameter in the Inform message.
InternetGatewayDevice.DeviceInfo.HardwareVersion
Identifies the hardware version of the CPE.
InternetGatewayDevice.DeviceInfo.ModelName
Identifies the model name of the CPE.
InternetGatewayDevice.DeviceInfo.
SoftwareVersionIdentifies the software version currently installed on the CPE. The software version is also known as firmware version.
InternetGatewayDevice.
ManagementServer.ParameterKeySpecifies the value of the ParameterKey reported by the device in the last Inform message or last set by the DPE, whichever occurred last.
Note
Last Fault Time
Specifies the date and time that a recurring fault occurred for this device.
Location
Specifies the server on which this fault occurred.
Fault Description
Provides a description of the recurring fault.
Managing Devices
The Devices menu lets you add devices to the RDU databases and update preprovisioned data. Device management includes:
•
•
•
•
–
–
–
–
–
–
–
For detailed information on these operations, see Performing Operations on Device.
This section describes how to perform the various device management functions on new or existing devices.
Adding Device Records
To add a device record:
Step 1
Step 2
Step 3
•
•
To add the property, click Add.
Step 4
Modifying Device Records
To modify a device record:
Step 1
Step 2
Step 3
Deleting Device Records
Deleting device records is a simple process, but one that you should use carefully. To undo the delete, you must restore a previously backed up database or re-add the device.
Note
To delete a device record:
Step 1
Step 2
Step 3
The device record stored in the RDU database is removed.
Viewing Device History
To view the history of a device configuration:
Step 1
Step 2
Step 3
The Device History Details page appears.
Regenerating Device Instructions
The Regenerate button or API operation force immediate regeneration of instructions for the device. These instructions are sent to the DPEs in the device's provisioning group. Normally, the process of regenerating the instruction is automatically triggered following changes to device, Class of Service, or other such impacting changes. However, after a change to a Class of Service, the system takes time to regenerate instructions for all devices. This button can be used to expedite regeneration of instructions for a given device. This may be desirable during proactive troubleshooting.
Device instructions are automatically regenerated whenever:
•
•
•
•
•
•
Some instructions cannot be automatically regenerated because the BAC system cannot determine if the change impacts device instructions. In such cases, you must manually regenerate instructions by using the
generationConfiguration()method or the administrator user interface. Instructions that must be manually regenerated are those that become necessary whenever:•
•
Note
Relating and Unrelating Devices
You can define any number of arbitrary groups. The Relate function lets you associate a device to a specific group, which is in turn associated with a specific group type.
Relating a Device to a Group
Note
To relate a device to a group:
Step 1
Step 2
Step 3
Note
Step 4
The Manage Devices page appears.
Note
Unrelating a Device from a Group
Note
To unrelate a device to a group:
Step 1
Step 2
Step 3
Note
Step 4
The Manage Devices page appears.
Searching Device(s) in a Group
To search for device(s) belonging to a particular group:
Step 1
Step 2
Step 3
Step 4
The device(s) related to the group appears.
Performing Operations on Device
You can perform the following functions from the Device Operations page:
•
•
•
•
You can choose the parameters that you want to view for this device operation by selecting from the options under the Parameter List File drop-down box. Each parameter list is an XML file that details the parameters each file will return; click the View Details icon to view the parameters.
You can also define the parameters that you want to be retrieved in parameter lists. BAC provides a sample list of live data templates which specify various parameters to be read during a view live data query.
•
Note
•
•
Note
Performing a Reboot
To reboot the device:
Step 1
Step 2
Step 3
Step 4
Performing a Request Connection
To force the device to initiate a connection request:
Step 1
Step 2
Step 3
Step 4
Performing a Factory Reset
To reset device settings to its original factory settings:
Step 1
Step 2
Step 3
Step 4
Displaying Live Data
To display parameters from a device:
Step 1
Step 2
Step 3
Step 4
Step 5
Note
Step 6
Note
Performing a Ping Diagnostic
To perform a ping operation to a device by using its IP address:
Step 1
Step 2
Step 3
Step 4
•
•
•
•
•
•
•
Step 5
Forcing a Firmware Upgrade
To force a firmware upgrade on a device on next contact and bypassing the MaintenanceWindow restrictions set in the firmware rules:
Step 1
Step 2
Step 3
Step 4
Forcing a Configuration Synchronization
To force a device to synchronize its configuration on next contact with the DPE regardless of the current configuration version on the device:
Step 1
Step 2
Step 3
Step 4
The device configuration is synchronized with the DPE.
Setting Device Operations Timeout
You can set the duration within which an operation is to be executed on device. After that period, the operation times out.
Note
To set the timeout value for a device operation:
Step 1
Step 2
Step 3
Step 4
Step 5
Group Management
Group management allows the creation, modification, and deletion of groups and group types.
Managing Group Types
Access the Manage Groups page (shown in Figure 16-4) by selecting Groups from either the main menu or the primary menu bar. Group Type is the default setting when this page appears.
Figure 16-4 Manage Groups Page
Adding a Group Type
To add a new group type:
Step 1
Step 2
Step 3
Step 4
Step 5
Step 6
The new group type is recorded in the RDU, and the new group type appears on the Manage Group Types page.
Modifying Group Types
To modify group type properties:
Step 1
Step 2
Step 3
Step 4
The Manage Groups page appears with the appropriately modified description.
Deleting Group Types
To delete group types:
Step 1
Step 2
Step 3
The Manage Groups page appears without the deleted Group Type.
Managing Groups
You can create and modify groups, and delete unwanted groups.
Adding a New Group
To add a new group:
Step 1
Step 2
Step 3
Step 4
If you have defined custom properties, the Property name and Property Value section appear. Optionally, select the appropriate Property Name from the drop-down list and enter the required Property Value.
Step 5
Step 6
The new group is recorded in the RDU, and the new group appears on the Manage Groups page.
Modifying a Group
To modify group properties:
Step 1
Step 2
Step 3
The Manage Group page appears with the appropriately modified description.
Deleting Groups
You can delete any group that appears in the Manage Groups page by checking the box corresponding to the correct group and clicking the Delete button.
Relating/Unrelating Groups to Groups
The relate and unrelate functions are used to establish a relationship between group objects. To either relate or unrelate this relationship:
Step 1
Step 2
Step 3
The Manage Groups page appears.
Viewing Group Details
To view details of a group:
Step 1
Step 2
Step 3
Step 4
The Modify Group page appears, with details of the Group Name and Group Type.
Viewing Servers
This section describes the BAC server pages:
•
•
Viewing Device Provisioning Engines
The Manage Device Provisioning Engines page lets you monitor the list of all DPEs currently registered with the BAC database. Each DPE name displayed on this page is a link to another page that shows the details for that DPE. Click this link to display the details page, which is similar to Figure 16-5.
Note
Figure 16-5 View Device Provisioning Engine Details Page
Table 16-3 identifies the fields and buttons shown in Figure 16-5.
Table 16-3 View Device Provisioning Engine Details Page
Host Name
Identifies the DPE hostname.
Port
Identifies the DPE port number from which DPE established connection to the RDU.
IP Address
Identifies the IP address of the DPE.
Primary Provisioning Group(s)
Identifies the primary provisioning group that the selected DPE belongs to. This is an active link that, if clicked, displays the Provisioning Group Details page for that provisioning group.
Properties
Identifies which properties have been configured for this DPE.
Version
Identifies the version of DPE software currently in use.
UpTime
Specifies the total time that the DPE has been operational since its last start-up.
State
Identifies whether the DPE is ready for operations. These states include:
•
•
•
•
•
•
For details on each state, see DPE-RDU Synchronization.
Note
Device with Faults
Displays number of devices with faults at this DPE. If number is greater than zero, features the View Details icon which if clicked, displays details of devices with faults.
DPE Log File
Features the View Details icon that if clicked displays the View Log File Contents page, which provides details of dpe.log.
Files
Identifies the number of files, such as firmware images, that are cached at the DPE.
Number of Devices
Identifies the number of CWMP devices for which the DPE maintains instructions. In a fully synchronized DPE, this number should equal the number of CWMP devices in the DPE's provisioning group.
Note
Sessions succeeded
Identifies the number of successful CWMP sessions.
Sessions failed
Identifies the number of failed CWMP sessions.
File Requests Succeeded
Identifies the number of successful firmware file download requests.
File Requests Failed
Identifies the number of failed firmware file download requests.
Immediate Device Operations Succeeded
Identifies the number of immediate device operations that succeeded.
Immediate Device Operations failed
Identifies the number of immediate device operations that failed.
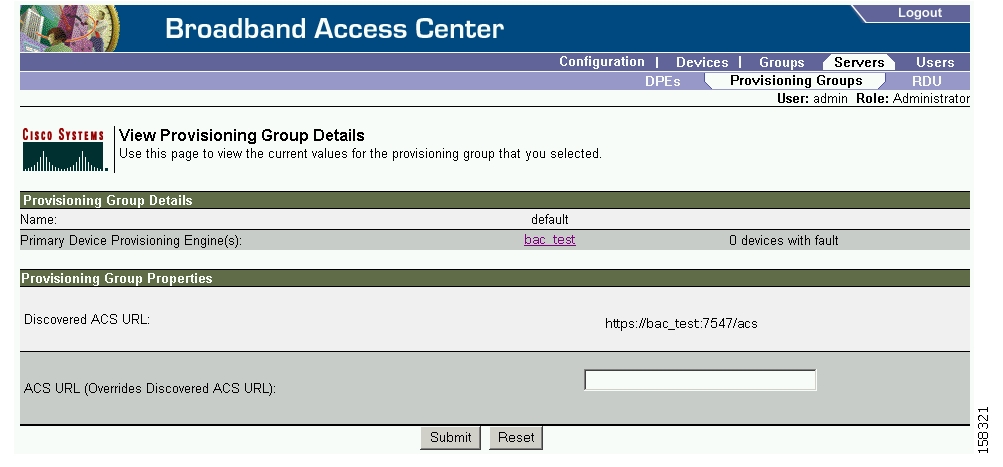
Viewing Provisioning Groups
The Manage Provisioning Groups page lets you monitor all current provisioning groups. Each provisioning group appearing in this list is a link to its own details page. Click this link to display the details page, which is similar to Figure 16-6.
Figure 16-6 View Provisioning Group Details Page
Table 16-4 identifies the fields and buttons shown in Figure 16-6. The fields described in Table 16-4 may include active links that, if clicked, display the appropriate details page.
Viewing Regional Distribution Unit Details
The RDU option, from the Servers menu, displays details of the RDU. Figure 16-7 illustrates a sample RDU details page.
Figure 16-7 View Regional Distribution Unit Details Page
Table 16-5 identifies the fields and buttons shown in Figure 16-7.
![]()
![]()
![]()
![]()
![]()
![]()
![]()
![]()
Posted: Thu Aug 31 23:54:04 PDT 2006
All contents are Copyright © 1992--2006 Cisco Systems, Inc. All rights reserved.
Important Notices and Privacy Statement.