|
|

Table Of Contents
NEIM Administrative Task: Setting Up Image Management Preferences
Understanding the NEIM User Interface
Roles Required to Perform NEIM Tasks
Adding Images from Vendor Websites to a Local Repository
Adding Images from a File System to a Local Image Repository
Image Analysis Using the Application Image Repository
Image Analysis Using a Vendor Website
Device-Centric Image Distribution
Device Centric Image Distribution from an External Location
Activating an Image on the Device
Activating Cisco IOS XR Packages
Deactivating Cisco IOS XR Packages
Rolling Back Cisco IOS XR Packages
Removing Cisco IOS XR Packages
Performing Package Management Tasks
Managing Software Images
Manually upgrading your network elements to the latest software version can be an error-prone and time-consuming process. The Network Element Image Management (NEIM) feature ensures rapid, reliable software upgrades, and automates the steps associated with upgrade planning, scheduling, downloadiExpressionsng, and monitoring.
In ANA 4.0, the NEIM feature is supported for Cisco devices only.
Using NEIM, you can:
•
Analyze software upgrades; for example, you can:
–
–
–
See Upgrade Analysis for more information.
•
–
–
–
•
–
–
–
See Distributing Images and Activating an Image on the Device for more information.
Note
•
Along with the NEIM basic functionalities, you can perform tasks specific to Cisco IOS XR.
See Managing Cisco IOS XR Devices and Performing Package Management Tasks for more information.
NEIM Administrative Task: Setting Up Image Management Preferences
You can set the following image management parameters:
•
•
See NEIM Preferences, page 14-22 for details.
Logging Into Cisco.com
Login privileges are required for all NEIM tasks that access Cisco.com. To get access, you must have a Cisco.com account. You can register by going to the following URL:
http://tools.cisco.com/RPF/register/register.do
If you do not have a user account and password on Cisco.com, contact your channel partner or enter a request on the main Cisco website.
To download the cryptographic images on Cisco.com through Software Management tasks, you must have a Cisco.com account with cryptographic access.
After getting the Cisco.com account:
Step 1
The Enter Network Password dialog box appears.
Step 2
The Encryption Software Export Distribution Authorization Form page appears.
Step 3
The Encryption Software Export Distribution Authorization form appears.
Step 4
The following message appears:
The
Cisco Encryption Software: Crypto Access Granted.
Note
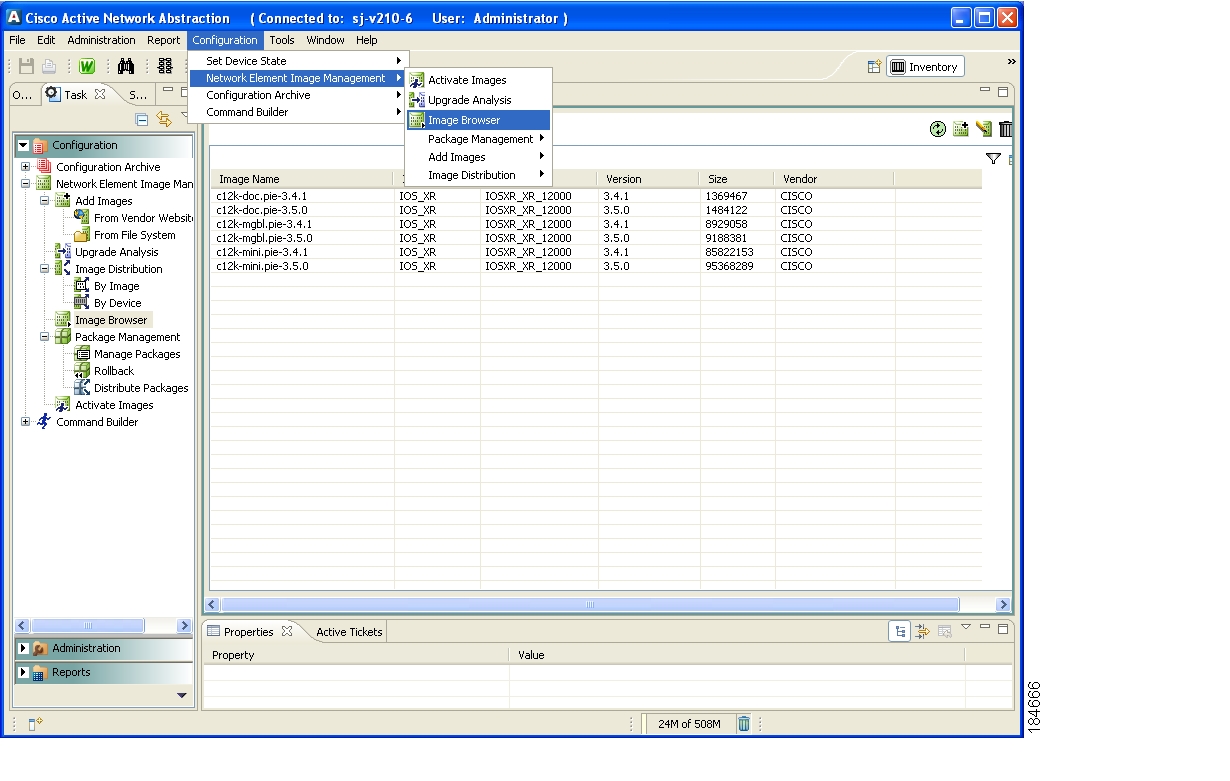
Understanding the NEIM User Interface
Figure 9-1 shows the NEIM Image browser.
Figure 9-1 Image Browser
Icons in the Image Browser
Table 9-1 explains the icons found in the Image browser.
Table 9-1 Image Browser Buttons
Refresh the image browser.
Add images.
Edit existing images.
Delete images.
Roles Required to Perform NEIM Tasks
Table 9-2 lists the roles that are required to perform NEIM functions. For more information on roles, see Creating and Managing ANA User Accounts.
Image Repository Management
You can maintain a copy of the images in the local repository. You can add, remove, and browse images in the repository. You can also edit and update image attributes.
The image repository stores the binary data and displays image attributes in the Image browser. The images available on vendor websites can be added to the repository.
You can add the images to image repository by:
•
•
Adding Images from Vendor Websites to a Local Repository
While adding images:
•
•
Algorithm for Adding Images from Cisco.com to the Image Repository
The following steps describe the algorithm for adding images from Cisco.com to the image repository:
1.
2.
3.
4.
5.
6.
7.
8.
9.
10.
11.
12.
To add image from vendor website:
Step 1
Step 2
Alternatively, from the main menu choose Configuration > Network Element Image Management > Add Images > From Vendor Website.
The Vendor and Network Element selection page is displayed.
Step 3
Step 4
Step 5
The Image Selection page is displayed.
Step 6
Step 7
Step 8
Step 9
You can add multiple images, and you can use the Clear All function to clear all the selected images.
Step 10
The Schedule Job page is displayed.
Step 11
•
•
If you want to perform the job immediately, click the Perform Now icon provided at the top right of the page.
•
•
Step 12
Adding Images from a File System to a Local Image Repository
Use this method to add software images from a file system to the software repository.
You add an image staged on the gateway file system to the local image repository. NEIM checks for the image family, image version, and image type information before adding it to the repository. Before the image is added, the repository is checked to determine whether the selected image already exists. NEIM does not allow the addition of duplicate images to the image repository.
Algorithm for Adding Images from a File System to a Local Image Repository
The following steps describe the algorithm for adding images from file system to local image repository:
1.
2.
3.
4.
5.
6.
7.
8.
To add image from file system:
Step 1
Expand the Add Images node and double-click From Vendor Website.
Alternatively, from the main menu choose Configuration > Network Element Image Management > Add Images > From File System.
The From File System window is displayed.
Step 2
A progress bar appears.
A confirmation message is displayed after the operation is complete.
Step 3
The images are added to the local repository.
Upgrade Analysis
Upgrade analysis feature allows you to determine if an image can be deployed on a set of network elements.
Note
During analysis, NEIM fetches the attributes of the selected image and checks the amount of RAM and Flash available on the network element. This analysis is based on the network element information available in the ANA inventory. For analysis, the ANA inventory must contain information on active image on the network element, Flash memory, modules, and processor details.
NEIM assumes that while images are added to the repository, information such as minimum RAM, minimum Flash, and so on, is available in the image header. This information is stored in the image repository. NEIM cannot analyze effectively if this information is not available in the image header.
You can perform image analysis using:
•
•
Image Analysis Using the Application Image Repository
Use the Local Repository Analysis feature to analyze images in your software repository and determine the impact to, and prerequisites for, a new software deployment. This feature enables you to get the Upgrade Analysis report, which shows the required boot ROM, Flash memory, and RAM.
Image Analysis helps you answer such questions as:
•
•
•
Algorithm for Upgrade Analysis Using the Local Image Repository
The following steps describe the algorithm for upgrade analysis using the local image repository:
1.
2.
3.
4.
5.
–
–
–
–
To perform upgrade analysis using the application image repository:
Step 1
Expand the Network Element Image Management node.
Step 2
Alternatively, from the main menu choose Configuration > Network Element Image Management > Upgrade Analysis.
The Upgrade Analysis window is displayed.
Step 3
The Device Selector is displayed.
Step 4
The Select Image page is displayed, showing the Network Element Information column that lists the network elements and the Image Information column that lists the details of images in each network element.
Step 5
Step 6
The Upgrade Analysis Report is displayed.
Image Analysis Using a Vendor Website
Use the Vendor Website feature to determine the impact to, and prerequisites for, a new software deployment using images that reside on vendor websites.
This option allows you to identify only images that meet certain criteria. It then analyzes the images to determine the required hardware upgrades (boot ROM, Flash memory, RAM, and access).
This option helps you answer such questions as:
•
•
•
•
•
Algorithm for Image Analysis Using Cisco.com
The following steps describe the algorithm for image analysis using Cisco.com:
1.
2.
3.
4.
5.
6.
–
–
–
–
–
To perform image analysis using vendor website:
Step 1
Expand the Network Element Image Management node.
Step 2
Alternatively, from the main menu choose Configuration > Network Element Image Management > Upgrade Analysis.
The Upgrade Analysis window is displayed.
Step 3
The Device Selector is displayed.
Step 4
The Select Image page is displayed, showing the Network Element Information column that lists the network elements and the Image Information column that lists the details of images in each network element.
Step 5
Step 6
The Upgrade Analysis Report is displayed.
Using the Image Browser
The Image browser helps you to view all the available images in the image repository and also:
•
•
•
You can view the following image attributes:
•
•
•
•
•
•
In the Image browser, you can do a filter operation based on image family; image type, version, size, and status; and time of update. You can sort images in repository based on image family and image types. The Refresh button refreshes the image list and displays the latest list of images.
To view the Image browser:
Step 1
Step 2
Alternatively, from the main menu, choose Configuration > Network Element Image Management > Image Browser. The Image browser is displayed.
You can perform the following operations from the Image browser:
•
•
•
Distributing Images
The Image Distribution feature allows you to:
•
•
Note
NEIM supports both monolithic and patch images distribution on network elements. The network elements with multiple upgrade entities are supported. The module cards or entities with independent IP address are identified as separate network elements.
NEIM uses the instrumentation embedded in the network element and information such as such as, minimum RAM or minimum Flash, encapsulated in image headers, to perform image distribution on the network element.
Image Distribution may be done in two ways:
•
•
Image-Centric Distribution
In Image-Centric mode, you can select an image from a local repository or an external location and perform distribution on one or more network elements. You can specify a destination partition on the device where the image needs to be copied. This is useful when you have to distribute the same image to multiple network elements.
You cannot use this procedure to upgrade:
•
•
After the image distribution, you can do either of the following:
•
•
Image-Centric Distribution Using a Local Repository with Image Activation
You can create an image distribution job to deploy and activate the selected image onto a set of managed devices. The images are copied from the local repository.
Algorithm for Image-Centric Distribution Using Local Repository with Image Activation
The following steps describe the algorithm for Image-Centric distribution using local repository. After the image distribution, activation of the image on the selected network elements will be performed as part of the same job:
1.
2.
3.
4.
5.
6.
7.
8.
9.
10.
Image-Centric distribution fails if:
•
•
•
•
Image-Centric Distribution Using an External Repository with Image Activation
You can create an image distribution job to deploy, and activate the selected images on a set of managed devices. The images are copied from the external repository.
Algorithm for Image-Centric Distribution Using External Repository
1.
2.
3.
4.
5.
6.
7.
8.
9.
10.
11.
12.
To perform Image-Centric distribution:
Step 1
Step 2
Step 3
The Image Selection page is displayed.
Alternatively, from the main menu, choose Configuration > Network Element Image Management > Image Distribution > Distribute by Image.
The Image Selection page is displayed.
Note
Step 4
The Device Selector is displayed.
Step 5
The Storage Selection page is displayed. It has the following fields:
•
•
•
•
Step 6
The verification page is displayed.
Step 7
The Schedule Job page is displayed.
Step 8
•
•
•
Step 9
•
•
Step 10
•
•
•
Step 11
•
•
When scheduling image operations which can reload the router, we recommend you choose sequential image activation mode. If you choose parallel mode, routers which are in the connectivity path of other routers participating in the job may reload, causing problems.
Step 12
Step 13
Device-Centric Image Distribution
In Device-Centric mode, you choose a set of network elements, and schedule image distribution.
Before you begin distributing the images, you should:
•
•
•
Algorithm for Device-Centric Distribution with Image Activation
The following steps describe the algorithm for Device-Centric distribution:
1.
2.
3.
4.
5.
6.
7.
8.
9.
To perform Device-Centric image distribution:
Step 1
Step 2
Step 3
The Device Selector is displayed.
Alternatively, from the main menu, choose Configuration > Network Element Image Management > Image Distribution > By Network Element.
The Device Selector is displayed.
Step 4
The Image and Storage options page is displayed.
Alternatively, go to the Objects tab in the Inventory perspective.
Right-click a managed network element, and select Network Element Image Management > Distribute Image.
The Image and Storage options page is displayed, showing the following details:
•
•
•
•
Step 5
The Verification page is displayed.
Step 6
The Schedule Job page is displayed.
Step 7
•
•
•
Step 8
•
•
Step 9
•
•
•
Step 10
•
•
When scheduling image operations which can reload the router, we recommend you choose sequential image activation mode. If you choose parallel mode, routers which are in the connectivity path of other routers participating in the job may reload, causing problems.
Step 11
Step 12
Device Centric Image Distribution from an External Location
You can perform device centric image distribution of an image stored in any external TFTP server.
Note
Step 1
Step 2
The Image Selection page is displayed, listing the available images.
Step 3
The Add an Image pop-up dialog box is displayed.
Step 4
tftp://servernameorIPAddress/imagename
Note
A table listing the following details is displayed:
•
•
•
•
Step 5
The Verification page is displayed.
Step 6
The Schedule Job page is displayed.
Step 7
•
•
•
Step 8
•
•
Step 9
•
•
•
Step 10
•
•
When scheduling image operations which can reload the router, we recommend you choose sequential image activation mode. If you choose parallel mode, routers which are in the connectivity path of other routers participating in the job may reload, causing problems.
Step 11
Step 12
Activating an Image on the Device
Image activation is the process of making a copied image active on a network element. After the image copy is successfully completed, the activation process can be triggered immediately in the context of distribution job, or you can schedule it for a later time.
Note
Algorithm for Image Activation
The following steps describe the algorithm for image activation on the network element:
1.
2.
3.
4.
–
–
5.
6.
7.
To activate an image on a network element:
Step 1
Step 2
Alternatively, from the main menu, choose Configuration > Network Element Image Management > Activate Images.
The Activate Images window is displayed.
Step 3
The Select Image page is displayed. It lists the Network Element Information and the corresponding Image Information.
Step 4
The Schedule Job page is displayed.
Step 5
•
•
•
Managing Cisco IOS XR Devices
NEIM supports distribution of IOS XR images onto network elements.
Tasks to be performed to populate the repository with packages obtained from vendor websites or transferred to the file system are the same for IOS XR as it is for other device types
Next task is to distribute the packages. We recommend you perform the distribution as one job, and do the activation as a separate job.
A rollback operation can be done if you want to revert to a previous package configuration. After some period of successful operation, you may want to remove inactive packages to save Flash space or make room for a subsequent package install operation.
After you perform operations such as activation, deactivation, or rollback, all of which change the package composition on the router, you must use Command Builder to run the ImageCommit command, a Cisco IOS XR-specific, system-defined command. The commit operation should be done only after you have verified that the new packages are operating correctly. See Using the Image Browser for information running commands.
Note
Along with the core NEIM functionalities such as, image distribution repository, and analysis, capabilities specific to Cisco IOS XR are also supported. The following are the specific IOS XR features:
•
•
•
•
•
•
•
You can select a single network element or multiple network elements to perform all these tasks.
Note
See Performing Package Management Tasks for more details.
Additional Notes on Performing Package Management Tasks
Read the following before performing package management tasks using NEIM:
•
For package management operations that involve upgrading the core packages on the device such as c12k-mini, the operation should be done only on the owner partition. Cisco IOS XR automatically upgrades nonowner partitions and initiates reload on both owner and nonowner partitions.
•
•
•
•
•
•
Activating Cisco IOS XR Packages
You can select one or more Cisco IOS XR device on which to perform the activate task. The NEIM user interface displays the list of installed packages that are not activated yet on the selected network element.
You must select the software package that you intend to activate and schedule a job for immediate execution or at a specific time. The result of the activation task can be viewed as job result
For multiple network elements, you must select the packages to be activated for each of the network elements and schedule a job. The job results will contain the details of the packages that were activated and transcript of network element interaction for each network element. See Performing Package Management Tasks for more details.
Deactivating Cisco IOS XR Packages
You can select one or more Cisco IOS XR devices on which to perform a deactivation task. The NEIM user interface displays the list of installed packages that are activated on that network element.
You must select the software package that you intend to deactivate and schedule a job for immediate execution or at specific time. The result of the task can be viewed as job result.
For multiple network elements, you must provide the packages to be deactivated for each of the network elements and schedule a job. The job results will contain the details of the packages that were deactivated and transcript of network element interaction for each network element. The deactivation task can be performed on the device cards and modules. See Performing Package Management Tasks for more details.
Rolling Back Cisco IOS XR Packages
You can select a set of network elements on which to perform a rollback task. The NEIM user interface displays the list of available rollback IDs to which you can roll back on that network element.
You must select the rollback ID and schedule the rollback job. The result of the rollback task can be viewed as a job result. When performing this task on multiple network elements, rollback points for each of the network elements selected are displayed. You can select the rollback ID for each of the network elements and schedule a job. The job results contain the details of the rollback action on each network element and a transcript of interactions with the network element for all the network elements in the job.
The removal of a package can make a rollback point invalid. If a package or version of a package that is associated with a specific rollback point is removed, it is no longer possible to roll back to that point. An error message will be generated by the Cisco IOS XR device and shown in the job status details. See Performing Package Management Tasks for more details.
Removing Cisco IOS XR Packages
You can select one or more network elements for which to remove packages. The NEIM UI displays the list of available packages on each of the selected network elements.
Performing Package Management Tasks
You can perform the following tasks:
•
•
•
These tasks can be performed only for Cisco IOS XR devices. You might encounter errors on other devices. See Additional Notes on Performing Package Management Tasks before you perform package management tasks.
Managing Packages
To manage packages:
Step 1
Step 2
Alternatively, from the main menu, choose Configuration > Network Element Image Management > Manage Packages.
The Manage Packages window is displayed.
Step 3
Step 4
The Select Packages page is displayed. This page has the following details:
•
•
•
•
–
–
–
Step 5
Step 6
Step 7
Step 8
•
•
•
If you want to perform a package compatibility check, check the Choose Compatibility Test check box. A verification is done, and a report is made available on the Reports page.
This check box controls whether the operation is done normally (by default, box is unchecked) or as a test only (if the check box is checked). A test only job shows the results of doing the job, but does not actually change the configuration of the network element.
Step 9
Performing Rollback
To perform a rollback operation:
Step 1
Step 2
Alternatively, from the main menu, choose Configuration > Network Element Image Management > Rollback.
The Rollback window is displayed.
Step 3
The Select Rollback Point page is displayed. It lists the following details:
•
•
•
•
Step 4
Step 5
•
•
•
Select the Choose Compatibility Test check box if you want to perform an image compatibility check.
This check box controls whether the operation is done normally (by default, box is unchecked) or as a test only (if the check box is checked). A test only job shows the results of doing the job, but does not actually change the configuration of the network element.
Step 6
Distributing Packages
To distribute package:
Step 1
Step 2
Alternatively, from the main menu, choose Configuration > Network Element Image Management > Package Management > Distribute Packages.
The Image Selection page is displayed. It has the following details.
•
•
•
•
Step 3
The Verification page is displayed. It displays the verification results. Status is always shown as Passed.
Step 4
Step 5
•
•
•
Step 6
•
•
Step 7
Note
Select from the following options:
•
•
•
Step 8
•
•
When scheduling image operations which can reload the router, we recommend you choose sequential image activation mode. If you choose parallel mode, routers which are in the connectivity path of other routers participating in the job may reload, causing problems.
Step 9
Step 10
NEIM Log Files
There is no NEIM-specific log file for ANA 4.0.
However, you can check the following to see NEIM debug messages:
•
•
On the client, you can check the following log file:
•
![]()
![]()
![]()
![]()
![]()
![]()
![]()
![]()
Posted: Mon Sep 24 07:30:30 PDT 2007
All contents are Copyright © 1992--2007 Cisco Systems, Inc. All rights reserved.
Important Notices and Privacy Statement.