cc/td/doc/product/rtrmgmt/ana/4_0
hometocprevnextglossaryfeedbacksearchhelp
PDF

Table Of Contents

Managing and Deploying Configuration Changes

Command Builder Administrative Task

Understanding Command Builder Job Policies

Hierarchy Management

Roles Required to Perform Command Builder Tasks

Managing User-Defined Commands

Understanding the Command Browser User Interface

Icons in the Command Browser

Using the Command Browser

Creating User-Defined Commands

Editing User-Defined Commands

Importing User-Defined Commands

Exporting User-Defined Commands

Running a Command

Deleting User-Defined Commands

Publishing a User-Defined Command

About System-Defined Commands

Defining ANA Macro Language Scripts

Defining Bean Shell Scripts

Command Builder Log Files


Managing and Deploying Configuration Changes


Command Builder is a tool for applying partial configuration changes on large sets of devices. It is typically used for credential updates and global configuration updates such as logging, RCP, CDP, and so on. It provides an interface to creating, modifying, and deleting user-defined templates. You can preview the command (including the variables) before it is executed. The input form is automatically generated and opened, displaying all the user-defined input fields for the command.

You can also use the system-defined templates provided in Command Builder.


Note System-defined templates are available only for devices running Cisco IOS XR software.


Command Builder supports multiple activations, meaning that a command can be invoked to run concurrently on multiple managed elements or network elements. Command Builder provides the ability to schedule and define job policies.

Command Builder Administrative Task

Each Command Builder job has a set of policies that define how the job should run. The administrator can configure default parameters for these policies that will apply to all Command Builder jobs, and can also specify, for each policy, whether users can change the values while scheduling a job.

See Understanding Command Builder Job Policies for information on Command Builder job policies. See Command Builder Preferences for procedural information.

Understanding Command Builder Job Policies

This section defines the Command Builder job policies.

Failure Policy

This policy defines what a job should do if an operation fails to run on the network element. The following failure policies are defined:

Roll back the failed device and stop—Rolls back the changes on the failed network element and stops the job.

Roll back the failed device and continue—Rolls back the changes on the failed network element and continues the job.

Roll back the entire job—Rolls back the changes on all network elements and stops the job.

See Fail, page D-5 in the Appendix D, "ANA Macro Language" for more information.

Execution Policy

If parallel execution is enabled, it allows the job to be run on multiple network elements simultaneously. If parallel execution is not enabled, the job runs on only one network element at a time. Parallel job execution is done in batches.

Version Policy

On enabling this policy, the configuration deployment job fails if the latest configuration version in the Configuration Archive at the time of job creation is not identical to the latest configuration version that is in the Configuration Archive at the time of job execution.

During job execution, Command Builder queries Configuration Archive for the version of the latest running configuration for each of the network elements and compares it with the value recorded at the time the job was created.

The Sync Archive policy is automatically enabled when this policy is chosen.

Sync Archive Policy

This policy, when enabled, makes the job archive the running configuration before making configuration changes. You should be careful while using sync archive and version policies together if the frequency of configuration change on the network is high, and the device is not configured to send syslog messages to the ANA Server.

Copy Running to Startup

This policy, when enabled, makes the job copy the running configuration to the startup configuration after a successful deployment of templates to the network element.

See Command Builder Preferences for procedural information.

Hierarchy Management

Hierarchy Manager enables you to move a command definition to a different location or change the scope of the command across the network hierarchy. Once a command has been defined and tested on a selected object instance, it can be published and applied to a wider network scope. You can publish a command definition to one or more locations across the inheritance hierarchy (as defined in the system).

See Publishing a User-Defined Command for information on publishing commands on network elements.

Roles Required to Perform Command Builder Tasks

Table 8-1 lists the roles that are required to use the Command Builder features. For more information on roles, see Creating and Managing ANA User Accounts. See About System-Defined Commands for information on roles required to use system-defined commands.

Table 8-1 Roles Required to Perform Command Builder Functions 

Task
Role Required

Create a new command

Any of the following roles:

Configurator

Administrator

Run a command

Any of the following roles:

Configurator

Administrator

Edit a command

Any of the following roles:

Configurator

Administrator

Delete a command

Any of the following roles:

Configurator

Administrator

Import a command

Any of the following roles:

Configurator

Administrator

Export a command

Any of the following roles:

Network Operator

Configurator

Administrator

Publish a command

Any of the following roles:

Configurator

Administrator


Managing User-Defined Commands

You can create a command that can be deployed on multiple network elements in your network. You can define the schedule time and the job policies while deploying this command.

For information on system-defined commands, see About System-Defined Commands.

The following topics provide more information on creating and deploying commands on your network:

Using the Command Browser

Creating User-Defined Commands

Editing User-Defined Commands

Running a Command

Importing User-Defined Commands

Exporting User-Defined Commands

Deleting User-Defined Commands

Publishing a User-Defined Command

Understanding the Command Browser User Interface

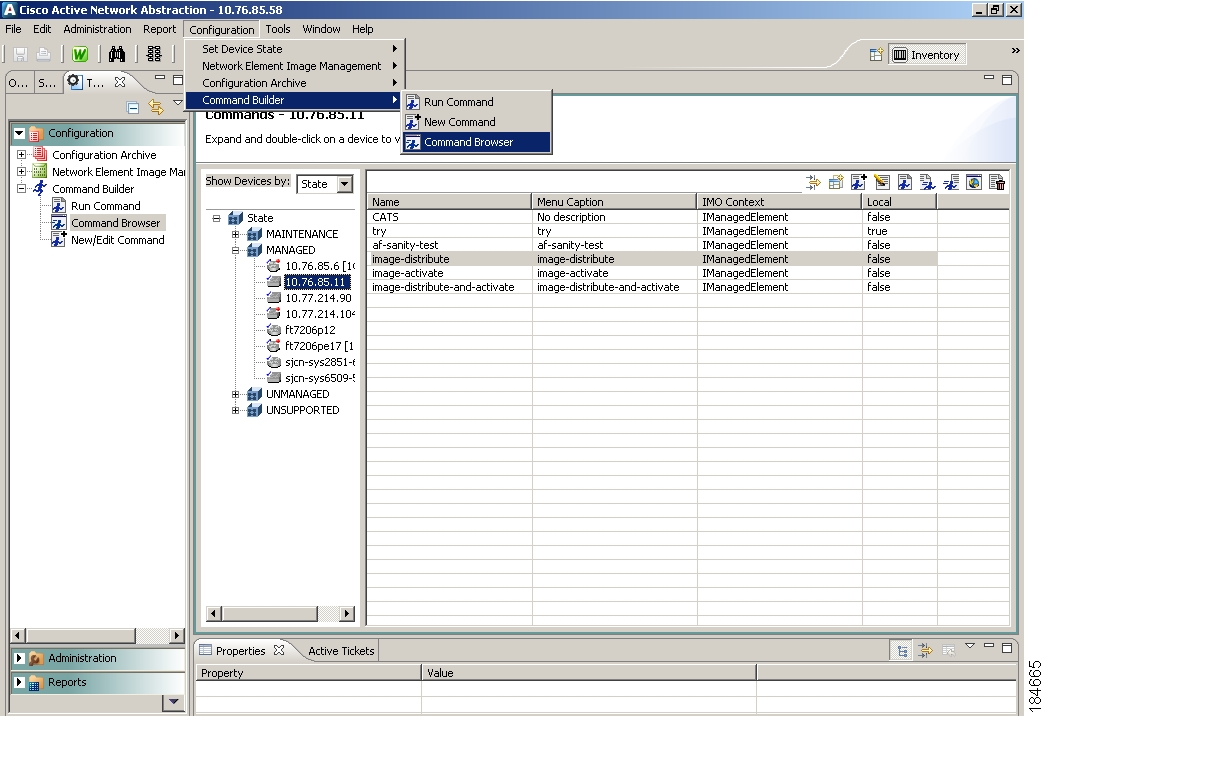
The Command browser allows you to view the commands and perform various tasks. It displays a table of all the existing commands that are available for the selected network element.

Figure 8-1 shows the Command browser:

Figure 8-1 Command Browser

Icons in the Command Browser

Table 8-2 explains the icons found in the Command browser:

Table 8-2 Command Browser Icons 

Icon
Description

Create a new command.

Edit an existing command.

Run a command.

Export a command.

Import a command.

Publish a command.

Delete selected commands.


Using the Command Browser

To view the Command browser:


Step 1 Go to the Tasks tab in the Inventory perspective and select the Configuration drawer.

Step 2 Expand the Command Builder node and double-click Command Browser.

The Command browser is displayed. You can select the network element for which you need to view the command.

Alternatively, from the main menu choose Configuration > Command Builder > Command Browser.

Step 3 Double-click the network element.

Alternatively, from the Objects tab, right-click a network element, and click Command Builder > Command Browser. The Command browser is displayed.

You can view the commands for only one network element at a time.


The Command browser displays all the commands that have been created. It has the following fields:

Name—The identifier of the command. This name is unique to the entire system.

Menu Caption—The text that describes the command in the menu.

IMO Context—The inventory object with which the command is associated. Can be a device, a card, or an interface.

Local—Whether the command is visible directly on a network element. Values can be True or False. True means that the command displayed is local to that network element. The command can be available on other network elements by means of inheritance. False means the command has been inherited by virtue of being in a hierarchy.

From the Command browser, you can perform the following operations:

Create a new command. See Creating User-Defined Commands for details.

Edit a command. See Editing User-Defined Commands for details

Run a command. See Running a Command for details.

Export Command. See Exporting User-Defined Commands for details.

Import Command. See Importing User-Defined Commands for details.

Publish Command. See Publishing a User-Defined Command for details.

Delete Command. See Deleting User-Defined Commands for details.

Creating User-Defined Commands

Command Builder enables you to create a command definition, which, by default, is created as a local instance. For more information about publishing a local instance of a command to a higher level in the hierarchy, see Publishing a User-Defined Command.

To create a command:


Step 1 Choose any of the navigational paths:

a. Go to the Tasks tab in the Inventory perspective and select the Configuration drawer.

b. Expand the Command Builder node and double-click New Command.

Or

Choose Configuration > Command Builder > New Command from the main menu.

The New Command page is displayed.

Step 2 From the Device Selector select the network element for which you need to create the command. You may select the network element from the network element tree, or search for the network element using the Search Network Elements tab.

Step 3 Click the Add > button to add the selected network element, and click Next.

Alternatively, go to the Objects tab in the Inventory perspective and right-click a network element.

Select Command Browser > New Command.

The New Command dialog box opens.

Step 4 Enter the following details:

Name—The name identifying the command. This name is unique to the entire system.

Menu Caption—Additional description.

Menu Path—Enter a value here to create a new menu path in the Object view. Command Builder creates a submenu with the same name (the value you entered) in the Objects view, and scripts are available under it.

Context IMO—Displays the inventory object that is associated with the command. Can be a device, a card, or an interface.

Language—Scripting language used. Select either ANA Macro or Bean Shell.


Note See Defining ANA Macro Language Scripts and Defining Bean Shell Scripts for details on ANA Macro language and BeanShell. See Appendix D, "ANA Macro Language" and Appendix E, "Bean Shell Commands" for more information and examples.


Protocol—Protocol to be used.

ANA Macro uses only Telnet.

Bean Shell can use either Telnet or SNMP.

Step 5 Click Next.

The ANA user roles are listed. You can specify the security access roles that will be allowed to execute the command.

Step 6 Select the check box corresponding to the required roles. For example, if you want to enable only Configurators and Network Operators to use a command, select only those two check boxes.

Step 7 Click Next. The User Input Arguments dialog box is displayed. Here, you may opt to create and insert metadata for the user input argument.

The Command Builder enables you to define any number of input parameters. The input parameter's attributes determine the structure and format of the input form. When the command is executed the input form is generated automatically.

Step 8 Click Add icon to create input parameters. The Add/Edit User Argument for Command dialog box is displayed.

Step 9 Enter the following to create parameters:

Name—Parameter name. Can contain only alphanumeric characters, hyphens (-), and underscores (_). Unique within the script scope.

Caption—Parameter display name.

Type—String, Integer, IPSubnet, Combo, IP Address, Float, Long. Only input values that are valid for the selected type will be accepted.

When Combo is selected in the Type field of the Add/Edit User Argument for Command dialog box, the Browse button is enabled and the Enum Editor dialog box is displayed. This enables you to create a drop-down list of the valid options that will be displayed in the combo box of the input form. Enter the key and the corresponding Value, (for example, Up = 1 and Down = 2), and click OK to add the values.

Width—Field width, in characters.

Default—Default value for the parameter.

Check the Visible check box to show this parameter or clear this option to hide the parameter from the user. In the case where the argument is hidden, it can still be used in the command (with its default value). When the parameter is not visible, and has been assigned a default value, it can serve as a constant argument.

Step 10 Click Next. The Script Lines dialog box is displayed.

Step 11 In the Script pane, enter the command lines that you want to run in the network element. Press Ctrl + Space to get help.

Step 12 In the Rollback pane, enter the command lines that you want to run in the network element as the rollback lines. Press Ctrl + Space to get help.

See ANA Macro Language and Bean Shell Commands for more information and examples.

Step 13 Click Finish.

See Editing User-Defined Commands for information on editing user-defined commands.


Editing User-Defined Commands

Command Builder enables you to edit the existing command definition.

To edit a command:


Step 1 Open the Command browser. See Using the Command Browser for details.

Step 2 Select the desired command and click the Edit Command icon.

Or,

Right-click the selected command and choose Edit.

The Command Identification page is displayed. The Name field is disabled. The other fields are pre-populated with their corresponding values.

Step 3 Modify the details as required and click Next.

Step 4 Modify the role assignment, if required, and click Next.

Step 5 Modify the Script and the Rollback lines, if required, and click Next.

Step 6 Click Finish. A confirmation message is displayed. It asks you whether you want to overwrite the existing command.

Step 7 Click OK to confirm the changes.


Importing User-Defined Commands

Command Builder enables you to import a command definition to a managed element. You can copy a full command definition from an exported file and import this command to another managed element.

To import a command:


Step 1 Open the Command browser. See Using the Command Browser for details.

You need to be in context of a network element before you can do an import operation.

Step 2 Click the Import icon. The Select Script Files file browser is displayed.

Step 3 Select a script file and click Open.


Exporting User-Defined Commands

Command Builder enables you to export (save) a full command definition to a file. You can save a full command definition to a file that can later be imported to another managed element.

To export a command:


Step 1 Open Command browser. See Using the Command Browser for details.

Step 2 Select the command you want to export.

Step 3 Click the Export Command icon. The Export Elements pop up window is displayed.

The pop-up window displays a table with the following fields:

Exists—Tick mark shows that the command exists on this node.

VNE Hierarchy Location—Location where the command exists in the UMDF hierarchy.

IMO Name—Name of the hierarchy node.

Step 4 Select the desired value and click OK. The Select Destination File file browser is displayed.

Step 5 Select the destination. The exported file is saved to that location.


Running a Command

To run a command:


Step 1 Go to the Tasks tab in the Inventory perspective and select the Configuration drawer.

Step 2 Expand the Command Builder node.

Step 3 Double-click Run Command. The Device Selector is displayed.

Step 4 Select the network elements and click Add >.

Step 5 Select the network elements in the Selected Network Elements pane and click Next.

Alternatively, you may also run a command for a network element from the Command browser. See Using the Command Browser for details on invoking Command browser.

To do this, select the command and click the Run Command icon.

You can either select more network elements and then click Next, or click Next directly to continue.

The Input Parameters page is displayed.

Step 6 Select the command from the Select Command dialog box, and click Add >. An instance of this command is created and listed in the Created Instances dialog box.

Step 7 (Optional) To preview the command, select it and click Preview.

Step 8 To continue with the Run Command operation, click Next in the Input Parameters page. The Schedule Job page is displayed.

Step 9 Specify the following in the Schedule Job pane:

Start date

The number of times this job should be run

Delay between jobs

Enter a job description in the Job Options pane.

You can select the following if the Allow User Configuration check box was selected while setting up administrative parameters at Administration > Global Settings > Command Builder Settings.

Fail on Mismatch of Config Versions

Sync Archive before Job Execution

Copy Running Config to Startup

Execution Policy—This can be:

Serial

Parallel

Failure Policy—This can be:

Rollback Job

Rollback Device and Stop

Rollback Device and Continue

See Understanding Command Builder Job Policies for details.

Step 10 Click Finish.


Deleting User-Defined Commands

Commands that you create are, by default, created as a local instance. A command that is defined locally is selected in the Command Builder wizard. You can only delete commands that exist locally; for example, commands that have not yet been published. You can delete a published template from Hierarchy Manager. See Publishing a User-Defined Command for details.


Note You cannot delete the system-defined commands. These commands are available only for Cisco IOS XR devices.


To delete a command:


Step 1 Open Command browser. See Using the Command Browser for details.

Step 2 Select the desired command and click Delete.


Publishing a User-Defined Command

Command Builder allows you to publish a user-defined command. This option helps you to deploy a command you have created for a device to another device or device type in the device tree. This is done with the help of Hierarchy Manager. See Hierarchy Management for details.

To publish a command:


Step 1 Open the Command browser. See Using the Command Browser for details.

Step 2 Select the command you want to publish and click the Publish Command icon.

The UMDF Hierarchy Manager is displayed. It shows the command you have selected, and the UMDF hierarchy to which it can be published.

Step 3 Select the command you want to publish and click the Copy icon.

Step 4 Browse to the device tree node where you want to publish the command and select the node.

Step 5 Click the Paste icon.

You may also export, import, or delete a published command. You can also use the Cut icon to remove a command from a node and publish it on another node.


About System-Defined Commands

Only Cisco IOS XR devices have system-defined commands in ANA 4.0. System-defined commands are populated in the Command browser, when you select a Cisco IOS XR device.

In addition to system-defined commands, you can define commands for Cisco IOS XR devices, using the New Commands option. See Creating User-Defined Commands for details.

You cannot edit or delete system-defined commands.

Table 8-3 lists the system-defined commands available for Cisco IOS XR devices.

Table 8-3 System-Defined Commands for Cisco IOS XR Devices 

Script Name
User Role
IMOContext
Script Language

Show Running Config

Any of the following roles:

Viewer

Configurator

Network Operator

Administrator

IManagedElement

ANA Macro Language

Show logged in users

Any of the following roles:

Viewer

Configurator

Network Operator

Administrator

IManagedElement

ANA Macro Language

Show configuration session users

Any of the following roles:

Viewer

Configurator

Network Operator

Administrator

IManagedElement

ANA Macro Language

Show IP interfaces brief

Any of the following roles:

Viewer

Configurator

Network Operator

Administrator

IManagedElement

ANA Macro Language

Copy configuration from TFTP to running-config

Any of the following roles:

Network Operator

Administrator

IManagedElement

ANA Macro Language

Copy configuration from running-config to TFTP

Any of the following roles:

Network Operator

Administrator

IManagedElement

ANA Macro Language

Copy configuration from FTP to running-config

Any of the following roles:

Network Operator

Administrator

IManagedElement

ANA Macro Language

Copy configuration from running-config to FTP

Any of the following roles:

Network Operator

Administrator

IManagedElement

ANA Macro Language

Set SNMP server host

Any of the following roles:

Network Operator

Administrator

IManagedElement

ANA Macro Language

Enable SNMP Traps

Any of the following roles:

Network Operator

Administrator

IManagedElement

ANA Macro Language

Ping destination

Any of the following roles:

Network Operator

Administrator

IManagedElement

BeanShell

Traceroute to destination

Any of the following roles:

Network Operator

Administrator

IManagedElement

ANA Macro Language

Add VRF

Any of the following roles:

Network Operator

Administrator

IManagedElement

ANA Macro Language

Remove VRF

Any of the following roles:

Network Operator

Administrator

IManagedElement

ANA Macro Language

Add Import Route Target to VRF

Any of the following roles:

Network Operator

Administrator

IManagedElement

ANA Macro Language

Add Export Route Target to VRF

Any of the following roles:

Network Operator

Administrator

IManagedElement

ANA Macro Language

Add VRF static route

Any of the following roles:

Network Operator

Administrator

IManagedElement

ANA Macro Language

Add Access Control List

Any of the following roles:

Network Operator

Administrator

IManagedElement

ANA Macro Language

Change Port Admin State

Any of the following roles:

Network Operator

Administrator

IPortConnector

ANA Macro Language

Add Port Description

Any of the following roles:

Network Operator

Administrator

IPortConnector

ANA Macro Language

Configure VLAN ID

Any of the following roles:

Network Operator

Administrator

IPortConnector

ANA Macro Language

RTPM add, modify, activate, deactivate or delete scripts

Any of the following roles:

Network Operator

Administrator

IManagedElement

ANA Macro Language


See RTPM Data Collection Process, page 10-6 for information on real-time performance management data collection using ANA 4.0.

Defining ANA Macro Language Scripts

ANA Macro Language scripts consist of a simple sequence of Telnet commands, user-defined input parameters that are replaced at runtime, and inline execution directives that are executed sequentially as Telnet configuration commands on a device.

ANA Macro Language represents both types of parameters (built-in and user-defined) in script lines within dollar symbols, namely, $...$. For example, in a VRF configuration command, the input variable vrfName can be defined as ip vrf $vrfName$.

To define ANA Macro Language script lines:


Step 1 In the User Input Arguments dialog box click Next. The Script Lines dialog box is displayed, enabling you to add or edit a script line.


Note To view all the user-defined and built-in parameters in Command Builder press Ctrl + Space to open the selection list of available arguments (containing both the user-defined input argument and the built-in properties of the IMO context).


The following areas are displayed in the Script Lines dialog box:

ScriptThe actual Telnet script lines sent to the device. The script lines can contain optional inline directives (pragmas) for finer-granularity control. For more information about the supported pragmas, see ANA Macro Language.

RollbackThe rollback script that is used when the command fails (optional).

If the rollback script fails, no additional actions can be performed.

Step 2 Define the script lines in the Script area.

Pragmas are enclosed with square brackets, for example, [...].

To view all the user-defined and built-in parameters in Command Builder, press CTRL + Space to open the selection list of available arguments (containing both the user-defined input argument and the built-in properties of the IMO context).

Wherever carriage returns are required in the command line, you must use &cr.

It is possible to use multiple pragmas in a single line, in which case all the pragmas are analyzed. If the same type of pragma is repeated only the last one is used.

Step 3 (Optional) Define the Rollback script.

Step 4 Click Finish.

The newly created command is displayed in the Command browser.

See Running a Command for information on running the command.

See Publishing a User-Defined Command for information on publishing the command.

See Appendix D, "ANA Macro Language" for further details on ANA Macro Language.


Defining Bean Shell Scripts

Bean Shell uses a fully programmatic logic via scripting language (conditions, loops, external files, and so on).

To define Bean Shell Script Lines:


Step 1 In the User Input Arguments dialog box click Next. The Script Lines dialog box is displayed.


Note To view all the user-defined and built-in parameters in Command Builder, press CTRL + Space to open the selection list of available arguments (containing both the user-defined input argument and the built-in properties of the IMO context).


Note Unlike ANA Macro Language, in Bean Shell, user argument inventory properties should not be embedded within $...$ symbols.


The following areas are displayed in the Bean Shell Script dialog box:

ScriptThe actual Telnet script lines sent to the device. The script lines can contain optional inline directives (pragmas) for finer-granularity control.

RollbackThe rollback script that is used when the command fails (optional).

Step 2 Press CTRL + Space and select the required field.

Step 3 Click OK. The selected field is displayed in the Bean Shell Script dialog box.

Step 4 Repeat Step 2 and Step 3 to add all the required fields.

Step 5 Click Finish.

The newly created command is displayed in the Command browser.

See Running a Command for information on running the command.

See Publishing a User-Defined Command for information on publishing the command.

See Appendix E, "Bean Shell Commands" for further details on Bean Shell.


Command Builder Log Files

There is no specific log file for Command Builder. However, you can use the common log file:

On the client, the log file is located at:

$User Home Dir\.ana\.metadata\

The log filename is .log.

On the server, the log file is located at:

$ANAHOME/Main/logs

The log filename is jboss.log.


hometocprevnextglossaryfeedbacksearchhelp

Posted: Mon Sep 24 07:21:00 PDT 2007
All contents are Copyright © 1992--2007 Cisco Systems, Inc. All rights reserved.
Important Notices and Privacy Statement.