|
|

This chapter describes how to view and change ONS 15200 configuration information using the Cisco ONS 15200 web interface. This chapter describes the configuration information for operator users and guest users. Guest users can only view the network configuration and alarm events. Guest users have no access to change the network configuration.
 |
Note Screens for Client Layer Interface Port (CLIP) modules vary according to the configuration of the CLIP modules. CLIP modules can be configured for protected or unprotected operation. The screens in this chapter show protected CLIP modules, and differences are noted. |
The ONS 15200 web interface allows you to view and adjust the configuration of each CLIP module installed in the ONS 15200 network. The following sections describe the parameters available for each module.
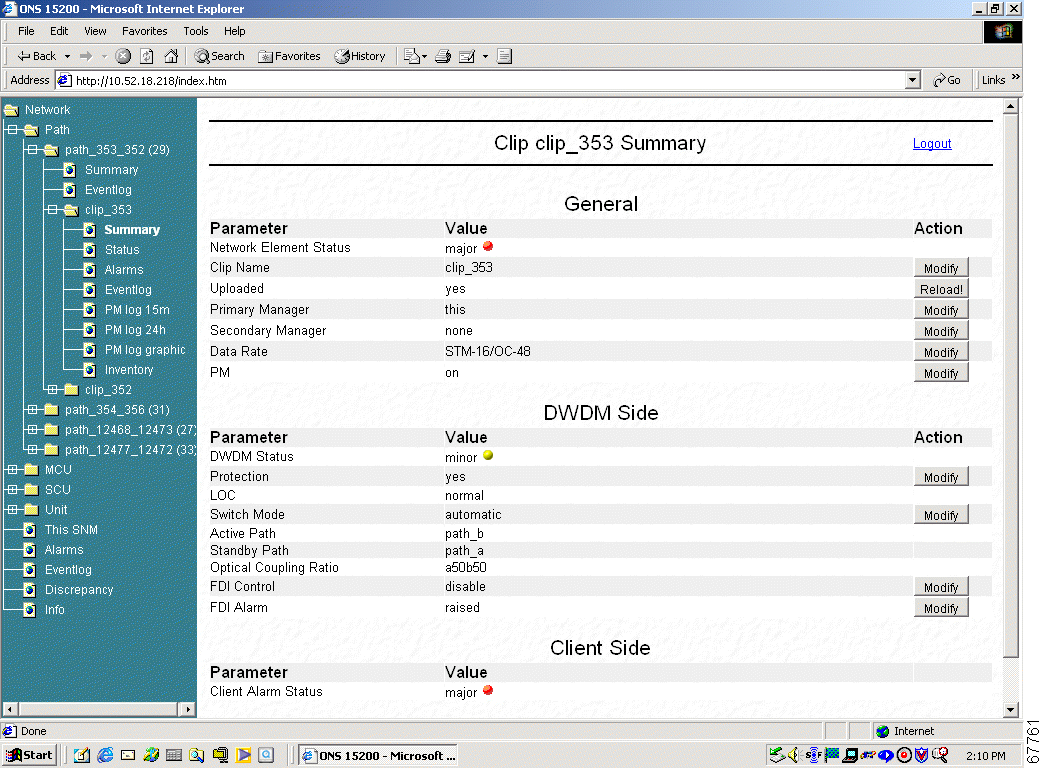
The CLIP Module Summary screen (Figure 3-1) displays the configuration of the CLIP module. The screen is divided into three sections:
|
Note The Action column on the right is available for operator users only. This column does not appear for guest users. |
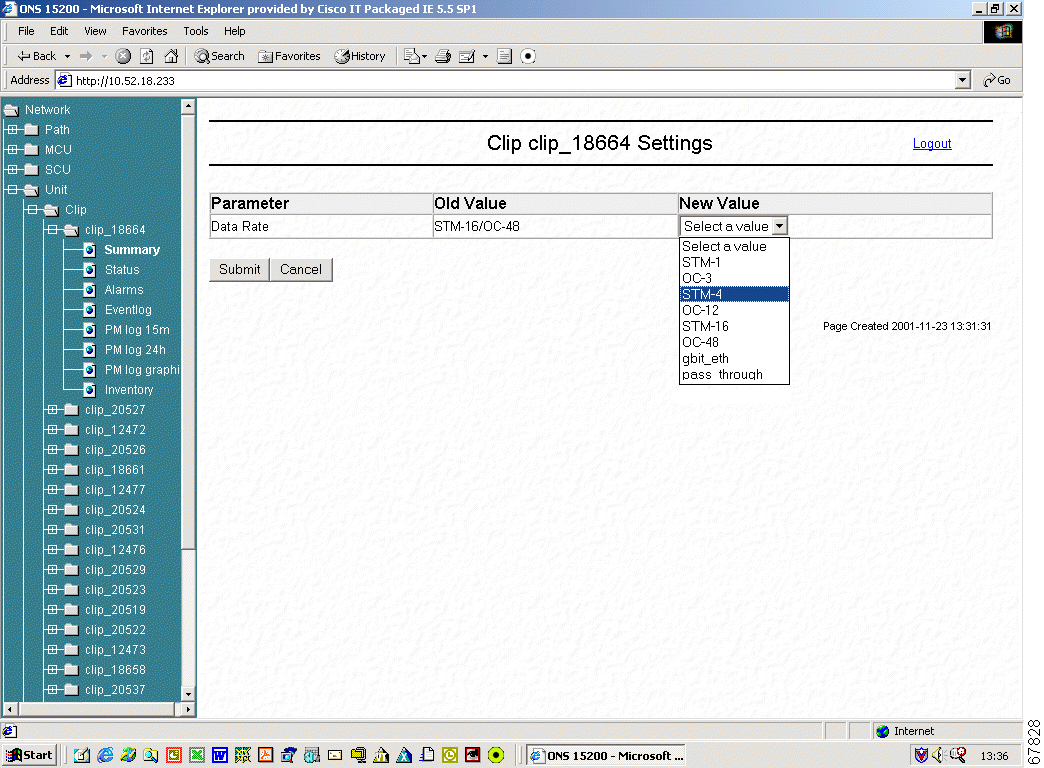
This procedure provides an example of how to change the data rate. The procedure is similar for all network configuration changes.
With this procedure you can make three adjustments to the network element:
Step 2 In the Data Rate row, click Modify. The CLIP Settings screen appears.
Step 3 Click the New Value pull-down menu and select the data rate you want to use (Figure 3-2).
Step 4 Click Submit.
|
Note This step may take a few seconds (depending on the web speed). |
Step 5 Check the current data rate; if required, repeat the procedure with the correct data rate.
|
Note The CLIP Settings screen is not available for guest users. |
Table 3-1 lists and defines the general parameters that are shown in Figure 3-1.
| Parameter | Definition |
|---|---|
Network Element Status | Defines the operating status of the CLIP module in the MCU and SCU. The following states are possible in this field: Critical Major Minor Warning Normal |
Clip Name | Modify the CLIP name |
Uploaded | The alarm messages will be updated from the system |
Primary Manager | Describes which NCB controls the system. The following states are possible in this field: none this |
Secondary Manager | Describes which NCB controls the system The following states are possible in this field: none this |
Data Rate | Describes the rate at which data is transmitted by the ONS 15200 system The following states are possible in this field: STM-1/OC-3 STM-4/OC-12 STM-16/OC48 Gigabit Ethernet Pass through Inconsistent (shown if both ends of the path are not equal) |
PM | Enables the measurement of the Performance Monitor The following states are possible in this field: on (enabled) off (disabled) |
DWDM Status | Defines the status of the DWDM Side The following states are possible in this field: Critical Major Minor Warning Normal |
Protection | Shows "yes" if the CLIP is in a protection mode |
LOC | Loss Of Channel (Displays if the channel working/protection or working is lost) |
Switch Mode | Displays the switching scheme assigned to the selected CLIP module. The following states are possible in this field: cond_a (protected operation, revertive switching to a) cond_b (protected operation, revertive switching to b) forced_a (operation forced to channel a) forced_b (operation forced to channel b) automatic (protected operation, non-revertive switching) |
Active Path | Identifies the active path (A side or B side) |
Standby Path | Identifies the protect path (or standby path) |
Optical Coupling ratio | Displays the traffic split ratio The following states are possible in this field: a100b0 a0b100 a10b90 a90b10 a50b50 |
FDI Control | Indicates whether the automatic protection switch is enabled or disabled |
FDI Alarm | Indicates whether a switching error to the protect path has taken place This alarm can be treated in the following way: inhibit—a possible error status is not recognized in the unit (it will not be visible anywhere, even if unsuppressed) uninhibit—a possible error status is recognized in the unit suppress—a recognized error is suppressed for further display and evaluation Unsuppress—a recognized error is not suppressed for further display and evaluation, so it is visible |
Client Alarm Status | Displays the operating status of the CLIP module in the MCU and SCU The following states are possible in this field: Critical Major Minor Warning Normal |
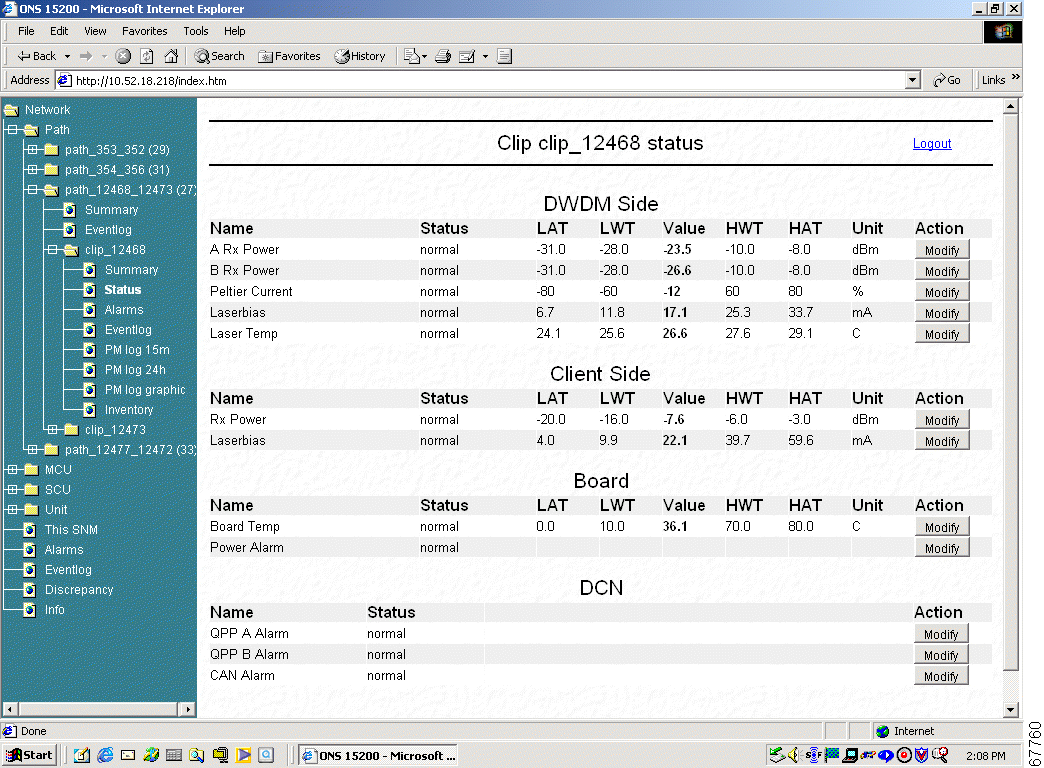
The CLIP Module Status screen displays the operating status of the CLIP module (Figure 3-3). Table 3-2 defines the measurements provided for each parameter.
| Measurement | Definition |
|---|---|
Status | Describes the protection status of the module
|
HAT | High Alarm Threshold—Displays the upper threshold value that causes an alarm to be raised |
HWT | High Warning Threshold—Displays the upper threshold value that causes a warning to be raised |
Value | Displays the real-time value of the parameter as measured by the module |
LAT | Lower Alarm Threshold—Displays the lower threshold value that causes an alarm to be raised |
LWT | Lower Warning Threshold—Displays the lower threshold value that causes a warning to be raised |
Unit | Displays the unit of measurement for the values of the selected parameter |
Action | Allows the operator user to modify system parameters |
The CLIP status screen (Figure 3-3) is divided into four sections: DWDM Side, Client Side, Board and DCN. Parameters listed in the DWDM Side section describe how the CLIP module is operating. Parameters listed in the Client Side section describe the quality of the signal received from the client equipment. The Board section provides the board parameter for the CLIP module. The DCN section describes the data protocol status.
|
Note The Action column on the right is available for operator users only. This column does not appear for guest users. |
The DWDM Side of the CLIP status screen describes how the CLIP module is operating. Table 3-3 describes the DWDM parameters.
| Parameter | Definition |
|---|---|
A RX Power (protected only) | Displays the values associated with the strength of the signal received from the A-side MCU or SCU. Note The A RX Power parameter is displayed only for protected CLIP modules. |
B RX Power (protected only) | Displays the values associated with the strength of the signal received from the B-side MCU or SCU. Note The B RX Power parameter is displayed only for protected CLIP modules. |
RX Power (unprotected only) | Displays the values associated with the strength of the signal received from the MCU or SCU. Note The RX Power parameter is not displayed for protected CLIP modules. |
Peltier Current | Displays the values associated with the strength of the current to the Peltier device. The Peltier device regulates the temperature of the laser, which maintains the wavelength of the signal. |
Laser Bias | Displays the value of the current component added to the modulation current in order to obtain a proper operating point for the laser. |
Laser Temp | Displays the values associated with the temperature of the laser that transmits on the ONS 15200 network. |
Figure 3-4 shows the RX and TX power measurement points for the DWDM interfaces on a CLIP module.
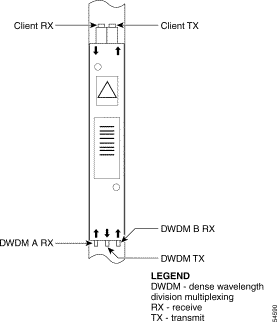
The Client Side of the CLIP status screen describes how the CLIP module is operating. Table 3-4 describes the client access parameters. Figure 3-4 shows the RX and TX power measurement points for the client interfaces on a CLIP module.
| Parameter | Definition |
|---|---|
RX Power | Displays the optical power of the signal received from the client equipment attached to the ONS 15200 network. |
Laser Bias | Displays the value of the current component added to the modulation current in order to obtain a proper operating point for the laser. |
The Board section of the CLIP status screen provides the Board Parameter for the CLIP module. The Board Temperature parameter displays the values associated with the ambient temperature on the surface of the CLIP module, which is located immediately below the TX transponder.
| Parameter | Definition |
|---|---|
Board Temp | Displays the values associated with the ambient temperature on the surface of the CLIP module, which is located immediately below the TX transponder. |
Power Alarm | Displays the Power Alarm of the Power Supply 1 (PS1) and Power Supply 1 (PS2) connection. |
The DCN section displays atheists of the software protocol that is used in the system.
| Parameter | Definition |
|---|---|
QPP A Alarm or QPP B Alarm | Displays an alarm status of the QPP proprietary protocol between two CLIPs forming one path (A path or B path) |
CAN Alarm | Displays an alarm status of the CAN bus of the NCB |
The CLIP Inventory screen provides information about the selected CLIP module. The CLIP Inventory screen is divided into four sections: General, Board, RX transponder, and TX transponder.
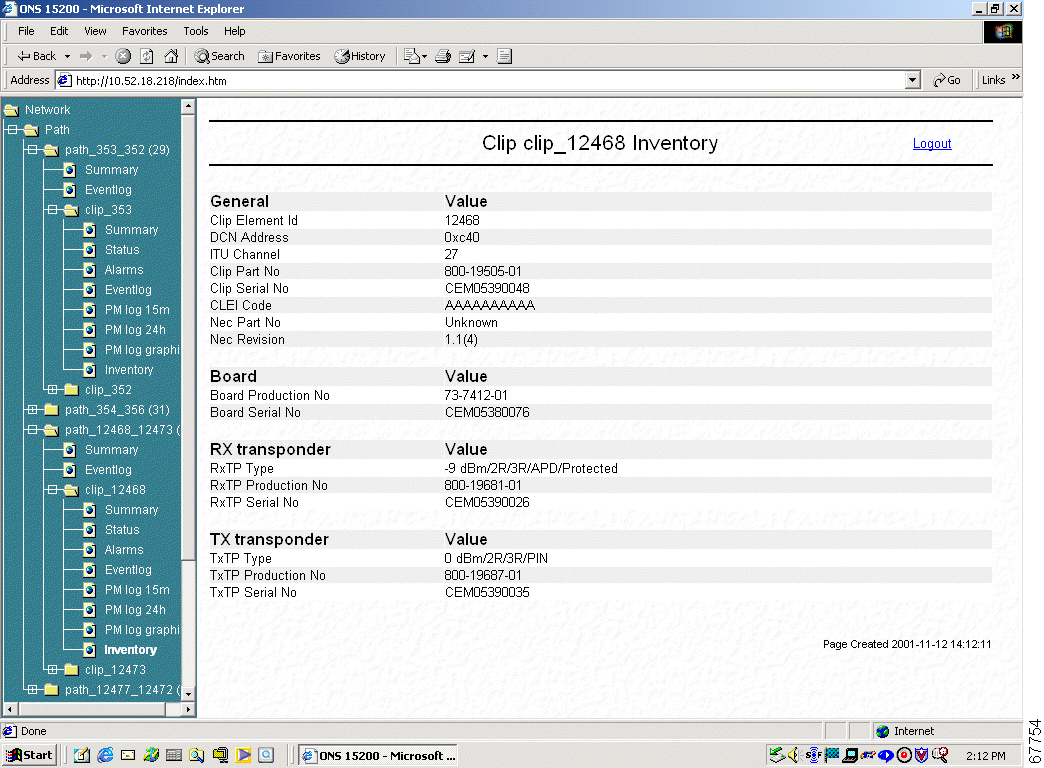
The General section of the CLIP Inventory screen displays inventory information about the entire CLIP module (Figure 3-5). Table 3-7 lists and defines the general parameters.
| Parameter | Definition |
|---|---|
CLIP Element Id | Displays the Element Id (identification) of the CLIP module |
DCN Address | Data Control Network address. Defines the address assigned to this module |
ITU Channel | Displays the channel that the CLIP module is configured to operate on. Channels are defined according to the standard ITU grid |
Clip Part No | Displays the CLIP Part Number (Cisco order number) |
Clip Serial No | Displays the Serial Number of the CLIP module |
CLEI Code | Displays the CLEI code |
Nec Part No | Displays the part number of the firmware that is installed in the selected CLIP module |
NE Revision | Displays the revision of the firmware that is installed in the selected CLIP module |
The Board section of the CLIP Inventory screen displays inventory information about the main circuit board on the CLIP module (Figure 3-5). Table 3-8 lists and defines the Board parameters.
| Parameter | Definition |
|---|---|
Board Production No | Displays the part number assigned to the main circuit board in the CLIP module. |
Serial Number | Displays the serial number of the main circuit board in the CLIP module. |
The RX transponder section of the CLIP Inventory screen displays inventory information about the RX transponder submodule on the CLIP module (Figure 3-5). Table 3-9 lists and defines the RX Transponder parameters.
| Alarm Name | Definition |
|---|---|
RxTP Type | Displays the type of RX transponder installed on the selected CLIP module. The Type definition is divided into the following parts:
|
RxTP Production No | Displays the part number of the RX transponder module installed in the selected CLIP module. |
RxTP Serial No | Displays the serial number of the RX transponder module installed in the selected CLIP module |
The TX transponder section of the CLIP Inventory screen displays inventory information about the TX transponder submodule on the CLIP module (Figure 3-5). Table 3-10 lists and defines the TX Transponder parameters.
| Alarm Name | Definition |
|---|---|
TxTP Type | Displays the type of TX transponder installed on the selected CLIP module. The Type definition is divided into the following parts:
|
TxTP Production No | Displays the part number of the TX transponder module installed in the selected CLIP module. |
TxTP Serial No | Displays the serial number of the TX transponder module installed in the selected CLIP module |
The ONS 15200 web interface allows you to view configuration information about the ONS 15200 network. The following sections describes the parameters available.
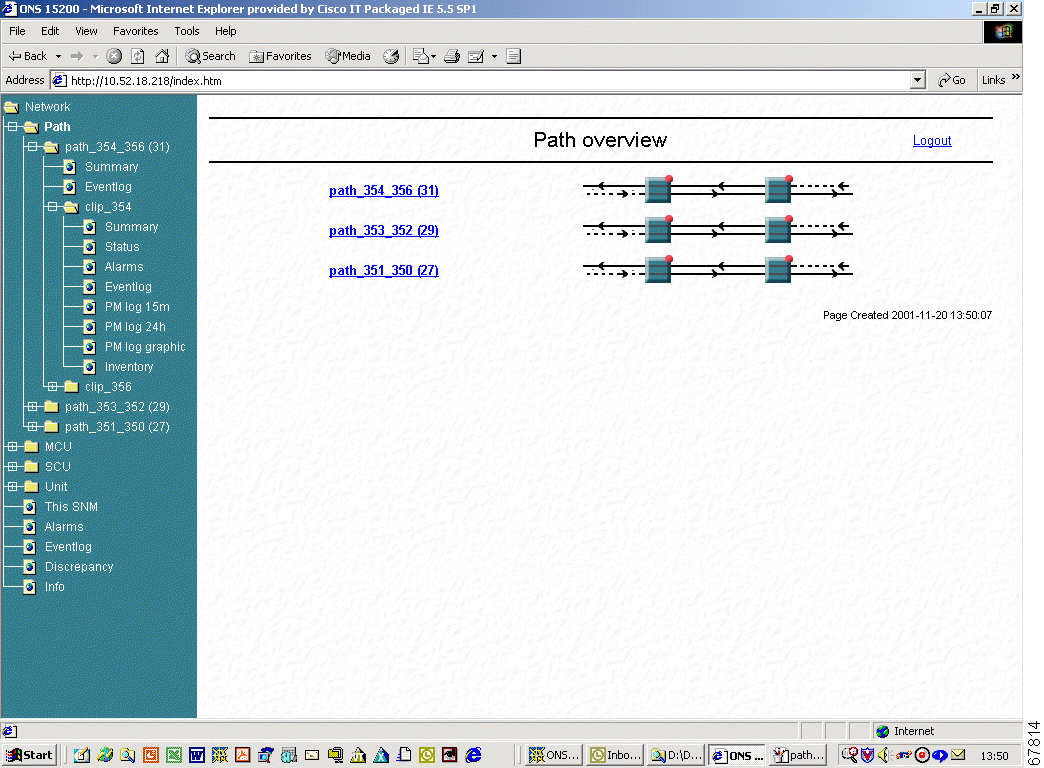
The Path Overview screen provides an overview of the optical paths configured for the ONS 15200 network (Table 3-7).
NE active alarms are indicated by LEDs. The type of path is indicated by the line style between the CLIP modules. A thick line indicates a protected path; a thin line indicates an unprotected path. A dotted line indicates no input signal.
 |
TimeSaver To access the CLIP status screen, click the rectangular NE graphical representation. |
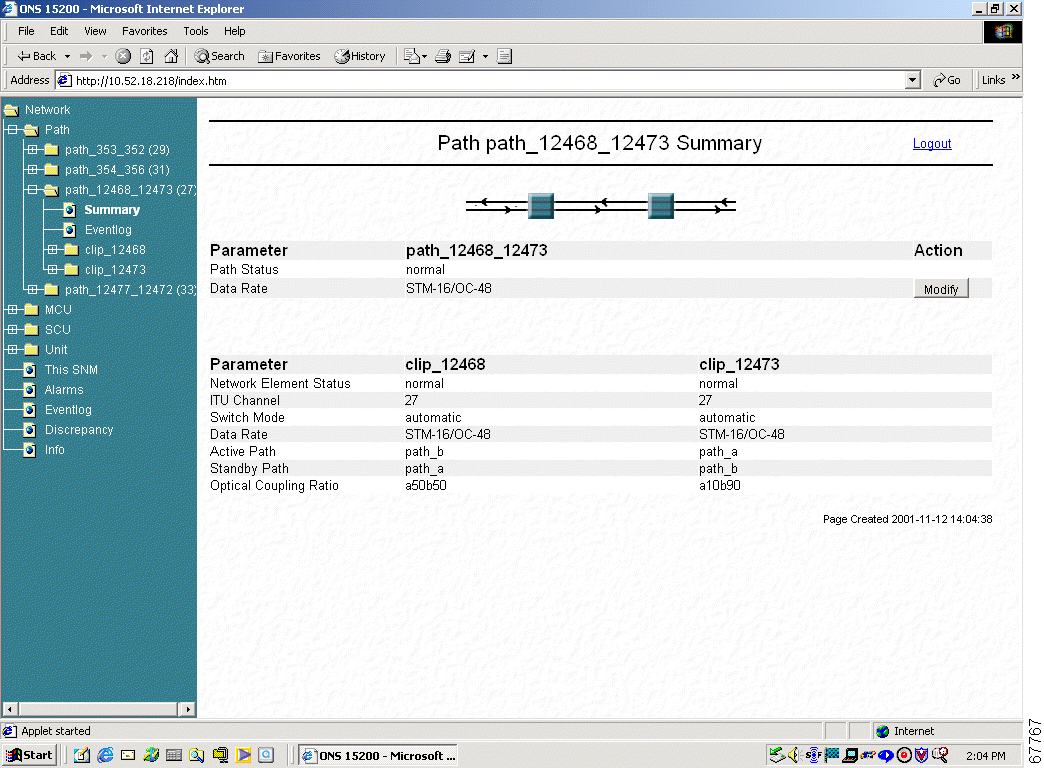
The Path Summary screen provides an operational summary of the selected path (Figure 3-7). The Path Summary screen is divided into two sections. The first section provides a graphical representation of the selected path. Active alarms are indicated by colored LEDs. The second section, the summary table, lists measurements for the each CLIP module in the path. See Table 3-11 for path summary parameter definitions.
|
Note The Action column on the right is available for operator users only. This column does not appear for guest users. |
| Parameter | Definition |
|---|---|
Path Status | Defines the operating status of the CLIP module in the MCU and SCU The following states are possible in this field:
|
Data Rate | Describes the rate at which data is transmitted by the ONS 15200 system The following states are possible in this field:
|
Network Element Status | Defines the operating status of the CLIP module in the MCU and SCU The following states are possible in this field:
|
ITU Channel | Displays the channel where the CLIP module is configured to operate |
Switch Mode (protected only) | Displays the switching scheme assigned to the selected CLIP module The following states are possible in this field:
|
Data Rate | Describes the rate at which data is transmitted by the ONS 15200 system The following states are possible in this field:
|
Active path | Defines whether the A side or B side is the active path |
Standby path (protected only) | Defines which path is the protect path |
Optical Coupling Ratio | Displays the traffic split ratio |
The MCU Overview screen provides an overview of the MCU that is configured for the ONS 15200 network. The MCU Overview screen is divided into two sections. One section provides a textual MCU and the other displays a graphical representation of the MCU.
Active NE alarms are indicated by LEDs. Click the network element the status screen to display the network element appears.
![]()
![]()
![]()
![]()
![]()
![]()
![]()
![]()
Posted: Fri Jan 4 16:40:35 PST 2002
All contents are Copyright © 1992--2002 Cisco Systems, Inc. All rights reserved.
Important Notices and Privacy Statement.