|
|

This chapter describes how to update the Cisco Metro 1500 series system, and it includes the following sections:
The system updates are in self-extracting WinZip format and are sequentially named using the convention F2updxx.exe, where xx is the update number.
The self-extracting WinZip file contains two files:
After successfully logging in, the NEMI system displays a message similar to the following:
Linux 2.0.35 Metro 1500 -u02.5
where -u02.5 means Update 2.5.
If you are already logged into the NEMI, you can execute the cat /etc/motd command to display the same information.
 |
Note System updates must be applied in ascending sequential order. |
Any system that has Internet connectivity receives downloads of the WinZip self-extracting system updates. Executing the file (on Windows 95/98/NT) or using unzip (on UNIX systems) extracts the two contained files.
Depending on customer preferences and established policies, the compressed tar file (F2updxx.tgz, where xx is the update number) must be transferred to the NEMI netadmin account.
You can transfer a system update to the NEMI in one of the following ways (listed in decreasing order of connection speed):
All of these options can be used in Windows 95/98/NT or UNIX except for using a local PPP connection. The third option is only available from a UNIX or Linux system because Windows 95/98 and Windows NT require a modem connection for establishing a PPP link.
After the compressed tar file has been transferred into the netadmin account, log onto the NEMI system as root.
System updates are applied automatically during startup whenever the NEMI detects a F2updxx.exe file in the netadmin account. After executing the update, the file is deleted and the file /etc/motd is updated to display the new update level. After logging in as root, enter reboot and the NEMI instantaneously executes a system shutdown, followed by a reboot and automatic system update as previously described.
 |
Note To upgrade to version 3.2, you must first install version 2.8 or later. |
To check for the system update level, log into the NEMI and watch the first line after your successful login. You see a line similar to the following:
Linux 2.0.35 Metro 1500 -u02.5
where -u02.5 means Update 2.5.
The NEMI runs firmware that may need to be updated to support new hardware. For example, firmware version 1.2.6, or later, and OS version 3.2, or later, are required to run the latest version of the ESCON TDM module. Due to the design of the hardware,the NEMI firmware can only be upgraded by Cisco Systems. Contact you Cisco distribution channel for instructions.
To automate logging into the NEMI, you need a script. The script named nemi.exe is available in the netadmin account as a self-extracting zip file.
To transfer a login script using FTP, follow these steps:
Step 1 Open a DOS shell on your local computer by pressing the Start button, choosing Run, and entering command. In Windows NT, enter cmd instead of command.
Step 2 Start the file transfer program by entering ftp IP address.
Step 3 Enter the username netadmin.
Step 4 Enter your password. The default password for netadmin is ChgMeNOW.
Step 5 Enter bin to switch to binary transfer mode.
Step 6 Transfer the login script by entering get nemi.exe.
Step 7 Finish the file transfer by entering the quit command. The login script is now stored on your computer.
Step 8 Close the DOS shell by entering exit.
Script files are usually kept in C:\Program Files\Accessories. You should explicitly specify this directory when executing nemi.exe to keep the file in its default location.
If you have problems accessing the NEMI, here is a script you can type in as a text file. Name the file nemi.scp.
 |
Caution Be careful when you enter the script because it is case sensitive. |
; Main entry point to script
;
proc main
transmit „^M"
waitfor „ogin: „
transmit $USERID, raw
transmit „^M"
waitfor „assword: „
transmit $PASSWORD, raw
transmit „^M"
endproc
; End of script
After you have changed or established PPP for UNIX using the netconfig command, it is time to create a dialup networking connection on your computer. Your computer uses this network connection to the NEMI.
 |
Note The following screen displays were taken using Windows 98; you will notice slight differences if you are using Windows 95. |
To set up a dialup networking connection on your computer, follow these steps:
Step 1 Double-click My Computer, and double-click the Dial-Up Networking folder. Double-click the icon labeled Make New Connection. This starts the New Connection Wizard and you see the display shown in Figure 5-1.
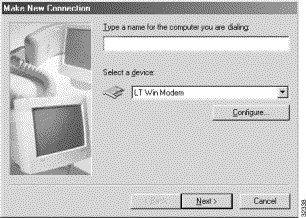
Step 2 Give this connection a meaningful name. Make sure the modem listed is the one you want to use, and then click Next.
Step 3 Enter the phone number for your connection to reach the NEMI (see Figure 5-2).

Step 4 Click Next. You see another screen saying that you successfully created a connection. Click the Finish button. You return to the dial-up networking folder, and you see the new connection.
Step 5 Right-click on the connection, and select Properties. You see a display similar to the one in Figure 5-3.
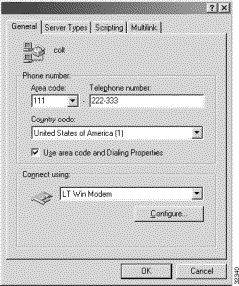
Step 6 Click the Configure button, and set the port to the correct one for your modem. Select the speaker volume you want, and set the maximum speed to 19200 if you are connecting with a 14.4K modem, or 38400 if you are using a 28.8K modem.
Step 7 Clear the Only connect at this speed check box. It should look similar to the display shown in Figure 5-4.

Step 8 Click the Connection tab, and set it as shown in Figure 5-5.
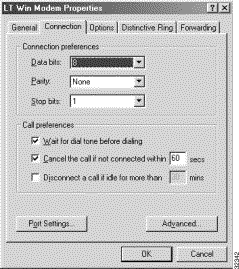
Step 9 Click Advanced while still on this panel, and make sure you select Use hardware flow control, Use error control, and Compress data, as shown in Figure 5-6.
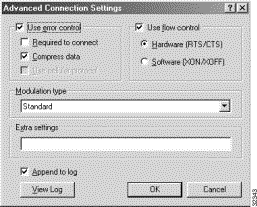
Step 10 Click OK, and then click the Options tab. Select the Display modem status check box, as shown in Figure 5-7.

Step 11 Click OK, and you return to the General tab of your connection. Now click Server Type. This gives you a new panel. Make sure the type of dialup server listed is PPP for Windows 95/98/NT. If it is not, click the drop-down arrow and select from the list.
Step 12 Clear the Log on to network and Require encrypted password check boxes. Under Allowed network protocols, make sure only TCP/IP is selected, as shown in Figure 5-8.

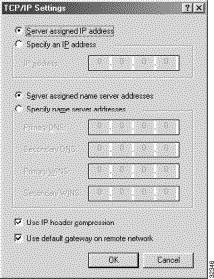
Step 13 Click TCP/IP Settings, click Server assigned IP address in the first section, and click Server assigned name server addresses. Select both the Use IP header compression and the Use default gateway on remote network check boxes, as shown in Figure 5-9.
Step 14 Click OK again. Click Scripting.
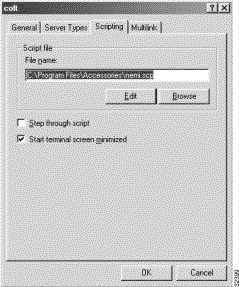
Step 15 Connect the script to the just defined dial-out. Browse to nemi.scp and click OK again. Click OK again, and then click OK one more time to return to the Dial-Up Networking folder, as shown in Figure 5-10.
Step 16 Make sure your connection is the highlighted icon, click the Connections option for the folder, and select Settings. Leave the prompt to Use Dial-Up Networking option selected.
This sets up your connection to auto redial if the line is busy.
 |
Note Reboot the computer so that the TCP/IP changes take effect. |
Step 17 Click the dialup networking icon to connect. Enter ppp as your username, and enter the password to the PPP account. Click the Connect button.
![]()
![]()
![]()
![]()
![]()
![]()
![]()
![]()
Posted: Sat Sep 28 02:42:47 PDT 2002
All contents are Copyright © 1992--2002 Cisco Systems, Inc. All rights reserved.
Important Notices and Privacy Statement.