|
|

This chapter describes how to connect the NEMI and DEMI modules used in the Cisco Metro 1500 series system. This chapter includes the following sections:
Use the following connection equipment to connect the NEMI and DEMI modules:
Use the external bus cable supplied to connect the NEMI in the primary chassis with the DEMI in extension chassis A. Figure 7-1 shows an external bus connector cable.
 |
Note The external bus cable is included in the same box that contains the DEMI. |
 External Bus Connector Cable
The bus interconnect port two (BUS 2) on the DEMI connects it to the NEMI. BUS 1 port must be terminated with the bus terminator supplied to eliminate extraneous noise on the bus. Figure 7-2 shows the bus terminator.

For a 17- to 32-channel system or for a 128-channel ESCON system, the NEMI-slaves in the extension chassis are connected to the DEMI modules in the extension chassis in the same manner as described in the "Connection Equipment" section.
Figure 7-3 shows how to connect the NEMI-master or the NEMI-slave with a DEMI.

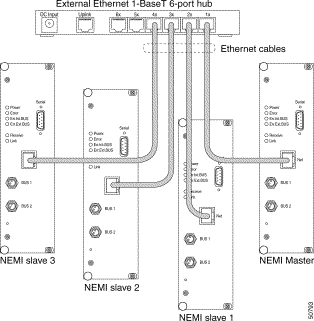
Both NEMI-master and NEMI-slaves must be connected to an external Ethernet hub with Ethernet cables. Figure 7-4 shows an example of these configurations.
Once interconnected, the NEMI modules exchange management and configuration control information across a private IP network. For information about configuring this private network, refer to the Cisco Metro 1500 Series Software Configuration Guide.

To connect NEMI modules to an Ethernet hub, follow these steps:
Step 2 Attach one end of an approved Ethernet cable to the RJ-45 Ethernet port of the NEMI-master in the primary chassis.
Step 3 Attach the other end of the cable to the RJ-45 Ethernet port of the external Ethernet hub. (See Figure 7-4.)
Step 4 Repeat these steps for all NEMI-slaves installed in chassis C, E, and G.
![]()
![]()
![]()
![]()
![]()
![]()
![]()
![]()
Posted: Fri Aug 2 18:17:06 PDT 2002
All contents are Copyright © 1992--2002 Cisco Systems, Inc. All rights reserved.
Important Notices and Privacy Statement.