|
|

In this chapter, you are going to configure IP routing between Token Ring VLANs on the Catalyst 5000 series Route Switch module (RSM).
As you learned in the "Using a Switch for Ring Microsegmentation" chapter, microsegmenting a network into VLANs enables you to maximize bandwidth and performance in your network. VLANs control the size of broadcast domains and localize traffic. However, in the past, end stations belonging to one bridged domain (TrBRF) could not communicate with network devices in another bridged domain (TrBRF) without an additional piece of equipment—the router.
With the Catalyst 5000 series RSM, you can configure interVLAN communication between bridged domain (TrBRFs) that are configured on multiple switches that are connected via ISL.
The Catalyst 5000 series RSM runs Cisco IOS software and provides multilayer switching and interVLAN routing services between switched VLANs and ELANs. Utilizing the Catalyst 5000 series RSM in your network enables you to bypass the purchase and maintenance of additional equipment in your network and to alleviate the burden being placed on centralized routers that are currently being used for interVLAN communication in your network.
This chapter provides the following information:
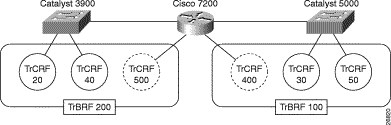
Currently, you have two bridged domains (TrBRFs) between which IP routing has been configured via a centralized router. The router is a Cisco 7200 in which a 2FEISL port adapter is installed.
One bridged domain (TrBRF) is dedicated to your company's Engineering departments and is configured on a Catalyst 5000 series switch in which a Token Ring module (WS-X5030) is installed in slot 3 and an ISL module is installed in slot 2. There are two rings (TrCRFs) configure to support two engineering departments. Ring 30 supports the engineering department located on the first floor of your R&D building. Ports 2 and 3 of the Token Ring module are assigned to this ring. Ring 50 supports the engineering department located on the second floor of your R&D building. Ports 7 and 8 of the Token Ring module are assigned to Ring 50. The rings have been joined via a logical bridge (TrBRF). The VLAN ID for the Engineering TrBRF is 100.
The second bridged domain is dedicated to your company's Marketing departments and is configured on a Catalyst 3900 series switch in which an ISL module is installed. There are two rings (TrCRFs) configure to support two marketing departments. Ring 20 supports the Public Relations department. Token Ring ports 2 and 3 of the Catalyst 3900 are assigned to this ring. Ring 40 supports the Product Marketing department. Token Ring ports 7 and 8 of the Catalyst 3900 are assigned to Ring 40. The rings have also been joined via a logical bridge (TrBRF). The VLAN ID for the Marketing TrBRF is 200.
Both bridged domains (TrBRFs) are members of the Eng-Marketing VTP management domain. The Catalyst 3900, Catalyst 5000, and Cisco 7200 are connected via ISL.
Figure 11-1 illustrates the initial network configuration.
Because the burden of additional traffic that is being placed on the router has affected your network, you have purchased a Catalyst 5000 series RSM and installed it in slot 5 of your Catalyst 5000 switch. Via the RSM, you intend to configure IP routing between the Marketing and Engineering TrBRFs.
Each TrBRF in a switched network requires an RSM interface and an IP address for IP routing. You have determined these values will be as follows:
| VLAN Name | VLAN ID | TrBRF IP Address |
|---|---|---|
TrBRF 100 | 100 | 172.122.30.1 255.255.255.0 |
TrBRF 200 | 200 | 172.122.40.1 255.255.255.0 |
TrBRF 100 and TrBRF 200 are source-route bridges. Therefore, you need to create a unique TrCRF on the RSM for each TrBRF. These TrCRFs are for the pseudo-ring on the RSM. The pseudo-ring is used to terminate RIFs. The RSM TrCRF for TrBRF 100 will be TrCRF 400, ring 100. The RSM TrCRF for TrBRF 200 will be TrCRF 500, ring 100.
 | Caution A unique TrCRF must be configure on the RSM for each TrBRF in your network. This unique TrCRF is required for the multiring functionality on the RSM. TrCRFs cannot be shared on the RSM because the network could be severely affected. |
Because IP routing is currently configured between the Marketing and Engineering departments via a centralized router, the Token Ring VLAN configuration as it exists in the switch network should be ready. However, the following is a checklist of the switched network configuration that you use to verify that the configuration is correct:
Once you have verified the switch network configuration, configuring IP routing on the RSM simply involves configuring an RSM interface for each of the bridged domains (TrBRFs) between which you want to configure IP routing and assigning an IP address to each of the RSM TrBRF interfaces.
Because your switch network is SRB, you are also going to configure a unique TrCRF on the RSM for each TrBRF RSM interface. This TrCRF is for the pseudo-ring that is used to cache the RIF for routed protocols.
To configure the TrBRF interfaces on the RSM module (located in slot 5 of the Catalyst 5000 series switch), complete the following tasks.
To configure the TrBRF RSM interfaces, you must first access the RSM and enter global configuration mode. To access the RSM and enter global interface mode, complete the following tasks:
Step 1. At the Catalyst 5000 prompt, enter enable and press Enter.
Step 2. At the enable prompt, enter session 5.
Step 3. Enter enable to access the RSM configuration mode.
Step 4. Enter configure terminal to access the RSM global configuration mode.
To enable IP routing on the RSM, complete the following task:
Step 1. Enter ip routing.
To configure the RSM interface for TrBRF 100, complete the following tasks:
Step 1. At the Router(config)# prompt, enter interface vlan 100 type trbrf.
Step 2. To assign an IP address to the TrBRF 100 RSM interface, enter ip address 172.122.30.1 255.255.255.0.
Step 3. Create the unique TrCRF for the pseudo-ring to enable the termination of RIF by entering multiring trcrf-vlan 400 ring 100.
Step 4. Configure multiring on this interface for all routed protocols by entering multiring all.
Step 5. For larger frame size support than the native Ethernet 1500 byte packets, change the MTU of the TrBRF 100 interface by entering mtu 4472.
Step 6. Enter no shutdown to administratively bring up the TrBRf 100 RSM interface.
To configure the RSM interface for TrBRF 200, complete the following tasks:
Step 1. At the Router(config)# prompt, enter interface vlan 200 type trbrf.
Step 2. To assign an IP address to the TrBRF 200 RSM interface, enter ip address 172.122.40.1 255.255.255.0.
Step 3. Create the unique TrCRF for the pseudo-ring to enable the termination of RIF by entering multiring trcrf-vlan 500 ring 100.
Step 4. Configure multiring on this interface for all routed protocols by entering multiring all.
Step 5. For larger frame size support than the native Ethernet 1500 byte packets, change the MTU of the TrBRF 100 interface by entering mtu 4472.
Step 6. Enter no shutdown to administratively bring up the TrBRF 100 RSM interface.
To verify the configuration of the interfaces you created for TrBRF 100 and TrBRF 200, complete the following tasks:
Step 1. Enter exit to exit configuration mode.
Step 2. Verify the configuration by entering show running-config.
Step 3. Save changes to NVRAM by entering copy running-config startup-config.
The output (Figure 11-2) indicates that an RSM interface has been configured for both TrBRF 100 and TrBRF 200. Also, an IP address has been assigned to each RSM TrBRF interface and a unique TrCRF for the pseudo-ring has been created on the RSM for each of the TrBRFs.
Router# show running-config
Building configuration...

Current configuration:
!
version 11.3
service timestamps debug uptime
service timestamps log uptime
no service password-encryption
!
(additional displayed text omitted)
!
interface vlan100 type trbrf
	mtu 4472
	ip address 172.122.30.1 255.255.255.0
	multiring trcrf-vlan 400 ring 100
	multiring all
!
interface vlan200 type trbrf
	mtu 4472
	ip address 172.122.40.1 255.255.255.0
	multiring trcrf-vlan 500 ring 100
	multiring all
!
(additional displayed text omitted)
The following is a summary of the configuration you completed on the RSM:
#accessing the rsm in slot 5
session 5
#accessing configuration mode on the RSM
enable
#entering global configuration mode on the RSM
configure terminal
#enabling ip routing on the RSM
ip routing
#configuring the interface for the trbrf 100 on the rsm
interface vlan 100 type trbrf

#assigning an IP parameters to the rsm brf100 interface
ip address 172.122.30.1 255.255.255.0

mtu 4472
#creating the unique TrCRF for the pseudo-ring for the brf100 interface
multiring trcrf-vlan 400 ring 100
#configuring multiring for all routed protocols on the interface
multiring all
#bringing up the brf100 RSM interface
no shutdown
#configuring the interface for the trbrf 200 on the rsm
interface vlan 200 type trbrf

#assigning an IP parameters to the rsm brf200 interface
ip address 172.122.40.1 255.255.255.0

mtu 4472
#creating the unique TrCRF for the pseudo-ring for the brf200 interface
multiring trcrf-vlan 500 ring 100
#configuring multiring for all routed protocols on the interface
multiring all
#bringing up the brf200 RSM interface
no shutdown
#exiting configuration mode
exit
#verifying the interface configuration
show running-config
#saving the configuration changes to NVRAM
copy running-config startup-config
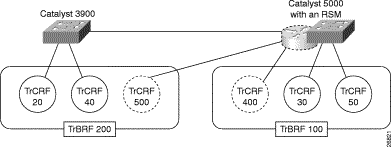
Figure 11-3 illustrates the resulting network configuration. You have now successfully configured IP routing between the Engineering and Marketing departments of your company via the RSM.
![]()
![]()
![]()
![]()
![]()
![]()
![]()
![]()
Posted: Wed Oct 2 03:46:56 PDT 2002
All contents are Copyright © 1992--2002 Cisco Systems, Inc. All rights reserved.
Important Notices and Privacy Statement.