|
|

This chapter describes the following feature enhancements to the Catalyst 1200 series switch:
An example configuration and an example of the commands used to configure it accompany each description. All of the commands used are described in detail in the appendix "Command Reference."
The optional RMON feature allows remote management of the network by the catalyst as a remote probe for performing off-line operation, preemptive monitoring, problem detection, and reporting. The RMON agent provides a standard MIB for Ethernet and is an extension of the SNMP MIB. The following nine RMON groups are supported:
These RMON groups are implemented with emphasis on the Segment statistics.
To collect and archive this data, Cisco offers Net Scout Management Console Software for:
RMON domains can be archived so that if the Catalyst 1200 series switch reboots, the RMON domains can be retrieved. To save the installed RMON domains, follow these steps:
Step 1 After installing the RMON domains from a NetScout Manager on a server, change to the bin directory under the directory where NetScout Manager is installed. For example, if the NetScout Manager is installed in/usr/nsman, then change to the /usr/nsman/bin directory.
Step 2 Save the list of installed domains of an agent into a new file (agent-list) in the directory where the startup file is saved, for example, in /user/nshome/usr. To save the domains on a UNIX server, type the following:
Step 3 Change to the /usr/nshome/usr directory.
Step 4 Copy the startup file (startup) into a new file (agent-startup).
Step 5 Open the new file (agent-startup). Replace the dvinst.cfg parameter in both places with the name of the new agent list file (agent-list) created in Step 2. Save and exit this file.
Step 6 Enter the NetScout Manager application. In the Start Up File field for the agent that needs to be saved, enter the name of the new agent startup file (agent-startup).
For each agent that uses this protocol and these groups in their domains, enter the name of the new agent startup file in the corresponding Start Up File field.
Step 7 Repeat Steps 4 through 6 for each agent that has different protocols and groups in its domain.
Use the set snmp rmon command to enable or disable remote network monitoring management on the switch. If you plan to use a network manager from a third-party vendor, you must enable default groups.
Following is a sample display:
Console> (enable) set snmp rmon
Usage: set snmp rmon [default_groups] <enable|disable>
Console> (enable) set snmp rmon enable
SNMP RMON support enabled.
Console> (enable)
The default is enabled. The default_groups parameter allows the switch to start packet gathering for the RMON immediately when the switch restarts.
When you enable default groups using the set snmp default_groups enabled command, the switch responds with the following message:This command will restart the system for RMON Default Groups re-configuration.
Do you want to continue (y/n) [n]?y
Enter y to restart the system; the default groups option for RMON is enabled. When default groups are enabled, you can only collect data for the segment statistics and history groups.
The Switched Port Analyzer allows "mirroring" of all traffic passing through any port onto a single designated monitoring port. All transmit and receive activity on one of the eight Ethernet ports can be monitored through this monitor port.
The following limitations apply:
The set span command allows individual port monitoring using SPAN. The variables are as follows:
Following is a sample display:
Console> (enable) set span ?
Usage: set span [<source_port> <destination_port> [rx|tx|both|promiscuous]] [enable|disable]
Console> (enable)
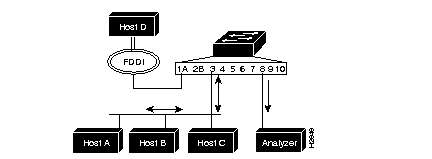
Figure 6-1 shows an example of a SPAN configured to monitor both transmit and receive traffic on port 3, with an analyzer attached to port 8.
Following is a sample display used to configure the example in Figure 6-1:
Console> (enable) set span 3 8 both enable
Enabled monitoring of port 3 transmit/receive traffic by port 8
Console> (enable)
Figure 6-2 is an example of a SPAN configured to monitor transmit traffic on port 3 with an analyzer attached to port 8.

Following is a sample display used to configure the example in Figure 6-2.
Console> (enable) set span 3 8 tx enable
Enabled monitoring of port 3 transmit traffic by port 8
Console> (enable)
Use the show span command to display port monitoring information. Following is a sample display:
Console> (enable) show span
Source Port  Destination Port  Direction           Status
-----------  ----------------  ------------------  --------
3            8                 receive             enabled
Console> (enable)
The Catalyst Switch supports the MTU Discovery Protocol. When the switch receives an IP packet that must be fragmented, but the packet does not allow itself to be fragmented, the switch will discard the packet and notify the originator that the packet was discarded because the MTU was exceeded.
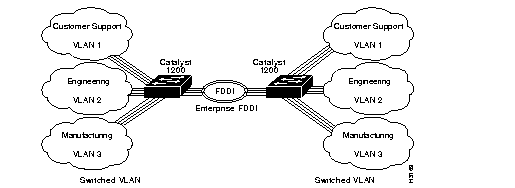
Use VNS to restrict certain data to specific ports and to increase network efficiency and scalability by minimizing unneeded transmissions. For example, a bank may want to give only certain people access to stock-trading information, or an organization with manufacturing data on one subnet and engineering data on another might be losing valuable bandwidth because both sets of traffic are broadcast everywhere.
Bridge VLANs allow ports to be grouped so that all bridging traffic is confined to members of only that group. This feature restricts broadcast, unicast, and multicast traffic (flooding) to only the ports that are included in a certain bridge VLAN.
Use the set bridge vlan command to groups ports into a bridge VLAN. The default is ports 1 through 10 grouped as bridge VLAN 1. Following is a sample display:
Console> (enable) set bridge vlan
Usage: set bridge vlan <vlan> <ports>
       (vlan = 1..1000,
        an example of ports is 1,3-5,9)
Console> (enable)
You can enter groups of ports as individual entries (1,3,4,5,6,7) or use a hyphen (for example, 1, 3-7). The hyphen designates the string of ports 3 through 7.
Figure 6-3 is an example of a switch configured as two bridge VLANs.
The accounting and engineering departments are completely isolated from each another in this configuration.

Following is a sample display used to configure the bridge VLANs in Figure 6-3:
Console> (enable) set bridge vlan 1 1-4
Bridge-Vlan   Ports
-----------  --------------------
1            1,3,4
Console> (enable) set bridge vlan 2 5-10
Bridge-Vlan   Ports
-----------  --------------------
2            5-10
Console> (enable)
Use the show bridge command to display the bridge information set with the set bridge vlan command. Following is a sample display:
Console> (enable) show bridge
IP fragmentation enabled
Default IPX translations:
    FDDI SNAP to Ethernet 802.3 RAW
    FDDI 802.2 to Ethernet 802.3
    Ethernet 802.3 Raw to FDDI SNAP
Bridge-Vlan   Ports
-----------  --------------------
1            1,3,4
2            5-10
Console> (enable) show bridge optimization
encheck = disabled
enrx = 0x20
entx = 0x20
fddicheck = disabled
fddirx = 0x80
fdditx = 0x80
Console> (enable)
Following is a description of the display fields of the show bridge command:
Bridge VLANs can be set up across multiple switches if they have any two ports connected, as shown in Figure 6-4. The bridge groups must be configured individually for both switches using the set bridge vlan command.
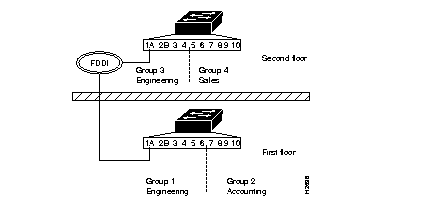
Following are the sample displays used to configure the bridge groups in Figure 6-4.
At the Catalyst Switch on the first floor:
First_Floor> (enable) set bridge vlan 1 1,3-6
Bridge-Vlan   Ports
-----------  --------------------
1            1,3-6
First_Floor> (enable) set bridge vlan 2 7-10
Bridge-Vlan   Ports
-----------  --------------------
2            7-10
First_Floor> (enable)
Use the show bridge command to display the first floor switch configuration. Following is a sample display:
First_Floor> (enable) show bridge
IP fragmentation enabled
Default IPX translations:
    FDDI SNAP to Ethernet 802.3 RAW
    FDDI 802.2 to Ethernet 802.3
    Ethernet 802.3 Raw to FDDI SNAP
Bridge-Vlan   Ports
-----------  --------------------
1            1,3-6
2            7-10
First_Floor> (enable)
At the Catalyst Switch on the second floor:
Second_Floor> (enable) set bridge vlan 1 1-4
Bridge-Vlan   Ports
-----------  --------------------
1            1,4
Second_Floor> (enable) set bridge vlan 2 5-10
Bridge-Vlan   Ports
-----------  --------------------
2            5-10
Use the show bridge command to display the second floor switch configuration. Following is a sample display:
Second_Floor> (enable) show bridge
IP fragmentation enabled
Default IPX translations:
    FDDI SNAP to Ethernet 802.3 RAW
    FDDI 802.2 to Ethernet 802.3
    Ethernet 802.3 Raw to FDDI SNAP
Bridge-Vlan   Ports
-----------  --------------------
1            1,3,4
2            5-10
Second_Floor> (enable)
The virtual IP service allows the switch to operate as a brouter (bridge/router) with the addition of IP routing support.
If IP routing is configured, the switch examines a received packet's protocol type. If the protocol type is an IP packet, the router code handles the processing of the packet. For any other packet type, the bridge handling code processes the packet as a bridge. In the IP VLAN configuration in Figure 6-5, any IP packets transmitted between hosts H and B are bridged, and IP packets transmitted between hosts B and Z are routed. This is configured on a pe-port basis.
Use the set ip rip command to enable or disable the IP Router Information Protocol (RIP). The default is enabled. Following is a sample display:
Console> (enable) set ip rip
Usage: set ip rip <enable|disable>
Console> (enable) set ip rip enable
Router RIP enabled.
Console> (enable)
Use the set ip unreachable command to enable or disable the Internet Control Message Protocol (ICMP) unreachable message sent from the switch. The ICMP unreachable message is sent if the router receives an IP datagram it cannot deliver. The default is enabled. Following is a sample display:
Console> (enable) set ip unreachable
Usage:  set ip unreachable <enable|disable>
Console> (enable) set ip unreachable enable
ICMP unreachable messages enabled
Console> (enable)
Use the set ip redirect command to enable or disable the ICMP redirect message sent from the switch. The ICMP redirect message is sent to a host whenever it is determined that the host is not using the most optimal route. The ICMP redirect requests the host to update its routes and forwards the original datagram to its destination. The default is enabled. Following is a sample display:
Console> (enable) set ip redirect
Usage: set redirect <enable|disable>
Console> (enable) set ip redirect enable
ICMP redirect messages enabled.
Console> (enable)
Use the set ip vlan command to group ports into IP VLANs. The default has all ports assigned to a single IP VLAN. Following is a sample display:
Console> (enable) set ip vlan
Usage: set ip vlan <vlan> [ports] [<ip_address> <net_mask> [broadcast]]
       (vlan = 1..1000,
         an example of ports is 1,3-5,9)
Console> (enable)
You can enter groups of ports as individual entries (1,3,4,5,6,7) or hyphenated (for example, 1, 3-7). The hyphen designates the string of ports 3 through 7.
Figure 6-5 is an example of a switch configured as two IP VLANs. IP VLAN 1, includes FDDI port 1/A through Ethernet ports 5, and IP VLAN 2 includes Ethernet ports 6 through 10.
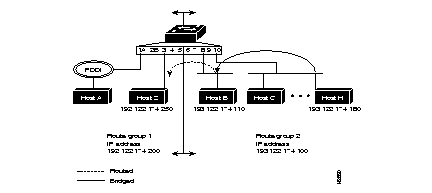
In this example any IP packets transmitted between hosts H and B are bridged and IP packets transmitted between hosts B and Z are routed.
Following is a sample display used to configure the example in Figure 6-5:
Console> (enable) set ip vlan 1 1-5 192.122.174.200 255.255.255.0 192.122.174.255 1,3-5: flags=863<UP,BROADCAST,RUNNING> inet 192.122.174.200 netmask 255.255.255.0 broadcast 192.122.174.255 IP-Vlan Ports IP-Address Netmask Broadcast Helper-VLANs ---- ------------ --------------- --------------- --------------- ------------ 1 1,3-5 192.122.174.200 255.255.255.0 192.122.174.255 2 6-10 193.122.174.100 255.255.255.0 193.122.174.255 Console> (enable)Use the show ip vlan command to display IP routing information. Following is a sample display:
Console> (enable) show ip vlan
Forwarding  Fragmentation  Redirect  RIP       Unreachable
----------  -------------  --------  --------  -----------
enabled     enabled        enabled   enabled   enabled
IP-Vlan  Ports    IP-Address      Netmask         Broadcast       Helper-VLANs
---- ------------ --------------- --------------- --------------- ------------
1    1,3-5        192.122.174.200 255.255.255.0   192.122.174.255
2    6-10         193.122.174.100 255.255.255.0   193.122.174.255
Console> (enable)
You can configure IP VLANs across multiple switches if their FDDI ports are connected as shown in Figure 6-6. The IP VLANs must be configured individually for both switches using the set ip vlan command.
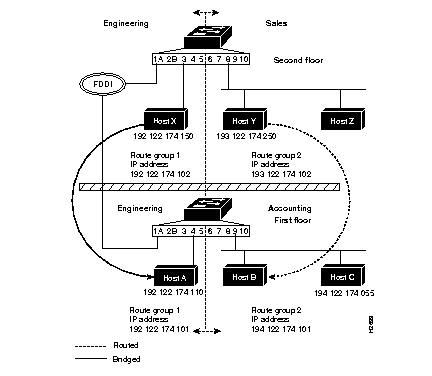
In this example, packets sent between host Y, in sales on the second floor, and host B, in accounting on the first floor, are routed because they are in different IP VLANs. Packets sent between host X, in engineering on the second floor, and host A, in engineering on the first floor, are bridged because they are in the same IP VLAN.
Following are the sample displays used to configure the IP VLANs in Figure 6-6.
At the Catalyst Switch on the first floor:
First_Floor> (enable) set ip vlan 1 1-5 192.122.174.100 255.255.255.0 192.122.174.255
1,3-5:  flags=863<UP,BROADCAST,RUNNING>
         inet 192.122.174.100 netmask 255.255.255.0 broadcast 192.122.174.255
IP-Vlan  Ports    IP-Address      Netmask         Broadcast       Helper-VLANs
---- ------------ --------------- --------------- --------------- ------------
1    1,3-5        192.122.174.100 255.255.255.0   192.122.174.255
First_Floor> (enable) set ip vlan 2 6-10 194.122.174.101 255.255.255.0 194.122.174.255
6-10:  flags=863<UP,BROADCAST,RUNNING>
         inet 194.122.174.101 netmask 255.255.255.0 broadcast 194.122.174.255
IP-Vlan  Ports    IP-Address      Netmask         Broadcast       Helper-VLANs
---- ------------ --------------- --------------- --------------- ------------
2    6-10         194.122.174.101 255.255.255.0   194.122.174.255
First_Floor> (enable)
At the Catalyst Switch on the second floor:
Second_Floor> (enable) set ip vlan 1 1-5 192.122.174.102 255.255.255.0 192.122.174.255
1,3-5:  flags=863<UP,BROADCAST,RUNNING>
         inet 192.122.174.102 netmask 255.255.255.0 broadcast 192.122.174.255
IP-Vlan  Ports    IP-Address      Netmask         Broadcast       Helper-VLANs
---- ------------ --------------- --------------- --------------- ------------
1    1,3-5        192.122.174.102 255.255.255.0   192.122.174.255
Second_Floor> (enable) set ip vlan 2 6-10 193.122.174.102 255.255.255.0 193.122.174.255
6-10:  flags=863<UP,BROADCAST,RUNNING>
         inet 193.122.174.102 netmask 255.255.255.0 broadcast 193.122.174.255
IP-Vlan  Ports    IP-Address      Netmask         Broadcast       Helper-VLANs
---- ------------ --------------- --------------- --------------- ------------
2    6-10         193.122.174.102 255.255.255.0   193.122.174.255
Second_Floor> (enable)
A trunk is a physical link between two Catalyst switches or between Catalyst switches and routers that carries multiple logical links for VLANs. The Catalyst 1200 series switch provides a means of multiplexing bridge virtual LANs between switches and routers using the 802.10 protocol. The Catalyst 1200 series switch supports trunks between FDDI ports only.
Bridge VLANs can be extended across the FDDI network by multiplexing switched VLANs over an FDDI interface using the IEEE 802.10 specification. Each packet contains a VLAN identifier that is interpreted by the Catalyst switch and forwarded to the final destination in the corresponding VLAN. The trunk also ensures that all traffic is transmitted to designated ports on the corresponding VLAN. Figure 6-7 shows an example of two Catalyst switches linked together through a trunk.
Use the set trunk command to configure trunks on ports. To establish a trunk, you must configure an FDDI port on each Catalyst 1200 series switch as a trunk port. To establish trunks, perform the following steps in privileged mode:
Step 1 Use the set trunk command enable VLANs to use the FDDI trunk port. In the following sample display, VLAN 2 is enabled on the FDDI trunk port:
Console> (enable) set trunk
Usage: set trunk <vlans>
       set trunk transitencapsulation
        (An example of vlans is 1,100-105,865)
Console> (enable) set trunk 2
Trunk Port 1 modified.
Port  VLANs allowed
1     2
Console> (enable)
Step 2 Use the show trunk command to verify that the trunk configuration is correct. In the following sample display, the show trunk command is used to verify that VLAN 2 is enabled on the FDDI trunk port.
Console> (enable) show trunk
Port  VLANs Allowed
----  ----------------------------------------
1     2
Console> (enable)
Access lists allow you to selectively receive frames based on criteria other than the source address, for example, frame contents, vendor code, or protocol type. Custom filtering operates after the frame is received.
The following filtering types are available:
Use the set filter command to set the custom port filter variables used to allow access list filtering.
Following is a sample display:
Console> (enable) set filter help
set filter commands:
----------------------------------------------------------------------
set filter broadcast           Set broadcast packets per second
set filter complex             Set complex filter
set filter help                Show this message
set filter macaddress          Set MAC address filter
set filter protocol            Set protocol type filter
set filter test                Set tests for complex filter
set filter vendor              Set Vendor ID filter
Console> (enable)
Figure 6-8 shows an example of a switch using access list filtering to filter frames between hosts.
Following are examples using each filtering type for the configuration in Figure 6-8:
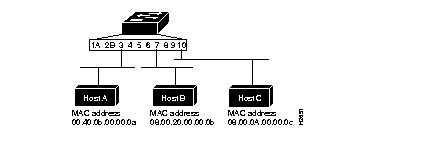
MAC address filtering allows frame filtering as determined by the source and destination MAC address. Up to 256 MAC address filters can be configured for each switch. The command variables are as follows, with deny as the default:
Following are sample displays used to configure the example in Figure 6-8:
Console> (enable) set filter macaddress
Usage: set filter macaddress <Ports> <mac_address> [permit|deny]
Console> (enable) set filter macaddress 3 00:40:0b:00:00:0a deny
Mac address filter added on port 3.
Console> (enable)
In the preceding example, all frames originated by host A are filtered by the Catalyst Switch at port 3.
Console> (enable) set filter macaddress
Usage: set filter macaddress <1..10> <mac_address> [permit|deny]
Console> (enable) set filter macaddress 3 08:00:20:00:00:0b deny
Mac address filter added on port 3.
Console> (enable)
In the preceding example, all frames originated by host A are filtered by the Catalyst Switch at host B.
The show filter command displays the new filter settings, as in the following sample display:
Console> (enable) show filter
Usage: show filter <port_number>
Console> (enable) show filter 3
MAC Address        Type
-----------------  ------
00:40:0b:00:00:0a  deny
08:00:20:00:00:0b  deny
Vendor-ID          Type
---------          ------
Protocol           Type
---------          ------
Test  Offset  Value       Mask
----  ------  ----------  ----------
Complex Expression
--------------------------------------------------
Broadcast Throttle
------------------------
unlimited packets/second
Console> (enable)
Vendor code filtering allows frame filtering determined by the source and destination vendor code. Up to 64 vendor ID filters can be configured for each switch. The command variables are as follows, with deny as the default:
Following is a sample display used to configure the example in Figure 6-8:
Console> (enable) set filter vendor
Usage: set filter vendor <ports> <vendor_id> [permit|deny]
Console> (enable) set filter vendor 3 00:40:0b deny
Vendor filter added on port 3.
Console> (enable)
In the preceding example, all frames originated by hosts A are filtered by the Catalyst Switch at port 3.
The show filter command displays the new filter settings as in the following example:
Console> (enable) show filter 3
MAC Address        Type
-----------------  ------
08-00-20-00-00-0b  deny
00-40-0b-00-00-0a  deny
Vendor-ID          Type
---------          ------
00:40:0b           deny
Protocol           Type
---------          ------
Test  Offset  Value       Mask
----  ------  ----------  ----------
Complex Expression
--------------------------------------------------
Broadcast Throttle
------------------------
unlimited packets/second
Console> (enable)
Protocol type filtering allows frame filtering as determined by the source and destination protocol type. Up to eight protocol filters can be configured for each switch. The command variables are as follows, with deny as the default:
Following is a sample display used to configure the example in Figure 6-8:
Console> (enable) set filter protocol
Usage: set filter protocol <ports> <protocol_type> [permit|deny]
Console> (enable) set filter protocol 3 0800 deny
Protocol filter added on port 3.
In the preceding example, all IP frames originated by host A are filtered by the Catalyst 1200 series switch at port 3.
The show filter command displays the new filter settings, as in the following sample display:
Console> (enable) show filter
Usage: show filter <port_number>
Console> (enable) show filter 3
MAC Address        Type
-----------------  ------
00:40:0b:00:00:0a  deny
08:00:20:00:00:0b  deny
Vendor-ID          Type
---------          ------
00:40:0b           deny
Protocol           Type
---------          ------
0x0800             deny
Test  Offset  Value       Mask
----  ------  ----------  ----------
Complex Expression
--------------------------------------------------
Broadcast Throttle
------------------------
unlimited packets/second
Test filtering allows the user to define patterns for use with the set filter complex command expressions. Up to eight test filters can be configured per port. The command variables are as follows:
Following is a sample display used to configure the example in Figure 6-8:
Console> (enable) set filter test
Usage: set filter test <ports> <test_number> <offset> <value> <mask>
Console> (enable) set filter test 3 1 18 0000c07a 0000ffff
Tests for complex filter added on port 3
Console> (enable) set filter test 3 2 1c 00050000 ffff0000
Tests for complex filter added on port 3
Console> (enable) set filter test 3 3 0c 81370000 ffff0000
Tests for complex filter added on port 3
Console> (enable)
The show filter command displays the new filter settings as in the following sample display:
Console> (enable) show filter
Usage: show filter <port_number>
Console> (enable) show filter 3
MAC Address        Type
-----------------  ------
00:40:0b:00:00:0a  deny
08:00:20:00:00:0b  deny
Vendor-ID          Type
---------          ------
00:40:0b           deny
Protocol           Type
---------          ------
0x0800             deny
Test  Offset  Value       Mask
----  ------  ----------  ----------
1     0x18    0x0000c07a  0x0000ffff
2     0x1c    0x00050000  0xffff0000
3     0x0c    0x81370000  0xffff0000
Complex Expression
--------------------------------------------------
Broadcast Throttle
------------------------
unlimited packets/second
Console> (enable)
Complex test filtering allows frame filtering as determined by user-defined conditions located anywhere in the frame, using values configured with the set filter test command. You can configure one complex filter containing up to eight test filters per port. The command variables are as follows:
You can enter groups as individual entries (1,3,4,5,6,7) or using hyphens (for example, 1, 3-7). The hyphen designates the string of ports 3 through 7.
Following is a sample display used to configure the example in Figure 6-8:
Console> (enable) set filter complex
Usage: set filter complex <ports> <expression>
      (expression consists of <test_number>s together with parenthesis and
       the logical operators: '&'(and), '|'(or), '!'(not))
Console> (enable) set filter complex 3 !((1&2)|3)
Complex filter added for port 3
Console> (enable)
The show filter command displays the new filter settings, as in the following sample display:
Console> (enable) show filter
Usage: show filter <port_number>
Console> (enable) show filter 3
MAC Address        Type
-----------------  ------
00:40:0b:00:00:0a  deny
08:00:20:00:00:0b  deny
Vendor-ID          Type
---------          ------
00:40:0b           deny
Protocol           Type
---------          ------
0x0800             deny
Test  Offset  Value       Mask
----  ------  ----------  ----------
1     0x18    0x0000c07a  0x0000ffff
2     0x1c    0x00050000  0xffff0000
3     0x0c    0x81370000  0xffff0000
Complex Expression
--------------------------------------------------
!((1&2)|3)
Broadcast Throttle
------------------------
unlimited packets/second
Console> (enable)
Broadcast filtering allows you to specify the number of broadcasts forwarded through the switch within a given timeframe, suppressing all broadcasts beyond that number. This allows limiting the portion of network bandwidth used by system resources to advertise server resources or other network-oriented updates. The command variables are as follows:
Following is a sample display used to configure the example in Figure 6-8:
Console> (enable) set filter broadcast
Usage: set filter broadcast <ports> <packets_per_second>
Console> (enable) set filter broadcast ?
Broadcast filter must be in the range 0..150000
Console> (enable) set filter broadcast 3 100
Broadcast packets limited to 100 packets/second on port 3.
In the preceding example, all broadcast frames originating from the segment connected to port 3 are filtered if they exceed 100 packets per second. The show filter command displays the new filter settings, as in the following sample display:
Console> (enable) show filter 3
MAC Address        Type
-----------------  ------
00:40:0b:00:00:0a  deny
08:00:20:00:00:0b  deny
Vendor-ID          Type
---------          ------
00:40:0b           deny
Protocol           Type
---------          ------
0x0800             deny
Test  Offset  Value       Mask
----  ------  ----------  ----------
Complex Expression
--------------------------------------------------
Broadcast Throttle
------------------------
100 packets/second
To set broadcast packets to unlimited, use the clear filter command, as in the following sample display:
Console> (enable) clear filter broadcast 3
Broadcast filter on port 3 cleared
Broadcast packets unlimited on port 3
Console> (enable)
In the preceding example, no broadcasts frames originating from the segment connected to port 3 are filtered.
The show filter command displays custom filtering information. Following is a sample display:
Console> (enable) show filter
Usage: show filter <port_number>
Console> (enable) show filter 3
MAC Address        Type
-----------------  ------
00:40:0b:00:00:0a  deny
08:00:20:00:00:0b  deny
Vendor-ID          Type
---------          ------
00:40:0b           deny
Protocol           Type
---------          ------
0x0800             deny
Test  Offset  Value       Mask
----  ------  ----------  ----------
1     0x18    0x0000c07a  0x0000ffff
2     0x1c    0x00050000  0xffff0000
3     0x0c    0x81370000  0xffff0000
Complex Expression
--------------------------------------------------
!((1&2)|3)
Broadcast Throttle
------------------------
Unlimited packets/second
Console> (enable)
IP multicasting allows transmission of an IP datagram to a "host group" identified by a single IP address. IP multicasting makes possible one-to-many and many-to-many communications. It minimizes bandwidth utilization for these multiport applications since only one copy of the datagram is sent over a network link, even when destined for multiple receivers.
The set multicast enable and set multicast disable commands enable or disable Internet Group Management Protocol (IGMP) filtering to dynamically find the presence of IP multicast hosts in the workgroup environment. This allows forwarding of multicast data streams to switched LANs where hosts have broadcast their membership to an IP multicast group. The default is disabled. Following is a sample display:
Console> (enable) set multicast enable
Multicast IGMP conditional filtering enabled.
Console> (enable)
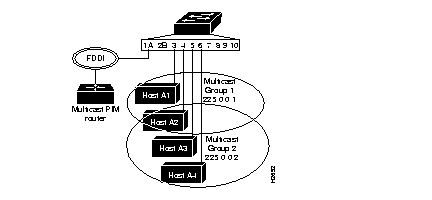
Figure 6-9 is an example of a switch configured using IP multicasting. In this example:
Examples of the commands used to configure the network in Figure 6-9 follow.
Use the set multicast router command to configure individual ports as multicast router ports.
The variables are:
Following is a sample display:
Console> (enable) set multicast router
Usage: set multicast router <port_num> <router|norouter|dynamic>
       (port_num = 1..10)
Console> (enable) set multicast router 1 router
Multicast router information set
Console> (enable) set multicast router 3 dynamic
Multicast router information set
Console> (enable) set multicast router 4 norouter
Multicast router information set
Console> (enable)
Use the set multicast router command to configure ports into multicast groups. The default is no multicast groups configured.
Following is a sample display:
Console> (enable) set multicast group
Usage: set multicast group <ip_address> <ports>
       (An example of ports is 1,3-5,9,
        ip_address is ipalias or IP address in dot notation: a.b.c.d)
Console> (enable) set multicast group 225.0.0.1 3,4
Multicast group 225.0.0.1 set
Console> (enable) set multicast group 225.0.0.2 4-6
Multicast group 225.0.0.2 set
Console> (enable)Console> (enable)
Use the show multicast command to display IP multicast information. Following is a sample display:
Console> (enable) show multicast
IGMP      IGMP Aging Time
--------  ---------------
enabled   180
Multicast Router:
Port 1   -       dynamic
Port 3   -       dynamic
Port 4   -       dynamic
Port 5   -       dynamic
Port 6   -       dynamic
Port 7   -       dynamic
Port 8   -       dynamic
Port 9   -       dynamic
Port 10  -       dynamic
Multicast Group:
Group Address    Ports
---------------  --------------
225.0.0.1         3,4
225.0.0.2         4-6
Console> (enable)
Following is a description of the display fields of the show multicast command:
IP routing has been enhanced on the Catalyst 1200 series switches to include IP Helper and support for the Dynamic Host Configuration Protocol (DHCP). The Catalyst 1200 series switch only performs relay agent functions; it does not perform as a BOOTP or DHCP server.
The ip helper command allows you to control which broadcast packets the switch forwards. For the switch to forward User Datagram Protocol (UDP) broadcasts, including BOOTP, received on an interface, use the ip helper command. DHCP protocol information is carried inside the BOOTP packets, so DHCP is also supported.
You can use the ip helper command to set up BOOTP clients residing in one network to boot from a BOOTP server residing in a different network. You do not need to setup an IP helper if the BOOTP server and the BOOTP client reside in the same network.
A sample configuration for a Catalyst 1200 series switch using IP helper for BOOTP forwarding has the following IP VLAN configuration:
Console> (enable) show ip vlan Forwarding Fragmentation Redirect RIP Unreachable ---------- ------------- -------- -------- ----------- enabled enabled enabled enabled enabled IP-Vlan Ports IP-Address Netmask Broadcast Helper-VLANs ---- ------------ --------------- --------------- --------------- ------------ 1 1,3-5,7,10 172.20.21.163 255.255.255.0 172.20.21.255 2 6,8,9 137.65.2.163 255.255.255.0 137.65.2.255 Console> (enable)In the above example, a BOOTP server resides on the 172.20.21.0 network in VLAN 1. A diskless BOOTP client resides on the network 137.65.2.0 in VLAN 2. To enable IP helper for the BOOTP clients on the 137.65.2.0 network to boot from the BOOTP server on the 172.20.21.0 network, the IP helper groups would be set up as follows:
Console> (enable) set ip helper Usage: set ip helper <vlan> <helper_vlans> (vlan = 1..1000, an example of vlans is 1,100-105,865) Console> (enable)Console> (enable) set ip helper 2 1 IP Helper VLANs set for VLAN 1 Console> (enable) show ip vlan Forwarding Fragmentation Redirect RIP Unreachable ---------- ------------- -------- -------- ----------- enabled enabled enabled enabled enabled IP-Vlan Ports IP-Address Netmask Broadcast Helper-VLANs ---- ------------ --------------- --------------- --------------- ------------ 1 1,3-5,7,10 172.20.21.163 255.255.255.0 198.219.135.255 2 6,8,9 137.65.2.163 255.255.255.0 193.122.174.255 1A common application that requires IP helper addresses is DHCP. DHCP is defined in RFC 1531. DHCP protocol information is carried inside the BOOTP packets. To enable BOOTP broadcast forwarding for a set of clients, configure a helper address on the switch closest to the client. The helper address should specify the address of the DHCP server. If you have multiple servers, you can configure one helper address for each server. Since BOOTP packets are forwarded by default, DHCP information is now also forwarded by the switch. The DHCP server now receives broadcasts from the DHCP clients.
The DHCP feature uses the functionality of the set ip helper command to link clients to their servers. Refer to the "IP Helper" section, earlier in this chapter, for configuration information.
|
|