|
|

This chapter describes how to install and configure switching modules in your Catalyst 5000 family switch and consists of these sections:
Note Before installing switch modules, you must install the Catalyst 5000 family switch chassis and supervisor engine modules. For information on installing the switch chassis, refer to the Catalyst 5000 Family Installation Guide. For information on installing the supervisor engine modules, refer to the Catalyst 5000 Family Supervisor Engine Installation Guide.
These tools are required to install switching modules in the Catalyst 5000 family switches:
Whenever you handle switching modules, always use a wrist strap or other grounding device to prevent electrostatic discharge (ESD). For information on preventing ESD, see the "Preventing ESD" section of the Site Preparation and Safety Guide.
This section describes how to install switching modules in Catalyst 5000 family switches.
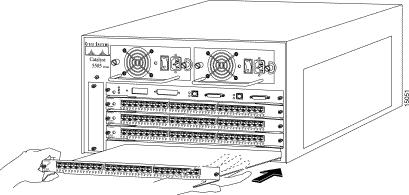
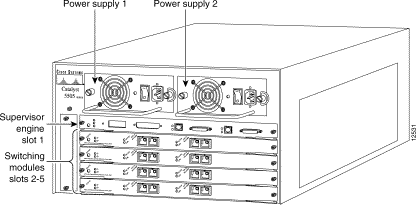
All Catalyst 5000 family switching modules are installed in horizontal slots that are numbered from top to bottom. (See Figure 3-1.)
The Catalyst 5002 switch chassis has two slots, which can be populated as follows:
Note The Catalyst 5002 switch does not support the Route Switch Module (RSM) or the fabric integration modules.
The Catalyst 5000 switch chassis has five slots, which can be populated as follows:
The Catalyst 5505 switch chassis has five slots, which can be populated as follows:
Note Supports Supervisor Engines II and II G but Supervisor Engine III, III FSX, III FLX, or III G is recommended for utilizing all three buses effectively.
The Catalyst 5509 switch chassis has nine slots, which can be populated as follows:
Note Supports Supervisor Engines II and II G but Supervisor Engine III, III FSX, III FLX, or III G is recommended for utilizing all three buses effectively.
The Catalyst 5500 switch chassis has 13 slots, which can be populated as follows:
Note Supports Supervisor Engines II and II G but Supervisor Engine III, III FSX, III FLX, or III G is recommended for utilizing all three buses effectively.
Note The fabric integration modules must be installed in slots 9 through 12 for the bridging function to work.
Note If you have LightStream 1010 modules, you can install them in slots 9 through 12. However, you must install an ATM switch processor in slot 13. If you have Catalyst 8510 CSR line modules, you can install them in slots 9 through 12. However, you must install an SRP in slot 13.
Install switching-module filler plates, which are blank switching-module carriers, in empty slots to maintain consistent airflow through the switch chassis.
To install switching modules in Catalyst 5000 family switches, perform these steps:
Step 2 Choose a slot for the new switching module. Check that you have enough clearance for any interface equipment that you will connect directly to the switching-module ports. If possible, place switching modules between empty slots that contain only switching-module filler plates.
Note If you are installing a WS-X5014 or WS-X5410, these modules require two adjacent slots.
Step 3 Loosen the captive installation screws securing the switching-module filler plate (or the existing switching module) to the desired slot.
Step 4 Remove the switching-module filler plate (or the existing switching module). Save the switching-module filler plate for future use.
Note If you are removing an existing switching module, refer to the "Removing Switching Modules" section.
Step 5 To install the new module, hold the switching-module front panel with one hand, and place your other hand under the carrier to support the switching module, as shown in Figure 3-2. Do not touch the printed circuit boards or connector pins.
Step 6 Align the edges of the switching-module carrier with the slot guides on the sides of the switch chassis, as shown in Figure 3-2.
Note The WS-X5014 Ethernet switching module and the WS-X5410 Gigabit EtherChannel switching module require two empty slots. Align the edges of the carrier with the slot guides in the lower of the two empty slots.
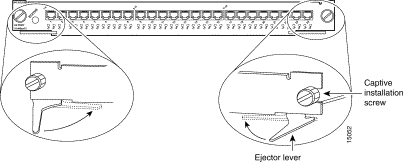
Step 7 Pivot the two module ejector levers out away from the faceplate, as shown in Figure 3-2.
Step 8 Carefully slide the switching module into the slot until the notches on both ejector levers engage the chassis sides.
Step 9 Using the thumb and forefinger of each hand, simultaneously pivot in both ejector levers, as shown in Figure 3-3, to fully seat the switching module in the backplane connector.
Note If you perform a hot swap, the console displays the message "Module n has been inserted." This message also appears if you are connected to the Catalyst 5000 family switch through a Telnet session.
Step 10 Use a screwdriver to tighten the captive installation screw on each end of the switching module faceplate.
Note The WS-X5014 Ethernet switching module and the WS-X5410 Gigabit EtherChannel switching module occupy two chassis slots. When you install these modules, you need to use a screwdriver to tighten all four captive installation screws on the module front panel.
Step 11 Attach network interface cables or other devices to the interface ports.
To remove a switching module from a Catalyst 5000 family switch, perform these steps:
Step 2 Loosen the captive screws at each end of the switching module.
Note Both the WS-X5014 Ethernet switching module and the WS-X5410 Gigabit EtherChannel switching module occupy two chassis slots. When you remove these modules, you must loosen all four captive installation screws.
Step 3 Place your thumbs on the left and right ejector levers. Push the levers outward to release the module from the backplane connector.
Step 4 Grasp the switching-module front panel with one hand, and place your other hand under the module to support and guide it out of the slot. Do not touch the printed circuit boards or connector pins.
Step 5 Pull the switching module straight out of the slot, keeping one hand under the module to guide it.
Step 6 Place the switching module on an antistatic mat, or in an antistatic bag, or immediately reinstall it in another slot.
Step 7 If the slot is to remain empty, install a switching-module filler plate to keep dust out of the chassis and to maintain proper airflow through the chassis.
This section describes how to connect cables to the installed modules.
On each 10BaseT, 100BaseTX, or 10/100BaseTX switching-module port, attach the cable connector to secure the cable in the port. Most Ethernet connections do not require a transceiver on the interface cable. However, 100BaseTX Fast Ethernet connections to the media-independent interface (MII) connector on the supervisor engine module require a Fast Ethernet transceiver.
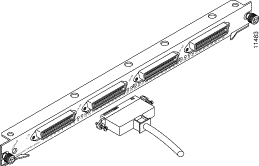
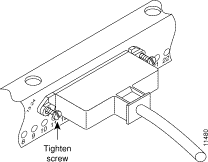
To secure the group switching Ethernet module 180-degree cable connection, engage the connector fully and tighten the two screws on either side of the connector, as shown in Figure 3-4 and Figure 3-5.
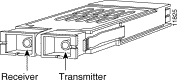
The Ethernet module, WS-X5015-MT, uses the MT-RJ style connector, shown in Figure 3-6.
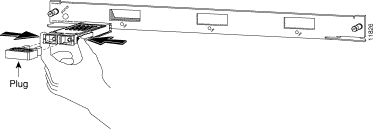
When you are connecting MT-RJ cables to a module, make sure you firmly press the connector plug into the socket. The upper edge of the plug must snap into the upper front edge of the socket. You may or may not hear an audible click. Gently pull on the plug to confirm whether or not the plug is locked into the socket. To disconnect the plug from the socket, press down on the raised portion on top of the plug (releasing the latch). You should hear an audible click indicating the latch has released. Carefully pull the plug out of the socket.
Note When you disconnect the fiber-optic cable from the module, grip the body of the connector. Do not grip the connector jacket-sleeve. Gripping the sleeve can, over time, compromise the integrity of the fiber-optic cable termination in the MT-RJ connector.
Always make sure that you insert the connector completely into the socket. This is especially important when you are making a connection between a module and a long distance (2 km) or a suspected highly attenuated network. If the link LED does not light, try removing the network cable plug and reinserting it firmly into the module socket. It is possible that enough dirt or skin oils have accumulated on the plug faceplate (around the optical-fiber openings) to generate significant attenuation, reducing the optical power levels below threshold levels so that a link cannot be made.
To clean the MT-RJ plug faceplate:
Step 2 Carefully wipe the faceplate with a dry lint-free tissue.
Step 3 Remove any residual dust from the faceplate with compressed air before installing the cable.
Note Make sure that dust caps are installed on all unused module connectors and unused network fiber-optic cable connectors.
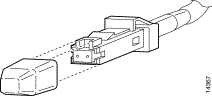
The Gigabit Ethernet module (WS-X5403) and the Gigabit EtherChannel module (WS-X5410) provide Gigabit Ethernet ports that you can configure with any combination of 1000BaseSX, 1000BaseLX/LH, or 1000BaseZX Gigabit Interface Converters (GBICs). A GBIC, shown in Figure 3-7, is a hot-swappable input/output device that plugs into the module, linking the module with the fiber-optic network.
Table 3-1 lists the GBIC types.
| GBIC | Product Number |
|---|---|
Note Cisco 1000BaseLX/LH interfaces fully comply with the IEEE 802.3z 1000BaseLX standard. However, the 1000BaseLX/LH has a higher optical quality allowing link distances of 10 km over SMF versus the 5 km specified in the standard.
The GBIC slides through an opening in the front of the Gigabit Ethernet module and mates with a connector on the module. (See Figure 3-8.)
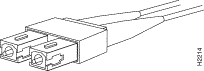
Use a SC-type single-mode (fiber) connector, shown in Figure 3-9, to connect the Gigabit Ethernet module ports with the external network. Connect the Gigabit Ethernet interface cables to the appropriate Ethernet network connector.
You must observe the following optical-fiber cabling restrictions when using GBICs:
This section describes how to connect Fiber Distributed Data Interface (FDDI) and Copper Distributed Data Interface (CDDI) cables to their respective switching modules.
The fiber-optic cables and unshielded twisted-pair (UTP) connect directly to the FDDI or CDDI module ports. FDDI and CDDI modules use one integrated transmit/receive cable for each physical interface (one for PHY A and one for PHY B). You need one FDDI or CDDI cable for a single-attachment connection and two cables for a dual-attachment connection. For cable and connector descriptions, see Chapter 2, "Installation Preparation."
This section also provides instructions for connecting an optical bypass switch to a dual-attachment FDDI network connection. Because the method of connecting optical bypass switches varies with different manufacturers' models, refer to the documentation for your particular bypass switch for correct connection instructions. If you are installing an optical bypass switch, see the "Installing an Optical Bypass Switch" section.
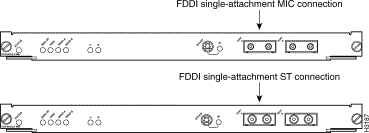
The FDDI and CDDI modules that are connected as a single-attachment station (SAS) connect to the ring through a concentrator. The FDDI and CDDI modules receive and transmit the signal through the same physical interface, usually PHY A. Depending on whether you are connecting to a single-mode or multimode FDDI fiber network or connecting to a CDDI network, connect the FDDI or CDDI modules as follows:
If you are connecting other FDDI or CDDI modules as dual-attachment stations (DASs), see the "Making Dual-Attachment Connections" section.
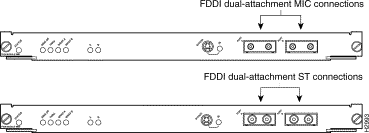
FDDI and CDDI modules that are connected as DASs connect to both the primary and secondary rings. The signal for each ring is received on one physical interface (PHY A or PHY B) and transmitted from the other. The standard connection scheme (see Figure 3-12 and Figure 3-13) for a DAS dictates that the primary ring signal comes into the FDDI or CDDI module on the PHY A receive port and returns to the primary ring from the PHY B transmit port. The secondary ring signal comes into the FDDI or CDDI module on the PHY B receive port and returns to the secondary ring from the PHY A transmit port.
Each integrated transmit/receive multimode interface cable attaches to both the primary and secondary ring; each cable receives the signal from one ring and transmits to the other ring. To avoid confusion, use the receive label on the cable connector as a key and connect the cables to the FDDI/CDDI module ports as described above.
Figure 3-12 shows the FDDI dual-attachment connections for both MMF and SMF using MICs and straight-tip (ST) connectors. Figure 3-13 shows the CDDI dual-attachment connections using two RJ-45 connectors.
If you are connecting an optical bypass switch, see the next section, "Installing an Optical Bypass Switch."
An optical bypass switch is a device installed between the ring and the station that provides additional fault tolerance to the network. If an FDDI module that connects to a bypass switch fails or shuts down, the bypass switch activates automatically and allows the light signal to pass directly through it, bypassing the FDDI module completely. A port for connecting an optical bypass switch is provided on the FDDI module SMF and FDDI module MMF. (See Figure 3-14.)
The optical bypass control port on the FDDI module is a six-pin, mini-DIN receptacle. Some optical bypass switches use a DIN connector, and some use a mini-DIN.
This procedure describes how to connect an optical bypass switch to an FDDI module; however, your particular bypass switch might require a different connection scheme. Use these steps as a general guideline, but refer to the instructions provided by the optical bypass switch's manufacturer for specific connection requirements.
Note Unless the documentation that accompanies the bypass switch instructs otherwise, use the same guidelines to connect the A/B ports on the bypass switch to the ring that you used to connect the ring directly to the FDDI module ports.
Step 2 Use the receive label on the cable MIC connectors as a guide, and connect the cables to the network (ring) side of the bypass switch as follows:
Step 3 Connect the optical bypass switch to the FDDI module.
Note Unless the documentation that accompanies the bypass switch instructs differently, consider the bypass switch an extension of the FDDI module ports and connect A to A and B to B. The network cables are already connected to the bypass switch following the standard B-to-A/A-to-B scheme.
Step 4 Connect an interface cable between the PHY A port on the station (FDDI module) side of the bypass switch and the FDDI module PHY A port.
Step 5 Connect an interface cable between the PHY B port on the station (FDDI module) side of the bypass switch and the FDDI module PHY B port.
Step 6 Connect the bypass switch control cable. If the control cable on your optical bypass switch uses a mini-DIN connector, connect the cable directly to the mini-DIN optical bypass port on the FDDI module.
The physical layer interface module (PLIM) on the ATM LANE module determines the type of ATM connection. There are no restrictions on slot locations or sequence; you can install an ATM fiber-optic module in any available module slot.
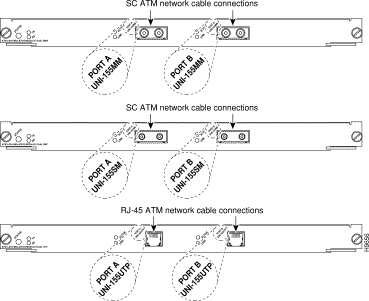
You need a SC-type single-mode (fiber) connector for SMF or MMF connections, shown in Figure 3-15, to connect the ATM LANE multimode switching module with an ATM switch.
Connect the ATM interface cables to the appropriate ATM network connector, as shown in Figure 3-16.
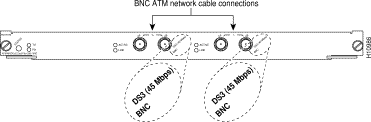
The ATM dual PHY DS3 modules are connected to an ATM network using 75-ohm, RG-59 coaxial cable with bayonet-style twist-lock (BNC) connectors. Figure 3-17 shows the ATM dual PHY DS3 BNC connectors.
The Token Ring module is connected to a Token Ring network using 100-, 120-, or 150-ohm cable fitted with RJ-45 connectors. Figure 3-18 shows the Token Ring module connectors.
The fiber Token Ring module is connected to a Token Ring network using multimode fiber cable fitted with Volition VF-45 connectors. Figure 3-19 shows the fiber Token Ring module connectors.
You can connect appropriate serial cables to the RSM console and auxiliary ports. For information on connecting the RSM, refer to the Route Switch Module Catalyst VIP2-15 and VIP2-40 Installation and Configuration Note.
For information on connecting LightStream 1010 ATM port adapters, refer to the ATM Port Adapter Guide for the Catalyst 8540 MSR, Catalyst 8510 MSR, Catalyst 5500, and LightStream 1010.
For information on connecting Catalyst 8510 CSR line modules, refer to the ATM Port Adapter Guide for the Catalyst 8540 MSR, Catalyst 8510 MSR, Catalyst 5500, and LightStream 1010.
For complete information on verifying and configuring all modules, refer to the Software Configuration Guide for your switch. For information on all switch commands, refer to the Command Reference for your switch.
Note To verify the installation of the RSM, refer to the Catalyst 5000 Family Route Switch Module Installation and Configuration Note.
Use the show module or show port [mod_num]/[port_num] command to verify that the system acknowledges the new modules and has brought them online. Refer to the Command Reference for your switch for additional information.
For information on configuring RSMs, refer to the Catalyst 5000 Family Route Switch Module Installation and Configuration Note and the Software Configuration Guide for your switch. For information on configuring RSM/VIP2s, refer to the Route Switch Module Catalyst VIP2-15 and VIP2-40 Installation and Configuration Note.
![]()
![]()
![]()
![]()
![]()
![]()
![]()
![]()
Posted: Sat Jan 18 12:47:46 PST 2003
All contents are Copyright © 1992--2002 Cisco Systems, Inc. All rights reserved.
Important Notices and Privacy Statement.