|
|

This chapter explains how to monitor a port on the Catalyst 3000 using SwitchProbe.
This chapter covers the following topics:
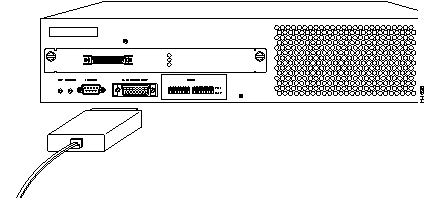
The SwitchProbe port, located on the Catalyst 3000 back panel, connects to probe devices such as protocol analyzers, RMON probes, and other Ethernet-compliant devices. This enables you to decode packet contents for troubleshooting or to analyze network characteristics. Using the SwitchProbe port, you can monitor any one of the 10Base-T ports on the Catalyst 3000.
The SwitchProbe port can not monitor the 100Base-TX ports.
The SwitchProbe port is used for monitoring only; it cannot be used to transmit data. Therefore, monitoring the Catalyst 3000 with an RMON probe requires the use of two ports: one to listen through the SwitchProbe port and one to communicate with the SNMP station.
To monitor several Catalyst 3000 devices using a single monitoring device, connect each SwitchProbe port to a hub, then connect the monitoring device to the hub. Do not connect any ports other than SwitchProbe ports. Only one SwitchProbe may be active at once; disable all other SwitchProbe ports by entering 0 in the SwitchProbe Port field of the SwitchProbe Configuration menu (see the section, Selecting the Port to Analyze, later in this chapter).
When traffic at a port that is being monitored by the SwitchProbe is very heavy (above 80 to 90%), the SwitchProbe (not the port) may drop some packets.
Use a standard Ethernet transceiver to connect the probe device to the SwitchProbe AUI port located on the back of the Catalyst 3000.
You can select which port you want to analyze using either the network management console connected to the EIA RS-232 port of the Catalyst 3000, or using an SNMP network management application such as the Cisco SwitchVision application or a Telnet session.
Follow these steps to select the port to analyze:
Step 1 From the Main menu, select the Configuration menu, then select the SwitchProbe (Configuration) menu. The following screen appears:
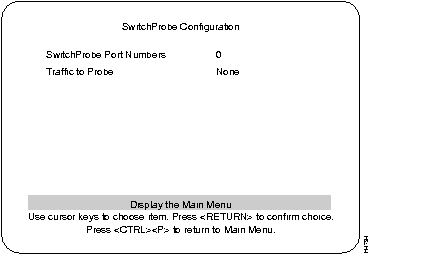
Step 2 Complete the field for the port number on the screen as follows:
Step 3 Select Return to Previous Menu to accept the new settings.
Step 4 Begin monitoring port traffic using the probe equipment.
|
|