|
|

This chapter explains monitoring the Catalyst 3000 from a Network Management System (NMS) using the CiscoView or any application that supports Simple Network Management Protocol (SNMP).
The following topics are covered in this chapter:
Follow these steps to use in-band management:
Step 1 Attach the Catalyst 3000 to the console and start a console session as described in Chapter 6, "Connecting a Network Management Console."
Step 2 Complete the IP Configuration menu.
Step 3 Complete the SNMP Configuration menu and following sub-menus:
Community String menu.
Trap Receiver menu.
The following sections describe the SNMP set-up menus.
The IP Configuration menu sets the IP address, gateway address, subnet mask, and IP state.
The IP Address and Default Gateway must be in the same subnet address class--that is, Class A, Class B, or Class C. The system prevents you from entering values from different classes. If you do inadvertently enter an incorrect value, enter 0.0.0.0 in every field, then re-enter the correct values.
Refer to Chapter 7, "Console Configuration," for a complete description on how to configure the IP Configuration menu.
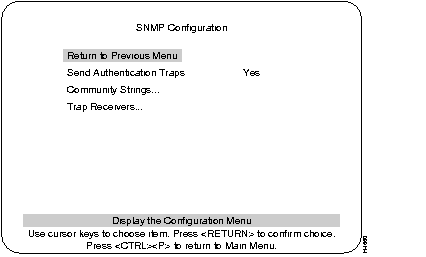
Use the SNMP Configuration Menu to configure specific attributes related to SNMP.

Indicates whether SNMP should issue an authentication trap to Trap Receivers whenever an unauthorized request is detected.
Default: Yes
Changes the community string table. The community string is the name associated with the Catalyst 3000 and a set of SNMP Managers. Entries in the table are saved across resets and power cycles.
Displays table of managers to which traps are sent. Entries in the table are saved across resets and power cycles.
Use the Community String menu to configure the community string for the Catalyst 3000. The community string is the name associated with the Catalyst 3000 and a set of SNMP managers allowed to manage it with the specified privilege level.

Entries are displayed in the order in which they are encountered. There is a limit of 10 community strings.
Community String Table entries are saved when you select Return to Previous Menu. Entries are preserved across resets and power cycles.
Sequential number of entries in the table.
The specified privilege level of the assigned community.
Specific access privileges of the community.
Adds community string.
Deletes community string.
Modifies community string and/or access mode.
Deletes all community strings.
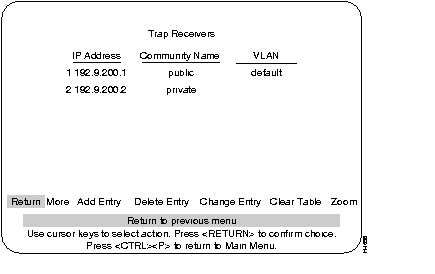
Trap Receiver Tables tell the Catalyst 3000 where to send traps. The table contains the IP address associated with an SNMP manager.

The Trap Receiver Table contains a maximum of 20 entries. It is displayed again each time the table changes.
Trap Receiver Table entries are saved when you select Return to Previous Menu. Entries are preserved across resets and power cycles.
The IP address associated with an SNMP manager.
The specified privilege level.
Specifies a list of VLANs in which the trap is sent out.
To view next page of table.
Adds a new entry to the trap receiver table.
Deletes an entry from the trap receiver table.
Modifies an entry in the trap receiver table.
Deletes all table entries.
To display a Trap receiver entry in detail.
|
|