|
|

This chapter explains how to monitor a port on the Catalyst 3000 using:
Follow these steps to use in-band management:
Step 1 Attach the Catalyst 3000 to the console and start a console session as described in Chapter 6, "Connecting a Network Management Console."
Step 2 Complete the IP Configuration menu.
Step 3 Complete the SNMP Configuration menu and following sub-menus:
Community String menu.
Trap Receiver menu.
The following sections describe the SNMP set-up menus.
The IP Configuration menu sets the IP address, gateway address, subnet mask, and IP state.
The IP Address and Default Gateway must be in the same subnet address class--that is, Class A, Class B, or Class C. The system prevents you from entering values from different classes. If you do inadvertently enter an incorrect value, enter 0.0.0.0 in every field, then re-enter the correct values.
Refer to Chapter , "Console Configuration," for a complete description on how to configure the IP Configuration menu.
Use the SNMP Configuration Menu to configure specific attributes related to SNMP.
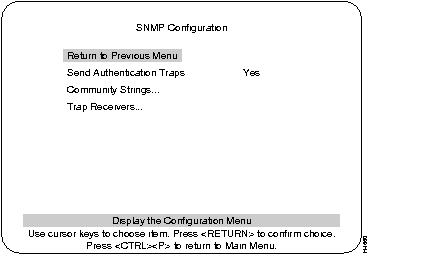
Indicates whether SNMP should issue an authentication trap to Trap Receivers whenever an unauthorized request is detected.
Default: Yes
Changes the community string table. The community string is the name associated with the Catalyst 3000 and a set of SNMP Managers. Entries in the table are saved across resets and power cycles.
Displays table of managers to which traps are sent. Entries in the table are saved across resets and power cycles.
Use the Community String menu to configure the community string for the Catalyst 3000. The community string is the name associated with the Catalyst 3000 and a set of SNMP managers allowed to manage it with the specified privilege level.
Entries are displayed in the order in which they are encountered. There is a limit of 10 community strings.
Community String Table entries are saved when you select Return to Previous Menu. Entries are preserved across resets and power cycles.
Sequential number of entries in the table.
The specified privilege level of the assigned community.
Specific access privileges of the community.
Adds community string.
Deletes community string.
Modifies community string and/or access mode.
Deletes all community strings.
Trap Receiver Tables tell the Catalyst 3000 where to send traps. The table contains the IP address associated with an SNMP manager.
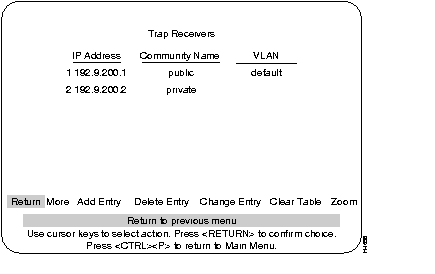
The Trap Receiver Table contains a maximum of 20 entries. It is displayed again each time the table changes.
Trap Receiver Table entries are saved when you select Return to Previous Menu. Entries are preserved across resets and power cycles.
The IP address associated with an SNMP manager.
The specified privilege level.
Specifies a list of VLANs in which the trap is sent out.
To view next page of table.
Adds a new entry to the trap receiver table.
Deletes an entry from the trap receiver table.
Modifies an entry in the trap receiver table.
Deletes all table entries.
To display a Trap receiver entry in detail.
The SwitchProbe port, located on the back panel of the Catalyst 3000, connects to probe devices such as protocol analyzers, RMON probes, and other Ethernet-compliant devices. This enables you to decode packet contents for troubleshooting or to analyze network characteristics. Using the SwitchProbe port, you can monitor any one of the 10BaseT ports on the Catalyst 3000.
The SwitchProbe port can not monitor the high-speed expansion module ports.
The SwitchProbe port is used for monitoring only; it cannot be used to transmit data. Therefore, monitoring the Catalyst 3000 with an RMON probe requires the use of two ports: one to listen through the SwitchProbe port and one to communicate with the SNMP station.
To monitor several Catalyst 3000 devices using a single monitoring device, connect each SwitchProbe port to a hub, then connect the monitoring device to the hub. Do not connect any ports other than SwitchProbe ports. Only one SwitchProbe port may be active at once; disable all other SwitchProbe ports by entering 0 in the SwitchProbe Port field of the SwitchProbe Configuration menu (see the section, Selecting the Port to Analyze, later in this chapter).
When traffic at a port that is being monitored by the SwitchProbe is very heavy (above 80 to 90%), the SwitchProbe (not the port) may drop some packets.
You can select which port you want to analyze using either the network management console connected to the EIA (RS)-232 console port of the Catalyst 3000, or using an SNMP network management application such as the Cisco SwitchVision application or a Telnet session.
Follow these steps to select the port to analyze:
Step 1 From the Main menu, select the Configuration menu, then select the SwitchProbe (Configuration) menu. The following screen appears:
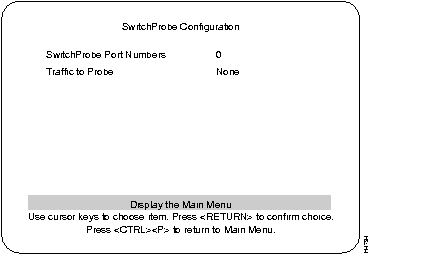
Step 2 Complete the field for the port number on the screen as follows:
Step 3 Select Return to Previous Menu to accept the new settings.
Step 4 Begin monitoring port traffic using the probe equipment.
Use the RMON Configuration Menu to establish communications with an RMON application.
Use the following steps to start, stop, or configure an RMON application:
Step 1 Go to the Configuration menu and select RMON Configuration.
Step 2 From the RMON Configuration menu, highlight Enable RMON and press RETURN.
Step 3 At the prompt, select Yes or No.
Step 4 To add the community string, go to the Configuration menu and select the SNMP Configuration menu.
Step 5 From the SNMP Configuration menu, select the Community Strings menu.
Step 6 At the Community Strings menu:
Step 7 Select the Trap Receivers menu at the SNMP Configuration menu.
Step 8 At the Trap Receivers menu:
Ethernet Statistics (see the section on RMON Ethernet Statistics Counters).
History
Events
Alarms
The following lists the RMON requirements for a single Catalyst switch and a Stack of switches.
A single switch can run with 4MB of memory with some restrictions. Do not increase the number of history buckets beyond 50. The number of VLANS (in the VTP VLAN Configuration) should be no more than 100.
Interface numbers 1-28 in Table 9-1.
The IP Controller switch (lowest number box in the Stack) must have 8MB of memory to run RMON on the Stack. Full configuration of all features is allowed.
It is recommend that switches with only 4MB not be used in a Stack. Otherwise, many restrictions apply. If the IP Controller switch has only 4MB, RMON statistics can be gathered only on that box. The number of VLANS (in the VTP VLAN Configuration) should be no more than 64, with ports assigned to no more than 14 VLANs. Do not increase the number of history buckets beyond 50. ISL trunks should not be installed in the IP Controller box.
Interface numbers 1-252. The interface numbers assigned to ports are listed in Table 9-1. They can also be calculated according to the following formula:
interface_number = (box_number - 1) * 32 + port_number
| Port # | Box 1 | Box 2 | Box 3 | Box 4 | Box 5 | Box 6 | Box 7 | Box 8 |
|---|---|---|---|---|---|---|---|---|
| 1 | 1 | 33 | 65 | 97 | 129 | 161 | 193 | 225 |
| 2 | 2 | 34 | 66 | 98 | 130 | 162 | 194 | 226 |
| 3 | 3 | 35 | 67 | 99 | 131 | 163 | 195 | 227 |
| 4 | 4 | 36 | 68 | 100 | 132 | 164 | 196 | 228 |
| 5 | 5 | 37 | 69 | 101 | 133 | 165 | 197 | 229 |
| 6 | 6 | 38 | 70 | 102 | 134 | 166 | 198 | 230 |
| 7 | 7 | 39 | 71 | 103 | 135 | 167 | 199 | 231 |
| 8 | 8 | 40 | 72 | 104 | 136 | 168 | 200 | 232 |
| 9 | 9 | 41 | 73 | 105 | 137 | 169 | 201 | 233 |
| 10 | 10 | 42 | 74 | 106 | 138 | 170 | 202 | 234 |
| 11 | 11 | 43 | 75 | 107 | 139 | 171 | 203 | 235 |
| 12 | 12 | 44 | 76 | 108 | 140 | 172 | 204 | 236 |
| 13 | 13 | 45 | 77 | 109 | 141 | 173 | 205 | 237 |
| 14 | 14 | 46 | 78 | 110 | 142 | 174 | 206 | 238 |
| 15 | 15 | 47 | 79 | 111 | 143 | 175 | 207 | 239 |
| 16 | 16 | 48 | 80 | 112 | 144 | 176 | 208 | 240 |
| 17 | 17 | 49 | 81 | 113 | 145 | 177 | 209 | 241 |
| 18 | 18 | 50 | 82 | 114 | 146 | 178 | 210 | 242 |
| 19 | 19 | 51 | 83 | 115 | 147 | 179 | 211 | 243 |
| 20 | 20 | 52 | 84 | 116 | 148 | 180 | 212 | 244 |
| 21 | 21 | 53 | 85 | 117 | 149 | 181 | 213 | 245 |
| 22 | 22 | 54 | 86 | 118 | 150 | 182 | 214 | 246 |
| 23 | 23 | 55 | 87 | 119 | 151 | 183 | 215 | 247 |
| 24 | 24 | 56 | 88 | 120 | 152 | 184 | 216 | 248 |
| 25 | 25 | 57 | 89 | 121 | 153 | 185 | 217 | 249 |
| 26 | 26 | 58 | 90 | 122 | 154 | 186 | 218 | 250 |
| 27 | 27 | 59 | 91 | 123 | 155 | 187 | 219 | 251 |
| 28 | 28 | 60 | 92 | 124 | 156 | 188 | 220 | 252 |
These notes also apply to other RMON managers.
1 ) When setting up an agent on a Stack port, change the timeout from the default of 5 to at least 15 seconds. Retries may be left at the default value. This will prevent TrafficDirector from thinking the agent is not responding during Stack updates or address aging.
2 ) No RMON agent settings are saved by the switch. If a switch is rebooted, agents will need to be reinstalled by TrafficDirector.
3 ) If the IP Controller box is removed from the Stack, the agents will need to be reinstalled by TrafficDirector.
4 ) If a new box that is already running is added to a working Stack, but has a different enable/disable state setting for RMON, reboot the Stack. Otherwise, change the RMON state to the one that matches the working Stack, reboot the box, then add it to the Stack.
5 ) If a box leaves and then rejoins a Stack, all agents on that box must be reinstalled by TrafficDirector.
The following sections list the Statistics anomalies and the following table, Table 9-2, contains RMON Statistics definition differences.
When the packet count (etherStatsPkts) wraps around at 4,294,967,295, the agent will think that the port's statistics have been cleared and will reset all the etherStats counters. If a network segment averages 5,000 pkts/sec, this counter will wrap around every 10 days.
The ISL ports have hardware support for accurate RMON counters, with one exception, etherStatsOversizePkts on ISL trunk ports. However, the other port types do not have special RMON counters, so the information may not be exactly according to the RMON counter definitions. Differences in the RMON definitions are listed in Table 9-2.
| Statistic Name | Definition | Differences |
|---|---|---|
| etherStatsDropEvents | Total number of packets dropped by the monitor due to lack of resources. This is not necessarily the number of packets dropped, just the number of times this condition has been detected. | For all ports, packets lost between the LMA and CPU buffers will not be counted. This can only happen under a long sustained, extremely heavy load of packets directed to the CPU. |
| etherStatsOctets | Total number of octets (including those in bad packets) received on the network. This excludes framing bits but includes Frame Check Sum (FCS) octets. | ISL and 100Mb ports are exact. 10Mb ports are missing octets from packets directed to the CPU, with errors, dropped due to buffer overflows, or limited to the local segment. 10Mb ports can only count octets of packets forwarded to other ports on the switch. |
| etherStatsPkts | Total number of packets received, including multicast, broadcast, and bad packets. | ISL ports are exact. All other ports include packets from other ports to this port that may have been dropped internally, a very infrequent event. |
| etherStatsBroadcastPkts | Total number of good packets received directed to the broadcast address. This does not include Multicast packets. | ISL ports are exact. All other ports are missing broadcast packets transmitted by this port and include broadcast packets with errors. |
| etherStatsMulticastPkts | Total number of good packets that are received directed to a multicast address (excluding broadcast addresses). | ISL ports are exact. All other ports are missing multicast packets transmitted by this port and include multicast packets with errors. |
| etherStatsCRCAlignErrors | Total number of packets received with valid size with checksum or alignment errors. | All ports are exact. |
| etherStatsUndersizePkts | Total number of packets received with fewer than 64 octets, otherwise well-formed. | ISL ports are exact. All other ports include short packets with errors, which are defined as etherStatsFragments. |
| etherStatsOversizePkts | Total number of packets longer than 1,518 octets, otherwise well formed. | ISL ports are exact in non-ISL mode but are reported as 0 when port is in ISL trunk mode. All other ports include long packets with errors, which are defined as etherStatsJabbers. |
| etherStatsFragments | Total number of packets received with fewer than 64 octets, with checksum or alignment errors. | ISL ports are exact. All other ports include short packets without errors, which are defined as etherStatsUndersizePkts. |
| etherStatsJabbers | Total number of packets received longer than 1518 with checksum or alignment errors. | ISL ports include all packets larger than 1536 bytes. All other ports include long packets without errors, which are defined as etherStatsOversizePkts. |
| etherStatsCollisions | Best estimate of the total number of collisions on this ethernet segment. | ISL ports are exact. All other ports count all packets that have collided at least once on this network segment, rather than counting the separate collisions. |
| etherStatsPkts60Octets etherStatsPkts65to127Octets etherStatsPkts128to255Octets etherStatsPkts256to511Octets etherStatsPkts512to1023Octets etherStatsPkts1024to1518Octets | Total number of packets (including bad packets) received in this size range. | ISL ports are exact. All other ports are 0. There is no way to get the packet size distribution without the appropriate hardware counters, because most packets are switched by the hardware. |
|
|