|
|

This chapter describes how to install your switch in a hazardous environment, interpret the power-on self-test (POST), and connect the switch to other devices. Read these topics, and perform the procedures in this order:
This section provides information about these topics:
These warnings are translated into several languages in "Translated Safety Warnings."
 |
Warning This equipment is to be installed and maintained by service personnel only as defined by AS/NZS 3260 Clause 1.2.14.3 Service Personnel. |
|
Warning Read the installation instructions before you connect the system to its power source. |
|
Warning Connect the unit only to DC power source that complies with the safety extra-low voltage (SELV) requirements in IEC 60950 based safety standards. |
|
Warning The nominal voltage for this product is 24 V. When the switch is installed in hazardous locations, the safe operating range of 18 to 30 VDC must be maintained. |
|
Warning This equipment is supplied as "open type" equipment. It must be mounted within an enclosure that is suitably designed for those specific environmental conditions that will be present and appropriately designed to prevent personal injury resulting from accessibility to live parts. The interior of the enclosure must be accessible only by the use of a tool. The enclosure must meet IP 54 or NEMA type 4 minimum enclosure rating standards. |
|
Warning Use twisted-pair supply wires suitable for 86°F (30°C) above surrounding ambient temperature outside the enclosure. |
|
Warning When used in a Class I, Division 2, hazardous location, this equipment must be mounted in a suitable enclosure with a proper wiring method that complies with the governing electrical codes. |
|
Warning In switch installations in a hazardous location, the DC power source could be located away from the vicinity of the switch. be sure that power is removed and power cannot be accidentally be turned on or the area is nonhazardous before proceeding. |
|
Warning When used in a Class I, Division 2, hazardous location, this equipment must be mounted in a suitable enclosure with proper wiring method, for all power, input and output wiring, that complies with the governing electrical codes and in accordance with the authority having jurisdiction over Class I, Division 2 installations. |
|
Warning When used in a Class I, Division 2, hazardous location, this equipment must be mounted in a suitable enclosure with a proper wiring method that complies with the governing electrical codes. |
|
Warning Do not stack the chassis on any other equipment. If the chassis falls, it can cause severe bodily injury and equipment damage. |
|
Warning When installing the unit, always make the ground connection first and disconnect it last. |
|
Warning This equipment is intended to be grounded. Ensure that the host is connected to earth ground during normal use. |
|
Warning This equipment is intended to be grounded to comply with emission and immunity requirements. Ensure that the switch functional ground lug is connected to earth ground during normal use. |
|
Warning Do not work on the system or connect or disconnect cables during periods of lightning activity. |
|
Warning Ultimate disposal of this product should be handled according to all national laws and regulations. |
|
Warning Class 1 laser product |
|
Warning Class 1 LED product |
|
Warning Invisible laser radiation may be emitted from disconnected fibers or connectors. Do not stare into beams or view directly with optical instruments. |
|
Warning Laser radiation is present when the system is open. |
|
Warning LED radiation is present when the system is open. |
|
Warning Avoid exposure to the laser beam. |
This section includes specific regulatory statements about the Catalyst 2955 switches.
This equipment is considered Group 1, Class A industrial equipment according to IEC/CISPR Publication 11. Without appropriate precautions, there may be potential difficulties ensuring electromagnetic compatibility in other environments due to conducted as well as radiated disturbance.
Group 1 contains all Industrial, Scientific and Medical (ISM) equipment in which there is intentionally generated and/or used conductively coupled radio-frequency energy which is necessary for the internal functioning of the equipment itself.
Class A equipment is suitable for use in all establishments other than domestic and those directly connected to a low voltage power supply network which supplies buildings used for domestic purposes.
Additional U.S. regulatory information for this product is in the front matter of this manual.
This is a Class A Information product. When used in a residential environment, it may cause radio frequency interference. Under such circumstances, the user may be requested to take appropriate countermeasures.
This is a Class A product based on the standard of the Voluntary Control Council for Interference by Information Technology Equipment (VCCI). If this equipment is used in a domestic environment, radio disturbance may arise. When such trouble occurs, the user may be required to take corrective actions.
|
||||||
This equipment is a Class A product and should be used and installed properly according to the Hungarian EMC Class A requirements (MSZEN55022). Class A equipment is designed for typical commercial establishments for which special conditions of installation and protection distance are used.
Figyelmeztetés a felhasználói kézikönyv számára:
Ez a berendezés "A" osztályú termék, felhasználására és üzembe helyezésére a magyar EMC "A" osztályú követelményeknek (MSZ EN 55022) megfeleloen kerülhet sor, illetve ezen "A" osztályú berendezések csak megfelelo kereskedelmi forrásból származhatnak, amelyek biztosítják a megfelelo speciális üzembe helyezési körülményeket és biztonságos üzemelési távolságok alkalmazását.
This equipment is intended for use in potentially explosive atmospheres as defined by European Union Directive 94/9/EC. Underwriters Laboratory International DEMKO certifies that this equipment has been found to comply with the Essential Health and Safety Requirements relating to the design and construction of Category 3 equipment intended for use in potentially explosive atmospheres, given in Annex II to this Directive. Compliance with the Essential Health and Safety Requirements has been assured by compliance with EN 50021 (1999).
When determining where to place the switch, observe these guidelines.
 |
Note When the switch is installed in an industrial enclosure, the
temperature within the enclosure is greater than normal room
temperature outside the enclosure. The temperature inside the enclosure cannot exceed 140oF (60oC), the maximum ambient enclosure temperature of the switch. |
|
Note Carefully remove the contents from the shipping container, and check each item for damage. If any item is missing or damaged, contact your Cisco representative or reseller for support. Return all packing materials to the shipping container and save them. |
The switch is shipped with these items:
If you want to connect a terminal to the switch console port, you need to provide an RJ-45-to-DB-25 female DTE adapter. You can order a kit (part number ACS-DSBUASYN=) with that adapter from Cisco.
For multimode (MM) connections, you can connect a 100BASE-FX port to a port on a target device by using one of the MT-RJ fiber-optic patch cables listed in Table B-1. Use the Cisco part numbers in Table B-1 to order the patch cables that you need.
For single-mode (SM) connections, you can connect a 100BASE-LX port to a port on a target device by using one of the connectors listed in Table B-2. Use the Cisco part numbers in Table B-2 to order the patch cables that you need.
Before installing the switch on a DIN rail or in a 19-inch rack, you should power on the switch and verify that the switch passes power-on self-test (POST). These sections describe the steps required to connect a PC to the switch console port, to power on the switch, and to observe POST:
Connecting a PC or a Terminal to the Console Port
Powering On the Switch and Running POST
To connect a PC to the console port, use the supplied RJ-45-to-DB-9 adapter cable. To connect a terminal to the console port, you need to provide an RJ-45-to-DB-25 female DTE adapter. You can order a kit (part number ACS-DSBUASYN=) with that adapter from Cisco. For console-port and adapter-pinout information, see the"Cable and Adapter Specifications" section.
The PC or terminal must support VT100 terminal emulation. The terminal-emulation software—frequently a PC application such as HyperTerminal or Procomm Plus—makes communication between the switch and your PC or terminal possible during the setup program.
Follow these steps to connect the PC or terminal to the switch:
Step 2 Configure the baud rate and character format of the PC or terminal to match these console-port default characteristics:
After gaining access to the switch, you can change the port baud rate. Refer to the switch software configuration guide for instructions.
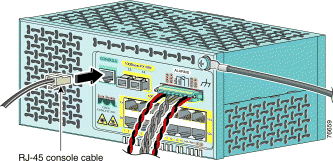
Step 3 Insert the adapter cable in the console port, as shown in Figure 3-1. (See the "Cable and Adapter Pinouts" section for pinout descriptions.)
Step 4 Attach the appropriate adapter to the terminal, if needed.
Step 5 Insert the other adapter cable end in the PC or terminal adapter.
Step 6 Start the terminal-emulation software.
 |
Caution The AC/DC power converter (PWR-2955-AC) can only be used in a nonhazardous location installation. |
These sections describe the steps required to power on the switch and to observe POST:
Wiring the DC-Input Power Source
Add the Ferrite to the Power and Relay Connector Wiring
Attach the Power and Relay Connector to the Switch
Locate the power and relay connector, the ground screw, and the ring terminal lug in the switch kit.
Obtain these necessary tools and equipment:
|
Warning This equipment is intended to be grounded to comply with emission and immunity requirements. Ensure that the switch functional ground lug is connected to earth ground during normal use. |
|
Warning When installing the unit, always make the ground connection first and disconnect it last. |
|
Warning Use twisted-pair supply wires suitable for 86°F (30°C) above surrounding ambient temperature outside the enclosure. |
|
Caution To make sure that the equipment is reliably connected to earth ground, follow the grounding procedure instructions, and use a UL-listed lug suitable for number 10-to-12 AWG wire and an M-5 thread ground screw. |
To ground the switch to earth ground by using the functional ground screw, follow these steps. Make sure to follow any grounding requirements at your site.
Step 2 If your ground wire is insulated, use a wire stripping tool to strip the 10- to 12-gauge ground wire to 0.5 inch (12.7 millimeter [mm]) ± 0.02 inch (0.5 mm) as shown in Figure 3-2.
Step 3 Slide the ground wire and the ring terminal around the ground screw.
Step 4 Insert the ground screw into the functional ground screw opening on the front panel.
Step 5 Using a Panduit crimping tool, crimp the ring terminal to the 10- to 12-gauge wire.
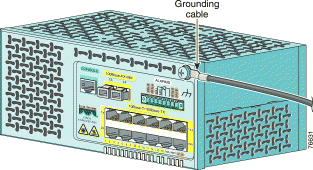
Step 6 Using a ratcheting torque screwdriver, tighten the ground screw and ground wire to the switch front panel to 15 in-lbs. (240 ounce-force inches [ozf-in.]), as shown in Figure 3-4.
Step 7 Attach the other end of the ground wire to a grounded bare metal surface, such as a ground bus, a grounded DIN rail, or a grounded bare rack.
|
Warning Only trained and qualified personnel should be allowed to install or replace this equipment. |
|
Warning In switch installations in a hazardous location, the DC power source could be located away from the vicinity of the switch. be sure that power is removed and power cannot be accidentally be turned on or the area is nonhazardous before proceeding. |
|
Warning When you disconnect the power and relay connector with power applied to the switch, an electrical arc can occur. This could cause an explosion in hazardous area installations. Be sure that power is removed from the switch and cannot be accidentally be turned on, or verify that the area is nonhazardous before proceeding. Failure to securely tighten the power and relay connector captive screws can result in an electrical arc if the connector is accidentally removed. |
|
Warning Connect the unit only to DC power source that complies with the safety extra-low voltage (SELV) requirements in IEC 60950 based safety standards. |
|
Caution The AC/DC power converter (PWR-2955-AC) can only be used in a nonhazardous location installation. |
|
Caution You must connect the Catalyst 2955 switch only to a DC-input power source that has an input supply voltage from 18 to 30 VDC. If the supply voltage is not in this range, the switch might not operate properly or might be damaged. |
|
Caution The switch must be installed with 2 A-branch-circuit protection. |
|
Caution This installation must comply with all applicable codes. |
To wire the switch to a DC-input power source, follow these steps:
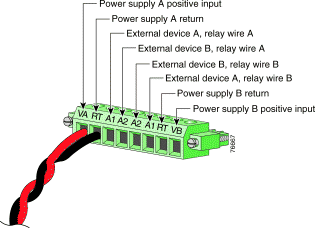
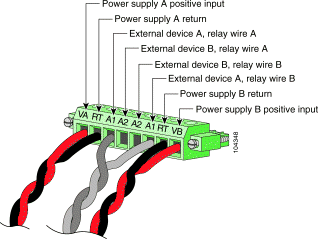
Step 2 Identify the positive and negative feed positions for the power and relay connector. The positive DC power input for power supply A is labeled 24 V A, and the return for power supply A is labeled RTN A. For power supply B (the redundant power supply), the positive DC power input is labeled 24 V B, and the return is labeled RTN B.
Step 3 Measure two strands of twisted-pair copper wire (18 to 20 AWG) long enough to connect to the DC power source.
Step 4 Using an 18-gauge wire-stripping tool, strip each of the two wires coming from each DC-input power source to 0.25 inch (6.3 mm) ± 0.02 inch (0.5 mm). Do not strip more than 0.27 inch (6.8 mm) of insulation from the wire. Stripping more than the recommended amount of wire can leave exposed wire from the power and relay connector after installation.
Step 5 Insert the exposed wire of one of the four DC-input power source wires into the power and relay connector, as shown in Figure 3-7. Make sure that you cannot see any wire lead. Only wire with insulation should extend from the connector.
Step 6 Use a ratcheting torque flathead screwdriver to torque the power and relay connector captive screw (above the installed wire lead) to 4.5 in-lbs. (72 ozf-in.). (See Figure 3-8.)
|
Caution Do not overtorque the power and relay connector captive screws. The recommended maximum torque is 4.5 in-lbs. |
Step 7 Repeat Step 4 through Step 6 for the return wire for the primary DC power source.
|
Note If you are connecting a second power supply, repeat Step 4 through Step 6 for the DC-input (24V B) and return (RTN B) for power supply B. |
Figure 3-9 shows the completed DC-input wiring for two power supplies on a power and relay connector.
|
Note If you plan to connect external alarm devices to the alarm relays, proceed to the "Wiring the External Alarm Device Relays" section. Otherwise, proceed to the next step. |
Step 8 Proceed to the next section, "Add the Ferrite to the Power and Relay Connector Wiring" for instructions on how to attach the ferrite to the power and relay connector wiring.
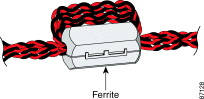
Before you connect the power and relay connector to the front panel, follow these steps to add a ferrite to the power and relay connector wiring.
|
Note If you plan to connect external alarm devices to the alarm relays, first proceed to the "Wiring the External Alarm Device Relays" section. |
Step 2 Loop the cable around the ferrite and back through the center to secure the ferrite. See Figure 3-10 for details.
Step 3 Proceed to the "Attach the Power and Relay Connector to the Switch" section for instructions on how to attach the power and relay connector to the front panel of the switch.
Follow these steps to attach the power and relay connector to the front panel of the switch.
|
Caution Secure the wires coming from the power and relay connector so that they cannot be disturbed by casual contact. For example, use tie wraps to secure the wires to the rack. |
Step 2 Use a flathead screwdriver to tighten the captive screws on the sides of the power and relay connector.
Locate the circuit breaker on the panel board that services the DC circuit, and switch the circuit breaker to the ON position.
After the power is connected, the switch automatically begins POST, a series of tests that verifies that the switch functions properly.
|
Note The uplink port status LEDs provide system and status information during POST. On the Catalyst 2955C-12 and Catalyst 2955S-12, the uplink ports are labeled 13 and 14. On the Catalyst 2955T-12, the uplink ports are labeled 1 and 2. |
When the Catalyst 2955C-12 and Catalyst 2955S-12 begin POST:
When the Catalyst 2955T-12 begins POST:
If POST completes successfully on the Catalyst 2955C-12 and Catalyst 2955S-12:
If POST completes successfully on the Catalyst 2955T-12:
If POST fails on the Catalyst 2955C-12 and Catalyst 2955S-12:
If POST fails on the Catalyst 2955T-12:
If your switch fails POST, see "Troubleshooting," to determine a corrective action.
|
Note Call Cisco Systems immediately if your switch does not pass POST. |
While the switch powers on, the power status LEDs are green. During POST, the power status LEDs are off. After POST completes successfully, the power status LEDs turn green if both power supplies are functioning normally and the switch has been configured to operate in dual power mode.
If the switch is configured to operate in single power mode operation, only the primary power status LED is on. If the primary power supply is not functioning normally or is not present, the power status LED turns amber. Refer to the switch configuration guide for details on single and dual power mode operation.
On a Catalyst 2950 switch, you can use the MODE button to recover the switch password. The Catalyst 2955 switch has no MODE button, so the boot loader compensates by using break key detection to stop the automatic boot sequence for password recovery.
On the Catalyst 2955C-12 and Catalyst 2955S-12 switches, during the initial appearance of the boot loader prompt on the console after POST, uplink port 13 LED blinks green, and uplink port 14 LED is off. On the Catalyst 2955T-12 switch, during the initial appearance of the boot loader prompt on the console after POST, uplink port 1 LED blinks green, and uplink port 2 LED is off.
|
Note Refer to the switch software configuration guide for details on the Catalyst 2955 switch password recovery process. |
After successfully running POST, follow these steps.
Step 2 Disconnect the cables.
Step 3 Decide where you want to install the switch.
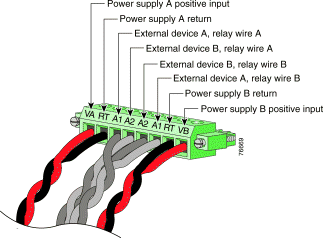
The alarm relays on the Catalyst 2955 switch are normally open (NO). To connect an external alarm device to the relays, you must connect two relay contact wires to complete an electrical circuit. Because each external alarm device requires two connections to a relay, the Catalyst 2955 switch supports a maximum of two external alarm devices.
After you have completed the wiring for the DC power connections, follow these steps to wire the switch to an external alarm device:
|
Note This procedure is optional. |
Step 2 Use a wire stripper to remove the casing from both ends of the wire to 0.25 inch (6.3 mm) ± 0.02 inch (0.5 mm). Do not strip more than 0.27 inch (6.8 mm) of insulation from the wire. Stripping more than the recommended amount of wire can leave exposed wire from the power and relay connector after installation.
Step 3 Insert the exposed wire for the external alarm device (alarm relay wire A) into the wire entry hole for the alarm relay contact, as shown in Figure 3-12.
Step 4 Use a ratcheting torque flathead screwdriver to torque the power and relay connector captive screw (above the installed wire lead) to 4.5 in-lbs. (72 ozf-in.). (See Figure 3-13 for details.)
|
Caution Do not overtorque the power and relay connector captive screws. The recommended maximum torque is 4.5 in-lbs. |
Step 5 Repeat Step 1 through Step 4 to connect alarm relay wire B.
|
Note To connect an additional external alarm device to the alarm relays, repeat Step 1 through Step 4 for the relay input and output wires. |
Figure 3-14 shows the completed wiring for two external alarm devices on a power and relay connector.
|
Note See the "Add the
Ferrite to the Power and Relay Connector Wiring" section for
instructions on how to attach the ferrite to the power and relay connector wiring. See the "Attach the Power and Relay Connector to the Switch" section for instructions on how to connect the power and relay connector to the front panel. |
You can mount the Catalyst 2955 switch on a DIN rail in a parallel or a face-down configuration.
|
Warning This equipment is supplied as "open type" equipment. It must be mounted within an enclosure that is suitably designed for those specific environmental conditions that will be present and appropriately designed to prevent personal injury resulting from accessibility to live parts. The interior of the enclosure must be accessible only by the use of a tool. The enclosure must meet IP 54 or NEMA type 4 minimum enclosure rating standards. |
|
Warning When used in a Class I, Division 2, hazardous location, this equipment must be mounted in a suitable enclosure with proper wiring method, for all power, input and output wiring, that complies with the governing electrical codes and in accordance with the authority having jurisdiction over Class I, Division 2 installations. |
|
Caution To prevent the switch from overheating, there must be a minimum of 3 inches between any other device and the top, bottom, or sides of the switch. |
|
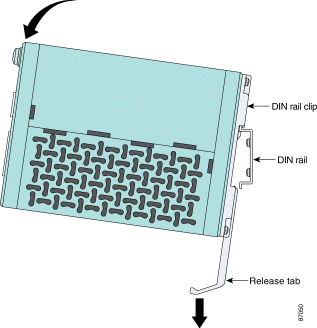
Note The Catalyst 2955 switch ships with the clip assembly installed on the rear panel
of the switch for a parallel mounting configuration. To mount the switch in a face-down configuration, use a screwdriver to remove the clip assembly from the rear panel and then install it on the top of the switch. |
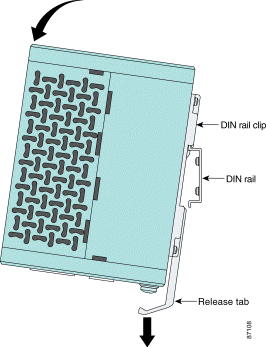
To attach the switch to a DIN rail, follow the procedures in this section.
Step 2 Pull down on the clip release tab as you press the switch toward the DIN rail.
Step 3 When the switch makes contact with the top and bottom of the DIN rail, let go of the clip release tab.
Step 4 Push down lightly on the switch to ensure that it is firmly locked in place.
After the switch is mounted on the DIN rail, power on the switch as described in "Powering On the Switch and Running POST" section.
|
Note For instructions on how to remove the switch from a DIN rail, see the "Removing the Switch from a DIN Rail or a Rack" section. |
|
Caution To prevent the switch from overheating, there must be a minimum of 3 inches between any other device and the top, bottom, or sides of the switch. |
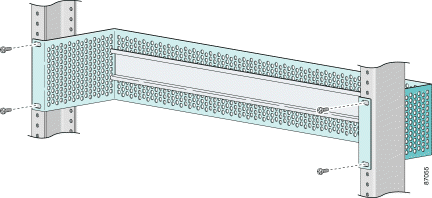
You can use an optional DIN rail adapter kit (available through Cisco, part number STK-RACKMNT-2955=) to mount the Catalyst 2955 switch in a 19-inch rack. The rack mounting kit comes with a DIN rail adapter and screws to attach the adapter to the rack. Ask your Cisco representative for details.
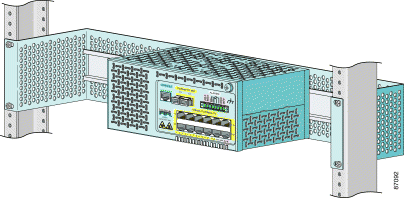
To install the switch in a rack, follow these steps:
Step 2 Pull down on the clip release tab as you press the switch toward the DIN rail.
Step 3 When the switch makes contact with the top and bottom of the DIN rail, let go of the clip release tab. See Figure 3-15 for details.
Step 4 Push down lightly on the switch to ensure that it is firmly locked in place. See Figure 3-18 for details.
After mounting the switch in the rack, start the terminal-emulation software, and provide power to the switch. See the "Powering On the Switch and Running POST" section for instructions.
|
Note For instructions on how to remove the switch from a rack, see the "Removing the Switch from a DIN Rail or a Rack" section. |
To remove the switch from a DIN rail or a rack, follow these steps:
Step 2 Detach the switch from the DIN rail or rack:
|
Note The DIN rail clip release tab might not be easily accessible in some mounting configurations. If you cannot reach the tab, insert a long flathead screwdriver into the tab slot and pull down to release the clip. |
The 10/100 ports on the Catalyst 2955 configure themselves to operate at the speed and duplex settings of attached devices.They operate at 10 or 100 Mbps in half- or full-duplex mode. If the attached devices do not support autonegotiation, you can explicitly set the speed and duplex parameters.
The 10/100/1000 ports configure themselves to operate at the speed setting of attached devices.These ports on the Catalyst 2955T-12 operate at either 10 or 100 Mbps in either full- or half-duplex mode or at 1000 Mbps in full-duplex mode. If the attached devices do not support autonegotiation, you can explicitly set the speed parameter.
Connecting devices that do not autonegotiate or devices with manually set speed and duplex parameters can reduce performance or result in link failures between the devices. To maximize performance, choose one of these methods for configuring the ports:
|
Warning Do not connect or disconnect cables to the ports while power is applied to the switch or any device on the network because an electrical arc can occur. This could cause an explosion in hazardous location installations. Be sure that power is removed from the switch and cannot be accidentally be turned on, or verify that the area is nonhazardous before proceeding. |
Follow these steps to connect the switch to 10BASE-T, 100BASE-TX, or 1000BASE-T devices:
|
Note When connecting to 1000BASE-T devices, be sure to use a four twisted-pair, Category 5 cable. |
Step 2 Insert the other cable end in an RJ-45 connector on the target device.
Step 3 Observe the port status LED.
The LED turns green when the switch and the target device have an established link.
The LED turns amber while Spanning Tree Protocol (STP) discovers the network topology and searches for loops. This process takes about 30 seconds, and then the LED turns green.
If the LED is off, the target device might not be turned on, there might be a cable problem, or there might be a problem with the adapter installed in the target device. See "Troubleshooting," for solutions to cabling problems.
Step 4 Reconfigure and restart the target device if necessary.
Step 5 Repeat Steps 1 through 4 to connect each port.
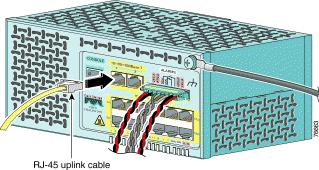
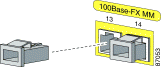
The 100BASE-FX MM fiber-optic uplink ports operate in full-duplex mode.
You can connect a 100BASE-FX port to a port on a target device by using one of the MT-RJ fiber-optic patch cables listed in Table B-1. Use the Cisco part numbers in Table B-1 to order the patch cables that you need.
|
Warning Do not connect or disconnect cables to the ports while power is applied to the switch or any device on the network because an electrical arc can occur. This could cause an explosion in hazardous location installations. Be sure that power is removed from the switch and cannot be accidentally be turned on, or verify that the area is nonhazardous before proceeding. |
|
Warning LED radiation is present when the system is open. |
|
Warning Class 1 LED product |
|
Caution Do not remove the dust plugs from the fiber-optic ports or the rubber caps from the fiber-optic cable until you are ready to connect the cable. The plugs and caps protect the fiber-optic ports and cables from contamination and ambient light. |
Follow these steps to connect the switch to a MM 100BASE-FX device:
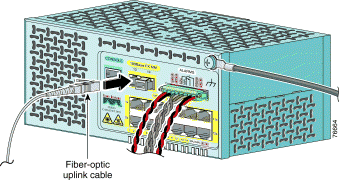
Step 2 Insert the cable in a 100BASE-FX port. (See Figure 3-24.)
Step 3 Insert the other cable end in an SC or ST port on the target device.
Step 4 Observe the port status LED.
The LED turns green when the switch and the target device have an established link.
The LED turns amber while STP discovers the network topology and searches for loops. This process takes about 30 seconds, and then the port LED turns green.
If the LED is off, the target device might not be turned on, there might be a cable problem, or there might be a problem with the adapter installed in the target device. See "Troubleshooting," for solutions to cabling problems.
Step 5 Reconfigure and restart the target device, if necessary.
Step 6 Repeat Steps 1 through 5 to connect each port.
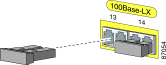
You can connect a 100BASE-LX port to a port on a target device by using one of the LC fiber-optic patch cables listed in Table B-2. Use the Cisco part numbers in Table B-2 to order the patch cables that you need.
Follow these steps to connect the switch to a 100BASE-LX SM device:
|
Warning Do not connect or disconnect cables to the ports while power is applied to the switch or any device on the network because an electrical arc can occur. This could cause an explosion in hazardous location installations. Be sure that power is removed from the switch and cannot be accidentally be turned on, or verify that the area is nonhazardous before proceeding. |
|
Warning Laser radiation is present when the system is open. |
|
Warning Invisible laser radiation may be emitted from disconnected fibers or connectors. Do not stare into beams or view directly with optical instruments. |
|
Warning Avoid exposure to the laser beam. |
|
Caution Do not remove the dust plugs from the fiber-optic ports or the rubber caps from the fiber-optic cable until you are ready to connect the cable. The plugs and caps protect the fiber-optic ports and cables from contamination and ambient light. |
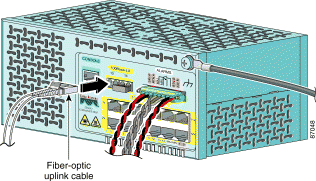
Step 2 Insert the cable in a 100BASE-LX port. (See Figure 3-26.)
Step 3 Insert the other cable end in an LC port on the target device.
Step 4 Observe the port status LED.
The LED turns green when the switch and the target device have an established link.
The LED turns amber while STP discovers the network topology and searches for loops. This process takes about 30 seconds, and then the port LED turns green.
If the LED is off, the target device might not be turned on, there might be a cable problem, or there might be a problem with the adapter installed in the target device. See "Troubleshooting," for solutions to cabling problems.
Step 5 Reconfigure and restart the target device, if necessary.
Step 6 Repeat Steps 1 through 5 to connect each port.
For information about starting the switch, refer to the release notes for the Catalyst 2955 switch.
For information about configuring the switch, refer to the switch software configuration guide.
![]()
![]()
![]()
![]()
![]()
![]()
![]()
![]()
Posted: Thu Nov 13 13:12:10 PST 2003
All contents are Copyright © 1992--2003 Cisco Systems, Inc. All rights reserved.
Important Notices and Privacy Statement.