|
|

Table Of Contents
How to Use Variables in a Formula
Expanded Call Context (ECC) Variables
Formulas
This chapter discusses formulas in script processing. It includes:
•
An introduction to ICM formulas and script processing
•
•
•
Introducing Formulas
A formula consists of one or more expressions that ICM software evaluates to produce a value which it can use for subsequent script processing. You define an expression, which is made up of variables, constants, operators, and functions, to set up custom selection rules or distribution criteria in scripts.
A formula can take many forms, as shown in the examples in Figure 5-1.
Figure 5-1 Sample Formula Formats
In each of the examples in Figure 5-1:
•
•
Variables are discussed in detail beginning on page 5-3 of this chapter; operators and functions beginning on 5-12.
Figure 5-2 shows a simple formula that evaluates the value of CallerEnteredDigit variable.
Figure 5-2 Simple Formula
In Figure 5-2, if the CallerEnteredDigit value is equal to 1, the formula returns a value of true; if the CallerEnteredDigit value is not equal to 1, the formula returns a value of false.
The Formula Editor
Many Script Editor node fields require a formula. In some cases, you can simply key the formula into this field. In most cases, however, you will need to click an Edit Formula button to access the Script Editor's Formula Editor, shown in Figure 5-3.
Figure 5-3 Formula Editor
There are two ways to use the Formula Editor to create or modify a formula:
•
•
Introducing Variables
You use variables, which are named objects that can hold a value, in formulas to:
•
•
This section describes how to use variables in a formula and the different types of variables that are available.
To see all available categories and the specific variables in each category, see the Variables tab in the Formula Editor dialog box.
Note
How to Use Variables in a Formula
The syntax for using a variable in a formula is as follows:
object-type.object-name.variable-name
Where:
•
•
•
•
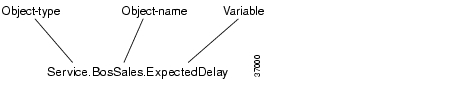
A Single-Target Variable
Figure 5-4 shows an example of a formula that examines the ExpectedDelay variable for a Service, BosSales.
Figure 5-4 A Variable Examining a Single Target
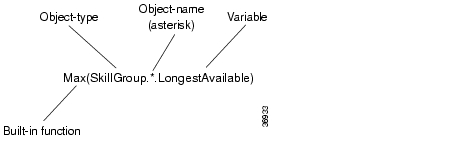
A Multiple-Target Variable
To use a variable to examine multiple targets of a node, use an asterisk (*) as the object-name value. When ICM software executes a variable with an asterisk, it replaces the asterisk by each target in turn.
For example, you could include the formula in Figure 5-5 in a Select node to find the skill group with the maximum value of the variable LongestAvailable.
Figure 5-5 A Variable Examining Multiple Targets
Call Control Variables
The call control variables provide information about the current call request. They include information about where the request came from, call classification data, and information to be passed to the peripheral that receives the call.
You can set the values with some call variables with the Set Variable node. To reference a call control variable in a script, the syntax is Call.variable.
Note
Table 5-1 summarizes the call control variables.
Note
Expanded Call Context (ECC) Variables
Expanded Call Context (ECC) variables are variables that you define and enable in the Configuration Manager to store values associated with the call. You can specify the variable name and data type. The name must begin with the string user. These are in addition to the variables the ICM software defines for each call (PeripheralVariable1 through PeripheralVariable10, CallerEnteredDigits, CallingLineID, etc.).
An ECC variable name can be up to 33 bytes long (1-32 usable characters + a null terminator). In addition, it is highly recommended that you use the following naming convention when creating an ECC variable:
user.<CompanyName>.<VariableDescription>
In this syntax:
•
•
For example, you could use the following name for an ECC variable created for Cisco account numbers:
user.Cisco.AcctNum
Using this naming convention will prevent naming conflicts with any third-party applications that interface with ICM software.
Note
An ECC variable can be either a scalar variable or an array.
The maximum length of a scalar variable or array element can be 1 to 210 bytes.
The maximum number of elements in an array can be 1 to 255.
The maximum buffer size for each scalar variable = 5 + the maximum length of the variable where the 5 bytes includes 4 bytes to tag the variable and 1 byte for the null terminator.
The maximum buffer size for each array = 5 + (1 + the maximum length of array element) * (the maximum number of elements in the array). There is a null terminator for each element, as well as a null terminator for the array as a whole.
Since the total size of the buffer used to store the variables internally is 2000 bytes, the total sum of all the maximum buffer sizes for each variable and each array must be no greater than 2000.
For example, if you intended to use one scalar ECC variable with a maximum length of 100 bytes, one scalar ECC variable with a maximum length of 80 bytes, and an ECC array with a maximum of 9 elements with each element having a maximum length of 200 bytes, the buffer size would be:
(5+100) + (5+80) + (5 + (1+200)*9) = 2004
This is too large so the length of one of the scalar ECC variables or the length of the array ECC variable needs to be adjusted.
Expanded call variable configuration consists of two steps:
•
•
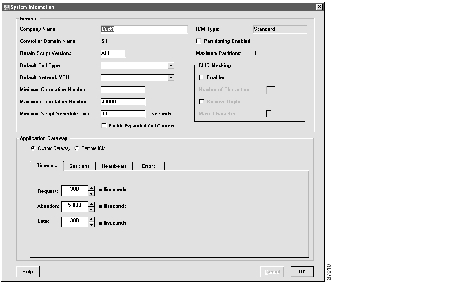
How to set the Enable Expanded Call Context option
Step 1
Step 2
Note
Step 3
How to define an Expanded Call Context (ECC) variable
Step 1
Step 2
Step 3
Step 4
Note
For additional information refer to the online Help.Step 5
User Variables
You can also create global user variables. For example, you could create a user variable called usertemp to serve as a temporary storage area for a string value used by an If node.
Each user variable must:
•
•
•
Note
After you have defined a variable, you can then use the Script Editor's Formula Editor to access the variable and reference it in expressions, just as you would with a "built-in" variable
Figure 5-6 Formula Editor Dialog Box
How to define a user variable
Step 1
Step 2
Step 3
Step 4
Note
Step 5
Operators
ICM software supports a large number of operators. Some operators have one operand; others have more than one. This section contains tables describing the various operators supported by ICM. Most of the table entries include examples.
Prefix Operators
Prefix operators, listed in Table 5-2, take a single operand.
Arithmetic Operators
The arithmetic operators, listed in Table 5-3, take two operands.
Note
Equality Operators
The equality operators, listed in Table 5-4, take two operands.
Relational Operators
The relational operators, listed in Table 5-5, take two operands.
Logical Operators
Logical operators, listed in Table 5-6, take two operands. Logical operators examine the values of different logical expressions.
Note
Bitwise Operators
The bitwise operators, listed in Table 5-7, take two integer operands.
Miscellaneous Operators
The miscellaneous operators, which don't fit in any of the preceding categories, are listed in Table 5-8.
Table 5-8 Miscellaneous Operators
?
Conditional
The conditional operator (?) takes three operands. Its syntax is as follows:
condition ? true-result : false-result
ICM software evaluates the expression by first examining the logical expression condition and then doing the following:
•
•
Example: The following expression determines whether the number of agents available for skill group S1 is even or odd:
(SkillGroup.S1.Avail & ~01) ? "even" : "odd"
Note
&
Concatenation
The concatenation operator (&) joins two strings end-to-end.
Example: "abc" & "def" returns the value "abcdef".
,
Sequential
The sequential or comma operator (,) takes two operands, each of which is an expression. ICM software evaluates the left expression first and then the right expression. The value of the overall expression is the value of the right expression. The first expression typically affects the valuation of the second.
Call.CallEnteredDigits = 99, Valid(Call.CallerEnteredDigits) ? 1 : 0
<<
Shift left
The shift left (<<) and shift right (>>) operators shift the bits within a value.
The following example shifts the bits in Avail two places to the left. The two rightmost positions are filled with zeroes:
Avail << 2
The following example shifts the bits in Avail two places to the right. In this case, the positions are filled with sign bits (0 if the original value is positive or zero; 1 if the original value is negative).
Avail >> 2
>>
Shift right
Operator Precedence
To write expressions correctly, you must understand the order in which ICM software evaluates each operator. Table 5-9 lists the levels of operator priority.
Note
Built-in Functions
ICM software provides a number of built-in functions that you can use in formulas. These functions allow you to manipulate dates and times, perform several standard mathematical operations, and so forth.
The tables in this section summarize the functions according to category.
Table 5-10 lists the functions that manipulate dates and times.
Table 5-11 lists the mathematical functions.
Table 5-12 lists the other built-in functions that are available.
Custom Functions
You can create custom functions for use within scripts. A custom function represents an expression. Optionally, the expression can contain parameters that receive values when the function is called.
You can also import or export a custom function from one system to another.
How to add a custom function
Step 1
Step 2
Step 3
•
•
•
–
–
Step 4
Step 5
Step 6
Step 7
Step 8
How to import a custom function
Step 1
Step 2
Step 3
Step 4
Note
Step 5
•
•
The Object Mapping dialog box contains three columns:
•
•
•
Step 6
Step 7
Note
Step 8
How to export a custom function
Step 1
Step 2
Note
Step 3
Note
Step 4
Step 5
![]()
![]()
![]()
![]()
![]()
![]()
![]()
![]()
Posted: Fri Nov 18 07:27:27 PST 2005
All contents are Copyright © 1992--2005 Cisco Systems, Inc. All rights reserved.
Important Notices and Privacy Statement.