|
|

Table Of Contents
Scheduled Jobs
When the ICM software is installed on an Admin Workstation, the installation software automatically sets up several scheduled jobs. Some of these jobs handle the purging of log files. Log files are generated by many processes in the ICM system to document events for the specific process. Log file purge jobs are scheduled by the ICM Setup program and cannot be changed through the Job Scheduler. However, you can schedule PrintRpt jobs to run whenever you like.
This chapter describes the following tasks:
•
Viewing the schedules for ICM jobs in the system
•
•
Overview
Table 6-1 lists the commands that the ICM schedules automatically and the commands you can schedule through the Job Scheduler.
Note
Starting the Job Scheduler
To invoke the Job Scheduler, double-click on its icon within the Cisco Admin Workstation group in the Windows NT Program Manager. The Job Scheduler main window appears.
The Job Scheduler main window displays a summary line for each job currently scheduled. In addition to jobs related directly to ICM software, you might see other jobs that have been scheduled on the workstation. This example shows the two jobs that ICM software automatically schedules.
Adding a New Job
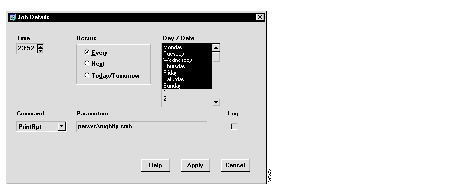
To create a new job, click the New button in the Job Scheduler's main window. The Job Details dialog box appears:
You can schedule a job to be executed once or periodically on specific days of the week or specific days of the month. In either case, you must first specify the time of day at which the job is to be executed.
Note
Time
The time is expressed in 24-hour format. For example, 8:00 P.M. is expressed as 20:00. You can change this value in one of two ways:
•
•
Set the time of day at which you want the job to execute. You can then specify on which day or days you want the job to execute.
Days
The Occurs and Day / Date fields specify the day or days on which the job executes. The Occurs field provides three choices:
•
•
•
In the Day / Date field you can choose one or more days of the week (Monday through Sunday) or days of the month (1 through 31).
Every
If you choose Every in the Occurs field, the job runs at regular intervals or on specific days of each week or month. For example, if you want a job to run every weekday, choose Every in the Occurs field and choose the five values Monday through Friday in the Day / Date field. If you want a job to run on the first and 15th of every month, choose Every and 1 and 15.
Next
If you choose Next in the Occurs field, the job executes one or more times depending on the values you choose in the Day / Date field. For example, if you choose Tuesday and Friday with Next, the job executes twice: on the next Tuesday and the next Friday. The job is automatically updated after each execution. For example, if you entered the job on a Monday, it would initially be set for Tuesday and Friday. After executing on Tuesday, the job would be updated to be for Friday only.
Today / Tomorrow
If you choose Today / Tomorrow in the Occurs field, the job executes once at the next occurrence of the specified time. For example, if you schedule a job to execute at 10:00, then the job executes at 10:00 A.M. either today (if you submit the job by 10:00 A.M.) or tomorrow (if you submit the job after 10:00 A.M.). In this case, the Day / Date field is ignored.
Complex Scheduling
You can intermix days of the week with days of the month in the Day / Date field. For example, you can schedule a job to execute every Monday and the 9th of every month. If the 9th falls on a Monday, the job is executed once on that day. If you specify Next with Monday and 9, then if the following Monday is the 9th, the job executes on that Monday and the 9th of the following month.
Although you can schedule a specific job to execute on more than one day, you cannot schedule a single job to execute at more than one time of day. If you want to execute a job twice on the same day, schedule two separate jobs. Similarly, if you want a job to execute at different times on different days, schedule two jobs.
Command and Parameters
Currently, the only command you can schedule is PrintRpt. In the Parameters field, enter the pathname of the report relative to your aw\customer directory. For example, if the report is located at \icr\cus01\aw\custom\persvc\nightly.cmb, enter persvc\nightly.cmb.
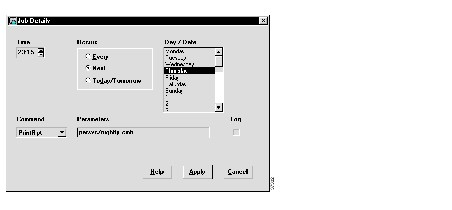
The following example shows a completed Job Details window for a printrpt job.
Logging
Some jobs write information to a log file when they execute. The information confirms that the job ran and includes any error messages the job generates.
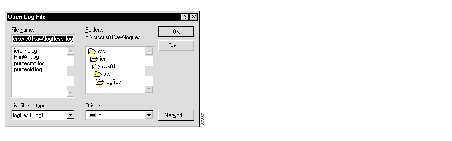
ICM software maintains separate logs for various commands. You can view any of these logs from within the Job Scheduler. To view a log, click the Inspect Log button in the Job Scheduler main window. The Open Log File dialog box appears:
All log files for a customer are stored in the directory aw\logfiles under the customer directory. Each log has the suffix.log. Choose the log you want to view from the list on the left. The Job Scheduler then invokes Notepad to display the log.
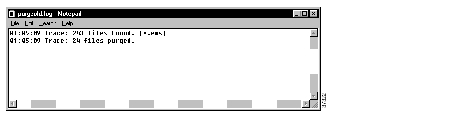
At this point, the Job Scheduler and Notepad are both active as separate applications. You can move freely between them. When you have finished inspecting the log, exit Notepad by choosing File > Exit from the menu bar.
Scheduled printrpt jobs create entries in two logs:
•
•
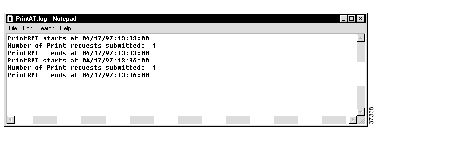
The printrpt command itself writes to the PrintAt.log:
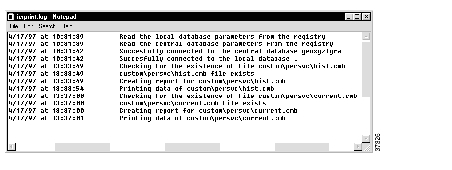
The Print Server writes to the icrprint.log:
To prevent the logs from growing too large, you must periodically remove old entries, delete the log, or archive it to another location. If you delete or move a log, ICM software automatically creates a new log when it executes a job that writes to it.
For more information about the contents of the logs, see the section, "Command Logs," in Chapter 7, "Event Management."
Job Details
The summary lines in the Job Scheduler main window display general information about each job. The Job Details dialog box displays complete information about a scheduled ICM job.
To display details about a job:
Double-click on a job within the Job Scheduler main window or select the job and click the Change button. The Job Details dialog box appears.
The Print Server
For a scheduled report to print, the ICM Print Server must be running on the Admin Workstation. You can use the ICM Setup program to set the Print Server to start automatically when you start the AW. If the Print Server is not running, any scheduled print jobs that execute are saved in a special queue. If you subsequently start Print Server, the queued jobs print.
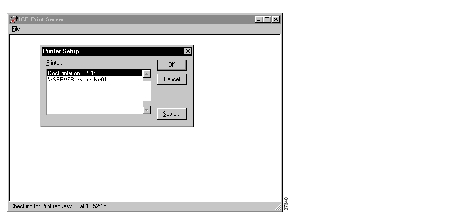
If the Print Server process is not running, double-click its icon in the Cisco Admin Workstation program group. You can also use the Print Server to choose a specific printer on which to print your scheduled reports.
The Print Server normally runs minimized, appearing as a button on the taskbar:
To choose a printer and set printing options:
Step 1
Step 2
Step 3
Step 4
Step 5
For more information on the Print Server, see the Cisco ICM Software Supervisor Guide.
Deleting a Job
When you no longer need to have a particular report scheduled to print, you can remove it from the job scheduler. Print jobs scheduled using the "Next" and "Today/Tomorrow" options are automatically deleted from the scheduler after they have executed.
To delete a job:
Step 1
Step 2
Step 3
Step 4
![]()
![]()
![]()
![]()
![]()
![]()
![]()
![]()
Posted: Mon Dec 6 11:44:41 PST 2004
All contents are Copyright © 1992--2004 Cisco Systems, Inc. All rights reserved.
Important Notices and Privacy Statement.