|
|

Table Of Contents
Checking Data Integrity in the Local Database
Synchronizing Databases from the Command Window
Synchronizing Databases with ICMDBA
General Administration
Because Intelligent Contact Management is a mission-critical application that runs 24 hours a day, ICM software takes care of many routine administration tasks automatically. In general, the ICM software retains control of most of the database administration functions in order to keep external interference to a minimum.
This chapter describes the data integrity checks that ICM software performs on configuration data. It also describes the scheduled database maintenance jobs that run on automatically.
As the ICM administrator, you might be responsible for performing several optional ICM administration tasks:
•
Setting networking options
•
•
•
•
•
This chapter describes each of these administration tasks.
Built-In Administration
ICM software maintains a database on each side of the Central Controller and a local database on each Distributor Admin Workstation. Each database consists of a group of interrelated tables. As you add or update data in the database, you must ensure that logical relationships are maintained. For example, if you delete a trunk group, you must not leave trunks in the database that reference that trunk group. If you do, the integrity of the database is broken.
Configuration Manager prevents you from making certain changes that disrupt the integrity of the data in the database. However, it cannot prevent all such changes. Usually, if data integrity in the local database is temporarily disrupted, no major problems occur. However, integrity problems in the central ICM database could cause errors in system processing.
Note
When support engineers install the ICM system, they perform integrity checks to make sure that the database is configured correctly. After that, the integrity of the central database is maintained by the ICM software. You do not need to manually check the integrity of the ICM central database. If you ever have a problem with data integrity in the central database, the problem is most likely a software problem that needs to be addressed by Customer Support.
Caution
Optional Administration
You can perform optional administration functions for ICM software such as manually checking data integrity in the local database, monitoring central database space, and viewing a Logger's event logs. These tasks are not required, but you may find them useful in situations when you need to check the system immediately.
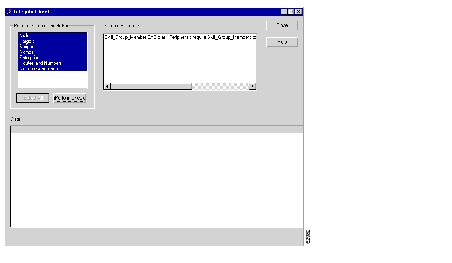
Checking Data Integrity in the Local Database
You can manually check the integrity of data in the local database. Configuration Manager provides a Check Integrity option under the Administer menu. Configuration Manager allows you to choose which checks you want to execute.
To check data integrity at any time:
Step 1
Step 2
Step 3
Step 4
Step 5
The specific data integrity check procedures are listed in Table 5-1.
For more information on the specific fields checked by these procedures, see the on-line help for the Configuration Manager tool.
Viewing Logger Events
You can view recent Logger activity by viewing the Logger's per-process log files. Per-process log files document events for the specific processes running on a computer. These files are useful in diagnosing problems with processes on the Logger (and on other nodes in the ICM system).
You can also view Logger event data in the central database. The Event Management System (EMS) logs events to the central database. You should be especially aware of Error and Warning events generated by the Logger. For example, ICM software logs a Warning event when the central database becomes 85 percent full. You can view this type of event data by using the Monitor ICM Event Viewer.
For more information on viewing the per-process log files and central database event data, see Chapter 7, "Event Management."
Database Networking Support
You can use the SQL Server Setup program to specify which network protocols the database manager supports. Named pipes are the default for Windows NT. You need not change this default.
For more information about database networking, see the Microsoft SQL Server System Administrator's Guide.
Performance Monitoring
When you install ICM software, ICM Setup installs a DLL and sets registry values that enable you to monitor ICM software through NT's Performance Monitor (perfmon.exe) utility. You can use this tool to monitor ICM software from the local machine or from a remote computer.
The Performance Monitor utility is a standard NT administrative tool. It graphically tracks one or more variables that you select. You can track variables related to the processor, memory, or various processes and services running on a machine. You can monitor the local machine or choose a remote machine to monitor.
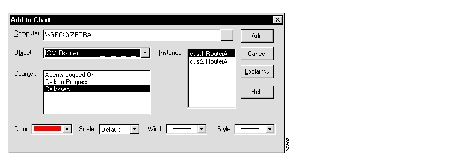
Start the Performance Monitor by double-clicking its icon or by choosing it through the Start menu. A blank performance chart appears.
From the Edit menu, choose Add to Chart. The Add to Chart dialog box appears:
If running from a remote computer, choose the ICM machine in the Computer field. In the Object field, choose ICM Router. The Instance field then lists all the instances running on the machine.
The Counter field displays the values that you can track:
•
•
•
Choose the instance and value to track and click the Add button to add it to the current chart.
Backup and Restore
A database or the NT registry can be lost or corrupted for several reasons; for example:
•
•
•
Because you cannot protect against all these conditions, you must have a backup strategy in place. This is especially important if you have a simplexed central database configuration. However, even for a duplexed system, you still need to perform backups to protect against software problems that corrupt both sides of the system.
NT Registry
Make a backup copy of the NT registry from each machine after you install the ICM software. Each time you make a change to the configuration on the machine, make a new backup copy.
To back up the NT registry:
Step 1
Step 2
Step 3
Step 4
If you need to reload the registry data from backup, run the Registry Editor and use the Import Registry File option on the Registry menu.
Note
Database
The following database backup strategies are commonly used:
•
•
•
Although the last two strategies might decrease system performance, they have the advantage of not requiring manual intervention. However, while these configurations protect against disk drive failure and bad media, they might not protect against some software errors.
In a simplexed database configuration, you need to ensure protection against all types of errors. It is recommended that you regularly back up the central database to Digital Audio Tape (DAT).
To perform a database backup, use the SQL Administrator tool provided with SQL Server.
Note
When you restore a database, you can only restore up to the last backup. Any transactions after that backup are lost. Therefore daily backups are recommended for simplexed systems.
Note
For information about developing a backup strategy, including the use of mirrored disks, see Microsoft's SQL Server System Administrator's Guide. For specific information about backing up a database using SQL Administrator, see Microsoft's SQL Administrator User's Guide.
Comparing Databases
For diagnostic purposes, you might want to check that two databases have the same data in a specific table. For example, you might want to check that the ICR_Locks table contains the same data on both sides of a Central Controller. The tool dbdiff.exe performs this type of check. Its syntax is as follows:
dbdiff database1.table@host1 database2.table@host2
For example:
dbdiff cust1_sideA.ICR_Locks@geoxyzlgra cust1_sideB.ICR_Locks@geoxyzlgrb
The batch script diffconfig.bat invokes dbdiff for various tables to automatically compare two ICM databases. Its syntax is as follows:
diffconfig database1 host1 database2 host2
For example:
diffconfig cust1_sideA geoxyzlgra cust1_sideB geoxyzlgrb
Resynchronizing Databases
It may occasionally be necessary to repair a corrupt Logger database on one side of a duplexed ICM by copying the Logger database from the other side. You can synchronize the databases using either the DOS Command window or the ICM Database Administration (ICMDBA) tool.
Synchronizing Databases from the Command Window
The following directions explain how to perform this copy from side A to side B for a customer named CustX.
To copy CustX database from Side A to Side B:
Step 1
Step 2
Step 3
install\syncloggers geoCustXlgrA CustX_SideA geoCustlgrB CustX_SideB
Step 4
When the command completes, you can restart the side B Logger.
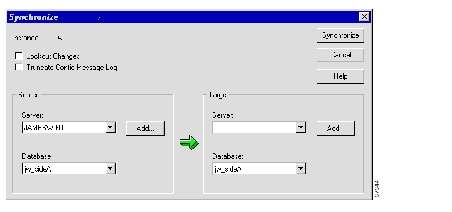
Synchronizing Databases with ICMDBA
To synchronize the data of two Logger databases:
Step 1
Step 2
Step 3
ICM Time Synchronization
This section describes the components that are involved in to keeping the time-of-day clocks synchronized across all machines that comprise an ICM system.
MDS
The MDS Synchronizer attempts to keep the system clocks of both sides of a duplexed system synchronized. The enabled Synchronizer is the time master, and the disabled Synchronizer is the time slave. The enabled Synchronizer supplies time messages every half-second to the synchronized application processes as well as to the disabled Synchronizer. To insulate applications against time discontinuities, the time supplied by the enabled Synchronizer is smoothed. If the system clock on the enabled side is changed, the enabled Synchronizer will supply time messages that appear to run 10% fast or slow (as needed) until the MDS time has converged with the system time.
The disabled Synchronizer receives time messages from the enabled Synchronizer every half second, and periodically compares the received time to the system time. In the event of a discrepancy greater than 100 milliseconds, the disabled Synchronizer uses NT system calls to run the system clock 10% fast or slow (as needed) until the discrepancy falls within tolerance. The net effect is that the systems clock on the disabled side smoothly tracks the MDS time, which in turn smoothly tracks the system clock on the enabled side.
MDS provides a "Set System Time" message API for setting the time. When MDS receives this message, the enabled Synchronizer sets the system time and the disabled Synchronizer does nothing (since it will track the clock of the enabled side.) The "Set System Time" message should be sent by a synchronous process (on both sides of the system), since it cannot be determined which Synchronizer is the enabled one.
VRU PIM
The VRU PIM supports a mechanism for keeping the VRU time synchronized with ICM time. The PIM periodically compares the time reported by the VRU to its own time, and sends a time adjustment message to the VRU if the times differ by more than about 15 seconds.
NAM/Customer ICM
In a Service Bureau installation, there can be multiple ICRP NICs running on the same machine (one per Customer ICM instance). However, only one of these NICs will be running on the ICM instance that is in control of the system clock, and only this NIC is able to affect the time on the CICM machine. This NIC will participate in time synchronization with the Network Applications Managers (NAMs).
While initializing, each ICRP NIC will query MDS to determine whether it can control the clock. Only one NIC on each machine will receive a positive response. This NIC will then periodically (every few hours) send an unsolicited "Time Indication" message to one member of each duplexed CIC pair. The time indication will include the NICs machine name and current time.
Each duplexed CIC pair may be configured to be a "Time Server", a "Time Client", or "Passive". A CIC that is passive with regard to time synchronization forwards all received time indications to the Routers for reporting purposes. A "Time Server" CIC additionally responds to each "Time Indication" message from an ICRP NIC with a "Set Time Request" message containing its own (MDS) time. (If the NIC and CIC reside on the same machine, as determined by the machine name in the "Time Indication" message, the CIC will not send a "Set Time Request" - this prevents the NAM and CICM from conflicting over control over the system clock.)
A "Time Client" CIC receives "Time Indication" messages and forwards them to the Routers for reporting purposes. In addition, a time client CIC may also receive "Set Time Request" messages. Upon receipt of a "Set Time Request" message, the CIC sends a "Set System Time" message to the Routers, which in turn send a "Set System Time" message to MDS. Participation of the Routers is required to ensure that the "Set System Time" message is delivered to MDS on both sides of the system.
Similar processing occurs when an ICRP NIC receives a "Set Time Indication" from a (time server) CIC: the NIC sends a "Set System Time" message to the Routers, and the Routers in turn send a "Set System Time" message to MDS on both sides of the system. In addition, the ICRP NIC forwards the "Set Time Indication" message to one member of each duplexed CIC pair other than the one from which the original message was received. This serves to keep multiple duplexed NAM pairs synchronized with each other.
CIC
The CIC can be configured with respect to time synchronization. A CIC configured to be a "Time Server" responds to a "Time Indication" message from an ICRP NIC with a "Set Time Request" message. A CIC configured to be a "Time Client" accepts "Set Time Request" messages from ICRP NICs and send a "Set System Time" message to the Router. All CICs forward CICM time indications to the Routers for reporting.
The CIC Time Manager Type key in the registry is
[HKEY_LOCAL_MACHINE\SOFTWARE\GeoTel\ICR\instanceName\ RouterA(B)\CIC\CurrentVersion\Configuration\CIC Time Manager Type]
To configure a CIC to be Time Server, set the type to 2. To configure a CIC to be Time Client, set the type to 1. Setting the Type to 0 will only forward Time Indications to the Router.Router
The Router attempts to keep the clocks of all controllers (NICs and PG's) synchronized with its own MDS time. It periodically queries each controller for its time. If the time discrepancy between the Router and controller is sufficiently large (15 seconds or more), the Router sends a time adjustment message to the controller instructing it to adjust its time by a delta value. The Router uses the round-trip delay of the query-response to account for transmission delay when computing the time adjustment.
Different controllers handle the time adjustment message in different ways. On a PG, OPC uses the MDS API to adjust the time of the (possibly duplexed) PG. An NT-based NIC (MCI, Sprint) ignores the time adjustment message, since adjusting the time on the Router machine could have unwanted feedback effects. A DOS-based NIC (ATT, BT) updates the system clock using a DOS function call.
The Router records the time skew of all controllers and peripherals and can report these statistics via rttest.
In addition, the Router can optionally be configured via the Registry to designate one peripheral (usually an ACD) as a reference time source. When the Router receives a time update from the named peripheral, it invokes the MDS "Set System Time" API to set the Router time. This effectively synchronizes the Routers and all controllers to the reference time provided by the ACD.
Logger
The Router attempts to keep Logger synchronized with its own Message Deliver Service (MDS) time. It periodically queries each Logger for its time. If the time discrepancy between the Router and Logger is 15 seconds or more, the Router sends a time adjustment message to the Logger instructing it to adjust its time by a delta value. The Logger then uses this delta value to adjust its time. The Router uses the round-trip delay of the query-response to account for transmission delay when computing the time adjustment.
![]()
![]()
![]()
![]()
![]()
![]()
![]()
![]()
Posted: Mon Dec 6 11:49:40 PST 2004
All contents are Copyright © 1992--2004 Cisco Systems, Inc. All rights reserved.
Important Notices and Privacy Statement.