|
|

Once you have finished with the Network Wizard and the Administrative Wizard, the Micro Webserver 200 is up and running. Now you are ready to complete the expert task of fine-tuning your Micro Webserver 200 using the Configuration Utility.
Topics included in this chapter are:
Start the Configuration Utility after you have installed the hardware and software as described in the preceding chapters of this guide. Make sure you use a Java-enabled Web Browser running on a Windows 95 (or Windows NT) PC or a workstation and that your Micro Webserver 200 and your PC or workstation are on the same subnet as your LAN.
Step 1 Start your Java-enabled Web browser (either Microsoft Internet Explorer or Netscape Navigator) as you normally would for your operating system.
Step 2 To open the home page of the server, enter either the IP address (if you have not entered your Micro Webserver 200 in a host file or a directory service such as DNS) or the server name of your Micro Webserver 200 in the proper field of your Web browser, and press Return.
For example, if the URL of your server is 192.168.0.0 and you are using Netscape Navigator, enter:
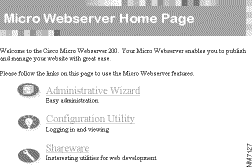
http://192.168.0.0Step 3 The Micro Webserver 200 Home Page appears.
Step 4 Click the Configuration Utility link as shown in Figure 5-1.
The main page of the Configuration Utility is divided into two panels: one is horizontal and one is vertical as shown in Figure 5-2. The vertical panel contains icons that represent major configuration categories for your Micro Webserver 200. The horizontal panel contains links to the minor settings for the currently selected major configuration categories that appear to the right of the vertical panel.

The Configuration Utility's six icons are as follows:
Each icon appears on the vertical panel, and related tab pages appear to the right of the vertical panel. The page usually contains one or more tables. For example, the first tab page associated with the Access icon is the Users tab (Figure 5-3). Each table on a tab page consists of rows and columns. Each row and/or column contains fields that you may be able to edit. To edit a field, use the scroll bar to the right of the table. Scroll down until you reach the last row, an empty row. Double-click the row, and type in your text. To edit a filled field in a table:
Step 1 Double-click the field.
Step 2 Delete the old text.
Step 3 Insert the new text.
Functions represented in the Configuration Utility's horizontal panel include:
Clicking the Access icon enables you to add, change, or remove users, as well as set the user's password and set the user's home directory. All information related to an individual user is saved in the Micro Webserver 200's database. The Access icon's tabs include the following:
First you must define users with the Users tab as shown in Figure 5-3.
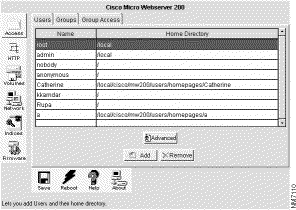
Step 1 With the scroll bar to the right of the table, scroll down until you reach the last row, an empty field.
Step 2 Double-click the field, and type in the user's name.
Step 3 Double-click the field next to the user's name (the Home Directory column), and type in the home directory path.
Step 4 Click the Add button. The user and home directory path are added.
Step 5 To save this configuration, click the Save icon.
You should now add more user information including the user's password:
Step 1 Click the Advanced button.
Step 2 Enter the user's real name and the user's password; the user's name and home directory will appear by default if you have already added the user.
Step 3 Re-enter the same password.
Step 4 Click the OK button.
Step 5 Click the Add button. The information is added to the user's profile.
Step 6 To save this configuration, click the Save icon.
Step 1 With the scroll bar to the right of the table, scroll down until you reach the row containing the user's name.
Step 2 Double-click the field, and select the user's name from the Name column.
Step 3 Click the Remove button. The user is deleted from the configuration.
Step 4 To save this configuration, click the Save icon.
To change user information:
Step 1 With the scroll bar to the right of the table, scroll down until you reach the row containing the user's name.
Step 2 Double-click the field, and select the user's name from the Name column.
Step 3 Click the Advanced button.
Step 4 Delete the old information.
Step 5 Enter the new information.
Step 6 Click the OK button.
Step 7 Click the Add button. The information is changed on the user's profile.
Step 8 To save this configuration, click the Save icon.
Three tables comprise the Groups tab page: the Groups table, the Users table, and the Users-in-Groups table. You must define groups using the Groups table. Groups are generally a collection of users that share a common need for services from the Micro Webserver 200.
Step 1 Scroll down the Groups table using the scroll bar to the left of the table.
Step 2 Double-click an empty field, and type in the new group's name.
Step 3 Click the Add button. The new group is added to the Groups table.
Step 4 To add users to this group (or an existing group), go to the Users table.
Step 5 Scroll down the Users table until you reach the name of the user you want to add.
Step 6 Click the name of the user you want to add to the newly created group (or an existing group).
Step 7 Click the Add button. The new user is added to the new group (or the existing group).
Step 8 To save this configuration, click the Save icon.
Step 1 Select a Group from the Groups table. All current Group members in the Users table will appear in the Users in Group table. This is the same list of users that is contained in the Access icon's Users tab page.
Step 2 Select a user(s) name(s) from the Users table.
Step 3 Click the Add button. The selected user(s) is (are) added to the selected Users in Group table.
Step 4 To save this configuration, click the Save icon.
If you remove a group from the system, all users belonging to that group must belong to at least one other group, so that after you remove a group all users still belong to at least one group.
Step 1 Select a Group from the Groups table. All current Group members in the Users table will appear in the Users in Groups table. This is the same list of users contained in the Names column of the Access icon's Users tab page.
Step 2 Decide which user you want to remove from the Users in Groups table.
Step 3 Click the Remove button to remove the user(s).
Step 4 To save this configuration, click the Save icon.
Step 1 Select the group you want to remove from the Groups table.
Step 2 Click the Remove button to remove the group.
Step 3 To save this configuration, click the Save icon.
Group access privileges for a particular directory path or file may be allowed or denied using the Group Access tab as shown in Figure 5-4. Groups and users must have been defined using the preceding tab, Groups.
The Directory/File field must contain the path to the particular directory path or file for which you want to set permissions. Type in the directory path, or select the path using the Browse button. The latter method forces you to select an existing path. After you enter a directory/file name, the corresponding access controls, or permissions, will appear. The ownership and access control components from the user interface are filled in regardless of whether the ownership and access control are inherited from the path's nearest ancestor or has already been specifically assigned to the path. Knowing the user and the group that currently owns the directory path and/or the files will enable you to further add, remove, or change the existing permissions.
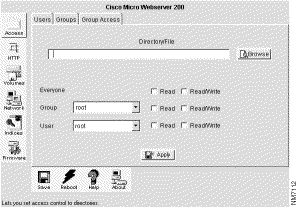
Table 5-1 explains the different levels of access necessary for three different types of Web sites: private, departmental, and public. Each publisher/reader scheme must have its permissions (or access controls) set properly for the proper set of publishers and readers.
Permissions are set at three different levels in your Micro Webserver 200:
The Micro Webserver 200 provides two permission parameters:
If you would like to create a Web site other than the three listed in Table 5-1, you must add new access controls (or permissions) for root, volume, and document root.
Ownership of a file or directory allows the user to change permissions for the file or directory.
Step 1 Enter the directory path of the directory or file for which you are setting ownership in the Directory/File field, or click the Browse button to locate it. (The current settings display.)
Step 2 Select the group or user from the pull-down Groups or Users tables.
Step 3 Check the Read and Read/Write checkboxes.
Step 4 Click the Apply button.
Step 5 To save this configuration, click the Save icon.
Step 1 Enter the directory path of the directory or file for which you are changing access in the Directory/File field, or click the Browse button to locate it. (The current settings display.)
Step 2 Check the Read and Read/Write checkboxes.
Step 3 Click the Apply button.
Step 4 To save this configuration, click the Save icon.
Step 1 Enter the directory path of the directory for which you are setting the access in the Directory/File field, or click the Browse button to locate the directory.
Step 2 Select the group or user that you want to access this directory path from the Groups or Users tables.
Step 3 Select the appropriate Group or User.
Step 4 Check the Read and Read/Write checkboxes.
Step 5 Click the Apply button.
Step 6 To save this configuration, click the Save icon.
Selecting the HTTP icon enables you to add and remove individual file extensions in the Search Order for Index Files table. The search will occur in the order in which you list your files, from top to bottom.
When you browse a particular URL, the Web browser searches for particular files to automatically load as shown in Figure 5-5. These files are called index files. Typical index files are: home.html, home.htm, index.html, index.htm, default.html, or default.htm. Using the Index Files tab, you can change the existing order of the files if you want to re-order the search engine's search order.
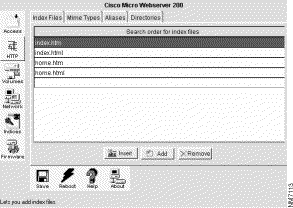
Step 1 If you want to specify index files other than those listed by default, double-click an empty row in the table.
Step 2 Type in the new filename.
Step 3 Click the Add button. The filename is added to the Index table.
Step 4 To save this configuration, click the Save icon.
If you want to delete an index file:
Step 1 Double-click the row that contains the index file you want to remove.
Step 2 Click the Remove button. The filename is deleted from the path.
Step 3 To save this configuration, click the Save icon.
Click the Insert button to change the order of the filenames, and therefore, the search order. You may insert a new row in between two rows, or add a row to the end of the row of filenames.
When the Micro Webserver 200 transmits a document to the Web browser, it sends a Multipurpose Internet Mail Extensions (MIME) type that tells the browser how to process the document according to its data type and form. See Figure 5-6. A filename without an extension cannot locate its extension, so you must first assign an extension to the file. Then you must assign a MIME type to the filename extension, and finally, map the extension to an icon.
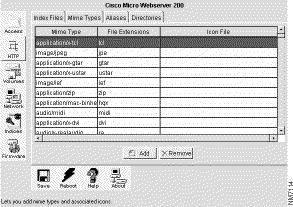
You can specify a filename extension to associate with specific files.
Step 1 Scroll down the File Extensions column using the scroll bar to the right of the table.
Step 2 Double-click an empty field.
Step 3 Type in the complete filename extension you want to add.
Step 4 Click the Add button to add the extension.
Step 5 To save this configuration, click the Save icon.
You can specify a MIME type to associate with a specific filename extension.
Step 1 Scroll down the MIME Type column using the scroll bar to the right of the table.
Step 2 Double-click an empty field.
Step 3 Type in the complete MIME type you want to map to a filename extension.
Step 4 Click the Add button to add the mapping.
Step 5 To save this configuration, click the Save icon.
You can specify an icon file to associate with a MIME type.
Step 1 Scroll down the Icon File column using the scroll bar to the right of the table.
Step 2 Double-click an empty field.
Step 3 Type in the complete icon filename of the file you want to add.
Step 4 Click the Add button to add the mapping.
Step 5 To save this configuration, click the Save icon.
You can remove an existing MIME type.
Step 1 Select an existing Mime Type map from the Mime Type column.
Step 2 Select the Mime Type map.
Step 3 Click the Remove button to delete the mapping.
Step 4 To save this configuration, click the Save icon at the bottom of the column.
You can remove an existing filename extension associated with specific files.
Step 1 Select the existing complete filename extension you want to remove from the File Extensions column.
Step 2 Click the Remove button to delete the filename extension.
Step 3 To save this configuration, click the Save icon.
You can remove an existing icon file.
Step 1 Select an existing icon file from the Icon File column.
Step 2 Click the Remove button to delete the icon file.
Step 3 To save this configuration, click the Save icon.
An alias is an alternative label for a URL, directory path, or file. To create an alias for an often-used directory, use the table under the Aliases tab. The table contains two columns: URL and Directory/File as shown in Figure 5-7.
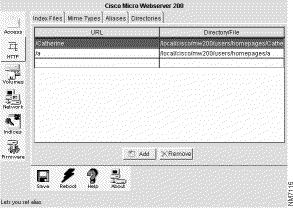
Step 1 Double-click a blank field in the URL column.
Step 2 Type in your alias.
Step 3 Double-click the corresponding blank field in the Directory/File column.
Step 4 Enter the complete directory path of the path for which you want to create an alias.
Step 5 Click the Add button to add the mapping to the Alias table.
Step 6 To save this configuration, click the Save icon.
Step 1 Double-click the URL you want to remove in the URL column.
Step 2 Delete the alias.
Step 3 Double-click the corresponding blank field in the Directory/File column.
Step 4 Delete the complete directory path of the path for which you want to create an alias.
Step 5 Click the Remove button to delete the mapping from the Alias table.
Step 6 To save this configuration, click the Save icon.
The directory structure on the Micro Webserver 200 is separated into two parts as shown in Figure 5-8.
1. Management URL Root. The Management URL Root contains mostly system and support files. Its default location is /local/cisco/mw200.
2. Document Root. The Document Root (doc root) directory contains all document files, including the default home pages for the administrator and the user. Its default location is /local/cisco/mw200. The Micro Webserver 200 prepends the doc root to all requested URLs.
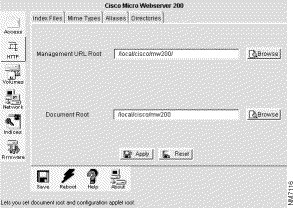
Step 1 Double-click the edit field and delete the old Document Root.
Step 2 Type in the new Document Root, or click the Browse button to select the new Document Root.
Step 3 Click the Apply button.
Step 4 To save this configuration, click the Save icon.
Step 1 Double-click the edit field and delete the old Management URL Root.
Step 2 Type in the new Management URL Root, or click the Browse button to select the new Management URL Root.
Step 3 Click the Apply button.
Step 4 To save this configuration, click the Save icon.
The Volumes icon allows you to format a disk volume and name a disk volume.
The Micro Webserver 200 supports 1 internal hard drive and up to 6 SCSI devices such as ZIP drives, external CD-ROM drives, and external hard disk drives. The unit supports one volume per device, and you may add or change labels for externally writable media, such as a ZIP drive, external CD-ROM drive, or external hard disk drive.
Click the Format button to format your Micro Webserver 200's hard drive.
Step 1 Enter a name in the Label edit field.
Step 2 Click the Label button.
Step 3 Click the Save icon.
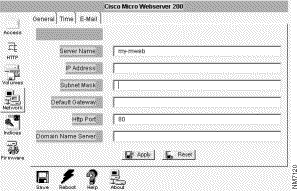
Selecting the Network icon displays information configured by the Network Wizard.
The General tab contains system-specific information for your Micro Webserver 200.
Step 1 To change any information, click the Reset button.
Step 2 Fill in the new information in the text fields next to the field's name.
Step 3 Click the Apply button.
Step 4 To save this configuration, click the Save icon.
Step 5 If you change the IP address or the DNS, the Reboot icon will flash indicating you must reboot your Micro Webserver 200.
The Time tab allows you to set the proper date and time for the Micro Webserver 200. See Figure 5-9. The time appears in directory listings and is used to record the time a file has been created or modified. Your Micro Webserver 200 will aim to set its time according to your site's network using the Network Time Protocol (NTP). This method is preferred by most users because NTP servers are very accurate.
If you cannot set the Micro Webserver 200's time from your site's network, you will need to set the time as follows:
Step 1 To change any information, click the Reset button.
Step 2 Fill in the new information.
Step 3 Click the Apply button.
Step 4 To save this configuration, click the Save icon.
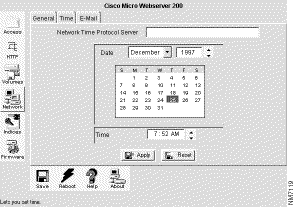
The E-mail tab allows the administrator to connect the Micro Webserver 200 to an e-mail server. See Figure 5-10.
Step 1 To change existing information, click the Reset button.
Step 2 Type in the Micro Webserver 200 administrator's e-mail name.
Step 3 Type in the Micro Webserver 200 administrator's e-mail server name.
Step 4 Type in the Micro Webserver 200 administrator's domain name.
Step 5 Click the Apply button.
Step 6 To save this configuration, click the Save icon.
The search engine will regenerate the source index files on the time and day you specify in the Indices icon's Administrative and Scheduling tab pages.
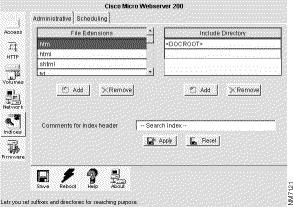
For a search engine to search your Web site, you must indicate the type of files you want the engine to search for and indicate the directories you want to include in the search. See Figure 5-11.
Step 1 Double-click an empty field in the File Extensions table.
Step 2 Type in the new filename extension.
Step 3 Click the Add button.
Step 4 To save this configuration, click the Save icon.
Step 1 Double-click an empty field in the Directory table.
Step 2 Type in the directory path.
Step 3 Click the Add button.
Step 4 To save this configuration, click the Save icon.
Step 1 Click the field containing the filename extension you want to remove in the File Extensions table.
Step 2 Click the Remove button.
Step 3 To save this configuration, click the Save icon.
Step 1 Click the field containing the directory path you want to remove in the Directory table.
Step 2 Click the Remove button.
Step 3 Click the Apply button.
Step 4 To save this configuration, click the Save icon.
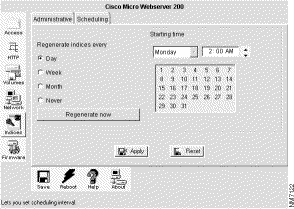
After you decide upon a schedule for regenerating the search engine index source files, you can use the Scheduling tab as shown in Figure 5-12 to automatically update the files.
Step 1 To change existing information, click the Reset button.
Step 2 Regenerate the index by selecting:
If you choose Regenerate now or Never, skip Step 3.
Step 3 Select the starting day, time, and date.
Step 4 Click the Apply button.
Step 5 To save this configuration, click the Save icon.
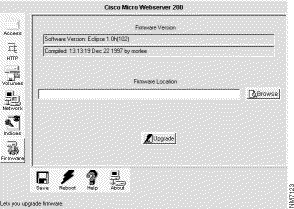
You can click the Firmware icon as shown in Figure 5-13 to update the firmware version.
Step 1 Download the latest software to the server you are upgrading using an FTP client.
Step 2 Log in to the Micro Webserver 200 using the Configuration Utility.
Step 3 Click the Firmware icon.
Step 4 Enter the filename with the complete path of the .bin file containing the latest firmware in the Firmware Location field.
You can also browse this field by clicking Browse.
Step 5 Click the Upgrade button.
The firmware in the source file loads to the NVRAM in the Micro Webserver 200.
Step 6 The Reboot icon will flash. Click the Reboot icon to reboot your Micro Webserver 200.
 | Warning If you lose power during the upgrade or if the upgrade fails, contact Cisco Systems, Inc. for technical support. |
![]()
![]()
![]()
![]()
![]()
![]()
![]()
![]()
Posted: Tue Dec 17 19:19:40 PST 2002
All contents are Copyright © 1992--2002 Cisco Systems, Inc. All rights reserved.
Important Notices and Privacy Statement.