|
|

This chapter describes how to configure and administer the Micro Webserver. Use this chapter after you have installed the hardware and software and verified that everything is functioning.
Topics included in this chapter are:
Step 1 Using your browser, enter the URL (either the IP address or the server name) of the Micro Webserver in the Location field. The Home Page appears.
Step 2 Select the configure icon. The Login tab appears: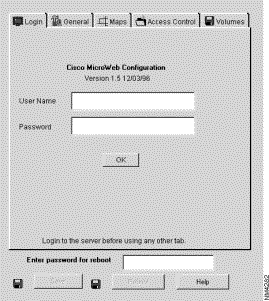
Step 3 Enter your username in the User Name field. Use root or supervisor without a password.
Step 4 If you have set a password, enter it in the Password field.
Step 5 Click OK to complete the login.
If you successfully completed the instructions in the section "Quickly Installing Micro Webserver" in chapter 2, the Micro Webserver is functional. This chapter helps you to configure it to be a functioning network server.
The General tabs let you set several general specifications for the Micro Webserver. Topics included in this section are:
Step 1 Using your browser, log into the configuration application as described in the section, "Logging into the Server".
Step 2 Select the General tab. The General Settings tabs appear.
Step 3 Select the Basic tab. The Basic tab appears: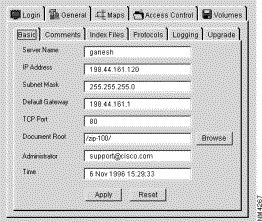
Step 4 Enter the new IP address in the IP Address field.
Step 5 Click Apply to change the IP address. To save this configuration, click Save at the bottom of the frame.
The following table summarizes the fields you can set using this tab:
| Field | Description |
|---|---|
Server Name | Enter the server name that you wish to apply to Micro Webserver. |
IP address | Enter the IP address that you wish to set Micro Webserver. |
Subnet Mask | Enter the subnet mask that you wish to apply to Micro Webserver. |
TCP Port | Enter the TCP Port if you are using a non-standard TCP port number. |
Document Root | Enter the directory or URL of the root document here. You can browse to find it by clicking the Browse button. |
Administrator | Enter the Email address of the system administrator. |
Save Button | The diskette icon next to this button flashes red if you make changes that require you to save the current configuration. Click this button if the icon is flashing red if you want to save the changes made. |
Reboot Button | The diskette icon next to this button flashes red if you make changes that require you to reboot the server for the changes to apply. Click this button if the icon is flashing red if you want to apply and save the changes made. |
Help Button | Click this button to view the online help system. |
Step 1 Select the General tab. The General Settings tabs appear.
Step 2 Select the Basic tab. The Basic tab appears:
Step 3 Enter the server name in the Server Name field.
Step 4 Click Apply. The server name changes for the current session. To save this configuration, click Save at the bottom of the frame.
Micro Webserver prepends the document root to all requested URLs. Only files in the directory under the document root are available to browser users.
Step 1 Using your browser, log into the configuration application as described in "Logging in to the Server". Select the General tab. The General Settings tabs appear.
Step 2 Select the Basic tab. The Basic tab appears:
Step 3 Enter the document root name in Document Root field. You can also click Browse to browse for the document root location.
Step 4 Click Apply. The document root location changes for the current session. To save this configuration, click Save at the bottom of the frame.
Step 1 Using your browser, log into the configuration application as described in the section, "Logging in to the Server".
Step 2 Select the General tab. The General Settings tabs appear.
Step 3 Select the Basic tab. The Basic tab appears:
Step 4 Enter the HTTP TCP port number in the TCP Port field (default is 80).
Step 5 Click Apply.
Step 6 Reboot the server by clicking Reboot.
Step 1 Using your browser, log into the configuration application as described in the section, "Logging in to the Server".
Step 2 Select the General tab. The General Settings tabs appear.
Step 3 Select the Basic tab. The Basic tab appears:
Step 4 Enter the System Administrator's email address in the Administrator field.
Step 5 Click Apply. The email address changes for the current session. To save this configuration, select Save at the bottom of the frame.
The ZIP drive media that comes preformatted with the Micro Webserver uses 8K clusters. Media that you purchase (if it is preformatted for PCs) uses 2K clusters. You can still read and write media that is formatted on a PC-compatible workstation; however, there will be an approximate performance degradation of 40%. For this reason, it is important to reformat any media using your Micro Webserver.
 | Caution Do not reformat the configuration ZIP media supplied with your Micro Webserver as it contains important files that are essential for configuring and operating your Micro Webserver. |
Step 1 Insert the ZIP media that you want to format into the Micro Webserver ZIP drive.
Step 2 From the Micro Webserver home page, select configure. The Login tab appears.
Step 3 Log into the server (if you have not already done so) as described in the section, "Logging into the Server".
Step 4 Select the Volumes tab. The Volumes tab appears: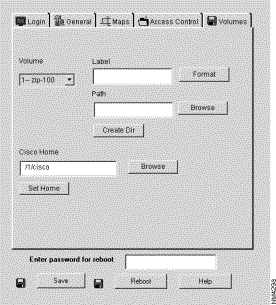
Step 5 Select the Volume you want to format from the Volume drop-down list.
Step 6 Enter a new volume name in the Label field. The volume name must start with a character from A-Z and may have from 1-8 characters. It may not contain spaces.
Step 7 Click Format. The media is formatted with 8K clusters and is now ready to use in your Micro Webserver.
Step 1 From the Micro Webserver home page, select Configure. The Login tab appears.
Step 2 Log into the server (if you have not already done so) as described in the section, "Logging into the Server".
Step 3 Select the Volumes tab. The Volumes tab appears:
Step 4 Select the Volume you want to format from the Volume drop-down list.
Step 5 Enter a new volume name in the Label field. The volume name must start with a character from A-Z and may have from 1-8 characters. It may not contain spaces.
Step 6 Click Format. The media is formatted with 8K clusters and is now ready to use with your Micro Webserver.
You can use the configuration utility to create directories on any read/write media supported by the Micro Webserver:
Step 1 From the Micro Webserver home page, select configure. The Login tab appears:
Step 2 Log into the server (if you have not already done so) as described in the section, "Logging into the Server".
Step 3 Select the Volumes tab. The Volumes tab appears:
Step 4 Select the Volume where you want to create a directory from the Volume drop-down list.
Step 5 Enter the path that you want to create in the Path field. You can browse to find the parent path by clicking Browse and append the new directory onto the path name in the Path field.
Step 6 Click Create Dir to create the directory.
You may want to change the home page file that is accessed when the Micro Webserver is first accessed. The default home page path is /1/Cisco. You can change this path to identify a directory where your site-specific server home page is located. For example, if you are using a SCSI drive, the performance is significantly faster if you put the home page on the SCSI drive.
Step 1 Create a new directory for the home page such as /1/serverhome.
Step 2 Copy the new server home page (index.html) to the Micro Webserver to /1/serverhome.
Step 3 From the Micro Webserver home page, select configure. The Login tab appears.
Step 4 Log into the server (if you have not already done so) as described in the section, "Logging into the Server".
Step 5 Select the Volumes tab. The Volumes tab appears:
Step 6 Select the Volume where the Cisco Home Page resides from the Volume drop-down list.
Step 7 Enter the path (/1/serverhome) for the Cisco Home Page in the Cisco Home field. You can also browse to locate the path by clicking Browse.
Step 8 Save the configuration by clicking Save at the bottom of the frame.
This section describes how to administer the Micro Webserver once it is functioning correctly. Topics described in this section include:
You can add or change comments to paths so that users can see the comments when they view the paths:
Step 1 Select the General tab. The General Settings tabs appear.
Step 2 Select the Comments tab. The Comments tab appears: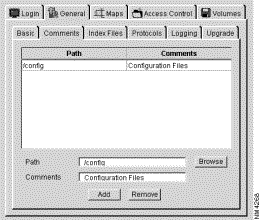
Step 3 Enter the path you want to attach a comment to in the Path field. You can also browse to locate this path by clicking Browse.
Step 4 Enter the comment that you want the user to see in the Comments field.
Step 5 Click Add. The comment is added to the Path/Comment table. To save this configuration, click Save at the bottom of the frame.
Step 1 Select the General tab. The General Settings tabs appear.
Step 2 Select the Comments tab. The Comments tab appears:
Step 3 Select the comment that you want to delete from the Path/Comments table.
Step 4 Click Remove. The comment is removed from the Path/Comments table. To save this configuration, click Save at the bottom of the frame.
When a user browses a particular URL, the browser searches for particular files in that path to automatically load. These files are called index files. Typical index files are: home.html, home.htm, index.html, and index.htm. If you want to specify any other index files than those listed, enter them in the Directory table of the Index Files tab:
Step 1 Select the General tab. The General Settings tabs appear.
Step 2 Select the Index Files tab. The Index Files tab appears: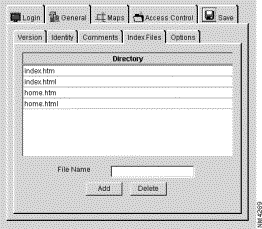
Step 3 Enter the Index file name you want to add in the File Name field.
Step 4 Click Add. The file name is added to the Directory table.
Step 1 Select the General tab. The General Settings tabs appear.
Step 2 Select the Index Files tab. The Index Files tab appears:
Step 3 Select the Index file name you want to delete from the Directory table.
Step 4 Click Delete. The file name is deleted from the Directory table.
By default, the Micro Webserver has all supported Protocols enabled. You may want to disable certain protocols either to protect your server from people trying to access it using specific protocols, or to disable the protocols while reconfiguring the server.
Step 1 Select the General tab. The General Settings tabs appear.
Step 2 Select the Protocols tab. The Protocol tabs appears: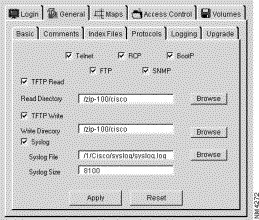
Step 3 Clear the check boxes to disable the corresponding protocol.
Step 4 Check the check boxes to enable the corresponding protocol.
Step 5 Click Apply to apply the changes.
The Logging Options allow you to keep track of and record file access in access log files and events in event log files. This is helpful for tracking problems on the network and identifying potential security violations.
Step 1 Using your browser, log into the configuration application as described in the section, "Logging in to the Server".
Step 2 Select the General tab. The General tabs appear.
Step 3 Select the Logging tab. The Logging tab appears: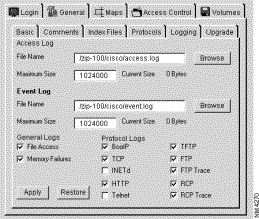
Step 4 Enter the directory where you want to store the event log files in the File Name field in the Event Log group. You can click Browse to browse for the location as well.
Step 5 Check the File Access box in the General Logs group to log when users access the server. Enter the directory where you want to store the access log files in the File Name field in the Access Log group. You can click Browse to browse for the location as well.
Step 6 If you want to log when the server encounters a memory allocation failure, check the Memory Failures box in the General Logs group. This will help you to track situations that cause memory allocation failures.
Step 7 Check the File Access box to enable access logging.
Step 8 Check the protocols you want logged in the Protocol Logs group.
Step 9 Click Apply. To reset the options to the state they were in when you entered the tab, click Restore. To save this configuration, select Save at the bottom of the frame.
This section describes how to redirect or map requested documents, content, or icons. Topics in this section are:
When the Micro Webserver receives a request for a document, it can redirect that request to any file you specify using the Document Mapping tab.
Step 1 Using your browser, log into the configuration application as described In the section, "Logging in to the Server".
Step 2 Select the Maps tab. The Maps tabs appear.
Step 3 Select the Document Map tab. The Document Map tab appears: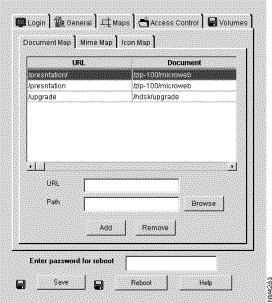
Step 4 Enter the URL of the document that you want to map in the URL field.
Step 5 Enter the path and filename that you want to map to the URL in the Path field. You can browse to find the file by selecting Browse.
Step 6 Click Add to add the URL to filename mapping to the URL/Document table. To save this configuration, click Save at the bottom of the frame.
Step 1 Using your browser, log into the configuration application as described in the section, "Logging in to the Server".
Step 2 Select the Maps tab. The Maps tabs appear.
Step 3 Select the Document Map tab. The Document Map tab appears:
Step 4 Select the existing mapping from the URL/Document Map table.
Step 5 Click Remove to delete the URL to filename mapping from the URL/Document Map table. To save this configuration, click Save at the bottom of the frame.
When the Micro Webserver transmits a document to the browser, it sends a mime type that the browser how to process the document. You can configure the mime type that is transmitted based on the file path using the Mime Map tab.
Step 1 Using your browser, log into the configuration application as described in the section, "Logging in to the Server".
Step 2 Select the Maps tab. The Maps tabs appear.
Step 3 Select the Mime Map tab. The Mime Map tab appears: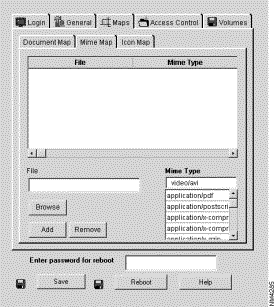
Step 4 Enter the complete filename of the file you want to map in the File field. You can also browse for the filename by clicking Browse.
Step 5 Select a content Mime type from the Mime Type list.
Step 6 Click Add to add the mapping to the File/Mime Type table. To save this configuration, click Save at the bottom of the frame.
Step 1 Using your browser, log into the configuration application as described in the section, "Logging in to the Server".
Step 2 Select the Maps tab. The Maps tabs appear.
Step 3 Select the Mime Map tab. The Mime Map tab appears:
Step 4 Select the existing mapping from the File/Mime Type table.
Step 5 Click Remove to delete the mapping from the File/Mime Type table. To save this configuration, click Save at the bottom of the frame.
You can specify an icon to associate with specific file types using the Icon Map tab.
Step 1 Using your browser, log into the configuration application as described in the section, "Logging in to the Server".
Step 2 Select the Maps tab. The Maps tabs appear.
Step 3 Select the Icon Map tab. The Icon Map tab appears: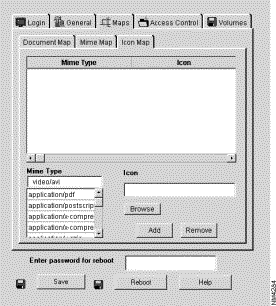
Step 4 Select a content Mime type from the Mime Type list.
Step 5 Enter the complete filename of the icon file you want to map in the Icon field. You can also browse for the filename by clicking Browse.
Step 6 Click Add to add the mapping to the Mime Type/Icon table. To save this configuration, click Save at the bottom of the frame.
Step 1 Using your browser, log into the configuration application as described in the section, "Logging in to the Server".
Step 2 Select the Maps tab. The Maps tabs appear.
Step 3 Select the Icon Map tab. The Icon Map tab appears:
Step 4 Select the existing mapping from the Mime Type/Icon table.
Step 5 Click Remove to delete the mapping from the Mime Type/Icon table.
Often, you want to be able to define users groups that share a common level of access or a common resource that they access. This section describes:
Step 1 Using your browser, log into the configuration application as described in the section, "Logging in to the Server".
Step 2 Select the Access Control tab. The Access Control tabs appear.
Step 3 Select the Users tab. The Users tab appears: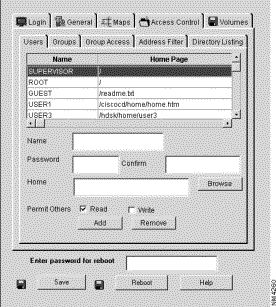
Step 4 Enter the Name of the user in the Name field.
Step 5 Enter an initial password for the user in the Password field.
Step 6 Enter the same initial password in the Confirm field.
Step 7 Select a home directory the user views when they access the server by entering a path in the Home field. You can also click Browse to browse for the home page.
Step 8 Click Add. The new user and home page are added to the list. To save this configuration, click Save at the bottom of the frame.
Step 1 Using your browser, log into the configuration application as described in the section, "Logging in to the Server".
Step 2 Select the Access Control tab. The Access Control tabs appear.
Step 3 Select the Users tab. The Users tab appears:
Step 4 Enter the Name of the user in the Name field.
Step 5 Enter a new password for the user in the Password field.
Step 6 Enter the same password in the Confirm field.
Step 7 Click Add. The new password is now set for the user. To save this configuration, click Save at the bottom of the frame.
Step 1 Using your browser, log into the configuration application as described in the section, "Logging in to the Server".
Step 2 Select the Access Control tab. The Access Control tabs appear.
Step 3 Select the Groups Access tab. The Groups Access tab appears: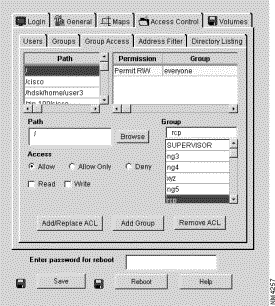
Step 4 Enter the name of the new group in the Group field.
Step 5 Click Add Group. The new group is added to the list. To save this configuration, click Save at the bottom of the frame.
Step 1 Using your browser, log into the configuration application as described in the section, "Logging in to the Server".
Step 2 Select the Access Control tab. The Access Control tabs appear.
Step 3 Select the Groups tab. The Groups tab appears: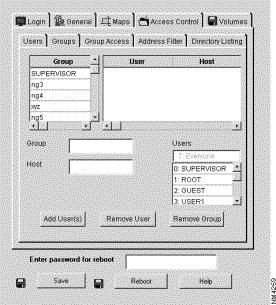
Step 4 Select the user you want to remove from the Users list.
Step 5 Click Remove User to remove the user from the Users list. To save this configuration, click Save at the bottom of the frame.
You can set a specific home page for each user that accesses the server. This is useful for allocating specific resources for different users. To set a home page for a user:
Step 1 Using your browser, log into the configuration application as described in the section, "Logging in to the Server".
Step 2 Select the Access Control tab. The Access Control tabs appear.
Step 3 Select the Users tab. The Users tab appears:
Step 4 Enter the name of the user you want to set a home page for in the Name field.
Step 5 Enter the home page in the Home field or click Browse to locate it.
Step 6 Click Add. Notice the Home Page column in the Name/Home Page table reflects the change. To save this configuration, click Save at the bottom of the frame.
Step 1 Using your browser, log into the configuration application as described in the section, "Logging in to the Server".
Step 2 Select the Access Control tab. The Access Control tabs appear.
Step 3 Select the Groups tab. The Groups tab appears:
Step 4 Select the group you want to remove from the Group list.
Step 5 Click Remove Group to remove the group. To save this configuration, click Save at the bottom of the frame.
This section describes how to allow or deny access to groups or individual users. Topics include:
Step 1 Using your browser, log into the configuration application as described in the section, "Logging in to the Server".
Step 2 Select the Access Control tab. The Access Control tab appears.
Step 3 Select the Group Access tab. The Group Access tab appears:
Step 4 Enter the path of the resource you are setting the access for in the Path field.
Step 5 Select the groups that you want to allow to access this path from the Group list.
Step 6 Select the appropriate Access group radio button and check the Read or Write check boxes that you want to apply to the group for the resource. Selecting the Allow Only radio button allows only the specified group access and restricts all other groups from accessing the path. If two different groups are given allow only access to the same path, the conflict may cause no one to be able to get access to the path.
Step 1 Using your browser, log into the configuration application as described in the section, "Logging in to the Server".
Step 2 Select the Access Control tab. The Access Control tabs appear.
Step 3 Select the Group Access tab. The Group Access tab appears:
Step 4 Select the Access you want to remove from the Path and Permission/Group tables.
Step 5 Click Remove ACL. Notice it has been deleted from the Path and Permission/Group tables. To save this configuration, click Save at the bottom of the frame.
If you make changes that require you to reboot the server, the diskette icon next to the Reboot button will be flashing red. To reboot the server, use the following procedure:
Step 1 Enter your password in the Enter Password for Reboot field.
Step 2 Click Reboot. The server reboots.
The Micro Webserver allows you to update the system firmware even from a remote location. To update the firmware:
Step 1 Download the latest software to the server you are upgrading using the System Load Utility or an FTP client.
Step 2 Log into the server using the Login tab.
Step 3 Select the General tab. The General tabs appear.
Step 4 Select the Upgrade tab. The Upgrade tab appears: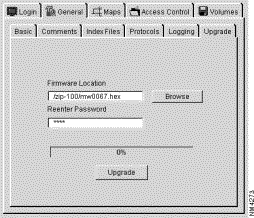
Step 5 Enter the filename with the complete path of the .HEX file containing the latest firmware in the Firmware Location field. You can also browse to locate this file by clicking Browse.
Step 6 Enter you password in the Reenter Password field.
Step 7 Click OK. The firmware in the source file loads to the NVRAM in the Micro Webserver.
The Flash Update Program (FLUP) in the Micro Webserver is compatible with the TFTP client available on many UNIX systems. The following procedure works for BSD UNIX; consult your system manuals for local command variations.
Step 1 Transfer the Micro Webserver flash update program file to your UNIX system, calling it MWUPDATE.HEX.
Step 2 Place the Micro Webserver in Flash Update Mode by using a Telnet client to log into the Micro Webserver (host name = mywebserver):
% telnet mywebserver
Cisco Micro Webserver ....
... login:
Step 3 Log in as root:
... login:root
Step 4 At the Micro Webserver prompt, type the command:
.../ # diag l t
This command immediately places the server into flash update mode; the Telnet connection is now disconnected (it will not respond to the command).
Step 5 Enter the Telnet escape character, control+], then enter close and press the Enter key.
Step 6 Use TFTP to transfer the system image to the Micro Webserver:
At the UNIX prompt, enter the TFTP command:
% tftp mywebserver
tftp> bin
tftp> put MWUPDATE.HEX
The file MWUPDATE.HEX is transferred to the server for updating. After the TFTP transfer completes, wait until the Micro Webserver reboots (it takes no more than 90 seconds). During this interval, the server is updating its NVRAM. Do not power off the Micro Webserver at this time.
Step 7 Terminate the TFTP command:
tftp> quit
Step 8 Verify that the upgrade has been installed by connecting with Telnet and examining the login banner.
![]()
![]()
![]()
![]()
![]()
![]()
![]()
![]()
Posted: Tue Dec 17 19:23:49 PST 2002
All contents are Copyright © 1992--2002 Cisco Systems, Inc. All rights reserved.
Important Notices and Privacy Statement.