|
|

This chapter describes how to use your Micro Webserver once it is properly installed and configured. Topics in this chapter include:
Once the server is properly functioning, you can use your Web browser to browse it as you would any other Web server.
Step 1 Run your browser as you normally would for your operating system.
Step 2 To open the home page of the server, enter the IP address in the URL, Location, Goto, Open or Netsite field (depending on your browser type and version) and press Enter. For example, if the URL of your server is 192.168.0.0 and you are using Netscape Navigator, the display appears as: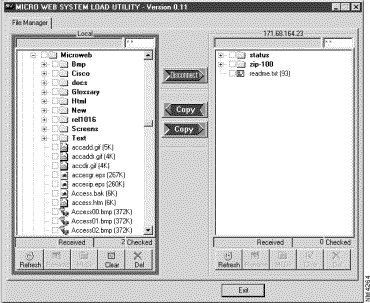
The Micro Webserver Home Page appears.
Step 3 You can now browse the file structure as you normally would. If you select files with an .html or .txt extension, they appear in the document windows. If you select files with any other extension, the browser's FTP client will allow you to save the file to your local drive:
Step 4 Enter the file name and type as desired in the appropriate fields and click Save.
The Micro Webserver has its own file transfer and management utility called the File Transfer Utility.This program runs under Windows 95 and Windows NT 4.x only. If you are running any other operating system, you must use a native FTP client (such as Fetch on the Macintosh). You can access the File Transfer Utility from the Cisco home page or the Cisco Micro Webserver program group on the Start menu. Topics in this section include:
Step 1 Run the File Transfer Utility by selecting it from the Start menu or selecting it from the Micro Webserver Home Page. The main window of the File Transfer Utility appears:
Step 2 Click Connect. The Login dialog appears: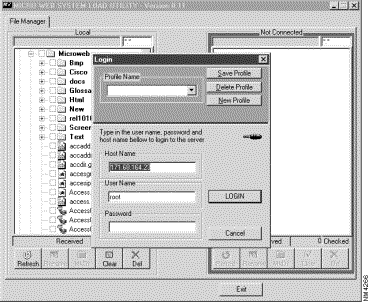
Step 3 Click New Profile (optional).
Step 4 Enter a Profile name in the Profile Name field (optional).
Step 5 Click Save Profile (optional).
Step 6 Enter your user name in the User Name field. (Defaults are root and administrator and do not need a password.)
Step 7 Enter a password if required in the Password field.
Step 8 Enter the IP address or host name of the Micro Webserver you are accessing in the Host Name field.
Step 9 Click LOGIN. The main window returns with the host file structure displayed in the right window: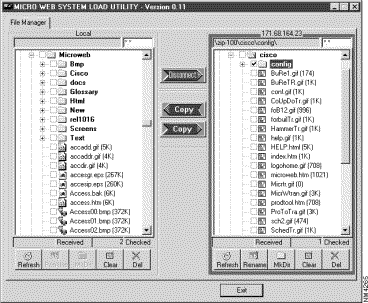
Step 10 Select the destination folder or volume in the Host window by checking the check box to the left of the desired destination. You can expand the directory where the file resides on the host by clicking the plus to the left of the drives and folders.
Step 11 Expand the local directory where the file resides on your workstation by clicking the plus to the left of the drives and folders.
Step 12 Select any files or folders that you want to copy to the host by checking the check box to the left of the filename or folder name. You can also select an entire drive in the same manner.
Step 13 Click the Copy button that reflects the direction that you want the transfer to occur (host to local or local to host). The selected files are transferred between the workstation and the host.
Step 1 Run the File Transfer Utility.
Step 2 Log into the server.
Step 3 Select the file(s) or folder(s) you want to delete by checking the check box to the left of the desired file or folder. You can expand the directory where the file resides by clicking the plus to the left of the drives and folders.
Step 4 Click Del. The file(s) or folder(s) are deleted. You will not be prompted; the file is deleted immediately.
Step 1 Run the File Transfer Utility.
Step 2 Log into the server.
Step 3 Select the file(s) or folder(s) you want to rename by checking the check box to the left of the desired file or folder. You can expand the directory where the file resides by clicking the plus to the left of the drives and folders.
Step 4 Click Rename. The file(s) or folder(s) names can now be changed.
Step 1 Run the File Transfer Utility.
Step 2 Log into the server.
Step 3 Select the drive or folder where you want the new directory under.
Step 4 Click MkDir. The Make Directory dialog appears.
Step 5 Enter the name of the new directory in the DIRECTORY NAME field.
Step 6 Click OK to Create the directory or Cancel to cancel the creation of the directory. The new directory is created.
If you check the check boxes in the folders as you expand and collapse them, they remain checked until you clear them. To clear a check box, click it again or you can clear all check boxes in a window by clicking Clear.
If you transferred or deleted files and want to see what the current directory structure looks like, click Refresh. The directory listing then reflects the current directory tree.
The Micro Webserver comes with a form managing utility program file called FormBuilder.exe. You can use one of the sample templates to create your forms or you can design your own from scratch. The Form Builder application must be run from a Windows 95 or Windows NT 4.x operating system.
The Form Builder application is a tool that lets you create HTML forms for the Micro Webserver that contain various screen elements (buttons, boxes, tables, graphics, text fields etc.) that people can fill out and submit complete with links to other HTML pages. You can then open the database files created by these forms with your browser.
When you create a form using the Form Builder application, several program types are created. For example, if you create a form that you save as SAMPLE, the following files are created:
The process for creating forms is as follows:
Step 1 Run the Form Builder application.
Step 2 Select each element that you want to add to your form using the appropriate tabs.
Step 3 Preview the affect of each step by clicking the Preview button on each tab.
Step 4 Reorder the elements and add page breaks between them using the Created Controls tab.
Step 5 Preview the finalized form by clicking the Preview button on the Created Controls tab.
Step 6 Save the form.
Step 7 FTP the form to the server of choice using the FTP button.
Step 8 As users enter data to your form, browse the database file using your Web browser.
Browse the Micro Webserver Home Page as described in the section, "Browsing the Server". Select the productivity tools icon and select the Form Builder icon. You can also run the Form Builder by clicking the Form Builder icon from the Cisco Micro Webserver program group accessed through the Start menu. The Form Builder main window appears: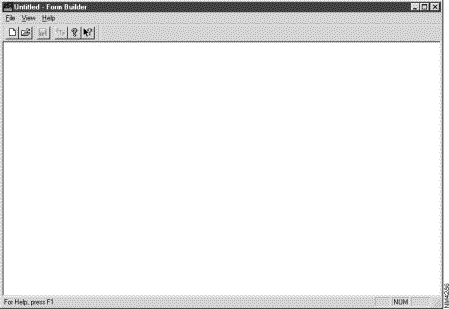
You now can either open an existing form or create a new one.
Step 1 Select the File menu and click Open. The Open dialog appears:
Step 2 Select the existing form file (with a .swz extension) from the list and click Open or double-click the desired file name. The Form Builder tabs appear:
Step 3 Step through each tab and change the data to reflect your application as described in the section, "Creating a New HTML Form".
Step 4 Select the File menu and choose Save As... The Save As dialog appears.
Step 5 Enter a unique, valid file name in the File name field.
Step 6 Click Save to save your new file.
Step 1 Select the File menu and choose New. The Form Builder tabs appear:
Step 2 Enter the heading that you want to appear at the top of the form in the Heading field.
Step 3 Enter a background image file name in the Background Image field. This file must be a .GIF or .JPG file. You can also browse to locate this file by clicking Browse.
Step 4 Enter a label that you want to display with the Submit button in the Submit Button Label field.
Step 5 Enter a label that you want to display with the Reset button in the Reset Button Label field. You can preview the effect of this tab, at any time, by clicking Preview.
Step 1 From the Form Settings tab of the Form Builder dialog, click Advanced. The Advanced Form Options dialog appears: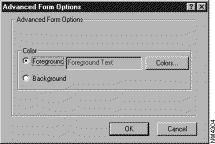
Step 2 Select a foreground color for the heading by clicking the Foreground radio button and clicking Colors.... The Color dialog appears: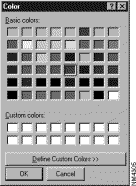
Step 3 Choose a Basic color to apply and click OK, or Click Define Custom Colors to set your own color. The Color (Custom Color) dialog appears. Select a color from the matrix and click Add to Custom Colors. The colors are added to the custom colors buttons on the left of the dialog. In the future you can select these colors to apply to foreground text and backgrounds. When you have added all of the colors you may want, click the color you want to apply to the heading text and click OK.
Step 4 Choose the Background radio button and follow the same procedure to select the background color for your page.
Step 5 Click OK. You can preview the effect of this tab, at any time, by clicking Preview.
Step 1 Select the Text Controls tab. The Text Controls tab appears: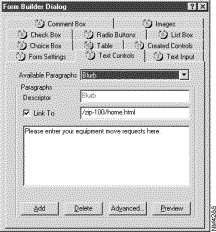
Step 2 Enter a description to identify the paragraph you want in the Descriptor field.
Step 3 If you want this to be an active hotspot link, check the Link To check box and enter the URL that you want to link to in the Link To field.
Step 4 Enter the text that you want for this paragraph in the large input field on the bottom of the dialog.
Step 5 Click Advanced to set paragraph fonts, alignments and colors. The Advanced Text Options dialog appears: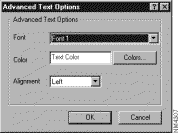
Step 6 Select the Font you want to apply from the Font drop-down list.
Step 7 Select the color to apply to the text by clicking the Colors button and selecting a color.
Step 8 Choose an alignment to apply to this paragraph from the Alignment drop-down list.
Step 9 Click OK to apply these attributes to the selected paragraph. The Text Controls tab appears.
Step 10 Click Add to add this paragraph to the list of available paragraphs.
Step 11 Enter as many paragraphs as you want for this form, each time using a different descriptor in the Descriptor field and clicking Add after each paragraph. In the future you can select these paragraphs from the Available Paragraph drop-down list. You can preview the effect of this tab, at any time, by clicking Preview.
You can define the text input fields with specific labels, lengths, and password protection using the Text Input tab:
Step 1 Select the Text Input tab. The Text Input tab appears: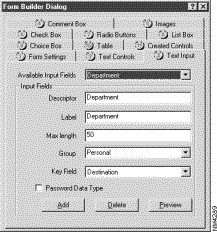
Step 2 Enter a description that will help you to identify it in the future in the Descriptor field.
Step 3 Enter a label that you want to display on the form with the input field in the Label field.
Step 4 Enter the maximum character length of the field in the Max length field.
Step 5 Select a group to associate the text control with from the Group drop-down list.
Step 6 Select a key field that you want to list on the index page from the Key Field drop-down list.
Step 7 Check the Password Data Type check box if you want password protection for this field.
Step 8 Click Add to add this input field to the Available Input Fields drop-down list.
Step 9 Repeat steps 1 through 8 for as many input fields as you need. Each time changing the Descriptor and Label fields and clicking Add. This will add these items to the Available Input Fields drop-down list for future selection. You can preview the effect of this tab, at any time, by clicking Preview.
You can add comment input fields to your forms using the Comment Box tab:
Step 1 Select the Comment Box tab. The Comment Box tab appears: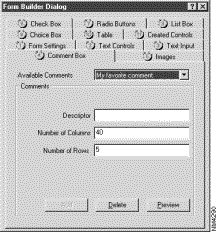
Step 2 Enter a name that will help you identify the comment field in the future in the Descriptor field.
Step 3 Enter the number of columns you want for the block in the Number of Columns field.
Step 4 Enter the number of rows you want for the block in the Number of Rows field.
Step 5 Click Add to add this comment input field to the Available Comments drop-down list.
Step 1 Select the Images tab. The Images tab appears: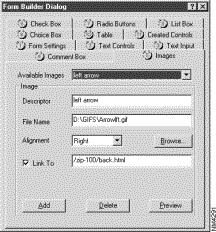
Step 2 Enter the name of the image file (.GIF or .JPG), with the full path name, in the File Name edit box. You can also browse to select this file by clicking Browse.
Step 3 Select an alignment from the Alignment drop-down list.
Step 4 Enter a description that will help you to identify this image in the Descriptor field.
Step 5 If you want this image to link to a specific URL, check the Link To check box and enter the URL in the Link To field.
Step 6 Click Add to add this image to your Available Images drop-down list.
Step 1 Select the Images tab. The Images tab appears:
Step 2 Select the name of the image that you want to delete from the Available Images drop-down list.
Step 3 Click Delete. The image is deleted from the Available Images drop-down list.
Step 1 Select the Check Box tab. The Check Box tab appears: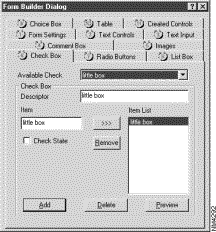
Step 2 Enter the name of the check box in the Item field.
Step 3 Check the Check State check box if you want the default state to be checked.
Step 4 Enter a description that will help you to remember the function of this check box in the Descriptor field.
Step 5 Click the >>> button to add this check box to the Item List. In the future, you can just select this check box from the Item List.
Step 6 Click Add to add this check box to the Available Check drop-down list.
Step 1 Select the Check Box tab. The Check Box tab appears:
Step 2 Select a check box from the Available Check drop-down list.
Step 3 Click Delete. The check box is deleted from the list.
Step 1 Select the Radio Buttons tab. The Radio Buttons tab appears: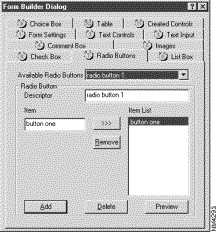
Step 2 Enter the name of the radio button in the Item field.
Step 3 Click the >>> button to add the radio button to the list. The radio button appears in the Item List table.
Step 4 Click Add. The list is added to the Available Radio Buttons drop-down list.
Step 5 Repeat steps 1 through 4 for as many radio buttons as you want.
Step 1 Select the Radio Buttons tab. The Radio buttons tab appears:
Step 2 Select the radio button you want to delete from the Available Radio Buttons drop-down list.
Step 3 Click Delete. The radio button is removed from the list.
Step 1 Select the List Box tab. The List Box tab appears: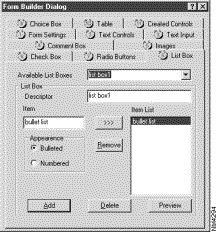
Step 2 Enter a description for the entire list in the Descriptor field.
Step 3 Enter the list item text in the Item field.
Step 4 Click the >>> button to add the text to the list. The text appears in the Item List table.
Step 5 Select whether you want the list numbered or bulleted by clicking the appropriate radio button in the Appearance group.
Step 6 Click Add. The list is added to the Available List Boxes drop-down list.
Step 7 Repeat steps 1 through 6 for as many lists as you want.
Step 1 Select the List Box tab. The List Box tab appears:
Step 2 Select the list that you want to delete from the Available List Boxes drop-down list.
Step 3 Click Delete button. The list is deleted from the Available List Boxes drop-down list.
Step 1 Select the Choice Box tab. The Choice Box tab appears: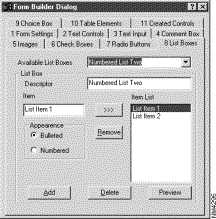
Step 2 Enter a description for your drop-down list in the Descriptor field.
Step 3 Enter the text that you want for the first item in the drop-down list in the Item field.
Step 4 Click the >>> button.
Step 5 Enter the subsequent text for your list in the Item field and click the >>> button for each item you want in the list. If you make a mistake or want to change an item, select the item and click Remove.
Step 6 When you have the list the way you want it, click Add. The list is added to the Available Choice drop-down list.
Step 1 Select the Choice Box tab. The Choice Box tab appears:
Step 2 Select the list you want to remove from the Available Choice drop-down list.
Step 3 Click Delete. The item is removed from the list.
Step 1 Select the Table tab. The Table tab appears: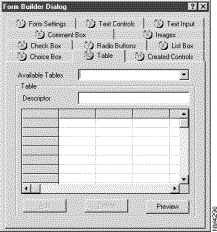
Step 2 Enter a description that will help you identify the table in the Descriptor field.
Step 3 Enter text that you want to appear in the columns and rows. You must fill in continuous blocks of columns and rows in order for the text to appear in the table.
Step 4 Click Add. The table is added to the list of tables in the Available Tables drop-down list.
Step 1 Select the Table tab. The Table tab appears:
Step 2 Select the table that you want to delete from the Available Tables drop-down list.
Step 3 Click Delete. The table is removed from the list.
Step 1 After you have added (or edited) all of the elements that you want in your form, select the Created Controls tab. The Created Controls tab appears: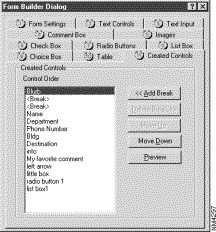
Step 2 All of the descriptors that you have added appear in the Control Order list. You can move them up or down using the Move Up and Move Down buttons. You can also add a <BREAK> tag forcing a new line by clicking the Add Break button. You can remove a <BREAK> tag by clicking the Remove Break button. When the order and breaks are as you want them, click Preview to view the form in your browser.
Step 3 Save your form by clicking Save (or Save As) from the File menu.
After you have completed the form, you must transfer the form to the server:
Step 1 With the form open (displaying in the main window), click the FTP button. The File Transfer Utility appears: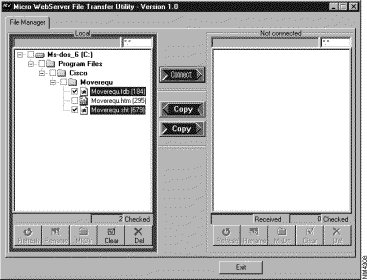
Step 2 All files that must be transferred to the server are automatically selected.
Step 3 Click Connect. Follow the instructions in the section, "Transferring Files" to log into the server and transfer the form files to the server.
![]()
![]()
![]()
![]()
![]()
![]()
![]()
![]()
Posted: Tue Dec 17 19:16:01 PST 2002
All contents are Copyright © 1992--2002 Cisco Systems, Inc. All rights reserved.
Important Notices and Privacy Statement.