|
|

This chapter presents an exercise that demonstrates how to configure the most common CDDM services. The exercise consists of the following steps:
Step 1 Creating the test domain using the DNM Browser (see "Create the Test Domain")
Step 2 Configuring the DNS server as a secondary name server for the test domain (see "Configure the DNS Server as a Secondary Name Server for the Test Domain")
Step 3 Configuring the Syslog service for troubleshooting DHCP and BootP service (see "Configure the Syslog Service")
Step 4 Configuring the DHCP service (see "Configure the DHCP Service")
Step 5 Managing the DNM server via the DHCP server (see "Configure the DHCP Server to Update DNS")
Step 6 Configuring the BootP service (see "Configure the BootP Service")
Use the DNM Browser to create and propagate the yoyodyne.com domain:
Step 1 Start the DNM Browser from the command line.
install_dir/MultiNet/bin/dnm_browser
Step 2 In the Authentication for localhost dialog box, enter admin in both the Username and in the Password fields.
Step 3 When the DNM Browser main window appears, choose Add from the Edit menu.
Step 4 In the Add dialog box, type yoyodyne.com.
Step 5 Verify that the Edit records box is enabled, and Click on OK.
Step 6 When the Edit Resource Records window appears, select the Authority tab.
Step 7 Add an SOA record by entering the values in Table 2-1.
| Field | Value | Description |
| Primary Name Server | ns1.yoyodyne.com | Server name |
| Responsible Person Mailbox | sysadmin@yoyodyne.com | E-mail address |
| Serial Number | 1 | Zone file serial number |
| Refresh Interval
(BIND requires the refresh value to be 15 minutes | 10800 | 3 hours in seconds |
| Retry Interval | 3600 | 1 hour in seconds |
| Expire Time | 604800 | 1 week in seconds |
| Minimum Time to Live | 86400 | 1 day in seconds |
Step 8 Click on the Name servers "+" button in the Name Server Records group.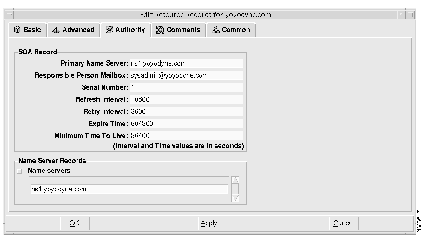
Step 9 Type ns1.yoyodyne.com to add the name server, and click on OK.
The yoyodyne.com domain appears in the DNM Browser.
Step 10 Choose Add from the Browser's Edit menu.
Step 11 In the Fully Qualified Name field of the Add dialog box, type ns1.yoyodyne.com.
Step 12 Make sure that the Edit records box is enabled and click on OK.
Step 13 In the Edit Resource Records window, click on Address Records.
Step 14 In the Add IP Address dialog box, type 10.1.1.1 in the Starting IP Address field, and click on OK.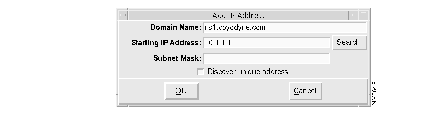
Step 15 When the Edit Resource Records dialog box is active again, click on OK.
Step 16 Using the procedure described in Steps 10 through 15 above, add another host called host1.yoyodyne.com with the address 10.1.1.2.
Step 17 Select the top-level (".") domain in the DNM Browser.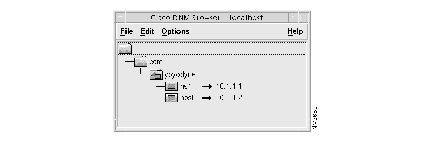
Step 18 To refresh the DNM Browser's display, choose Reload Domain from the Edit menu.
Step 19 In the DNM Browser window, double-click on ARPA to expand it. Under IN-ADDR, expand 10, 1, and 1. 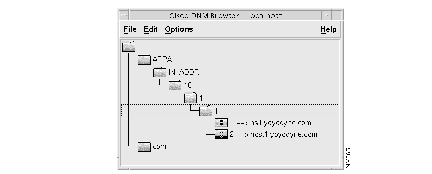
Step 20 Add the SOA records for the 1.1.10.in-addr.arpa domain:
(a) Make sure 1.1.10.in-addr.arpa is selected, then choose Modify Records from the Edit menu.
The Edit Resource Records dialog box appears.
(b) Select Authority in the Edit Resource Records window.
(c) Add an SOA record by entering the values in Table 2-1.
(d) Click on the Name servers "+" button in the Name Server Records group, enter ns1.yoyodyne.com, then click on OK.
The icon for 1.1.10.in-addr.arpa in the DNM Browser now indicates the new SOA record with a red triangle.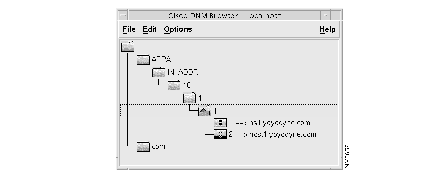
Step 21 Choose Exit from the File menu to close the DNM Browser, and click on Yes in the confirmation dialog box.
To configure the DNS server to request zone transfers for the domain yoyodyne.com from the DNM server on port 705:
Step 1 Choose DomainName from the Available Services list.
Step 2 Select the Config tab.
Step 3 Add an entry for yoyodyne.com in the Secondary area:
(a) Type yoyodyne.com in the Zones field.
(b) Type 127.0.0.1/705 in the Source field.
(c) Type install_dir/MultiNet/test/yoyodyne.bak in the Backup File field.
Step 4 Add an entry for 1.1.10.in-addr.arpa in the Secondary area:
(a) Click on Add in the Secondary area. A blank entry is displayed.
(b) Type 1.1.10.in-addr.arpa in the Zones field.
(c) Type 127.0.0.1/705 in the Source field.
(d) Type install_dir/MultiNet/test/1_1_10.bak in the Backup File field.
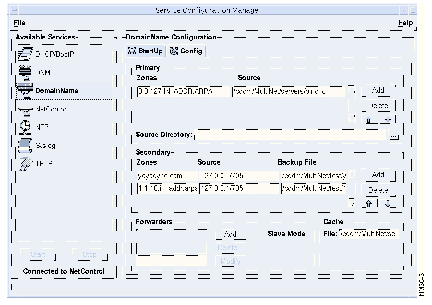
Step 5 Choose Save Configuration from the File menu to save your configuration.
Step 6 Restart the DNS server by stopping and restarting NetControl:
(a) Choose NetControl from the Available Services list.
(b) Click on Stop.
(c) Click on Yes in the confirmation dialog box.
(d) When you see that NetControl has stopped, click on Start to restart NetControl.
The CDDM Syslog service is designed specifically for troubleshooting CDDM services. It does not implement all the features of your operating system's native Syslog service. For details, see the Cisco Server Suite Release Notes.
To configure the Syslog service for troubleshooting the DHCP and BootP services:
Step 1 Choose Syslog from the SCM's Available Service list.
Step 2 Configure Syslog to log DHCP messages to a DHCP log file:
(a) Select the Config tab and click on Add to create a new entry. A blank entry field is displayed.
(b) Type bootp.* in the Class field.
(c) Type install_dir/MultiNet/log/bootp.log in the Log File field.
(d) Click on the Up Arrow button to move the new entry to the top of the list.
Step 3 Log all messages to a user-defined file:
(a) Click on Add to create a new entry.
(b) Type *.* in the Class field.
(c) Type install_dir/MultiNet/log/all.log in the Log File field.
Step 4 Set the $Discard-If-LoggeD$ flag. This flag should already be set by default, so you should only need to confirm its state. If the flag is set, its Class field is *.*, and its Log File field is $DISCARD-IF-LOGGED$. If the flag is not set, do the following:
(a) Click on Add to create a new entry.
(b) Type *.* in the Class field.
(c) Type $Discard-If-LoggeD$ in the Log File field.
(d) If necessary, use the Up and Down arrow buttons to position $DISCARD-IF- LOGGED$ as the last entry in the list.
Step 5 Choose Save Configuration from the File menu.
Step 6 Select the Startup tab.
Step 7 Select the Basic tab.
Step 8 Make sure that Syslog is set to start automatically. If not, do the following:
(a) Set the Start field to AUTOMATIC.
(b) Choose NetControl from the Available Services list.
(c) Click on Stop.
(d) Click on Yes in the confirmation dialog box.
Step 9 When you see that NetControl has stopped, click on Start to restart NetControl.
Step 10 Verify that the log files you have just created are now active by entering the following command:
ls -l install_dir/MultiNet/log
If the all.log file is listed, the Syslog service is running properly.
Step 1 In the SCM, Choose DHCP/BootP from the Available Services list.
Step 2 Select the DHCP Config tab.
Step 3 Set up a pool of IP addresses as a DHCP configuration:
(a) Type host in the Entries field, and click on Add.
Enable the following option tags by clicking on the box next to the tag and entering the following data:
| Option Tag | Value | Description |
| ds | 10.1.1.1 | DNS server |
| gw | 10.1.1.254 | Default gateway |
| ip | 10.1.1.10-15 | IP address pool |
| sm | 255.255.255.0 | Subnet mask |
(c) Choose Save Configuration from the File menu.
(d) Click on Start to start the DHCP service.
(e) Boot your client to test the configuration.
Step 4 Configure a static DHCP entry (optional procedure):
(a) In the SCM, type static1 in the Entries field, and click on Add.
Enable the following option tags by clicking on the box next to each tag and entering the value given:
| Option Tag | Value | Description |
| ds | 10.1.1.1 | DNS server |
| gw | 10.1.1.254 | Default gateway |
| ha | 018002010203 | Hardware address |
| ht | 1 | Hardware type |
| ip | 10.1.1.16 | IP address |
| sm | 255.255.255.0 | Subnet mask |
(c) Choose Save Configuration from the File menu.
(d) Click on Stop, then click on Start to restart the DHCP service.
(e) Boot your client to test the configuration; troubleshoot, if necessary.
Step 5 Configure an entry from which other entries can inherit option tags:
(a) In the SCM, type common in the Entries field, and click on Add.
(b) Enable the following option tags by clicking on the box next to the tag and entering the value given:
| Option Tag | Value | Description |
| ds | 10.1.1.1 | DNS server |
| gw | 10.1.1.254 | Default gateway |
| sm | 255.255.255.0 | Subnet mask |
(c) Select "static1" and modify the entry's option tags as follows:
| Option Tag | Value | Description |
| ip | 10.1.1.16 | IP address |
| tc | common | Inherit values from subnet entry |
| ha | 018002010203 | Hardware address |
| ht | 1 | Hardware type |
(d) Delete the ds, sm, and gw tags from the "static1" entry, as they will be inherited from the common tag. To delete a tag, clear the option tag's check box.
(e) Make sure "common" appears before "static1" in the Entries list. If necessary, select the "common" entry, then click on the "up" arrow button to move the entry up the list.
(f) Choose Save Configuration from the File menu.
(g) Click on Stop, then click on Start to restart the DHCP service.
(h) Boot your client to test the configuration; troubleshoot if necessary.
To configure the DHCP server to update the DNS server:
Step 1 Choose DHCP/BootP from the SCM's Available Services list.
Step 2 Select the Startup tab.
Step 3 Select the Basic tab.
Step 4 Verify that the Start field is set to AUTOMATIC. If not, set the Start field to AUTOMATIC.
Step 5 Select the Parameters tab.
Click on the following parameters and set as follows. Leave all the other parameters set to their default values.
| Parameter | Value | Description |
| Authoritative-nameserver | ns1.yoyodyne.com | name of DNS authoritative for the dynamic domain |
| Dnm-server-address | 127.0.0.1 | IP address of DNM server |
| Dnm-server-username | admin | user name for accessing DNM server |
| Dnm-server-password | admin | password for accessing DNM server |
| Dynamic-domainname | dynamic.yoyodyne.com | name of domain dedicated to DHCP clients |
| Responsible-person | sysadmin@yoyodyne.com | valid email address |
Step 7 Choose the DHCP Config tab.
Step 8 Select "host" in the Entries list.
Step 9 In the Option Tags group, enable the ub tag under DHCP Specific Tags.
Step 10 Choose Save Configuration from the File menu.
Step 11 Choose NetControl from the Available Services list.
Step 12 Click on Stop to stop NetControl, and click on Yes in the message box when it is displayed.
Step 13 Click on Start to restart NetControl.
Step 14 Start the DNM Browser from the command line:
install_dir/MultiNet/bin/dnm_browser
Step 15 In the DNM Browser main window, double-click on "com," then "yoyodyne," then "dynamic." The "dynamic" domain now includes domain names for the DHCP clients. 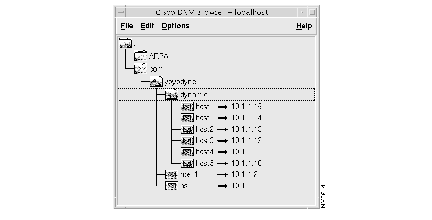
Do not confuse BootP configuration with DHCP. DHCP and BootP are configured in a similar manner and they run on the same server, but they use different protocols. All BootP addresses are static. In addition, IP address pools are not defined in the BootP protocol.
Step 1 Choose DHCP/BootP from the Available Services list.
Step 2 Select the BootP Config tag.
Step 3 Configure a static BootP entry:
(a) In the SCM, type static2 in the Entries field, and click on Add.
(b) Enable the option tags as follows:
| Option Tag | Value | Description |
| ds | 10.1.1.1 | DNS server |
| gw | 10.1.1.254 | Default gateway |
| ha | 018002010203 | Hardware address |
| ht | 1 | Hardware address type |
| ip | 10.1.1.17 | IP address |
| sm | 255.255.255.0 | Subnet mask |
(c) Choose Save Configuration from the File menu.
(d) Click on Stop, then click on Start to restart the BootP service.
(e) Boot your client to test the configuration; troubleshoot if necessary.
Step 4 Create an entry from which other entries can inherit option tags:
(a) In the SCM, type subnet in the Entries field, and click on Add.
(b) Enable the option tags as follows:
| Option Tag | Value | Description |
| ds | 10.1.1.1 | DNS server |
| gw | 10.1.1.254 | Default gateway |
| sm | 255.255.255.0 | Subnet mask |
(c) Modify the "static2" entry's option tags as follows:
| Option Tag | Value | Description |
| ip | 10.1.1.17 | IP address |
| ha | 018002010203 | Hardware address |
| ht | 1 | Hardware address type |
| tc | subnet | Inherit values from subnet entry |
(d) Delete the sm, gw, and ds tags from the "static2" entry, as they will be inherited from the subnet entry. To delete a tag, clear the option tag's check box.
(e) Make sure "subnet" appears before "static2" in the Entries list. If necessary, select the "subnet" entry, then click on the "up" arrow button to move the entry up the list.
(f) Choose Save Configuration from the File menu.
(g) Click on Stop, then click on Start to restart the BootP service.
(h) Boot your client to test the configuration; troubleshoot if necessary.
|
|