|
|

This chapter demonstrates how to use existing DNS configuration and zone data to configure the CDDM. In this exercise, you will configure the DNS and DNM servers using a set of zone files located in the directory install_dir/MultiNet/test.
The example zone files come from a name server, ns1.test.yoyodyne.com, which is configured as a primary name server for the domain, test.yoyodyne.com, and two subdomains, admin.test.yoyodyne.com and sales.test.yoyodyne.com. ns1 is also configured as a secondary name server for the domain eng.test.yoyodyne.com, for which ns2.eng.test.yoyodyne.com is primary. The grey area in the following figure represents the zones for which ns1 is authoritative.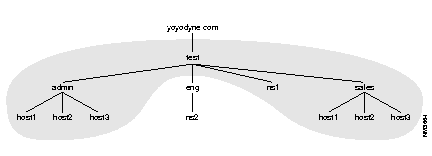
ns2.eng.test.yoyodyne.com is a HP-UX system running the native DNS server. All hosts in test.yoyodyne.com are on the same network segment, 10.1.1, and ns1.test.yoyodyne.com is primary for the domain 1.1.10.in-addr.arpa.
Several steps also ask you to test your work by looking up specific names with nslookup. To test your work in this exercise:
You can also follow the procedures in this exercise by entering values exactly as they appear in each step, and verify your work by comparing the DNM Browser and SCM screens with the figures in this chapter. If you have not met the above requirements, you will not be able to resolve names with nslookup.
The IP addresses used in this example comply with RFC 1918 so that you can create the test.yoyodyne.com domain exactly as shown in the procedures. You can, however, substitute your own IP addresses, and domain names.
To migrate from existing DNS configuration and zone data:
Step 1 Make sure all servers are working (see Chapter 1, "Testing the CDDM Servers").
Step 2 Import the existing zone files to the DNM Server using the DNM Browser (see "Import the Existing Zone Files").
Step 3 Configure the Cisco DNS server to be secondary for the test domains (see "Make the DNS Server Secondary for the Test Zones").
This procedure loads existing zone file data into the DNM server via a DNM Browser. Once the DNM server contains the zone data, you can configure DNS servers to obtain zone transfers for the imported zones.
Your native DNS server stores data for the test.yoyodyne.com domain in the file named.boot. This exercise assumes the named.boot for the test domain's current DNS server contains the following lines:
primary test.yoyodyne.com db.yoyodyne primary admin.test.yoyodyne.com db.admin primary sales.test.yoyodyne.com db.sales primary 1.1.10.in-addr.arpa db.1_1_10 secondary eng.test.yoyodyne.com 10.1.1.8 eng_yoyodyne.bak
Step 1 Start the DNM Browser and connect to the DNM server, "localhost," using the admin DNM user account and password set up in Chapter 1.
Step 2 If yoyodyne.com already appears in the DNM Browser window (remaining from the exercises in previous chapters), delete the DNM server's database by selecting the top-level domain ("."), and choosing Delete from the Edit menu.
Step 3 Load test.yoyodyne.com into the DNM server.
The first "primary" line in named.boot indicates that this host obtains zone data for the zone yoyodyne.com from the file, db.test. The CDDM includes a copy of this zone file in the install_dir/MultiNet/test directory.
(a) Choose Import Zone from the File menu.
(b) In the Import Zone File dialog, enter test.yoyodyne.com in the Domain field, and install_dir/MultiNet/test/db.test in the Domain Name field, and click on OK.
For example, if you installed CDDM in /cddm, enter /cddm/MultiNet/test/db.test as follows:
(c) Expand the DNM Browser's domains to view the imported zone data. The yoyodyne.com and in-addr.arpa domains should appear as follows: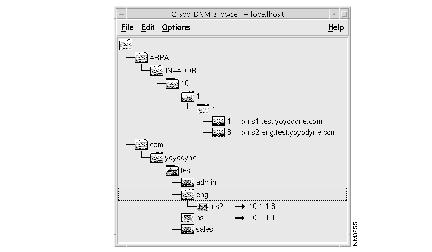
The DNM server automatically creates the reverse mappings for ns1 and ns2 in the in-addr.arpa domain because the DNM Browser's "Automatically Maintain Record Pairs" parameter (under Settings in the Options menu) is enabled.
(d) Expand the eng.yoyodyne.com domain to verify the presence of ns2.eng.test.yoyodyne.com.
Step 4 Load admin.test.yoyodyne.com into the DNM server.
The second "primary" line in named.boot indicates that the DNS server obtains zone data for the zone admin.test.yoyodyne.com from the file, db.admin. The CDDM includes a copy of this zone file in the install_dir/MultiNet/test directory.
(a) Choose Import Zone from the File menu.
(b) In the Import Zone File dialog, enter admin.test.yoyodyne.com in the Domain field, and install_dir/MultiNet/test/db.admin in the Domain Name field, and click on OK.
For example, if you installed CDDM in /cddm, enter the following data:
(c) Expand the DNM Browser's domains to view the imported zone data. The admin.test.yoyodyne.com and in-addr.arpa domains should appear as follows: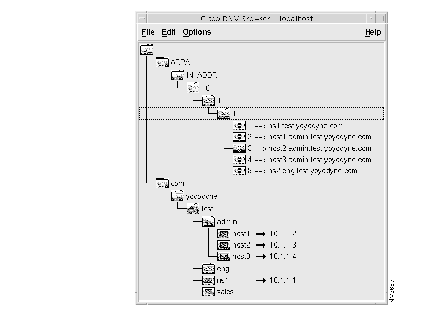
Step 5 Load sales.test.yoyodyne.com into the DNM server.
The third "primary" line in named.boot indicates that the DNS server obtains zone data for the zone sales.test.yoyodyne.com from the file, db.sales. The CDDM includes a copy of this zone file in the install_dir/MultiNet/test directory.
(a) Choose Import Zone from the File menu.
(b) In the Import Zone File dialog, enter sales.test.yoyodyne.com in the Domain field, and install_dir/MultiNet/test/db.sales in the Domain Name field, and click on OK.
For example, if you installed CDDM in /cddm, enter /cddm/MultiNet/test/db.sales as follows:
(c) Expand the DNM Browser's domains to view the imported zone data. The sales.test.yoyodyne.com and in-addr.arpa domains should appear as follows: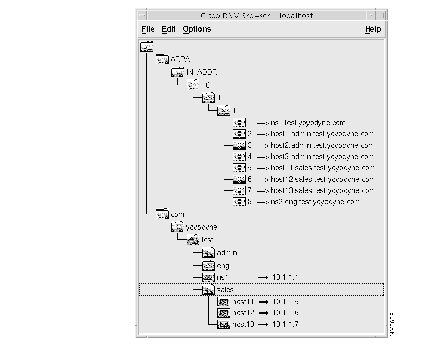
Step 6 Define the Start of Authority for 1.1.10.in-addr.arpa:
(a) Select the domain 1.1.10.in-addr.arpa in the DNM Browser.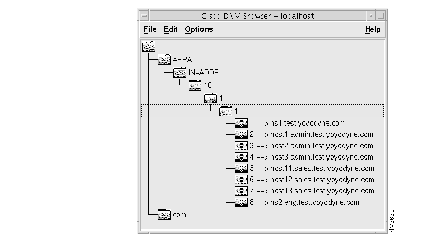
(b) Choose Modify Records from the Edit menu.
(c) Select the Authority tab.
(d) Enter the SOA data as follows: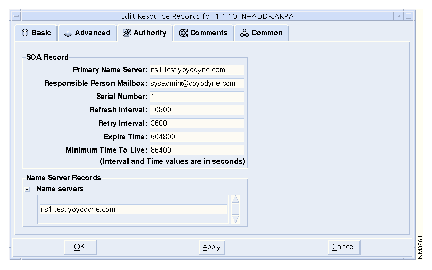
(e) Click on the Name servers "+" button in the Name Server Records group, and enter ns1.test.yoyodne.com, and click on OK.
(f) Expand the DNM Browser's domains to view the imported zone data. The 1.1.10.in-addr.arpa domain icon should reflect the new SOA record as follows: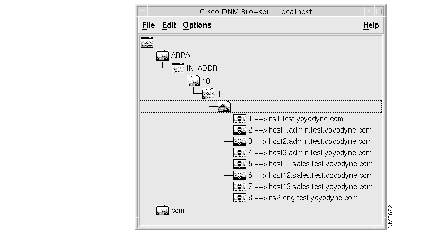
Step 7 Choose Exit from the File menu and click on OK in the confirmation dialog box.
Now that the DNM server contains the zone data for test.yoyodyne.com, admin.yoyodyne.com, sales.yoyodyne.com, and 1.1.10.in-addr.arpa, you can configure the DNS server on ns1 to be authoritative for those domains.
Step 1 Start the SCM.
Step 2 Choose the DNS server configuration editor by clicking on the DomainName icon in the Available Services list. Notice that the DNS server is already configured to resolve the reverse domain for "localhost" and "0.0.127.in-addr.arpa" in the Primary area.
Step 3 If a secondary entry already exists for yoyodyne.com (remaining from the previous exercise), delete it by selecting a field in that entry, and clicking on Delete in the secondary group.
Step 4 Make the DNS server secondary for test.yoyodyne.com:
(a) Enter test.yoyodyne.com in the Zone field of a blank entry in the Secondary area. If there are no blank entries, click on Add in the Secondary area to create a new blank entry.
(b) Enter 127.0.0.1/705 in the Source field. This entry tells the DNS server to obtain zone data for test.yoyodyne.com from the local DNM server via port 705.
(c) Enter install_dir/MultiNet/test/test.bak in the Backup File field.
Step 5 Make the DNS server secondary for admin.test.yoyodyne.com:
(a) Click on Add in the Secondary area to create a new blank entry.
(b) Enter admin.test.yoyodyne.com in the Zone field.
(c) Enter 127.0.0.1/705 in the Source field. This entry tells the DNS server to obtain zone data for admin.test.yoyodyne.com from the local DNM server via port 705.
(d) Enter install_dir/MultiNet/test/admin.bak in the Backup File field.
Step 6 Make the DNS server secondary for sales.test.yoyodyne.com:
(a) Click on Add in the Secondary area to create a new blank entry.
(b) Enter sales.test.yoyodyne.com in the Zone field.
(c) Enter 127.0.0.1/705 in the Source field. This entry tells the DNS server to obtain zone data for sales.test.yoyodyne.com from the local DNM server via port 705.
(d) Enter install_dir/MultiNet/test/sales.bak in the Backup File field.
Step 7 Make the DNS server secondary for 1.1.10.in-addr.arpa:
(a) Click on Add in the Secondary area to create a new blank entry.
(b) Enter 1.1.10.in-addr.arpa in the Zone field.
(c) Enter 127.0.0.1/705 in the Source field. This entry tells the DNS server to obtain zone data for 1.1.10.in-addr.arpa from the local DNM server via port 705.
(d) Enter install_dir/MultiNet/test/1_1_10.bak in the Backup File field.
Step 8 Make the DNS server secondary for eng.test.yoyodyne.com:
(a) Click on Add in the Secondary area to create a new blank entry.
(b) Enter eng.test.yoyodyne.com in the Zone field.
(c) Enter ns2.eng.test.yoyodyne.com in the Source field. This entry tells the DNS server to obtain zone data for eng.test.yoyodyne.com from the DNS server running on ns2.eng.test.yoyodyne.com. You do not have to specify a port because ns2's DNS server only performs zone transfers on the default port 53.
(d) Enter install_dir/MultiNet/test/eng.bak in the Backup File field.
The DNS server configuration should appear as follows: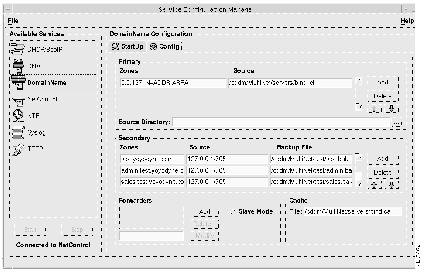
Note that although ns1 was originally primary for test.yoyodyne.com, 1.1.10.in-addr.arpa, and the admin and sales subdomains, it is now secondary for these domains.
Step 9 Save the DNS server configuration.
Step 10 Restart the DNS server by stopping and restarting NetControl:
(a) Choose NetControl from the Available Services list.
(b) Click on Stop.
(c) Click on Yes in the confirmation dialog box.
(d) When you see that NetControl has stopped, click on Start to restart NetControl.
When NetControl starts, it restarts the DNS server. Because the DNS server does not yet have back-up zone files for the new zones, it requests zone transfers for test.yoyodyne.com, 1.1.10.in-addr.arpa, admin.test.yoyodyne.com, and sales.test.yoyodyne.com from the local DNM server, and it requests a zone transfer for eng.test.yoyodyne.com from ns2.eng.test.yoyodyne.com's DNS server.
Step 11 If you have used your own real domain name instead of yoyodyne.com in this exercise, test your system by resolving names with nslookup:
% nslookup ns1.test.yoyodyne.com 127.0.0.1
% nslookup host1.admin.test.yoyodyne.com 127.0.0.1
% nslookup host11.sales.test.yoyodyne.com 127.0.0.1
|
|