|
|

In the previous chapters, you installed the CDDM, tested the DNS server's ability to respond to resolver queries, and tested the DNM server's ability to respond to management commands from a DNM Browser. In this chapter, you will manage a new domain using the DNM Browser and learn how to use the DNM server to coordinate the DHCP and DNS servers.
The exercise in this chapter consists of the following steps:
Step 1 Create the test domain using the DNM Browser (see "Creating the Test Domain").
Step 2 Configure the DNS server as a secondary name server for the test domain (see "Configuring the DNS Server as a Secondary Name Server for the Test Domain").
Step 3 Configure the Syslog service for troubleshooting DHCP and BootP service (see "Configuring the Syslog Service").
Step 4 Manage the DNM server via the DHCP server (see "Configuring the DHCP Server to Update DNS").
Step 5 Configure the BootP service (see "Configuring the BootP Service").
Use the DNM Browser to create and propagate the yoyodyne.com domain:
Step 1 Start the DNM Browser:
install_dir\dnmbwr32
install_dir/CSCOcddm/bin/dnm_browser
where install_dir is the directory in which you installed CDDM.
Step 2 In the Authentication for localhost dialog box, enter admin in both the Username and in the Password fields, and click 
OK.
Step 3 In the DNM Browser main window, choose Add from the Edit menu.
Step 4 Type yoyodyne.com in the Fully Qualified Name 
field.
Step 5 Verify that the Modify records box is enabled, and click OK.
Step 6 When the Modify Resource Records window appears, select the Authority tab.
Step 7 Click Reset to Suggested Values. The DNM Browser inserts a set of suggested SOA values.
Step 8 Change the Primary Name Server field to ns1.yoyodyne.com.
Step 9 Change the Responsible Person Mailbox field to sysadmin@yoyodyne.com.
Step 10 Click the Name servers "+" button in the Name Server Records group.
Step 11 Type ns1.yoyodyne.com in the Name servers field, and click 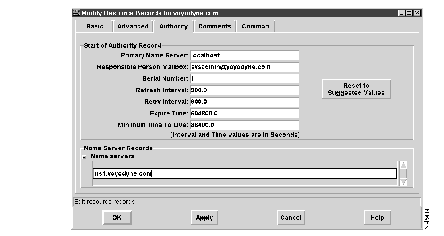
OK.
The yoyodyne.com domain appears in the DNM 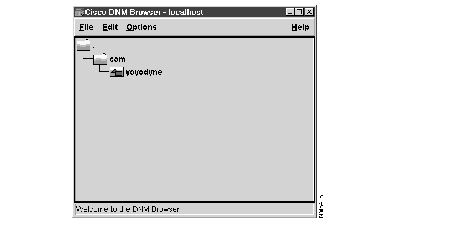
Browser.
Step 12 Choose Add from the Browser's Edit menu.
Step 13 In the Fully Qualified Name field of the Add dialog box, type ns1.yoyodyne.com.
Step 14 Make sure that the Modify records box is enabled, and click OK.
Step 15 In the Basic tab of the Modify Resource Records window, click the "+" button in the Address Records group.
Step 16 In the Add IP Address dialog box, type 10.1.1.1 in the Starting IP Address field, and click 
OK.
Step 17 When the Modify Resource Records dialog box is active again, click OK. ns1 now appears in the DNM Browser.
Step 18 Using the procedure described in Steps 12 through 17 above, add another host called host1.yoyodyne.com with the address 10.1.1.2.
Step 19 Select the top-level (".") domain in the DNM 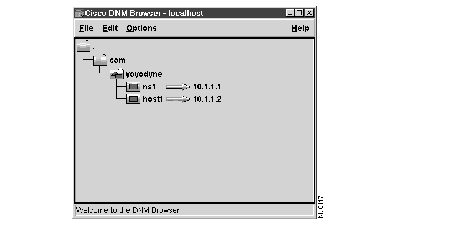
Browser.
Step 20 To refresh the DNM Browser's display, choose Reload from the Edit menu.
Step 21 In the DNM Browser window, double-click ARPA to expand it. Under IN-ADDR, expand 10, 1, and 
1.
Step 22 Add the SOA records for the 1.1.10.in-addr.arpa domain:
(a) Make sure 1.1.10.in-addr.arpa is selected, then choose Modify from the Edit menu.
The Modify Resource Records dialog box appears.
(b) Select Authority in the Modify Resource Records window.
(c) Click Reset to Suggested Values. The DNM Browser inserts a set of suggested SOA values.
(d) Change the Primary Name Server field to ns1.yoyodyne.com.
(e) Change the Responsible Person Mailbox field to sysadmin@yoyodyne.com.
(f) Click the Name servers "+" button in the Name Server Records group, enter ns1.yoyodyne.com, then click OK.
The icon for 1.1.10.in-addr.arpa in the DNM Browser now indicates the new SOA record with a red 
triangle.
Step 23 Choose Exit from the File menu to close the DNM Browser, and click Yes in the confirmation dialog box.
To configure the DNS server to request zone transfers for the domain yoyodyne.com from the DNM server on port 705:
Step 1 Start the CSM and choose DNS from the Available Services list.
Step 2 Select the Config tab.
Step 3 Add an entry for yoyodyne.com in the Secondary area:
(a) Type yoyodyne.com in the Zones field.
(b) Type 127.0.0.1/705 in the Source field. The "/705" tells the DNS server to request zone transfers for yoyodyne.com on port 705 instead of the default port, 53.
(c) Specify a backup file for the yoyodyne.com zone data:
install_dir/CSCOcddm/test/yoyodyne.bak in the Backup File field.
install_dir\test\yoyodyne.bak in the Backup File field.
where install_dir is the directory in which you installed CDDM. On Windows NT, install_dir must include the drive letter.
Step 4 Add an entry for 1.1.10.in-addr.arpa in the Secondary area:
(a) Click Add in the Secondary area. A blank entry is displayed.
(b) Type 1.1.10.in-addr.arpa in the Zones field.
(c) Type 127.0.0.1/705 in the Source field.
(d) Specify a backup file for the 1.1.10.in-addr.arpa zone data.
install_dir/CSCOcddm/test/1_1_10.bak in the Backup File field.
install_dir\test\1_1_10.bak in the Backup File field.
where install_dir is the directory in which you installed CDDM. On Windows NT, install_dir must include the drive 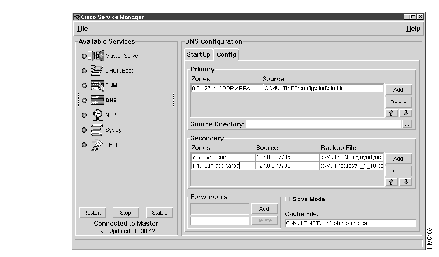
letter.
Step 5 Choose Save Configuration from the File menu to save your configuration.
Step 6 Restart the DNS server by stopping and restarting the Master Server:
(a) Choose Master Server from the Available Services list. If the Master Server is already running, the CSM displays a Restart button below the Available Services list.
(b) Click Start or Restart.
(c) Click Yes in the confirmation dialog box.
The CDDM Syslog service is designed specifically for troubleshooting CDDM services. It does not implement all the features of your operating system's native Syslog service. For details, see the Cisco DNS/DHCP Manager 1.1(2) Release Notes.
To configure the Syslog service for troubleshooting the DHCP and BootP services:
Step 1 Choose Syslog from the CSM's Available Service list.
Step 2 To log all messages to a user-defined file:
(a) Click Add to create a new entry.
(b) Type *.* in the Class field.
(c) Specify a log file:
install_dir/CSCOcddm/log/all.log in the Log File field.
$FILE$:install_dir\log\all.log in the Log File field.
where install_dir is the directory in which you installed CDDM. On Windows NT, install_dir must include the drive letter.
Step 3 Set the $Discard-If-LoggeD$ flag. This flag should already be set by default, so you should only need to confirm its state. If the flag is set, its Class field is *.*, and its Log File field is $DISCARD-IF-LOGGED$. If the flag is not set, do the following:
(a) Click Add to create a new entry.
(b) Type *.* in the Class field.
(c) Type $Discard-If-LoggeD$ in the Log File field.
(d) If necessary, use the Up and Down arrow buttons to position $DISCARD-IF- LOGGED$ as the last entry in the list.
Step 4 Choose Save Configuration from the File menu.
Step 5 Select the StartUp tab. The Basic parameter tab appears.
Step 6 If Syslog is not configured to start automatically, set the Start field to AUTOMATIC and then either start the Syslog server if you only want to log local messages or restart the Master Server if you want to log messages from other CDDM systems:
(a) Choose Master Server from the Available Services list. If the Master Server is already running, the CSM displays a Restart button below the Available Services list.
(b) Click Start or Restart. If you start or restart without first saving changes, the CSM presents a dialog that says the changes were saved. When the save confirmation appears, click OK.
(c) Click Yes in the confirmation dialog box.
Step 7 Verify that the log files you have just specified are now active.
ls -l install_dir/CSCOcddm/log
where install_dir is the directory in which you installed CDDM.
In this section you will configure the DHCP/BootP server to add host names to the DNM server every time clients obtain leases using "Method 2" behavior. For information on how the DHCP server chooses host names, see the section "Specifying How the DHCP/BootP Server Chooses Names for DHCP Clients" in Chapter 1.
To configure the DHCP server to update the DNS server:
Step 1 Choose DHCP/BootP from the CSM's Available Services list.
Step 2 Select the StartUp tab.
Step 3 Select the Parameters tab.
Enable the following parameters and set as follows. Leave all the other parameters set to their default values.
Step 5 Select the DHCP Config tab.
Step 6 Select "host" in the Entries with Inheritance list.
Step 7 Choose Basic from the Group option menu, and enable the Update DNS and Insert Host Name 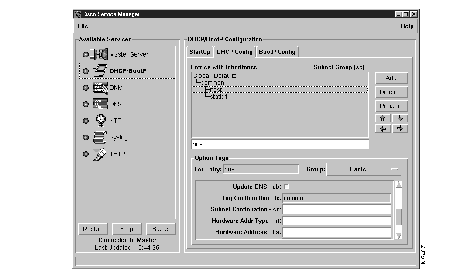
parameters.
Step 8 Configure the DNS server as a secondary name server for dynamic.yoyodyne.com:
(a) Choose DNS from the Available Services list.
(b) Select the Config tab.
(c) Click Add in the Secondary area. A blank entry appears.
(d) Type dynamic.yoyodyne.com in the blank Zones field.
(e) Type 127.0.0.1/705 in the Source field.
(f) Specify a backup file for the dynamic.yoyodyne.com zone data:
install_dir/CSCOcddm/test/dynamic.bak in the Backup File field.
install_dir\test\dynamic.bak in the Backup File field.
where install_dir is the directory in which you installed CDDM. On Windows NT, install_dir must include the drive letter.
Step 9 Choose Save Configuration from the File menu. Because you modified parameters in the StartUp tab, the CSM warns that you must restart the Master Server to load the startup 
parameters.
Step 10 Click OK to acknowledge the startup parameter warning.
Step 11 Choose Master Server from the Available Services list, click Restart, and click Yes in the message box when it is displayed.
Step 12 Start a DHCP client on your network.
Step 13 Start the DNM Browser:
install_dir\dnmbwr32
install_dir/CSCOcddm/bin/dnm_browser
where install_dir is the directory in which you installed CDDM.
Step 14 When prompted, log in with your DNM user account name and password.
Step 15 In the DNM Browser main window, double-click "com," then "yoyodyne," then "dynamic." The "dynamic" domain now includes the domain names of any DHCP clients that have obtained leases from the DHCP/BootP server.
Do not confuse BootP configuration with DHCP. DHCP and BootP are configured in a similar manner and they run on the same server, but they use different protocols. All BootP addresses are static. In addition, IP address pools are not defined in the BootP protocol.
Step 1 Choose DHCP/BootP from the Available Services list.
Step 2 Select the BootP Config tag.
Step 3 Configure a static BootP entry:
(a) In the CSM, type static2 in the Entries with Inheritance field, and click Add.
(b) Choose Standard from the Group option menu.
Enter the following parameters:
| Parameter | Option Tag | Value |
| DNS servers | ds | 10.1.1.1 |
| Routers | gw | 10.1.1.254 |
| Hardware address | ha | 001800201020 |
| Hardware address type | ht | 1 |
| IP address pool | ip | 10.1.1.17 |
| Subnet mask | sm | 255.255.255.0 |
(d) Choose Save Configuration from the File menu.
(e) Click Start or Restart to restart the DHCP/BootP service.
(f) Boot your BootP client to test the configuration; troubleshoot if necessary.
Step 4 Create an entry from which other entries can inherit option tags:
(a) In the CSM, select the BootP Config tab.
(b) Type subnet in the Entries field, and click Add.
(c) Choose Standard from the Group option menu.
Enter the following parameters:
| Parameter | Option Tag | Value |
| DNS servers | ds | 10.1.1.1 |
| Routers | gw | 10.1.1.254 |
| Subnet Mask | sm | 255.255.255.0 |
Step 5 Modify the static2 entry to inherit the subnet entry's parameters:
(a) Select "static2" in the Entries with Inheritance list.
(b) Choose Standard from the Group option menu in the Option Tags group.
(c) Clear the Subnet Mask, Routers, and DNS Servers parameter fields.
(d) Use the up and down arrow buttons to move the static2 entry directly below the subnet, then click the right arrow button to indent the static2 entry under the subnet entry.
Step 6 Choose Save Configuration from the File menu.
Step 7 Restart the DHCP/BootP service by clicking Restart.
Step 8 Boot your client to test the configuration; troubleshoot if necessary.
|
|