|
|

This chapter describes the steps for upgrading your system software to the Cisco 6400 Service Connection Manager (SCM) application Release 2.0.1.
 |
Note Throughout this guide, Cisco 6400 SCM application Release 1.x refers to Release 1.2 and Release 1.3. |
 |
Note Before you attempt to upgrade your system, read "Before Upgrading." |
You can upgrade from Release 1.x of the Cisco 6400 SCM to Release 2.0.1 using:
 |
Note The unmanaged time is the time taken to uninstall the Cisco 6400 SCM Release 1.x and Cisco Element Manager Framework (Cisco EMF) Release 2.1.4, and subsequently to install Cisco EMF Release 3.0 and Cisco 6400 SCM Release 2.0.1. If you are upgrading using a single workstation, a minimum estimated time is an hour. |
When you wish to upgrade and have other Cisco Element Manager Framework (Cisco EMF) Element Manager (EM) applications installed, you must upgrade using two workstations (so that existing Cisco EMs still running on Release 2.0.1 of the Cisco EMF can continue to be managed).
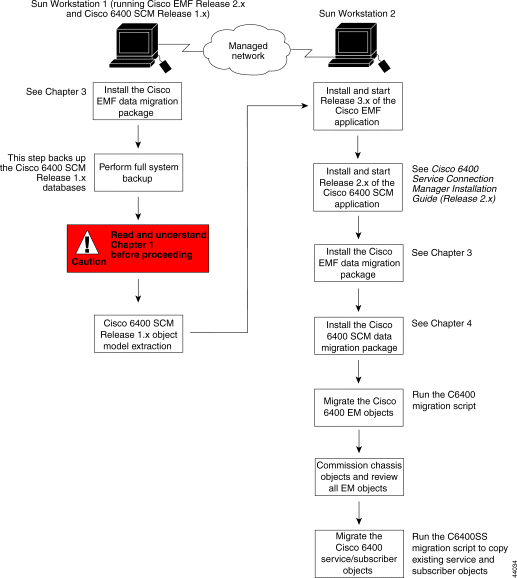
Figure 2-1 describes the upgrade procedure from Release 1.x to Release 2.0.1 using two workstations.

To upgrade from Release 1.x to Release 2.0.1 of the Cisco 6400 SCM using two workstations, follow these steps:
Step 2 Back up all Cisco 6400 SCM Release 1.x databases using your original (Cisco 6400 SCM, Release 1.x) workstation. Type:
CEMFROOT ./cemf backup
or
directory path ./cemf backup
 |
Note Substitute CEMFROOT with the directory path in which the Cisco 6400 SCM (Release 1.x) package is installed (by default, this is /opt/CEMF). You are prompted to confirm this directory. |
The ./cemf backup command creates a new directory called <CEMF>/backup/.
 |
Caution Copy the backup directory and the files contained within the backup directory to a separate directory out with the CEMF directory. |
 |
Note Use the CEMF V2.1.4 restore method to restore your original database setup if problems occur during upgrade. Refer to the Cisco Element Manager Framework User Guide (Release 2.1.4) for further details. |
extractData -o outputfile
 |
Note Substitute DMROOT with the directory path to which the Cisco EMF Data Migration package is installed (by default, this is /opt/DM). You are prompted to confirm this directory name. |
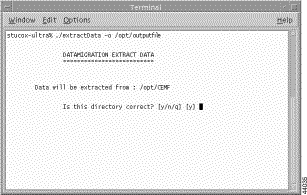
Figure 2-2 illustrates the terminal window showing data extraction.

 |
Note You must be a root user to run the extractData command. The greater number of objects and containments you extract, the longer the extraction process takes. This is the file that contains information about the objects deployed in the Cisco 6400 SCM (Release 1.x). This file is now ready for manipulation to a format suitable for the Cisco 6400 SCM (Release 2.0.1). |
 |
Caution Any management changes you make to the Cisco 6400 SCM Release 1.x system during migration are not migrated to Cisco 6400 SCM Release 2.0.1. |
On the second workstation:
Step 4 Install and start Release 3.x of the Cisco EMF application. Refer to the Cisco Element Manager Framework Installation Guide for further instructions.
Step 5 Install Release 2.0.1 of the Cisco 6400 SCM application. Refer to the Cisco 6400 Service Connection Element Manager Installation Guide for further instructions.
Step 6 Install the Cisco EMF data migration package on the workstation running the Cisco 6400 SCM (Release 2.0.1) application. Refer to the Cisco Data Migration Installation Guide: CEMF2 to CEMF3 for further details.
Step 7 Install the Cisco 6400 SCM Data Migration Package (and any applicable patches). Refer to "Installing the Data Migration Package for the Cisco 6400 Service Connection Manager."
Step 8 Migrate the Cisco 6400 SCM objects by running the C6400 migration script located in the DMROOT/bin directory. Type:
DMROOT ./C6400Migration outputfile
 |
Note Substitute DMROOT with the directory path to which the Cisco EMF Data Migration package is installed (by default, this is /opt/DM). You are prompted to confirm this directory name. |
 |
Note The output file created is the result of step 3. |
Step 9 All chassis and cards are initially in the Decommissioned state. Commission each of the chassis objects.
When the EM objects are deployed into Release 2.0.1 of the Cisco 6400 SCM, the objects are in the Decommissioned state. Refer to the appropriate section in the Cisco 6400 Service Connection Manager User Guide for details on how to commission a chassis. Commissioning a chassis automatically discovers any cards installed in the chassis not deployed into Release 1.x of the Cisco 6400 SCM. This step updates the alarm information that has not been migrated. Visually review the deployed objects to ensure that they appear as you expect in Release 2.0.1 of the Cisco 6400 SCM.
Delete any site, region, bay, or network objects that have been deployed as part of the upgrade that do not "parent" any Cisco 6400 SCM specific chassis objects. To view these objects, look in the PhysicalView window.
 |
Note Step 10 is only required if Release 1.x of the Cisco 6400 SCM was used to manage services and subscribers. |
Step 10 Migrate the Cisco 6400 Service Subscriber objects by running the C6400SS migration script located in the DMROOT/bin directory. Type:
./C6400SSMigration outputfile
You are now ready to start managing your system using Release 2.0.1 of the Cisco 6400 SCM application. Refer to the Cisco 6400 Service Connection Manager User Guide for further details.
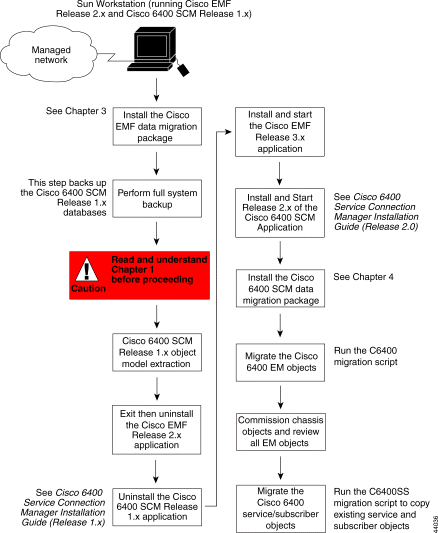
Figure 2-3 describes the database upgrade procedure from Release 1.x to Release 2.0.1 using a single workstation.

To upgrade from Release 1.x to Release 2.0.1 of the Cisco 6400 SCM using a single workstation, follow these steps:
Step 2 Back up all Cisco 6400 SCM Release 1.x databases in use on your original (Cisco 6400 SCM Release 1.x) workstation. Type:
CEMFROOT ./cemf backup
 |
Note Substitute CEMFROOT and DMROOT with the directory path to which the Cisco EMF Data Migration package is installed (by default, this is /opt/DM). You are prompted to confirm this directory name. |
 |
Caution Copy the backup directory and the files contained within the backup directory to a separate directory within the CEMF directory. |
Step 3 Extract all of the Cisco 6400 SCM (Release 1.x) data to a specified file. Type:
DMROOT /bin/extractData -o outputfile
Replace outputFile with the specified location in which you want to save the extracted data. Be sure to save this file in a safe location within the Cisco 6400 SCM (Release 1.x) directory structure.
The ./cemf backup command creates a new directory CEMFROOT/backup/.
Figure 2-4 illustrates the terminal window showing data extraction.

 |
Note You must be a root user to run the extractData command. The greater number of objects and containments you extract, the longer the extraction process takes. |
 |
Caution Do not attempt to manage any data on your Cisco 6400 SCM Release 1.x system during the migration process. Any changes you make to the Cisco 6400 SCM Release 1.x system during migration are not migrated to Cisco 6400 SCM Release 2.0.1. |
Step 4 Exit and uninstall Release 2.x of the Cisco EMF application. Refer to Release 2.x of the Cisco Element Manager Framework Installation Guide for further instructions.
Step 5 Uninstall Release 1.x of the Cisco SCM application. Refer to Release 1.x of the Cisco Service Connection Manager Installation Guide for further instructions.
Step 6 Install and start Release 3.x of the Cisco EMF application. Refer to the Cisco Element Manager Framework Installation Guide for further instructions.
Step 7 Install Release 2.0.1 of the Cisco 6400 SCM application. Refer to the Cisco 6400 Service Connection Element Manager Installation Guide for further instructions.
Step 8 Install the Cisco 6400 SCM data migration package. Refer to "Installing the Data Migration Package for the Cisco 6400 Service Connection Manager."
Step 9 Migrate the Cisco 6400 EM objects by running the C6400 migration script located in the DMROOT/bin directory. Type:
DMROOT ./C6400Migration outputfile
 |
Note Substitute DMROOT with the directory path to which the Cisco EMF Data Migration package is installed (by default, this is /opt/DM). You are prompted to confirm this directory name. |
 |
Note The output file created is the result of step 3. |
Step 10 All chassis and cards are initially in the Decommissioned state. Commission each of the chassis objects.
When the EM objects are deployed into Release 2.0.1 of the Cisco 6400 SCM, they are in the Decommissioned state. Refer to the appropriate section in the Cisco 6400 Service Connection Manager User Guide for details on how to commission a chassis. Commissioning a chassis automatically discovers any cards installed in the chassis not deployed into Release 1.x of the Cisco 6400 SCM. Visually review the deployed objects to ensure that they appear as you expect in Release 2.0.1 of the Cisco 6400 SCM.
Delete any site, region, bay, or network objects that have been deployed as part of the upgrade that do not "parent" any Cisco 6400 SCM specific chassis objects. You can view these objects in the PhysicalView window. Delete these objects only when the Cisco EMF Release 2.x is being used with multiple Element Managers.
 |
Note Step 11 below is only required if Release 1.x of the Cisco 6400 SCM was used to manage services and subscribers. |
Step 11 Migrate the Cisco 6400 Service Subscriber objects by running the C6400 migration script located in the DMROOT/bin directory. Type:
DMROOT ./C6400SSMigration outputfile
 |
Note Substitute DMROOT with the directory path to which the Cisco EMF Data Migration package is installed (by default, this is /opt/DM). You are prompted to confirm this directory name. |
You are now ready to start managing your system using Release 2.0.1 of the Cisco 6400 SCM application. Refer to the Cisco 6400 Service Connection Manager User Guide for further details.
![]()
![]()
![]()
![]()
![]()
![]()
![]()
![]()
Posted: Fri Aug 4 00:20:13 PDT 2000
Copyright 1989-2000©Cisco Systems Inc.