|
|

The Cisco 6400 Chassis Management window has four tabbed sections: Faults, Status, Configuration, and Inventory.
The Faults tab (shown in Figure 5-1) appears by default and has a single frame.
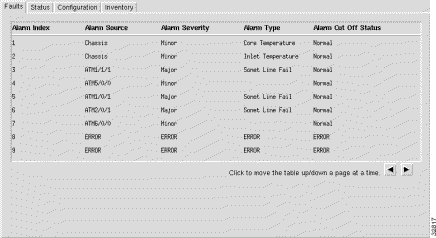
The Alarm Information table displays the following information:
Alarm Index --- an arbitrary integer value to uniquely identify an alarm information entry.
Alarm Source --- indicates the source of the alarm. The variable displays a string in one of the following formats:
Alarm Severity --- indicates the severity of the alarm, which can be minor, major or critical
Alarm Type --- indicates the type of alarm, which can be one of the following:
Alarm Cut Off Status --- indicates whether the audible/visible local alarm relay is cut off locally for the particular alarm source. When the Alarm Cut Off Status is normal, the alarm in the entry has closed the local audible/visible alarm relay contacts. When the Alarm Cut Off Status is cut off, the alarm in the entry initially closed the local relay contacts, but was suppressed by a local user pressing the external ACO button on the 6400 NSP.
The Status tab (shown in Figure 5-2) appears by default and is divided into five frames: Chassis Status, Power Supply 1, Power Supply 2, Temperature Threshold Configuration, and Facility Alarm Status.
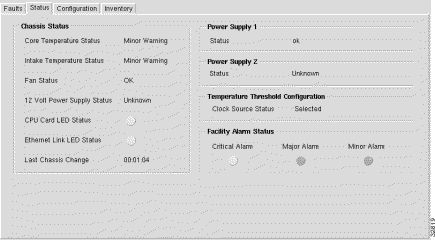
The Chassis Status frame (shown in Figure 5-2) displays the following status information:
Core Temperature Status --- chassis temperature status
Intake Temperature Status --- intake temperature of the chassis
Fan Status --- status of the chassis fan
12 Volt Power Supply Status --- status of the chassis 12 volt supply
CPU Card LED Status --- status of the CPU card
Ethernet Link LED --- status of the Ethernet link status LED on the CPU card
Last Chassis Change --- last time the chassis physical content was changed
The Power Supply 1 frame (shown in Figure 5-2) indicates the status of power supply 1.
The Power Supply 2 frame (shown in Figure 5-2) indicates the status of power supply number 2.
The Temperature Threshold Configuration frame (shown in Figure 5-2) displays the following status information:
Clock Source Status --- notification signifies that the agent detects a change in the system clock source status. Notification is generated when the status value changes.
The Alarm Status frame (shown in Figure 5-2) displays the following status information:
Critical Alarm --- when a green icon appears, no critical alarms are detected. When a red icon appears, at least one critical alarm is detected.
Major Alarm --- when a green icon appears, no major alarms are detected. When a red icon appears, at least one major alarm is detected.
Minor Alarm --- when a green icon appears, no minor alarms are detected. When a red icon appears, at least one minor alarm is detected.
The Configuration tab is divided into five frames: Chassis, Clock, Alarm, Temperature Threshold, and Power Supply Configuration.

The Chassis Configuration frame (shown in Figure 5-3) allows you to view and change the following Chassis configuration information:
The Clock Configuration frame (shown in Figure 5-3) allows you to view and change the following configuration information:
The Alarm Configuration frame (shown in Figure 5-3) allows you to view and change the following chassis configuration information:
Clear Alarms --- allows you to specify whether to clear all, major or minor alarms indication and reset the alarm contacts. You can set Clear Alarms to all, minor, major or done.
The temperature threshold Configuration frame (shown in Figure 5-3) allows you to view and change the following configuration information:
Core Major Threshold --- allows you to set and enable or disable the core major temperature alarm threshold.
Core Minor Threshold --- allows you to set and enable or disable the core minor temperature alarm threshold.
Intake Major Threshold --- allows you to set and enable or disable the intake major temperature alarm threshold.
Intake Minor Threshold --- allows you to set and enable or disable the intake minor temperature alarm threshold.
The Power Supply Configuration frame (shown in Figure 5-3) allows you to view and change the following configuration information:
PS1 Admin Status --- allows you to Enable, Disable or Reset power supply 1.
PS2 Admin Status --- allows you to Enable, Disable or Reset power supply 2.
The Inventory tab (shown in Figure 5-4) is divided into two frames.
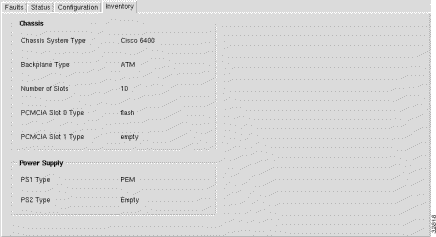
The Chassis frame (shown in Figure 5-4) displays the following inventory information:
Chassis System Type --- displays the chassis system type.
Backplane Type --- displays the chassis backplane type.
Number of Slots --- displays the number of slots in the chassis for plug-in modules.
PCMCIA Slot 0 Type --- displays the type of PCMCIA slot 0 type.
PCMCIA Slot 1 Type --- displays the type of PCMCIA slot 1type.
The Power Supply frame (shown in Figure 5-4) displays the following inventory information:
PS1 Type --- displays the type of power supply number 1.
PS2 Type --- displays the type of power supply number 2.
The Cisco 6400 NRP Management window is divided into five tabbed sections: Faults, Status, Performance, Configuration, and Inventory.
The Faults tab appears by default and is divided into two frames.
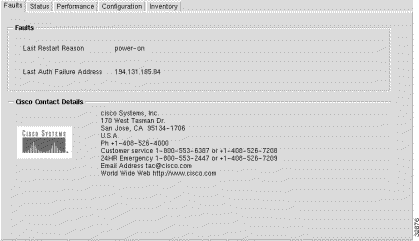
The Faults frame (shown in Figure 5-5) displays the following error information:
Last Restart Reason --- displays the reason why the system was last restarted.
Last Auth Failure Address --- displays the last SNMP authorization failure IP address.
The Cisco Contact Details frame displays Cisco contact details.
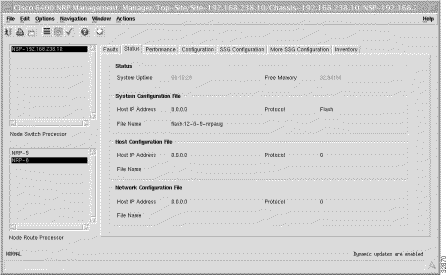
The Status tab (shown in Figure 5-6) is divided into four frames.
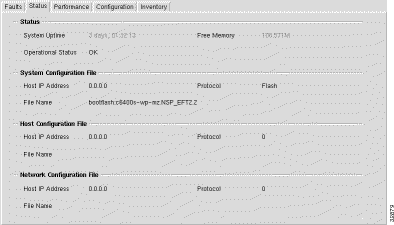
The Status frame (shown in Figure 5-6) displays the following information:
System Uptime --- displays the time that the system has been active.
Operational Status --- displays the operational status of the system.
Free Memory --- displays the amount of free memory in bytes.
The System Configuration File frame (shown in Figure 5-6) displays the following information:
Host IP Address --- displays the address of the host that supplied the system boot image.
File Name --- displays the name of the system boot image.
Protocol --- displays the protocol or media that supplied the system boot image.
The Host Configuration File frame (shown in Figure 5-6) displays the following information:
Host IP Address --- displays the address of the host that provided the host-configuration file.
File Name --- displays the name of the last configured host-confg file.
Protocol --- displays the protocol that supplied the host- confg file.
The Network Configuration File frame (shown in Figure 5-6) displays the following status information.
Host IP Address --- displays the address of the host that supplied the network-confg file.
File Name --- displays the name of the network configuration file.
Protocol --- displays the protocol that supplied the network-confg file.
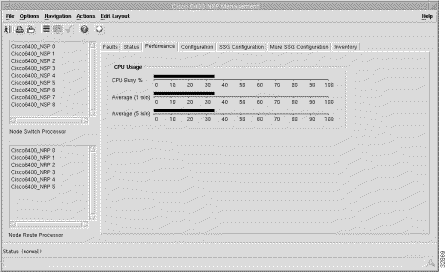
The Performance tab (shown in Figure 5-7) has a single frame.

The CPU Usage frame displays the following performance information:
CPU Busy --- displays the percentage usage of the CPU.
Average (1 min) --- displays the percentage usage of the CPU averaged over a minute period.
Average (5 min) --- displays the percentage usage of the CPU averaged over a five minute period.
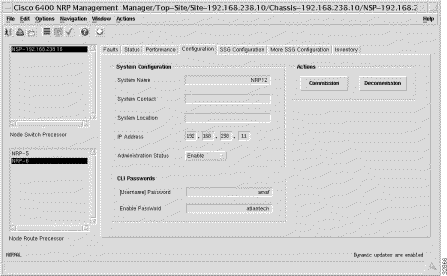
The Configuration tab (shown in Figure 5-8) has a single frame.
The System Configuration frame allows you to view and change the following configuration information:
System Name --- allows you to specify a name for the managed node. By convention, the System Name is the node's fully-qualified domain name. The field is blank when the System Name is unknown.
System Contact --- allows you to specify the contact person for the managed node, together with information on how to contact the person. When contact information is unknown, the field is blank.
System Location --- allows you to specify the physical location of the node. The System Contact field is blank when the location is unknown.
IP Address --- allows you to specify the IP address of the selected NSP.
Administration Status --- the Administration Status option allows you to enable, disable or reset the module. You can set the Administration Status option to:
The Actions frame allows you to commission and decommission the selected NSP.
Commission --- selecting the Commission button commissions the selected NSP, when it is decommissioned.
Decommission --- selecting the Decommission button decommissions the selected NSP, when it is commissioned.
The CLI Password frame allows you to view and change the following configuration information.
Password --- allows access to the command line interface.
The Inventory tab (shown in Figure 5-9) has a single frame.

The System Inventory frame displays the following inventory information:
Host Name --- represents the name of the host in printable ascii characters.
Domain Name --- displays the domain portion of the domain name of the host.
Hardware Version --- displays the hardware version of the module.
Module Type --- displays the type of module installed.
ROM ID --- displays the System Bootstrap description and version identification.
Module Description --- displays a descriptive string used by the agent to describe the module.
System Description --- displays a description of the entity. The System Description value should include the full name and version identification of the system's hardware type, software operating-system, and networking software.
BootImage Host --- displays the IP address of the host that supplied the current software.
Serial Number --- displays the serial number of the selected module.
Software Version --- displays the software version of the selected module.
The Cisco 6400 NRP Logs Window is divided into two tabbed sections: Event Command History and sysLog Message Table.
The Event Command History tab (shown in Figure 5-10) appears by default and is divided into two sections.
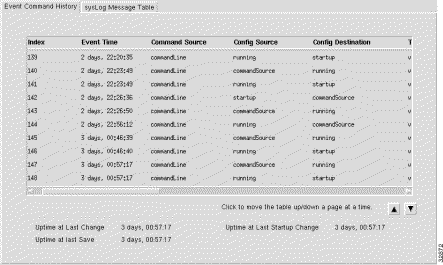
The table (shown in Figure 5-10) displays the following information:
Index --- an arbitrary integer value to uniquely identify the listed events. When it reaches the maximum value, the agent wraps the value back to 1 and may flush existing entries
Event Time --- the value of sysUpTime when the event occurred.
Command Source --- the source of the command that instigated the event. You will see either command Line or SNMP.
Config Source --- the configuration data source for the event.
Config Destination --- the configuration data destination for the event.
Terminal Type --- when Command Source is set to commandLine, the terminal type appears (unknown, console, terminal, virtual or auxiliary), otherwise notApplicable appears.
Terminal Number --- when Command Source is set to commandLine, the terminal number appears. When the terminal is no available or not applicable, -1 appears.
Terminal User --- when Command Source is set to commandLine, the name of the logged in user appears. When the terminal type is not available or not applicable nothing appears in the field.
Terminal Location --- when Command Source is set to commandLine, the hard-wired location of the terminal or the remote host for an incoming connection appears. When the terminal type is not available or not applicable nothing appears in the field.
Command Source Address --- when Terminal Type is set to virtual, the internet address of the connected system appears. When Command Source is set to SNMP, the internet address of the requester appears.
Virtual Host Name --- when Terminal Type is set to virtual, the host name of the connected system appears. When the terminal type is not available or not applicable nothing appears in the field.
Config Filename --- when Config Source or Config Destination is set to networkTftp or networkRcp, the configuration file name at the storage file server appears.
RCP User --- when Config Source or Config Destination is set to networkRcp, the remote user name appears.
The general information frame (shown in Figure 5-10) displays the following information:
Uptime at Last Change --- displays the amount of time the system had been up from when the running configuration was last changed.
Uptime at Last Save --- displays the amount of time the system had been up for, when the running configuration was last saved (written).
Uptime at last Startup Change --- displays the amount of time the system had been up for, when the startup configuration was last written to. In general the Uptime at last Startup Change is the default configuration used when cold starting the system. It may have been changed by a save of the running configuration or by a copy from elsewhere.
Entries Bumped --- displays the number of times the oldest entry in the Event Command Table was deleted to make room for a new entry.
Max Table Entries --- displays the maximum number of entries that can be held in the Event Command Table.
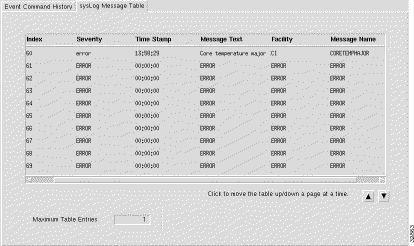
The SysLog Message Table tab (shown in Figure 5-11) is divided into two frames.

The table (shown in Figure 5-11) displays the following information:
Index --- an arbitrary integer value to uniquely identify the listed messages. When it reaches the maximum value the agent flushes the table and wraps the value back to 1.
Severity --- displays the severity of the message.
Time Stamp --- displays the time the system has been running (when the message was generated).
Message Text --- displays the text of the message. When the text of the message exceeds 255 bytes, the message is truncated to 254 bytes and a '*' character is appended, indicating that the message has been truncated.
Facility --- name of the facility that generated the Facility message.
Message Name --- a textual identification for the message type. A facility name in conjunction with a message name uniquely identifies a message type.
The general information frame (shown in Figure 5-11) displays the following information:
Messages Flushed --- displays the number of entries that have been removed from the SysLog Message Table in order to make room for new entries. The Messages Flushed object can be used to decide whether your polling frequency on the history table is fast enough and/or the size of your history table is large enough such that you are not missing messages.
The Cisco 6400 NRP Management window is divided into seven tabbed sections: Faults, Status, Performance, Configuration, Inventory, SSG Configuration, and More SSG Configuration.
The Faults tab (shown in Figure 5-12) appears by default and is divided into two frames.
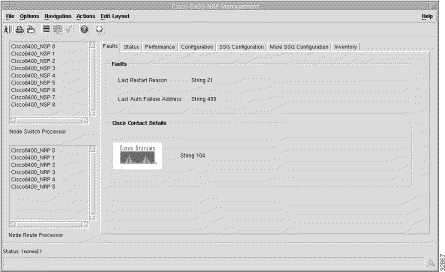
The Faults frame displays the following error information:
Last Restart Reason --- displays the reason why the system was last restarted.
Last Auth Failure Address --- displays the last SNMP authorization failure IP address.
The Cisco Contact Details frame displays Cisco contact information.
The Status tab (shown in Figure 5-13) is divided into four frames.
The Status frame (shown in Figure 5-13) displays the following information:
System Uptime --- displays the time that the system has been active.
Operational Status --- displays the operational status of the NRP.
Free Memory --- displays the amount of free memory in bytes.
The System Configuration File frame (shown in Figure 5-13) displays the following status information:
Host IP Address --- displays the address of the host that supplied the system boot image.
File Name --- displays the name of the system boot image.
Protocol --- displays the protocol or media that supplied the system boot image.
The Host Configuration File frame (shown in Figure 5-13) displays the following information:
Host IP Address --- displays the address of the host that provided the host-configuration file.
File Name --- displays the name of the last configured host-confg file.
Protocol --- displays the protocol that supplied the host-confg file.
The Network Configuration File frame (shown in Figure 5-13) displays the following information:
Host IP Address --- displays the address of the host that supplied the network-confg file.
File Name --- displays the name of the network configuration file.
Protocol --- displays the protocol that supplied the network-confg file.
The Performance tab (shown in Figure 5-14) has a single frame.
The CPU Usage frame (shown in Figure 5-14) displays the following information:
CPU Busy --- displays the percentage usage of the CPU.
Average (1 min) --- displays the percentage usage of the CPU averaged over a minute period.
Average (5 min) --- displays the percentage usage of the CPU averaged over a five minute period.
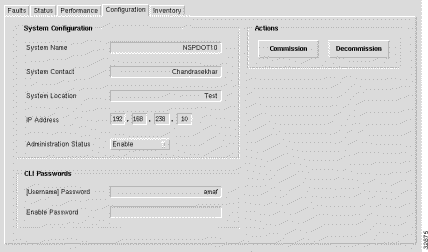
The Configuration tab (shown in Figure 5-15) is divided into three frames.
The System Configuration frame (shown in Figure 5-15) allows you to view and change the following configuration information.
System Name --- allows you to specify a name for the managed node. By convention, it is the node's fully-qualified domain name. When the name is unknown it is left blank.
System Contact --- allows you to specify the contact person for the managed node, together with information on how to contact them. When no contact information is known the field is left blank.
System Location --- allows you to specify the physical location of the node. The field is left blank when the location is unknown.
IP Address --- allows you to specify the IP address of the selected NRP.
Administration Status --- allows you to enable, disable or reset the module. You can set the Administration Status option to Reset (reset the module's control logic), Enable (enable the module) or Disable (disable the module).
The Actions frame (shown in Figure 5-15) allows you to commission and decommission the selected NRP.
Commission --- selecting Commission will commission the selected NRP, when it is decommissioned.
Decommission --- selecting Decommission will decommission the selected NRP, when it is commissioned.
The CLI Password frame (shown in Figure 5-15) allows you to view and change the following configuration information:
Password --- allows access to the command line interface.
Enable Password --- allows you to view privileged information on the command line interface.
The SSG Configuration tab (shown in Figure 5-18) has three frames.

The SSG Parameters frame (shown in Figure 5-18) are a pre-requisite for setting NRP SSG features. The SSG Parameters frame displays the following information:
Transparent Passthrough --- The NRP-SSG can support services and Transparent Passthrough simultaneously. When Transparent Passthrough is Enabled, unauthenticated traffic is allowed to pass through the NRP-SSG in either direction using normal rating methods. Transparent Passthrough is Enabled, by default.
Cisco Express Forwarding --- when Enabled will use CEF, if Disabled will use fast switching. Cisco Express Forwarding should only be set to Enabled when using Cisco IOS version 12.0(5) and later.
Default Network IP Address --- IP address of the default network.
Default Network Subnet Mask --- subnet mask of the default network. A subnet mask is a 32 bit number used to separate the network and host sections of an IP address.
Service Password --- this password must be the same as the passwords used in the PTA-MD local service profiles.
The Layer 3 Parameters frame (shown in Figure 5-18) allows you to enable service selection dashboard access and layer 3 services. The Layer 3 Parameters frame displays the following information:
SSG Auth-Port --- authentication port for the SSG. Defaults to 1645.
SSG Acct-Port --- accountancy port for the SSG. Defaults to 1646.
Shared Secret --- this is the shared password between the SSG and SSD.
The Local RADIUS Parameters frame (shown in Figure 5-18) are a pre-requisite for setting NRP SSG features. The Local RADIUS Parameters frame displays the following information:
IP Address --- IP address of the local radius server that resides within the SSGs default network.
Auth-Port --- authentication port for the local radius server. Defaults to 1645.
Acct-Port --- accountancy port for the local radius server. Defaults to 1646.
Secret Key --- this is the password shared between the local radius server and the SSG.
Configures the parameters set on the Cisco 6400 NRP Management Window (SSG Configuration Tab) on the NRP-SSG.
Allows you to deconfigure the parameters set on the NRP-SSG.
The More SSG Configuration tab (shown in Figure 5-17) has four frames: PPPoA Virtual Template, PPPoE Virtual Template, PPPoA Address Pool, and PPPoE Address Pool. The More SSG Configuration tab allows parameters to be set on the NRP-SSG that are pre-requisites of the PTA-MD service. Refer to the "PTA-MD Service" section for further details.
Before connecting a subscriber to a PTA-MD service using PPPoA or PPPoE the corresponding parameters on the More SSG Configuration tab should be configured. For example, the parameters in the PPPoE Virtual Template and PPPoE IP Address Pool should be set and configured to connect a subscriber to a PTA-MD service using PPPoE.
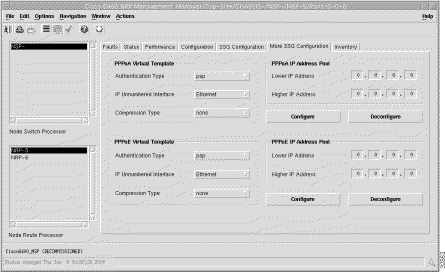
The PPPoA Virtual Template frame (shown in Figure 5-18) displays the following information:
Authentication Type --- authentication type for any subscribers wishing to connect to this service.
IP Unnumbered Interface --- this allows the operator to select which interface IP to target traffic at.
Compression Type --- the compression type used within the virtual template.
The PPPoE Virtual Template frame (shown in Figure 5-18) displays the following information:
Authentication Type --- authentication type for any subscribers wishing to connect to this service.
IP Unnumbered Interface --- this allows the operator to select which interface IP to target traffic at.
Compression Type --- the compression type used within the virtual template.
The PPPoA IP Address Pool frame (shown in Figure 5-18) displays the following information:
Lower IP Address --- the lower limit on the IP address pool.
Higher IP Address --- the upper limit on the IP address pool.
No IP address pool is configured when the Higher IP Address and Lower IP Address parameter are left blank.
Configures the parameters set on the Cisco 6400 NRP Management Window (SSG Configuration Tab) on the NRP-SSG.
Allows you to deconfigure the parameters set on the NRP-SSG.
The PPPoE IP Address Pool frame (shown in Figure 5-18) displays the following information:
Higher IP Address --- the upper limit on the IP address pool.
Lower IP Address --- the lower limit on the IP address pool.
No IP address pool is configured when the Higher IP Address and Lower IP Address parameter are left blank.
Configures the parameters set on the Cisco 6400 NRP Management Window (SSG Configuration Tab) on the NRP-SSG.
Allows you to deconfigure the parameters set on the NRP-SSG.
The Inventory tab (shown in Figure 5-18) has a single frame.

The System Inventory frame (shown in Figure 5-18) displays the following information:
Host Name --- displays the name of the host in printable ascii characters.
Domain Name --- displays the domain portion of the domain name of the host.
Hardware Version --- displays the hardware version of the module.
Module Type --- displays the type of module installed.
ROM ID --- displays the System Bootstrap description and version identification.
Module Description --- displays a descriptive string used by the agent to describe the module.
System Description --- displays a description of the entity. The System Description should include the full name and version identification of the system's hardware type, software operating-system, and networking software.
BootImage Host --- displays the IP address of the host which supplied the current software.
Serial Number --- displays the serial number of the selected module.
Software Version --- displays the software version number of the selected module.
The Cisco 6400 NRP Logs window is divided into two tabbed sections: Event Command History and sysLog Message Table.
The Event Command History tab (shown in Figure 5-19) appears by default.

The table (shown in Figure 5-19) displays the following information:
Index --- an arbitrary integer value to uniquely identify the listed events. When it reaches the maximum value, the agent wraps the value back to 1 and may flush existing entries
Event Time --- displays the value of suspecting when the event occurred.
Command Source --- displays the source of the command that instigated the event. You will see either commandLine or SNMP.
Config Source --- displays the configuration data source for the event.
Config Destination --- displays the configuration data destination for the event.
Terminal Type --- when Command Source is set to commandLine, the terminal type appears (unknown, console, terminal, virtual or auxiliary), otherwise notApplicable appears.
Terminal Number --- when Command Source is set to commandLine, the terminal number appears. When the terminal is no available or not applicable then -1 appears.
Terminal User --- when Command Source is set to commandLine, the name of the logged in user appears. Nothing appears when the terminal type is not available or not applicable.
Terminal Location --- when Command Source is set to commandLine, the hard-wired location of the terminal or the remote host for an incoming connection appears. Nothing appears when the terminal type is not available or not applicable nothing appears.
Command Source Address --- when Terminal Type is set to virtual, the internet address of the connected system appears. When Command Source is 'SNMP', the internet address of the requester appears.
Virtual Host Name --- when Terminal Type is set to virtual, the host name of the connected system appears. When the terminal type is not available or not applicable nothing appears.
Config Filename --- when Config Source or Config Destination is set to networkTftp ornetworkRcp, the configuration file name at the storage file server appears.
RCP User --- when Config Source or Config Destination is set to networkRcp, the remote user name appears.
The general information frame displays the following information:
Uptime at Last Change --- displays the amount of time the system had been up from when the running configuration was last changed.
Uptime at Last Save --- displays the amount of time the system had been up when the running configuration was last saved (written).
Uptime at last Startup Change --- displays the amount of time the system had been up when the startup configuration was last written to. In general the Uptime at last Startup Change is the default configuration used when cold starting the system. It may have been changed by a save of the running configuration or by a copy from elsewhere.
Entries Bumped --- displays the number of times the oldest entry in Event Command History Table was deleted to make room for a new entry.
Max Table Entries --- displays the maximum number of entries that can be held in the Event Command History Table.
The SysLog Message Table tab (shown in Figure 5-20) is divided into two frames.
The table (shown in Figure 5-20) displays the following information:
Index --- an arbitrary integer value to uniquely identify the listed messages. When it reaches the maximum value the agent flushes the table and wraps the value back to 1.
Facility --- displays the name of the facility that generated the message.
Severity --- displays the severity of the message.
Message Name --- a textual identification for the message type. A facility name in conjunction with a message name uniquely identifies a message type.
Message Text --- displays the text of the message. When the text of the message exceeds 255 bytes, the message is truncated to 254 bytes and a '*' character is appended, indicating that the message has been truncated.
Time Stamp --- displays the amount of time the system had been up when the message was generated.
The general information frame (shown in Figure 5-20) displays the following information:
Messages Flushed --- displays the number of entries that have been removed from the SysLog Message Table in order to make room for new entries. The Messages Flushed object can be utilized to determine whether your polling frequency on the history table is fast enough and/or the size of your history table is large enough such that you are not missing messages.
Max Table Entries --- displays the upper limit on the number of entries that the SysLog Message Table may contain. A value of 0 will prevent any history from being retained. When the table is full, the oldest entry is deleted and a new one is created.
The Cisco 6400 NRP ATM Port Management window is divided into six tabbed sections: Faults, Status, Performance, Configuration, More Configuration, and Inventory.
The Faults tab (shown in Figure 5-21) appears by default and has one frame.

The Errors frame (shown in Figure 5-21) displays the following error information.
Transmitted Message Errors --- displays the number of incorrect messages detected on the interface. The Incorrect Messages Counter reflects any sort of incorrect information in a message.
Detected Message Errors --- displays the number of incorrect messages detected on the interface. The incorrect messages counter reflects any sort of incorrect information in a message.
SSCOP Errored PDUs --- displays the sum of the following errors:
Invalid PDUs are defined in SSCOP and consist of PDUs with incorrect length (MAA-ERROR code U), undefined PDU type code or not 32-bit aligned.
PDUs that result in MAA error codes are discarded.
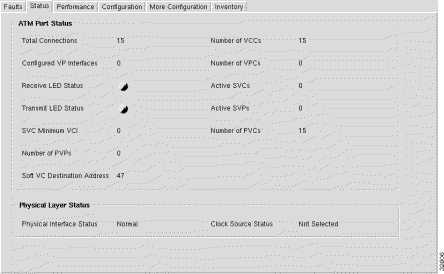
The Status tab (shown in Figure 5-22) has a single frame.

The ATM Port Status frame displays the following information:
Total Connections --- displays the total number of existing connections at the interface.
Configured VP Interfaces --- displays the number of configured VP interfaces at the physical interface.
Receive LED Status --- displays the receive LED color of the port. It can be one of the following: off, steadyGreen, steadyYellow, steadyRed, flashGreen, flashYellow or flashRed.
Transmit LED Status --- displays the transmit LED color of the port. It can be one of the following: off, steadyGreen, steadyYellow, steadyRed, flashGreen, flashYellow or flashRed.
SVC Minimum VCI --- displays the minimum of the range of values from which VCIs are assigned to new SVC connections. When the value is larger, more VCIs are reserved for setting up PVCs. It applies to every VPI of the physical interface and every logical port.
Number of PVPs --- displays the number of permanent virtual paths at the interface.
Soft VC Destination Address --- displays the 20 byte ATM address of the destination ATM interface for soft ATM PVC/PVP.
Number of VCCs --- displays the number of VCCs (PVCs and SVCs) configured for use at the ATM interface.
Number of VPCs --- displays the number of VPCs (PVCs and SVCs) configured for use at the ATM interface. At the ATM UNI, the configured number of VPCs (PVCs and SVCs) can range from 0 to 256 only.
Active SVCs --- displays the number of active switched virtual channels at the interface.
Active SVPs --- displays the number of active switched virtual paths at the interface.
Number of PVCs --- displays the number of permanent virtual channels at the interface.
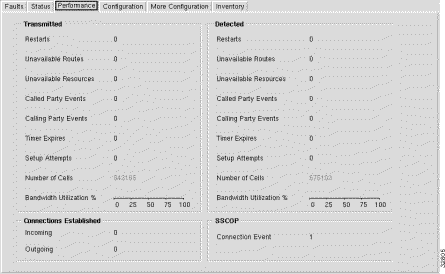
The Performance tab is divided into four frames.
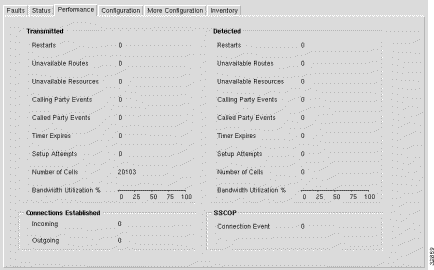
The Transmitted frame (shown in Figure 5-23) displays the following performance information:
Restarts --- displays the number of Restart Activity errors transmitted from the interface. The Restart Activity Counter provides a count of host, switch, or network restart activity. The counter is incriminated when transmitting a RESTART message.
Unavailable Routes -Displays the number of route unavailability transmitted from the interface. The counter is incrimented when a RELEASE, RELEASE COMPLETE (only when not preceded by a RELEASE mesg for the same call), ADD PARTY REJECT, or STATUS message that contains one of the following cause code values is transmitted (Cause values apply to both UNI3.0 and UNI3.1):
| Cause Value | Meaning |
1 | unallocated (unassigned) number |
1 | no route to specified transit network |
3 | No route to destination |
Unavailable Resources --- displays the number of Resource Unavailability transmitted from the interface. The counter is incriminated when a RELEASE, RELEASE COMPLETE (only when not preceded by a RELEASE message for the same call), ADD PARTY REJECT, or STATUS message that contains one of the following cause code values is received:
| Cause Value | Meaning |
17 | user busy |
18 | no user responding |
21 | call rejected |
22 | number changed |
23 | user rejects all calls with calling line ID restriction (CLIR) |
27 | destination out of order |
31 | normal, unspecified |
88 | incompatible destination |
Calling Party Events --- displays the number of Calling Party Events transmitted from the interface. The counter monitors error events that occur due to the originating user doing something wrong. The counter is incriminated when a RELEASE, RELEASE COMPLETE (only when not preceded by a RELEASE message for the same call), ADD PARTY REJECT, or STATUS message that contains one of the following cause code values is transmitted:
| Cause Value | Meaning |
28 | invalid number format (address incomplete) |
43 | access information discarded |
57 | bearer capability not authorized |
65 | bearer capability not implemented |
73 | unsupported combination of traffic parameters |
78 | AAL parameters cannot be supported (UNI3.1 only) |
91 | invalid transit network selection |
93 | AAL parameters cannot be supported (UNI3.0 only) |
Called Party Events --- displays the number of Called Party Responsible For Unsuccessful Call transmitted from the interface. The counter is incriminated when a RELEASE, RELEASE COMPLETE (only when not preceded by a RELEASE message for the same call), ADD PARTY REJECT, or STATUS message that contains one of the following cause code values is transmitted.
| Cause Value | Meaning |
17 | user busy |
18 | no user responding |
21 | all rejected |
22 | number changed |
23 | user rejects all calls with calling line ID restriction (CLIR) |
27 | destination out of order |
31 | normal, unspecified |
88 | incompatible destination |
Timer Expires --- displays the number of Timer Expiries transmitted from the interface. The Timer Expiries counter provides a count of network timer expiries, and to some extent, host or switch timer expiries.
The conditions for incrementing the Timer Expires counter are:
Expiry of any network timer --- receipt of a RELEASE or RELEASE COMPLETE message with Cause #102, recovery on timer expiry.
Setup attempts --- displays the number of call set up attempts (both successful and unsuccessful) transmitted on the interface.
Number of Cells --- displays the number of cells transmitted on the interface, including p2p and p2mp cells.
Bandwidth Utilization -Displays the utilized bandwidth as a percentage of the maximum bandwidth supported by the port.
The Connections Established frame (shown in Figure 5-23) displays the following performance information:
Incoming --- displays the number of SVC VCCs established at the signalling entity for incoming connections.
Outgoing --- displays the number of SVC VCCs established at the signalling entity for outgoing connections.
The Detected frame (shown in Figure 5-23) displays the following performance information.
Restarts --- displays the number of Restart Activity errors detected on the interface. The Restart Activity Counter provides a count of host, switch, or network restart activity. The counter is incriminated when receiving a RESTART message.
Unavailable Routes --- displays the number of Route Unavailability detected on the interface. The counter is incriminated when a RELEASE, RELEASE COMPLETE (only when not preceded by a RELEASE message for the same call), ADD PARTY REJECT, or STATUS message that contains one of the following cause code values is received.
| Cause Value | Meaning |
1 | unallocated (unassigned) number |
1 | no route to specified transit network |
3 | No route to destination |
88 | incompatible destination |
Unavailable Resources --- displays the number of Resource Unavailability detected on the interface. The Unavailable Resources counter incriminated when a RELEASE, RELEASE COMPLETE (only when not preceded by a RELEASE message for the same call), ADD PARTY REJECT, or STATUS message that contains one of the following cause code values is received.
| Cause Value | Meaning |
35 | requested VPCI/VCI not available |
37 | user cell rate not available (UNI3.1 only) |
38 | network out of order |
41 | temporary failure |
45 | no VPCI/VCI available |
47 | resource unavailable, unspecified |
49 | Quality of Service unavailable |
51 | user cell rate not available (UNI3.0 only) |
58 | bearer capability not presently available |
63 | Service or option not available, unspecified |
92 | too many pending add party requests |
Calling Party Events --- number of Calling Party Events detected on the interface. The counter monitors error events that occur due to the originating user doing something wrong. The counter is incriminated when a RELEASE, RELEASE COMPLETE (only when not preceded by a RELEASE message for the same call), ADD PARTY REJECT, or STATUS message that contains one of the following cause code values is received:
| Cause Value | Meaning |
28 | invalid number format (address incomplete) |
43 | access information discarded |
57 | bearer capability not authorized |
65 | bearer capability not implemented |
73 | unsupported combination of traffic parameters |
78 | AAL parameters cannot be supported (UNI3.1 only) |
91 | invalid transit network selection |
93 | AAL parameters cannot be supported (UNI3.0 only) |
Called Party Events --- displays the number of Called Party Responsible For Unsuccessful Call detected on the interface. The counter is incriminated when a RELEASE, RELEASE COMPLETE (only when not preceded by a RELEASE message for the same call), ADD PARTY REJECT, or STATUS message that contains one of the following cause code values is received:
| Cause Value | Meaning |
17 | user busy |
18 | no user responding |
21 | all rejected |
22 | number changed |
23 | user rejects all calls with calling line ID restriction (CLIR) |
27 | destination out of order |
31 | normal, unspecified |
88 | incompatible destination |
Timer Expires --- displays the number of Timer Expiries detected on the interface. The Timer Expiries Counter provides a count of network timer expiries, and to some extent, host or switch timer expiries. The conditions for incrementing the counter are:
Setup attempts --- displays the number of call setup attempts (both successful and unsuccessful) detected on the interface.
Number of Cells --- the number of cells received on the interface, including p2p and p2mp cells.
The SSCOP section of the Performance tab allows you to view the following performance information.
Connection Event --- displays the SSCOP Connection Events Counter. The counter counts the sum of the following errors:
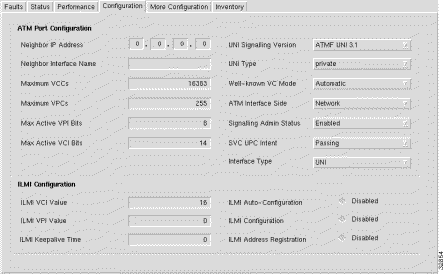
The window shown below appears by selecting the Configuration tab.The window is divided into two sections.
The ATM Port Configuration frame (shown in Figure 5-24) allows you to view and change the following configuration information:
Neighbor IP Address --- allows you to specify the IP address of the neighbor system connected to the far end of the interface, to which a Network Management Station can send SNMP messages, as IP datagrams sent to UDP port 161, in order to access network management information concerning the operation of that system.
Neighbor Interface Name --- allows you to specify the textual name of the interface on the neighbor system on the far end of the interface, and to which the interface connects. When the neighbor system is manageable through SNMP and supports the object ifName, the value of the object must be identical with that of ifName for the ifEntry of the lowest level physical interface for the port. When the interface does not have a textual name, the value of the object is a zero length string. Note that the value of the object may be obtained in different ways, for example, by manual configuration, or through ILMI interaction with the neighbor system.
Maximum VCCs --- allows you to specify the maximum number of VCCs (PVCs and SVCs) supported at the ATM interface.
Maximum VPCs --- allows you to specify the maximum number of VPCs (PVCs and SVCs) supported at the ATM interface. At the ATM UNI, the maximum number of VPCs (PVCs and SVCs) ranges from 0 to 256 only.
Max Active VPI Bits --- allows you to specify the maximum number of active VPI bits configured for use at the ATM interface. At the ATM UNI, the maximum number of active VPI bits configured for use ranges from 0 to 8 only.
Max Active VCI Bits --- allows you to specify the maximum number of active VCI bits configured for use at the ATM interface.
UNI Signalling Version --- allows you to specify the version of UNI signalling that is currently being used on the interface. You can set the UNI Signalling Version to:
UNI Type --- allows you to specify the type of User to Network Interface (UNI). You can set the UNI Type to public or private.
Well-known VC Mode --- allows you to specify whether well-known VCs should be automatically or manually created for the interface. You can set the Well-known VC Mode to:
ATM Interface Side --- allows you to specify the side of ATM interface. You can set the ATM Interface Side to either a User or Network side or Not Applicable. A Not Applicable value implies that Interface Type is other than uni or iisp.
Signalling Admin Status --- allows you to Enable or Disable signalling/sscop on the interface. You can set the Signalling Admin Status option to:
SVC UPC Intent --- allows you to specify the policing (Usage Parameter Control or UPC) action to take for SVCs established through the interface. Yo can set the SVC UPC Intent option to Passing, Tagging or Dropping.
Interface Type --- allows you to specify the type of ATM interface. You can set the Interface Type to Other, UNI (User to Network), PNNI, IISP or NNI PVC Only.
The ILMI Configuration frame (shown in Figure 5-24) allows you to view and change the following configuration information:
ILIM VCI Value --- allows you to specify the VCI value of the VCC supporting the ILMI at the ATM interface. When the values of atmInterfaceIlmiVpi and atmInterfaceIlmiVci are both equal to zero then the ILMI is not supported at the ATM interface.
ILMI VPI Value --- allows you to specify the VPI value of the VCC supporting the ILMI at the ATM interface. When the values of atmInterfaceIlmiVpi and atmInterfaceIlmiVci are both equal to zero then the ILMI is not supported at the ATM interface.
ILMI Keepalive Time --- allows you to specify the amount of time that should elapse between successive ILMI keepalive messages sent on the interface. A value of 0 disables ILMI keepalive messages on the interface.
ILMI Auto-Configuration --- allows you to Enable or Disable the ILMI link and interface type determination. You can set the ILMI Auto-Configuration option to:
ILMI Configuration --- allows you to Enable or Disable ILMI configuration on the interface.
ILMI Address Registration --- allows you to Enable or Disable the ILMI Address Registration on the interface.
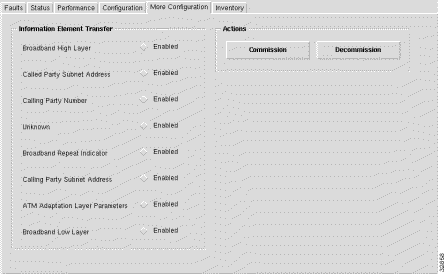
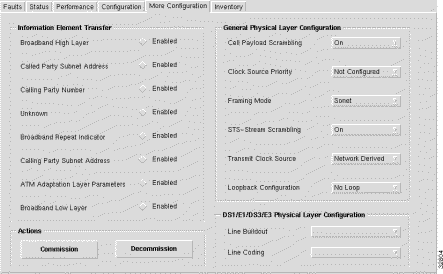
The More Configuration tab is divided into two frames.
The Information Element Transfer frame (shown in Figure 5-25) allows you to view and change the following configuration information:
Broadband High Layer --- allows you to specify whether to accept, transfer, and deliver the Broadband High Layer Information Element from the calling party to the called party. You can set the Broadband High Layer to:
Called Party Subnet Address --- the Called Party Subnet Address is required for ATM systems that support only a value of "disabled" (that is, the ATM systems does not support the feature associated with the parameter).
Calling Party Number --- allows you to specify whether the Calling Party Number Information Element is transferred to the called party address. You can set the Calling Party Number to:
Unknown --- allows you to specify whether to accept, transfer, and deliver the unknown Information Element from the calling party to the called party, when the IE instruction field flag is set to zero. You can set the Unknown option to:
Broadband Repeat Indicator --- the Broadband Repeat Indicator is required for ATM systems that support only a value of "disabled" (that is, the ATM systems does not support the feature associated with the parameter).
Calling Party Subnet Address --- allows you to specify whether to accept and transfer the Calling Party Subaddress Information Element from the calling party to the called party. You can set the Calling Party Subnet Address to:
ATM Adaption Layer Parameters --- allows you to specify whether to accept, transfer, and deliver the ATM Adaptation Layer Parameters Information Element from the calling party to the called party. You can set the ATM Adaption Layer Parameters option to:
Broadband Low Layer -The Broadband Low Layer parameter is required for ATM systems that support only a value of "disabled" (that is, the ATM systems does not support the feature associated with the parameter).
The Actions frame (shown in Figure 5-25) allows you to commission or decommission the selected NRP ATM Port.
Commission --- commissions the selected NRP ATM Port, when it is decommissioned.
Decommission --- decommissions the selected NRP ATM Port, when it is commissioned.
The Inventory tab (shown in Figure 5-26) has a single frame.
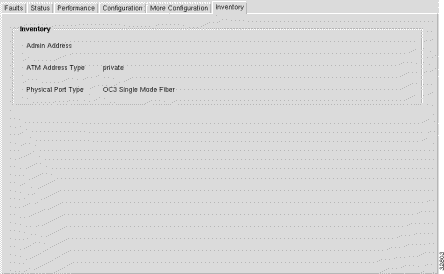
The Inventory frame (shown in Figure 5-26) displays the following inventory information:
Admin Address --- displays the address assigned for administrative purposes, for example, an address associated with the service provider side of a public network UNI. When the interface has no assigned administrative address, or when the address used for administrative purposes is the same as that used for ifPhysAddress, then the Admin Address is an octet string of zero length.
ATM Address Type --- displays the type of primary ATM address configured for use at the ATM interface.
Physical Port Type --- displays the type of physical layer medium on the port.
The Cisco 6400 Line Card Management window has one tabbed section.
The Line Card tab is divided into four frames.

The Status frame (shown in Figure 5-27) displays the following information:
Operational Status --- displays the operational status of the submodule.
The Configuration frame allows you to view and change the following information:
Administration Status --- allows you to set the administration status to Reset or OK.
The Inventory frame displays the following information:
Module Type --- displays the module type of the selected Line Card.
Serial Number --- displays the serial number of the sub-module.
Max Supported Ports --- displays the maximum number of ports supported by the sub-module.
Hardware Version (major) --- displays the major hardware version of the sub-module. Together with ciscoLS1010SubModuleHwVersionMinor, this completely specifies the hardware version of the sub-module.
Hardware Version (minor) --- displays the minor hardware version of the sub-module. Together with ciscoLS1010SubModuleHwVersion, this completely specifies the hardware version of the sub-module.
Software Version --- displays the current software version number.
The Actions frame allows you to commission and decommission the selected Line Card.
Commission --- commissions the selected Line Card, when it is decommissioned.
Decommission --- decommissions the selected Line Card, when it is commissioned.
The Cisco 6400 Line Card ATM Port Management window is divided into six tabbed sections: Faults, Status, Performance, Configuration, More Configuration, and Inventory.
The Faults tab (shown in Figure 5-28) appears by default and is divided into three frames.

The Errors frame (shown in Figure 5-28) displays the following error information:
Transmitted Message Errors --- displays the number of Incorrect Messages detected on the interface. The Incorrect Messages Counter reflects any sort of incorrect information in a message.
Detected Message Errors --- displays the number of Incorrect Messages detected on the interface. The Incorrect Messages Counter reflects any sort of incorrect information in a message.
SSCOP Errored PDUs --- displays the sum of the following errors:
Invalid PDUs are defined in SSCOP and consist of PDUs with incorrect length (MAA-ERROR code U), undefined PDU type code or not 32-bit aligned. PDUs that result in MAA error codes are discarded.
The Sonet Frame Errors frame (shown in Figure 5-28) displays the following error information:
Path FEBE Errors --- displays the number of G1 (Path FEBE) errors on the physical interface. This object is only present for SONET interfaces.
Line FEBE Errors --- displays the number of Z2 (Line FEBE) errors on the physical interface. This object is only present for SONET interfaces.
Path Parity Errors --- displays the number of B3 (BIP) errors on the physical interface. This object is only present for SONET interfaces.
Line Parity Errors --- displays the number of B2 (BIP) errors on the physical interface. This object is only present for SONET interfaces.
Section Parity Errors --- displays the number of B1 (BIP) errors on the physical interface. This object is only present for SONET interfaces.
The DS1/E1/DS3/E3 Errors frame displays the following error information:
LCV Errors --- displays the number of CRC errors (in CRC-4 mode) on the physical interface. This object is only present for E1 interfaces.
C-Bit Parity Errors --- displays the number of C-bit parity violations on the physical interface. This object is only present for DS3 interfaces.
P-bit Parity Errors --- displays the number of P-bit parity violations or E3 G.832 BIP-8 errors on the physical interface. This object is present only for DS3/E3 interfaces.
PLCP BIP Violations --- displays the number of PLCP BIP violations on the physical interface. This object is only present for DS3/E3/DS1/E1 interfaces.
E1 CRC Errors --- displays the number of bit errors (CRC-6 error in ESF mode and framing bit error in SF mode) on the physical interface. This object is only present for DS1 interfaces.
DS1 Bit Errors --- displays the number of Line Code Violation errors on the physical interface. This object is only present for DS3/E3/DS1/E1 interfaces.
The Status tab is divided into two frames.
The ATM Port Status section (shown in Figure 5-29) displays the following status information:
Total Connections --- displays the total number of existing connections at the interface.
Configured VP Interfaces --- displays the number of configured VP interfaces at the physical interface.
Receive LED Status --- displays the receive LED color of the port. It can be off, steadyGreen, steadyYellow, steadyRed, flashGreen, flashYellow or flashRed
Transmit LED Status --- displays the transmit LED color of the port. It can be off, steadyGreen, steadyYellow, steadyRed, flashGreen, flashYellow or flashRed.
SVC Minimum VCI --- displays the minimum of the range of values from which VCI's are assigned to new SVC connections. When the SVC Minimum VCI value is larger, more VCI's are reserved for setting up PVCs. The SVC Minimum VCI value applies to every VPI of the physical interface and every logical port.
Number of PVPs --- displays the number of permanent virtual paths at the interface.
Soft VC Destination Address --- displays the 20 byte ATM address of the destination ATM interface for soft ATM PVC/PVP.
Number of VCCs --- displays the number of VCCs (PVCs and SVCs) configured for use at the ATM interface.
Number of VPCs --- displays the number of VPCs (PVCs and SVCs) configured for use at the ATM interface. At the ATM UNI, the configured number of VPCs (PVCs and SVCs) can range from 0 to 256 only.
Active SVCs --- displays the number of active switched virtual channels at the interface.
Active SVPs --- displays the number of active switched virtual paths at the interface.
Number of PVcs --- displays the number of permanent virtual channels at the interface.
The Physical Layer Status frame (shown in Figure 5-29) displays the following status information:
Physical Interface Status --- displays the status of the physical interface. The value of the object is only valid when the interface's ifAdminStatus has the value 'up'. Note that some of the enumerated values are specific to a particular physical layer. You will see: normal, los, lof, loc, ais, yellowLine, yellowPath, lop, idle, yellowAlarm, plcpLOF, plcpYellow, maFERF, pathAis or ocd.
Clock Source Status --- displays the network clock source status of the interface:
The Performance tab (shown in Figure 5-30) is divided into four frames.
The Transmitted frame (shown in Figure 5-30) displays the following performance information.
Restarts --- displays the number of Restart Activity errors transmitted from the interface. The Restart Activity Counter provides a count of host, switch, or network restart activity. The Restarts counter is incriminated when transmitting a RESTART message.
Unavailable Routes -Displays the number of Restart Activity errors transmitted from the interface. The Restart Activity Counter provides a count of host, switch, or network restart activity. The Unavailable Routes counter is incriminated when transmitting a RESTART message.
Unavailable Resources --- displays the number of Resource Unavailability transmitted from the interface. The Unavailable Resources counter is incriminated when a RELEASE, RELEASE COMPLETE (only when not preceded by a RELEASE mesg for the same call), ADD PARTY REJECT, or STATUS message that contains one of the following cause code values is received.
| Cause Value | Meaning |
17 | user busy |
18 | no user responding |
21 | call rejected |
22 | number changed |
23 | user rejects all calls with calling line ID restriction (CLIR) |
27 | destination out of order |
31 | normal, unspecified |
88 | incompatible destination |
Called Party Events --- displays the number of Called Party Responsible For Unsuccessful Call transmitted from the interface. The Called Party Events counter is incriminated when a RELEASE, RELEASE COMPLETE (only when not preceded by a RELEASE message for the same call), ADD PARTY REJECT, or STATUS message that contains one of the following cause code values is transmitted:
| Cause Value | Meaning |
17 | user busy |
18 | no user responding |
21 | all rejected |
22 | number changed |
23 | user rejects all calls with calling line ID restriction (CLIR) |
27 | destination out of order |
31 | normal, unspecified |
88 | incompatible destination |
Calling Party Events --- displays the number of Calling Party Events transmitted from the interface. The Calling Party Events counter monitors error events that occur due to the originating user doing something wrong. The Calling Party Events counter is incriminated when a RELEASE, RELEASE COMPLETE (only when not preceded by a RELEASE mesg for the same call), ADD PARTY REJECT, or STATUS message that contains one of the following cause code values is transmitted:
| Cause Value | Meaning |
28 | invalid number format (address incomplete) |
43 | access information discarded |
57 | bearer capability not authorized |
65 | bearer capability not implemented |
73 | unsupported combination of traffic parameters |
78 | AAL parameters cannot be supported (UNI3.1 only) |
91 | invalid transit network selection |
93 | AAL parameters cannot be supported (UNI3.0 only) |
Timer Expires --- displays the number of Timer Expiries transmitted from the interface. The Timer Expiries counter provides a count of network timer expiries, and to some extent, host or switch timer expiries. The conditions for incrementing the Timer Expiries counter are:
Expiry of any network timer
Receipt of a RELEASE or RELEASE COMPLETE message with Cause #102, 'recovery on timer expiry'
Setup attempts --- displays the number of call setup attempts (both successful and unsuccessful) transmitted on this interface.
Number of Cells --- displays the number of cells transmitted on the interface, including p2p and p2mp cells.
Bandwidth Utilization --- displays the utilized bandwidth as a percentage of the maximum bandwidth supported by the port.
The Connections Established frame (shown in Figure 5-30) displays the following performance information:
Incoming --- displays the number of SVC VCCs established at the signalling entity for incoming connections.
Outgoing --- displays the number of SVC VCCs established at the signalling entity for outgoing connections.
The Detected frame (shown in Figure 5-30) displays the following performance information:
Restarts --- displays the number of Restart Activity errors detected on the interface. The Restart Activity Counter provides a count of host, switch, or network restart activity. The Restarts counter is incriminated when receiving a RESTART message.
Unavailable Routes --- displays the number of Route Unavailability detected on the interface. The Unavailable Routes counter is incriminated when a RELEASE, RELEASE COMPLETE (only when not preceded by a RELEASE mesg for the same call), ADD PARTY REJECT, or STATUS message that contains one of the following cause code values is received.
| Cause Value | Meaning |
1 | unallocated (unassigned) number |
1 | no route to specified transit network |
3 | No route to destination |
88 | incompatible destination |
Unavailable Resources --- displays the number of Resource Unavailability detected on the interface. The Unavailable Resources counter is incriminated when a RELEASE, RELEASE COMPLETE (only when not preceded by a RELEASE mesg for the same call), ADD PARTY REJECT, or STATUS message that contains one of the following cause code values is received.
| Cause Value | Meaning |
35 | requested VPCI/VCI not available |
37 | user cell rate not available (UNI3.1 only) |
38 | network out of order |
41 | temporary failure |
45 | no VPCI/VCI available |
47 | resource unavailable, unspecified |
49 | Quality of Service unavailable |
51 | user cell rate not available (UNI3.0 only) |
58 | bearer capability not presently available |
63 | Service or option not available, unspecified |
92 | too many pending add party requests |
Called Party Events --- displays the number of Called Party Responsible For Unsuccessful Call detected on the interface. The Called Party Events counter is incriminated when a RELEASE, RELEASE COMPLETE (only when not preceded by a RELEASE mesg for the same call), ADD PARTY REJECT, or STATUS message that contains one of the following cause code values is received:
| Cause Value | Meaning |
17 | user busy |
18 | no user responding |
21 | all rejected |
22 | number changed |
23 | user rejects all calls with calling line ID restriction (CLIR) |
27 | destination out of order |
31 | normal, unspecified |
88 | incompatible destination |
Calling Party Events --- number of Calling Party Events detected on the interface. The Calling Party Events counter monitors error events that occur due to the originating user doing something wrong. The Calling Party Events counter is incriminated when a RELEASE, RELEASE COMPLETE (only when not preceded by a RELEASE mesg for the same call), ADD PARTY REJECT, or STATUS message that contains one of the following cause code values is received:
| Cause Value | Meaning |
28 | invalid number format (address incomplete) |
43 | access information discarded |
57 | bearer capability not authorized |
65 | bearer capability not implemented |
73 | unsupported combination of traffic parameters |
78 | AAL parameters cannot be supported (UNI3.1 only) |
91 | invalid transit network selection |
93 | AAL parameters cannot be supported (UNI3.0 only) |
Timer Expires --- displays the number of Timer Expiries detected on the interface. The Timer Expiries Counter provides a count of network timer expiries, and to some extent, host or switch timer expiries. The conditions for incrementing the Timer Expires counter are:
Setup attempts --- displays the number of call setup attempts (both successful and unsuccessful) detected on the interface.
Number of Cells --- the number of cells received of the interface, including p2p and p2mp cells.
Bandwidth Utilization --- displays the utilized bandwidth as a percentage of the maximum bandwidth supported by the port.
The SSCOP frame (shown in Figure 5-30) displays the following performance information:
Connection Event --- SSCOP Connection Events Counter. The Connection Event counter counts the sum of the following errors:
The Configuration tab (shown in Figure 5-31) is divided into two frames.
The ATM Port Configuration frame (shown in Figure 5-31) allows you to view and change the following configuration information.
Neighbor IP Address --- allows you to specify the IP address of the neighbor system connected to the far end of the interface, to which a Network Management Station can send SNMP messages, as IP datagrams sent to UDP port 161, in order to access network management information concerning the operation of that system.
Neighbor Interface Name --- allows you to specify the textual name of the interface on the neighbor system on the far end of the interface to which the interface connects. When the neighbor system is manageable through SNMP and supports the object ifName, the value of the object must be identical with that of ifName for the ifEntry of the lowest level physical interface for the port. When the interface does not have a textual name, the value of the object is a zero length string. Note that the value of the object may be obtained in different ways, for example, by manual configuration, or through ILMI interaction with the neighbor system.
Maximum VCCs --- allows you to specify the maximum number of VCCs (PVCs and SVCs) supported at the ATM interface.
Maximum VPCs --- allows you to specify the maximum number of VPCs (PVCs and SVCs) supported at the ATM interface. At the ATM UNI, the maximum number of VPCs (PVCs and SVCs) ranges from 0 to 256 only.
Max Active VPI Bits --- allows you to specify the maximum number of active VPI bits configured for use at the ATM interface. At the ATM UNI, the maximum number of active VPI bits configured for use ranges from 0 to 8 only.
Max Active VCI Bits --- allows you to specify the maximum number of active VCI bits configured for use at the ATM interface.
UNI Signalling Version --- allows you to specify the version of UNI signalling that is currently being used on the interface. You can set the UNI Signalling Version to:
UNI Type --- allows you to specify the type of User to Network interface. You can set the UNI Type to public or private.
Well-known VC Mode --- allows you to specify whether well-known VCs should be automatically or manually created for the interface. You can set the UNI Type to:
ATM Interface Side --- allows you to specify the side of ATM interface. You can set the ATM Interface Side to either a user or network side or Not Applicable. A Not Applicable value implies that Interface Type is other than uni or iisp.
Signalling Admin Status --- allows you to Enable or Disable signalling/sscop on this interface. You can set Signalling Admin Status to:
SVC UPC Intent --- allows you to specify the policing (Usage Parameter Control or UPC) action to take for SVCs established through this interface. Yo can set this option to Passing, Tagging or Dropping.
Interface Type --- allows you to specify the type of ATM interface. You can set the Interface Type to a UNI (User to Network), PNNI, IISP or NNI PVC only.
The ILMI Configuration frame (shown in Figure 5-31) allows you to view and change the following configuration information:
ILIM VCI Value --- allows you to specify the VCI value of the VCC supporting the ILMI at this ATM interface. When the values of atmInterfaceIlmiVpi and atmInterfaceIlmiVci are both equal to zero then the ILMI is not supported at this ATM interface.
ILMI VPI Value --- allows you to specify the VPI value of the VCC supporting the ILMI at this ATM interface. When the values of atmInterfaceIlmiVpi and atmInterfaceIlmiVci are both equal to zero then the ILMI is not supported at this ATM interface.
ILMI Keepalive Time --- allows you to specify the amount of time that should elapse between successive ILMI keepalive messages sent on this interface. A value of 0 disables ILMI keepalive messages on this interface.
ILMI Auto-Configuration --- allows you to Enable or Disable the ILMI link and interface type determination. You can set the ILMI Auto-Configuration to:
ILMI Configuration --- allows you to Enable or Disable ILMI configuration on this interface.
ILMI Address Registration --- this option allows you to Enable or Disable ILMI Address Registration on this interface.
The More Configuration tab (shown in Figure 5-32) is divided into four frames.
The Information Element Transfer frame (shown in Figure 5-32) allows you to view and change the following configuration information.
Broadband High Layer --- allows you to specify whether to accept, transfer, and deliver the Broadband High Layer Information Element from the calling party to the called party. You can set the Broadband High Layer option to:
Called Party Subnet Address --- this parameter is required for ATM systems that support only a value of 'disabled' (at is, the ATM systems does not support the feature associated with the parameter).
Calling Party Number --- allows you to specify whether the Calling Party Number Information Element is transferred to the called party address. You can set the Calling Party Number to:
Unknown --- allows you to specify whether to accept, transfer, and deliver the unknown Information Element from the calling party to the called party, when the IE instruction field flag is set to zero. You can set the Unknown option to:
Broadband Repeat Indicator --- this parameter is required for ATM systems that support only a value of 'disabled' (that is, the ATM systems does not support the feature associated with the parameter).
Calling Party Subnet Address --- allows you to specify whether to accept and transfer the Calling Party Subaddress Information Element from the calling party to the called party. You can set the Calling Party Subnet Address to:
ATM Adaption Layer Parameters --- allows you to specify whether to accept, transfer, and deliver the ATM Adaptation Layer Parameters Information Element from the calling party to the called party. You can set the ATM Adaption Layer Parameters to:
Broadband Low Layer -the Broadband Low Layer parameter is required for ATM systems that support only a value of 'disabled' (that is, the ATM systems does not support the feature associated with the parameter).
The Actions frame (shown in Figure 5-32) allows you to commission or decommission the selected Line Card ATM Port.
Commission --- selecting this button will commission the selected Line Card ATM Port, when it is decommissioned.
Decommission --- selecting this button will decommission the selected Line Card ATM Port, when it is commissioned.
The General Physical Layer Configuration frame (shown in Figure 5-32) allows you to view and change the following configuration information:
Cell Payload Scrambling --- allows you to specify whether cell payload scrambling is enabled or disabled on the physical interface. You can set the ATM Adaption Layer Parameters to:
Clock Source Priority --- allows you to specify the priority of this interface when configured as a network clock source. You can set the Clock Source Priority option to: notConfigured, priority1, priority2, priority3 or priority4.
Framing Mode --- allows you to specify the framing format present on the physical interface. You can set the Framing Mode option to:
STS-Stream Scrambling --- allows you to specify whether STS-stream scrambling is enabled or disabled on the physical interface.You can set the STS-Stream Scrambling option to:
Transmit Clock Source --- allows you to specify the source of the transmit clock:
Loopback Configuration --- allows you to specify the loopback configured on the physical interface. You can set Loopback Configuration to:
The DS1/E1/DS3/E3 Physical Layer Configuration section allows you to view and change the following configuration information:
Line Buildout --- allows you to specify the line buildout configured on the transmit signal. You can set the Line Buildout option to:
E3 All Cables --- this applies to all cables of E3 physical interfaces.
DS3 Cables Under 225 --- this applies to cables under 225 feet of DS3 physical interfaces.
DS3 Cables Over 225 --- this applies to cables over 225 feet of DS3 physical interfaces.
DS1 Cables 0 To 110 --- this applies to cables 0 to 110 feet of DS1 physical interfaces.
DS1 Cables 110 To 220 --- this applies to cables 110 to 220 feet of DS1 physical interfaces.
DS1 Cables 220 To 330 --- this applies to cables 220 to 330 feet of DS1 physical interfaces.
DS1 Cables 330 To 440 --- this applies to cables 330 to 440 feet of DS1 physical interfaces.
DS1 Cables 440 To 550 --- this applies to cables 440 to 550 feet of DS1 physical interfaces.
DS1 Cables 550 To 660 --- this applies to cables 550 to 660 feet of DS1 physical interfaces.
DS1 Cables Over 600 --- this applies to cables over 600 feet of DS1 physical interfaces.
E1 All Cables --- this applies to all cables of E1 physical interfaces.
Line Coding --- allows you to specify the line coding present on the physical interface. You can set Line Coding to:
AMI --- displays alternate mark inversion (AMI) line code on the DS1/E1 interface.
B8ZS --- displays B8ZS line code on the physical interface and applies only to DS1 interfaces.
HDB3 --- displays HDB3 line code on the physical interface and applies only to E1 interfaces.
The Inventory tab (shown in Figure 5-33) has a single tabbed frame.
The Inventory frame allows you to view the following information:
Admin Address --- displays the address assigned for administrative purposes, for example, an address associated with the service provider side of a public network UNI. When the interface has no assigned administrative address, or when the address used for administrative purposes is the same as that used for ifPhysAddress, then the Admin Address is an octet string of zero length.
ATM Address Type --- displays the type of primary ATM address configured for use at the ATM interface.
Physical Port Type --- displays the type of physical layer medium on the port.
The Cisco 6400 Redundancy Manager window has three tabbed sections: NSP Redundancy, Slot Redundancy, and Sub Slot Redundancy.
The NSP Redundancy tab (shown in Figure 5-34) appears by default and is divided into two frames.
The Auto Sync Configuration frame allows you to configure the following parameters:
Start Up Config --- allows you to enable or disable the start up configuration.
Standard --- allows you to enable or disable the standard configuration.
Running Config --- allows you to enable or disable the Running configuration.
Config Register --- allows you to enable or disable the Configuration register.
Bootvar --- allows you to enable or disable the Bootvar.
The NSP frame (shown in Figure 5-34) allows you to configure the following parameter.
Preferred CPU Slot --- allows you to specify which NSP is the working NSP.
The Slot Redundancy tab (shown in Figure 5-35) has four frames.
The Slot 1/2 frame allows you to set up a redundant slot pair on slots 1 and 2 of the chassis:
Redundancy --- allows you to enable or disable redundancy on the selected pair.
Preference --- allows you to specify which Slot is the working slot.
The Slot 3/4 frame allows you to set up a redundant slot pair on slots 3 and 4 of the chassis:
Redundancy --- allows you to enable or disable redundancy on the selected pair.
Preference --- allows you to specify which Slot is the working slot.
The Slot 5/6 frame allows you to set up a redundant slot pair on slots 5 and 6 of the chassis:
Redundancy --- allows you to enable or disable redundancy on the selected pair.
Preference --- allows you to specify which Slot is the working slot.
The Slot 7/8 frame allows you to set up a redundant slot pair on slots 7 and 8 of the chassis:
Redundancy --- allows you to enable or disable redundancy on the selected pair.
Preference --- allows you to specify which Slot is the working slot.
The Sub Slot Redundancy tab (shown in Figure 5-36) has eight frames.

The Slot 1/2 Subslots 0 frame (shown in Figure 5-36) allows you to set up a redundant sub slot pair on the upper part of slots 1and 2 of the chassis:
Redundancy --- allows you to enable or disable redundancy on the selected pair.
Preference --- allows you to specify which subslot is the working subslot.
The Slot 1/2 Subslots 1 frame (shown in Figure 5-36) allows you to set up a redundant sub slot pair on the lower part of slots 1and 2 of the chassis:
Redundancy --- allows you to enable or disable redundancy on the selected pair.
Preference --- allows you to specify which subslot is the working subslot.
The Slot 3/4 Subslots 0 frame (shown in Figure 5-36) allows you to set up a redundant sub slot pair on the upper part of slots 3 and 4 of the chassis:
Redundancy --- allows you to enable or disable redundancy on the selected pair.
Preference --- allows you to specify which subslot is the working subslot.
The Slot 3/4 Subslots 1 frame (shown in Figure 5-36) allows you to set up a redundant sub slot pair on the lower part of slots 3 and 4 of the chassis:
Redundancy --- allows you to enable or disable redundancy on the selected pair.
Preference --- allows you to specify which subslot is the working subslot.
The Slot 5/6 Subslots 0 frame (shown in Figure 5-36) allows you to set up a redundant sub slot pair on the upper part of slots 5 and 6 of the chassis:
Redundancy --- allows you to enable or disable redundancy on the selected pair.
Preference --- allows you to specify which subslot is the working subslot.
The Slot 5/6 Subslots 1 frame (shown in Figure 5-36) allows you to set up a redundant sub slot pair on the lower part of slots 5 and 6 of the chassis:
Redundancy --- allows you to enable or disable redundancy on the selected pair.
Preference --- allows you to specify which subslot is the working subslot.
The Slot 7/8 Subslots 0 frame allows you to set up a redundant sub slot pair on the upper part of slots 7 and 8 of the chassis:
Redundancy --- allows you to enable or disable redundancy on the selected pair.
Preference --- allows you to specify which subslot is the working subslot.
The Slot 7/8 Subslots 1 frame allows you to set up a redundant sub slot pair on the lower part of slots 7 and 8 of the chassis:
Redundancy --- allows you to enable or disable redundancy on the selected pair.
Preference --- allows you to specify which subslot is the working subslot.
The Sonet APS Manager window is divided into two tabbed sections: Statistics and Configuration.
The Statistics tab (shown in Figure 5-37) appears by default and is divided into four frames.

The Path frame displays the following information:
Work Path Status --- the Work Path Status indicates the path level status of the working channel in APS. The c64SonetAPSWorkPathStatus is a bit map represented as a sum of multiple alarms simultaneously. The sonetPathNoDefect should be set when and only when no other flag is set.
Possible bit positions are:
1 | sonetPathNoDefect |
2 | sonetPathSTSAIS |
3 | sonetPathSTSRDI |
4 | sonetPathSTSLOP |
5 | sonetBIPE(BIP-8) |
6 | sonetFEBE |
7 | sonetPathUnequipped |
8 | sonetPathSignalLabelMismatch |
Work Path BIPE --- displays the number of path BIP-8 errors in working channel.
Work Path FEBE --- displays the number of path far-end-block-errors in working channel.
Protected Path Status --- this variable indicates the path level status of the protection channel in APS. The c64SonetAPSProtectPathStatus is a bit map represented as a sum of multiple alarms simultaneously. The sonetPathNoDefect should be set when and only when no other flag is set.
Possible bit positions are:
1 | sonetPathNoDefect |
2 | sonetPathSTSLOP |
4 | sonetPathSTSAIS |
8 | sonetBIPE(BIP-8) |
16 | sonetFEBE |
32 | sonetPathSTSRDI |
64 | sonetPathUnequipped |
128 | sonetPathSignalLabelMismatch |
Protected Path BIPE --- displays the number of path BIP-8 errors in the protection channel.
Protected Path FEBE --- displays the number of path far-end-block-errors in the protection channel.
The Line frame (shown in Figure 5-37) displays the following information:
Work Line Status --- this variable indicates the line level status of the working channel in APS. The c64SonetAPSWorkLineStatus is a bit map represented as a sum of multiple alarms simultaneously. The sonetLineNoDefect should be set when and only when no other flag is set.
Possible bit position are:
1 | sonetLineNoDefect |
2 | sonetLineAIS |
3 | sonetLineRDI |
4 | sonetBIPE(BIP-8/24) |
5 | sonetFEBE |
Work Line BIPE --- displays the number of line BIP-8/24 errors in the working channel.
Work Line FEBE --- displays the number of line far-end-block-errors in the working channel.
Protected Line Status --- this variable indicates the line level status of the protection channel in APS. The c64SonetAPSProtectLineStatus is a bit map represented as a sum of multiple alarms simultaneously. The sonetLineNoDefect should be set when and only when no other flag is set.
Possible bit positions are:
1 | sonetLineNoDefect |
2 | sonetLineAIS |
4 | sonetLineRDI |
8 | sonetBIPE(BIP-8/24) |
16 | sonetFEBE |
Protected Line BIPE --- displays the number of line BIP-8/24 errors in protection channel.
Protected Line FEBE --- displays the number of line far-end-block-errors in protection channel.
The Section frame (shown in Figure 5-37) displays the following information:
Work Section Status --- this variable indicates the section level status of the working channel in APS. The c64SonetAPSWorkSectionStatus is a bit map represented as a sum of multiple alarms simultaneously. The sonetSectionNoDefect should be set when and only when no other flag is set.
Possible bit positions are:
1 | sonetSectionNoDefect |
2 | sonetSectionLOS |
3 | sonetSectionLOF |
4 | sonetBIPE(BIp-8) |
Work Section BIPE --- displays the number of section BIP-8 errors in working channel.
Protected Section Status --- this variable indicates the section level status of the protection channel in APS. The c64SonetAPSProtectSectionStatus is a bit map represented as a sum of multiple alarms simultaneously. The sonetSectionNoDefect should be set when and only when no other flag is set.
Possible bit positions are:
1 | sonetSectionNoDefect |
2 | sonetSectionLOS |
4 | sonetSectionLOF |
8 | sonetBIPE(BIp-8) |
Protected Section BIPE --- displays the number of section BIP-8 errors in protection channel.
The Operational frame (shown in Figure 5-37) displays the following information:
Work Operational Status --- displays the last condition detected in working channel.
Protected Operational Status --- this object indicates the last condition detected in protection channel.
The Configuration tab (shown in Figure 5-38) has a single Configuration frame.
The Configuration frame (shown in Figure 5-38) allows you to view and configure the following parameters:
Mode --- allows you to set the APS mode on the corresponding interface referenced by ifIndex object. You can set the Mode option to:
BER Threshold --- allows you to set the Bit-Error-Rate threshold at which an APS request of priority 'Signal Degrade' is posted.
Switch Command --- this option is used to post an APS priority request. This request succeeds when no higher-priority request is posted. You can set the Switch Command option to:
The Backup/Restore Manager window has a single tabbed section.
The Backup/Restore tab appears by default and is divided into three frames.
The Configuration frame allows you to view/configure the following parameters:
Backup Server --- allows you to set the TFTP IP address.
Backup after every Action --- allows you to take a backup after every Telnet action (for example: service (de)commission, service (dis)connection. You can set the Backup after every Action option to:
The Status frame displays the following parameters:
Time Stamp of last Backup --- the time of the last backup.
Backup File Name --- the name of the backup file.
The Actions frame allows you to initiate the following actions:
Backup --- initiates the action of backing-up the running configuration of a Cisco 6400 UAC.
Restore --- initiates the action of restoring the running configuration to a Cisco 6400 UAC.
Schedule Backup --- select Schedule Backup to schedule a date and time for the backup to take place, the Schedule Dialog window (shown in Figure 5-40) appears:

Enter a date (mm/dd/yyyy) and time (hh:mm) for the scheduled backup to take place automatically. Click on the Ok button to save the new date and time.
The IOS Image Download for NSP/NRP window (shown in Figure 5-41) has a single tabbed section.
 | Caution The SCM is unable to verify that the source image is a valid IOS boot image for the device. Downloading an invalid boot image could prevent the device from booting normally, which would leave it unmanageable and unable to carry traffic. Details of how to load a working IOS image in this situation can be obtained from the documentation accompanying your Cisco 6400. When you have downloaded an invalid boot image but have not yet rebooted the device, you should download a valid boot image immediately. In particular, be aware that NSP boot images are not compatible with the NRP, and vice-versa. |
The Download tab (shown in Figure 5-41) appears by default and is divided into three frames.
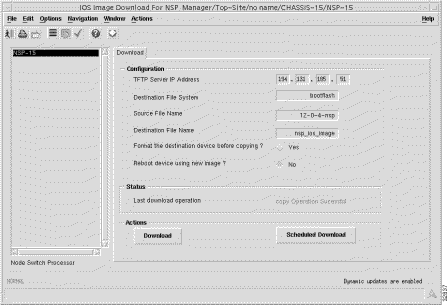
The Configuration frame allows you to view/configure the following parameters:
TFTP Server IP Address --- allows you to set the TFTP IP address.
Destination File System --- allows you to specify any file system name supported by the 6400 UAC. File system names supported by the 6400 are:
Source File Name --- allows you to specify the source file name (IOS image name).
Destination File Name --- allows you to specify the name for the file as it is stored in the file system of the 6400 SCM.
Format the destination device before copying? --- allows you to format the destination device before copying. You can set the Format the destination device before copying? option to:
Reboot device using new image? --- allows you to reboot the device after a successful download. You can set the Reboot device using new image? option to:
The Status frame (shown in Figure 5-41) allows you to view the Last download operation that displays the date and time of the last download.
The Actions frame (shown in Figure 5-41) allows you to initiate the following actions:
Download --- clicking on the Download button downloads the IOS image (specified by the Source File Name in the Configuration frame) from the specified TFTP server to the file system of the Cisco 6400 (specified in the Destination File Name in the Configuration frame).
Scheduled Download --- clicking on Scheduled Download opens a ScheduleDialog window. The ScheduleDialog window allows you to enter a Date (in <mm><dd><yyyy> format) and time (Hour and Minute format) for the download to be performed.
![]()
![]()
![]()
![]()
![]()
![]()
![]()
![]()
Posted: Mon Jan 31 15:18:00 PST 2000
Copyright 1989 - 2000©Cisco Systems Inc.